Home>Home Appliances>Kitchen Appliances>How To Make Fruit Roll-Ups In A Food Dehydrator
Kitchen Appliances
How To Make Fruit Roll-Ups In A Food Dehydrator
Modified: August 17, 2024
Learn how to make delicious fruit roll-ups using a food dehydrator in your kitchen. Discover a fun and healthy way to enjoy homemade snacks. Ideal for kitchen appliances enthusiasts.
(Many of the links in this article redirect to a specific reviewed product. Your purchase of these products through affiliate links helps to generate commission for Storables.com, at no extra cost. Learn more)
Introduction
Welcome to the world of homemade fruit roll-ups! If you're a fan of this chewy, fruity snack, you'll be thrilled to learn how to make them in the comfort of your own kitchen using a food dehydrator. Crafting your own fruit roll-ups allows you to customize the flavors, control the ingredients, and indulge in a healthier alternative to store-bought varieties. Plus, the delightful aroma of fresh fruits wafting through your home will surely elevate your culinary experience.
In this guide, we'll delve into the art of creating delectable fruit roll-ups using a food dehydrator, providing step-by-step instructions and insightful tips to ensure your success. From selecting the perfect fruits to achieving the ideal texture, you'll soon be savoring your homemade fruit roll-ups with pride.
So, let's embark on this delightful journey of transforming fresh fruits into delightful, chewy treats that are perfect for snacking, lunchboxes, or satisfying those sweet cravings. Get ready to unleash your creativity and culinary prowess as we explore the wonderful world of homemade fruit roll-ups!
Key Takeaways:
- Create custom fruit roll-ups by choosing fresh, ripe fruits, experimenting with flavor combinations, and embracing seasonal varieties for a healthier, personalized snack experience.
- Transform prepared fruit into velvety puree, spread it evenly on dehydrator trays, and monitor dehydration to achieve chewy, flavorful homemade fruit roll-ups.
Read more: How To Make Fruit Leather In A Dehydrator
Choosing the Right Fruits
When it comes to making fruit roll-ups, the first step is selecting the perfect fruits. The beauty of homemade fruit roll-ups lies in the ability to experiment with a wide variety of fruits, either individually or in creative combinations. Here are some key considerations to keep in mind when choosing fruits for your fruit roll-ups:
- Freshness: Opt for fresh, ripe fruits that are at the peak of their flavor. This will ensure that your fruit roll-ups boast vibrant, natural sweetness.
- Texture: Consider the texture of the fruits. While smooth fruits like berries and mangoes are ideal for creating a uniform puree, you can also incorporate chunkier fruits for added texture and visual appeal.
- Flavor Profile: Think about the flavor profile you want to achieve. Whether you prefer the tangy zing of strawberries, the tropical notes of pineapple, or the earthy sweetness of apples, the choice of fruits will determine the overall taste of your fruit roll-ups.
- Combining Fruits: Don’t be afraid to mix and match different fruits to create unique flavor combinations. For example, blending strawberries with kiwi or peaches with raspberries can result in delightful flavor fusions.
- Seasonal Availability: Embrace seasonal fruits to take advantage of their peak freshness and affordability. This also allows you to vary your fruit roll-up creations throughout the year, celebrating the bounty of each season.
Ultimately, the key is to select fruits that you enjoy and that inspire your creativity. Whether you opt for classic choices like strawberries and bananas or venture into more exotic options such as dragon fruit and guava, the world of fruit roll-ups is yours to explore. Once you’ve chosen your fruits, it’s time to move on to the next exciting step: preparing the fruit for the transformation into delightful, chewy roll-ups.
Preparing the Fruit
Before diving into the process of creating fruit roll-ups, it’s crucial to properly prepare the fruits to ensure a smooth and flavorful outcome. Here’s a step-by-step guide to preparing the fruits for your homemade fruit roll-ups:
- Wash and Dry: Start by thoroughly washing the fruits under running water to remove any dirt, pesticides, or waxy residues. Once cleaned, pat them dry with a clean kitchen towel or paper towels.
- Peel and Core: For fruits with inedible skins or cores, such as apples, pears, and pineapples, peel and core them using a sharp knife or a specialized fruit corer. This step ensures that the puree will be free of undesirable textures and enhances the smoothness of the fruit roll-ups.
- Remove Seeds: If your chosen fruits contain seeds, such as berries or kiwi, take the time to remove them to prevent any unwanted grittiness in the final puree.
- Cut into Uniform Pieces: Slice the fruits into uniform pieces to promote even drying and facilitate the blending process. This step is particularly important for larger fruits like mangoes, peaches, and melons.
- Adjust Sweetness (Optional): Depending on the natural sweetness of the fruits and your personal preference, you can add a touch of sweetness by drizzling the fruit pieces with a bit of honey or agave nectar before pureeing.
By meticulously preparing the fruits, you set the stage for creating a luscious, velvety puree that will ultimately become the heart of your fruit roll-ups. With the fruits prepped and ready, it’s time to move on to the exciting process of transforming them into a delightful, chewy treat. Let’s dive into the next step: making the fruit puree.
Making the Fruit Puree
Now that your fruits are impeccably prepared, it’s time to embark on the exhilarating journey of creating the luscious fruit puree that will serve as the foundation of your delectable fruit roll-ups. Follow these simple steps to transform your fresh fruits into a velvety, flavorful puree:
- Load the Blender: Transfer the prepared fruit pieces into a high-powered blender or food processor. Depending on the capacity of your appliance, you may need to work in batches to ensure thorough blending.
- Add Flavor Enhancements (Optional): If desired, infuse the fruit puree with additional flavors by incorporating ingredients such as a splash of citrus juice (lemon, lime, or orange) for brightness, a hint of vanilla extract for depth, or a sprinkle of spices like cinnamon or ginger for a tantalizing twist.
- Blend to Silky Smoothness: Process the fruits until they transform into a smooth, homogeneous puree. Take care to blend thoroughly, ensuring that no lumps or chunks remain. The goal is to achieve a silky texture that will yield perfectly smooth fruit roll-ups.
- Adjust Sweetness (Optional): Taste the puree and, if necessary, adjust the sweetness to suit your preference. You can gently sweeten the puree with a drizzle of honey, agave nectar, or a sprinkle of sugar, bearing in mind that the flavors will concentrate during the dehydration process.
With the fruit puree prepared to perfection, you’ve reached a pivotal stage in the journey of creating your homemade fruit roll-ups. The delightful aroma of fresh fruits and the vibrant colors of the puree signal that you’re on the cusp of crafting a delightful, wholesome treat. Now, let’s move on to the next step: spreading the puree on dehydrator trays, where the magic truly begins.
To make fruit roll-ups in a food dehydrator, puree your favorite fruits and spread the mixture evenly on the dehydrator trays. Set the temperature to 135°F and let it dry for 6-8 hours. Flip the roll-ups halfway through for even drying. Enjoy your homemade healthy snacks!
Spreading the Puree on Dehydrator Trays
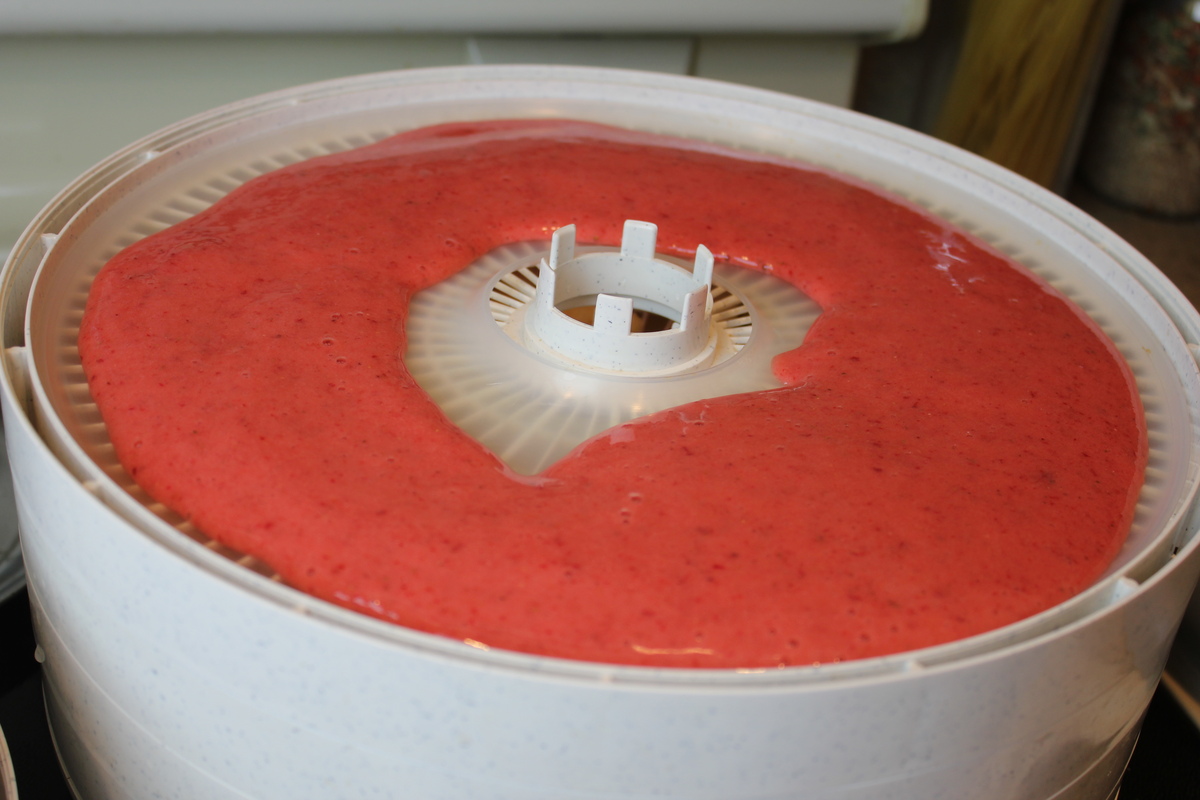
As you prepare to transform your luscious fruit puree into delightful fruit roll-ups, the next crucial step involves spreading the puree onto the dehydrator trays. This process sets the stage for the gradual dehydration that will yield chewy, flavorful fruit roll-ups. Follow these steps to ensure that your puree is evenly spread and ready for the dehydration process:
- Prepare the Dehydrator Trays: If your dehydrator trays are not non-stick, consider lining them with silicone mats or parchment paper to prevent the puree from sticking during the dehydration process.
- Evenly Spread the Puree: Using a spatula or an offset spatula, carefully spread the fruit puree onto the prepared dehydrator trays. Aim for a uniform thickness of approximately 1/8 to 1/4 inch to ensure even drying and consistent texture throughout the fruit roll-ups.
- Create Smooth, Even Layers: Take care to create smooth, even layers of puree, paying attention to the edges and corners to maintain a consistent thickness. This meticulous approach will result in beautifully finished fruit roll-ups.
- Leave Space Between Portions: As you spread the puree, ensure that there is adequate space between portions to allow for air circulation during the dehydration process. This promotes efficient drying and prevents the puree from merging during dehydration.
- Customize with Creative Designs (Optional): Embrace your creativity by experimenting with decorative patterns or swirling multiple fruit purees together on the trays. This not only adds visual appeal but also introduces delightful flavor combinations in each roll-up.
With the puree expertly spread onto the dehydrator trays, you’re now poised to commence the transformative dehydration process that will elevate your fruit puree into delectable, chewy fruit roll-ups. The next step: dehydrating the fruit puree, is where the magic truly unfolds, bringing you one step closer to savoring your homemade fruit roll-ups.
Read more: How To Dehydrate Fruit In A Dehydrator
Dehydrating the Fruit Puree
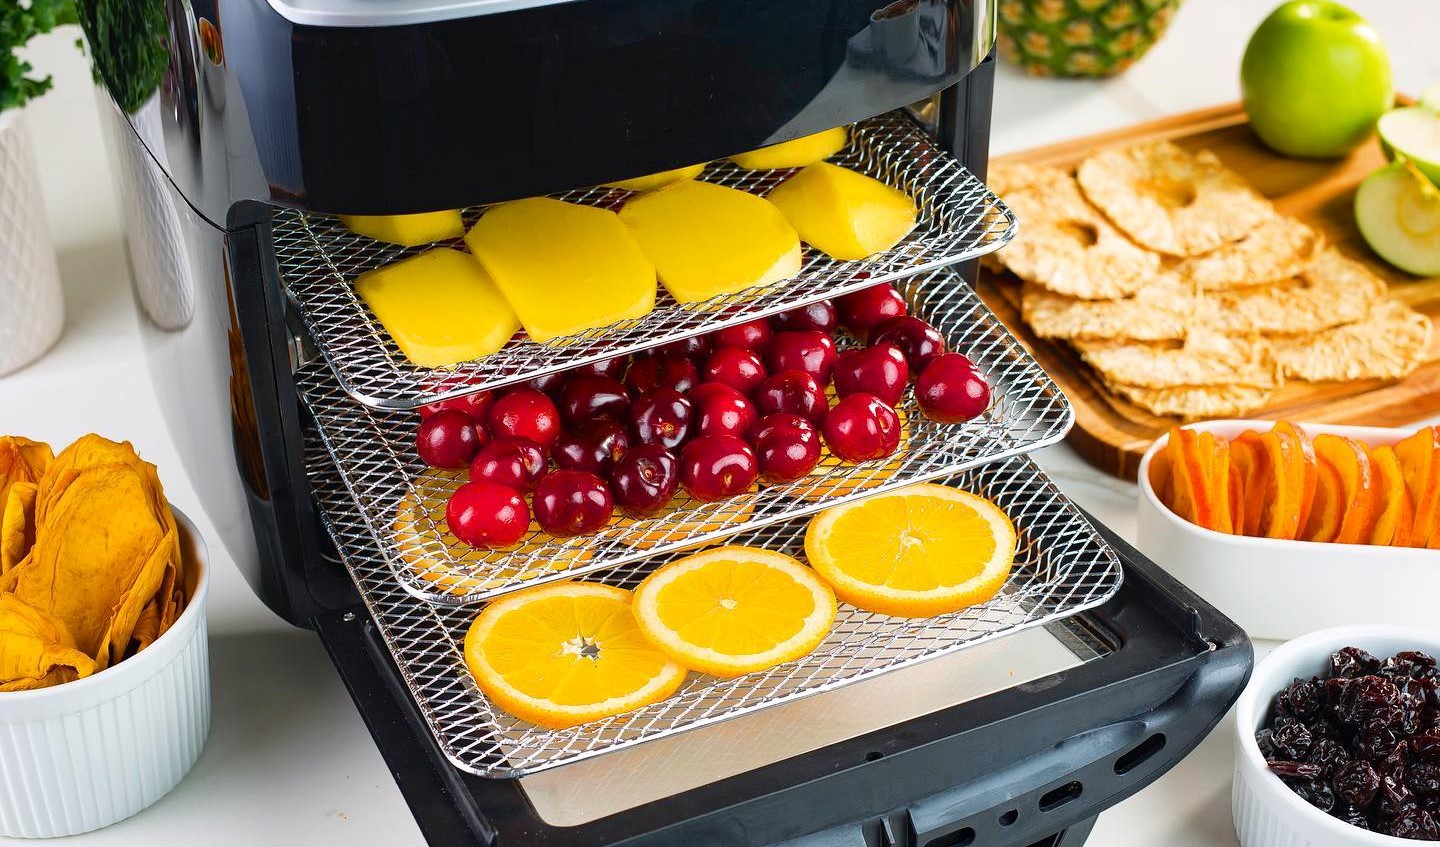
As the puree-laden dehydrator trays await their transformation, the time has come to initiate the dehydration process that will gradually turn the luscious fruit puree into chewy, flavorful fruit roll-ups. Follow these essential steps to ensure successful dehydration and achieve the perfect texture for your homemade fruit roll-ups:
- Set the Dehydrator Temperature: Refer to your dehydrator’s manual or the specific recommendations for fruit dehydration. Generally, a temperature range of 125°F to 135°F (approximately 51°C to 57°C) is suitable for drying fruit puree, promoting thorough dehydration while preserving the vibrant colors and essential flavors of the fruits.
- Initiate the Dehydration Process: Carefully place the loaded dehydrator trays into the appliance, ensuring that there is ample space between them for proper air circulation. This promotes uniform drying and prevents the puree from retaining excess moisture.
- Monitor the Drying Progress: Throughout the dehydration process, periodically check the fruit puree for signs of progress. Depending on the moisture content, fruit variety, and thickness of the puree, the dehydration duration may range from 6 to 12 hours.
- Rotate the Trays (Optional): If your dehydrator features multiple trays, consider rotating their positions during the dehydration process. This practice ensures even drying, especially if your dehydrator has variations in temperature or airflow.
- Observe for Desired Consistency: The fruit puree is ready for the next stage when it transforms into a pliable, tacky consistency without any wet or sticky areas. This indicates that the moisture has been sufficiently removed, setting the stage for the final phase of creating your fruit roll-ups.
As the fruit puree undergoes the transformative dehydration process, the tantalizing aroma of fresh fruits fills the air, offering a preview of the delightful fruit roll-ups that await. With the dehydration stage near completion, the next step: checking for doneness, will guide you in determining when the fruit puree is ready to be transformed into delightful, chewy roll-ups.
Checking for Doneness
As the fruit puree undergoes the transformative dehydration process, it’s essential to assess its readiness before proceeding to the final stage of crafting your homemade fruit roll-ups. Follow these steps to determine when the fruit puree has reached the perfect level of doneness for creating delectable, chewy fruit roll-ups:
- Visual Inspection: Carefully examine the dehydrated fruit puree for any remaining moisture. It should appear uniformly dry and pliable, with no visible signs of stickiness or wet spots.
- Texture Assessment: Gently touch the surface of the dehydrated puree to gauge its texture. It should feel tacky to the touch without any excessive moisture. The puree should easily peel away from the dehydrator tray without leaving any residue on your fingers.
- Bend Test: Lift a corner of the dehydrated puree and gently bend it. If it flexes without cracking or breaking and retains its shape, it has reached the ideal consistency for creating fruit roll-ups.
- Time and Temperature Consideration: Keep in mind that the dehydration duration may vary based on factors such as the moisture content of the fruit puree, the specific fruits used, and the temperature and airflow of your dehydrator. Adjust the assessment based on these variables to ensure thorough dehydration.
Upon conducting these checks, if the fruit puree exhibits the desired characteristics of thorough dehydration, it’s time to proceed to the final phase of crafting your delightful fruit roll-ups. With the fruit puree reaching the perfect level of doneness, the next step: storing the fruit roll-ups, will guide you in preserving and savoring the flavorful results of your culinary endeavor.
Storing the Fruit Roll-Ups
Congratulations on reaching the final phase of your fruit roll-up creation journey! With your delectable fruit puree successfully transformed into chewy, flavorful roll-ups, it’s time to ensure that they are stored appropriately to maintain their quality and freshness. Follow these essential steps to store your homemade fruit roll-ups for future enjoyment:
- Cooling Period: Once the fruit roll-ups have completed the dehydration process and have been deemed ready, allow them to cool completely on the dehydrator trays. This cooling period ensures that any residual warmth dissipates, preventing moisture buildup inside the storage containers.
- Cutting into Portions: Using clean kitchen shears or a sharp knife, carefully cut the dehydrated fruit sheet into individual portions. Consider shapes such as strips, squares, or fun shapes using cookie cutters to add a playful touch to your fruit roll-ups.
- Layering and Separation: If stacking the fruit roll-ups for storage, place parchment paper or wax paper between the layers to prevent them from sticking together. This simple step maintains the integrity of each roll-up and facilitates easy removal when serving.
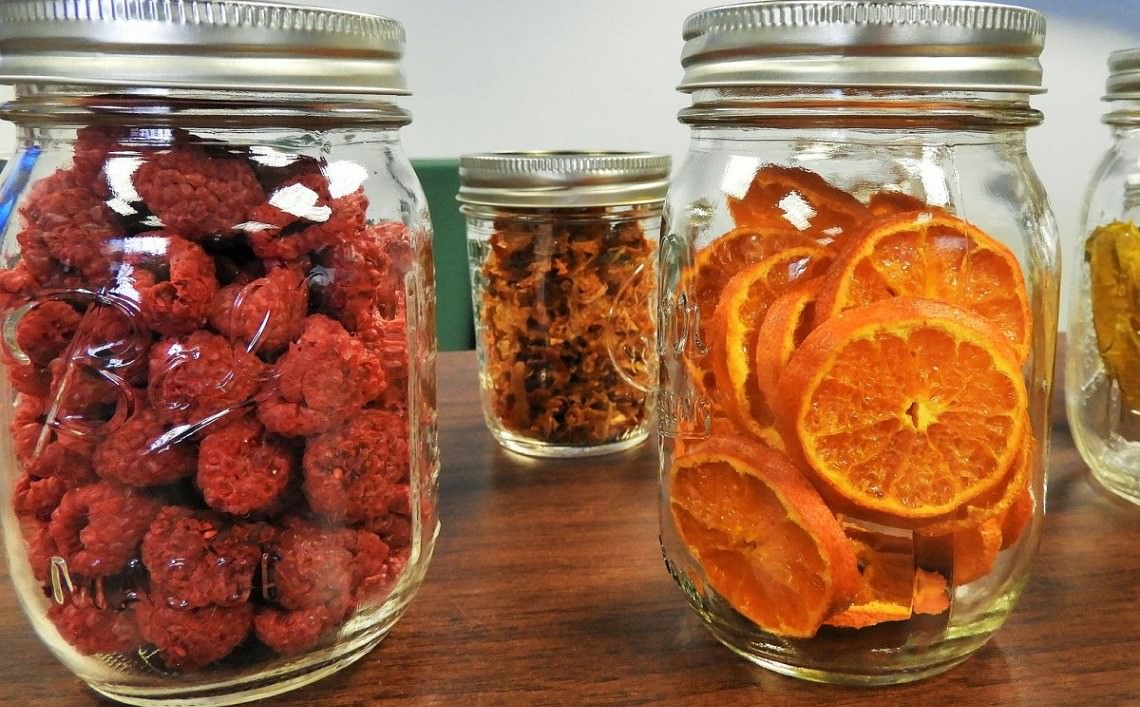
- Airtight Containers: Store the cut fruit roll-ups in airtight containers such as glass jars, resealable bags, or food storage containers with secure lids. Airtight storage protects the fruit roll-ups from exposure to moisture and air, preserving their chewy texture and vibrant flavors.
- Cool, Dry Environment: Choose a cool, dry location for storing your fruit roll-ups, away from direct sunlight and heat sources. Proper storage conditions prolong the shelf life of the roll-ups and maintain their delightful chewiness.
- Refrigeration or Freezing (Optional): While fruit roll-ups can be stored at room temperature for short-term enjoyment, refrigeration or freezing extends their shelf life. If you opt for long-term storage, consider refrigerating or freezing the roll-ups in well-sealed containers or freezer bags.
With your homemade fruit roll-ups expertly stored, you can look forward to savoring these delightful, chewy treats at your convenience. Whether enjoyed as a wholesome snack, packed in lunchboxes, or shared with family and friends, your homemade fruit roll-ups are a testament to your culinary creativity and dedication. Now, it’s time to revel in the satisfaction of transforming fresh fruits into a delightful, wholesome delight!
Frequently Asked Questions about How To Make Fruit Roll-Ups In A Food Dehydrator
Was this page helpful?
At Storables.com, we guarantee accurate and reliable information. Our content, validated by Expert Board Contributors, is crafted following stringent Editorial Policies. We're committed to providing you with well-researched, expert-backed insights for all your informational needs.


0 thoughts on “How To Make Fruit Roll-Ups In A Food Dehydrator”