Home>Home Maintenance>How To Repair Water Leak Pipes In Your Home
Home Maintenance
How To Repair Water Leak Pipes In Your Home
Modified: March 6, 2024
Learn how to effectively repair water leak pipes in your home with our expert home maintenance tips. Fixing leaks has never been easier!
(Many of the links in this article redirect to a specific reviewed product. Your purchase of these products through affiliate links helps to generate commission for Storables.com, at no extra cost. Learn more)
Introduction
Welcome to this comprehensive guide on how to repair water leak pipes in your home. Dealing with water leakages can be a frustrating and potentially damaging issue for homeowners. It can cause water damage to your property, lead to mold growth, and result in costly repairs if not addressed promptly. But fear not, because in this article, we will walk you through the step-by-step process of identifying and fixing water leak pipes in your home.
Water leaks can occur in various places within your home’s plumbing system, such as pipes under sinks, behind walls, or even in the main water supply line. Identifying the source of the leak is crucial in order to effectively repair it. Once you’ve located the leak, taking quick action is necessary to minimize any further damage and prevent wasting water.
In this guide, we will cover the essential steps to follow when repairing water leak pipes. We’ll discuss how to turn off the water supply, the tools and materials you’ll need, and the proper techniques to fix the leak. By following these steps, you can save money on professional plumbing services and gain the confidence to tackle minor repairs on your own.
Before we dive into the repair process, it’s important to note that some leaks may require the expertise of a professional plumber. If you’re unsure or uncomfortable with DIY repairs, it’s always a good idea to consult a licensed plumber who can assess and fix the issue. Safety should always be your top priority when dealing with plumbing problems.
Now, without further ado, let’s get started with step one: identifying the source of the water leak.
Key Takeaways:
- Identifying and fixing water leaks in your home is crucial to prevent costly damage. Follow the steps in this guide to confidently tackle minor repairs and save money on professional plumbing services.
- Prioritize safety when dealing with plumbing issues. If unsure, consult a licensed plumber for expert guidance. With the right knowledge and precautions, you can maintain your home’s plumbing system effectively.
Read more: How To Fix Leaking Pipe Under Sink
Step 1: Identify the source of the water leak
The first step in repairing a water leak pipe is to identify where the leak is coming from. This can sometimes be a challenging task, especially if the leak is hidden or not easily accessible. However, with a systematic approach, you can locate the source of the leak.
Start by visually inspecting the area where you notice water dripping or pooling. Look for any signs of moisture, such as water stains, discoloration, or dampness on walls, ceilings, or floors. Follow the trail of water to narrow down the potential source. Be sure to check both the hot and cold water lines, as leaks can occur in either.
If the water leak is not immediately visible, you may need to do some detective work. Check the water meter to see if it is still running when all faucets and appliances are turned off. If the meter is still moving, it indicates that there is a leak somewhere in the plumbing system.
You can also try isolating different parts of the plumbing system to pinpoint the source. Turn off the water supply to different fixtures and observe if the leak stops. This can help you narrow down which area of the plumbing system is causing the issue.
Another useful technique is to listen for any sounds of running or dripping water. Turn off any background noise, such as the TV or radio, and listen for any audible clues. A stethoscope can come in handy for detecting subtle sounds in the walls or floors.
If the leak is still elusive, you may need to call in a professional plumber who can employ specialized equipment, such as thermal imaging cameras or leak detection devices, to help locate the source more accurately.
Once you’ve successfully identified the source of the water leak, you’re ready to move on to the next step: turning off the water supply.
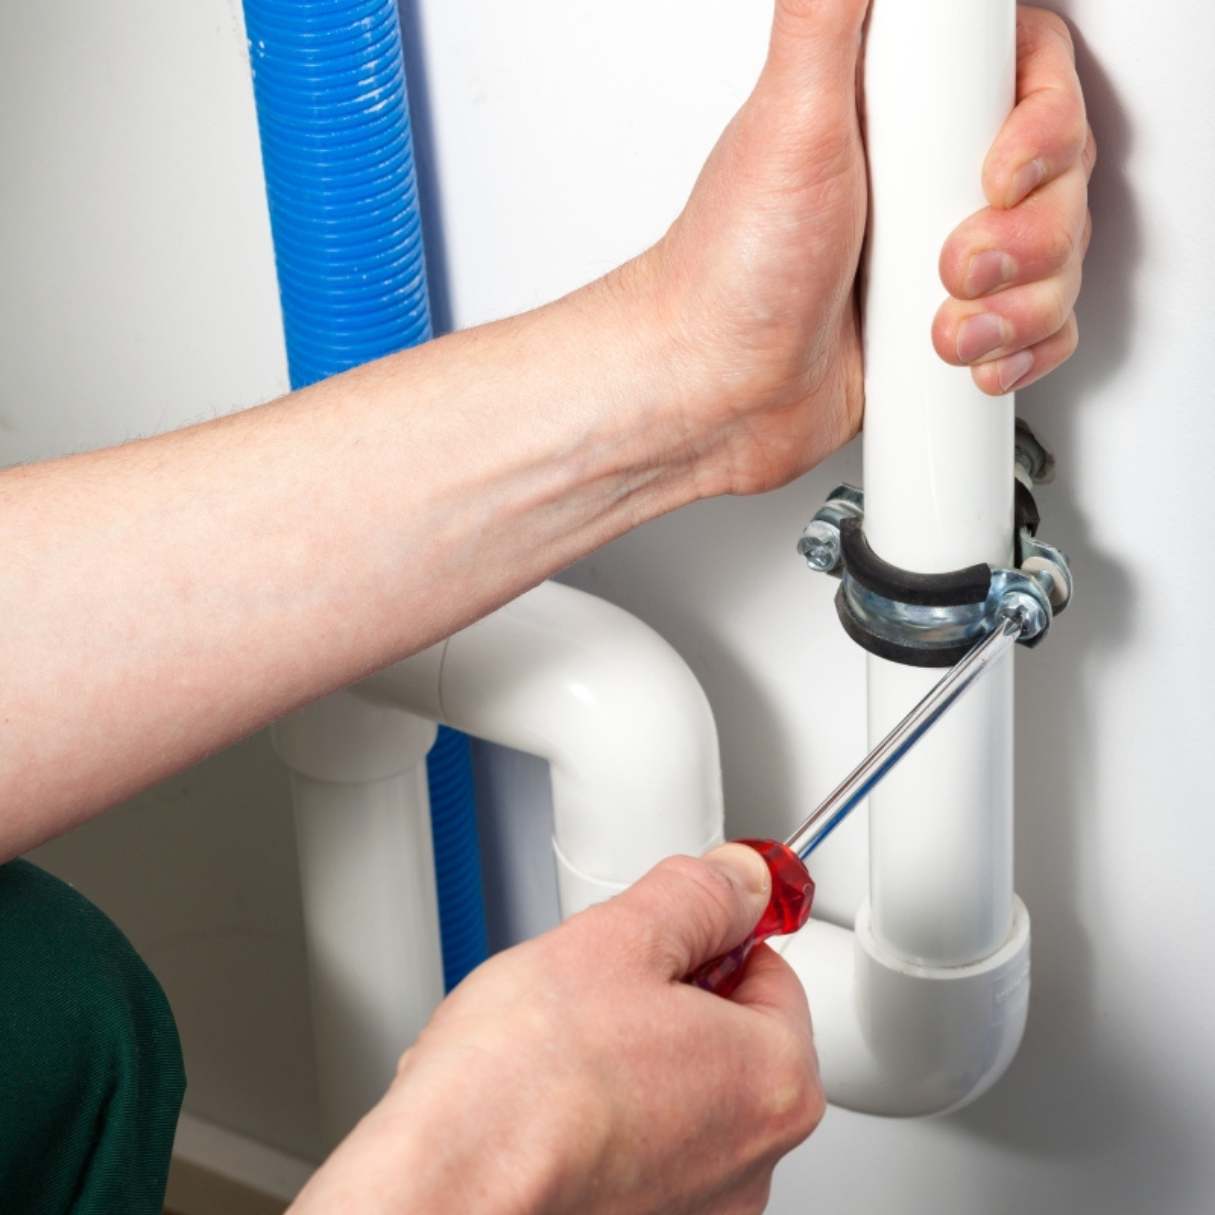
Step 2: Turn off the water supply
Now that you have identified the source of the water leak, it is crucial to turn off the water supply before proceeding with any repairs. This step is essential to prevent further water damage and ensure your safety during the repair process.
The location of the main water shut-off valve may vary depending on the layout of your home. In most cases, you can find it near the water meter or where the main water line enters your property. It could be outside your home, in the basement, or even in a utility room.
If you are unable to locate the main shut-off valve, consult your home’s plumbing blueprints or contact a professional plumber for assistance. It’s helpful to familiarize yourself with the shut-off valve’s location beforehand to save valuable time in case of an emergency.
Once you have located the shut-off valve, turn it clockwise (or to the right) to shut off the water supply. This will stop the flow of water to your entire home, ensuring that no further water leaks occur while you work on the pipe repair.
After shutting off the main water supply, open a few faucets in your home to drain any remaining water in the system. This will help relieve pressure in the pipes and minimize the risk of accidental water release during the repair.
Remember, safety should always be a priority when working with water and plumbing systems. Turning off the water supply is a crucial step to protect yourself and your property from potential accidents.
Now that the water supply is turned off, you can proceed to the next step: gathering the necessary tools and materials for the repair.
Step 3: Gather necessary tools and materials
Before you begin repairing the water leak pipe, it’s important to gather all the necessary tools and materials. Having everything ready will ensure a smoother repair process and prevent any interruptions or delays.
Here’s a list of tools and materials you may need:
- Adjustable wrench: This tool is essential for loosening and tightening pipe fittings.
- Pipe cutter or hacksaw: You’ll need a pipe cutter or hacksaw to cut out the damaged section of the pipe.
- Emery cloth or sandpaper: Use emery cloth or sandpaper to clean the ends of the pipe and ensure a proper connection.
- Pipe repair tape or epoxy putty: Depending on the type of leak and the pipe material, you may use pipe repair tape or epoxy putty for temporary or permanent repairs.
- Pipe fittings: If the damaged section of the pipe needs to be replaced, make sure you have the appropriate pipe fittings, such as couplings, elbows, or tees.
- Bucket or towels: To catch any excess water and prevent it from causing further damage, have a bucket or towels nearby.
- Gloves and safety glasses: Protect your hands and eyes by wearing gloves and safety glasses during the repair process.
It’s important to note that the specific tools and materials required may vary depending on the type of pipe and the extent of the damage. It’s always a good idea to have a basic plumbing toolkit in your home, which includes these essential items.
Ensure that all tools are in good working condition and materials are readily available before starting the repair. This will save you time and frustration, allowing you to focus on fixing the water leak efficiently.
With your tools and materials gathered, you’re now ready to move on to the next step: draining the affected pipe.
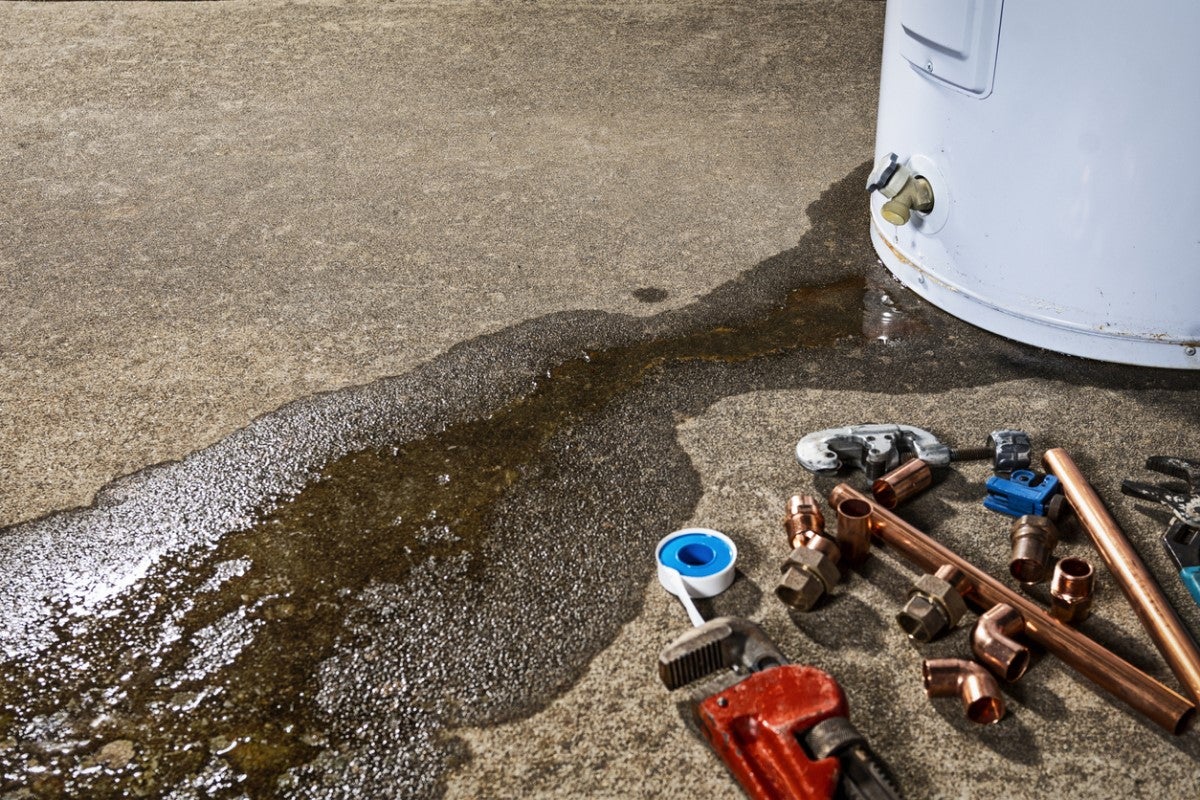
Step 4: Drain the affected pipe
Before you begin any repairs on the water leak pipe, it’s important to drain the affected pipe to minimize the risk of water spillage and ensure a clean and dry working area. Draining the pipe will help prevent water from leaking out and potentially causing further damage.
Here’s how you can drain the affected pipe:
- Open all faucets and fixtures connected to the affected pipe. This will allow the water to flow out of the pipe and relieve any pressure.
- If necessary, attach a hose to any accessible drain valves or spigots to redirect the water away from the repair area. This will help prevent any water from pooling around the work area.
- If the affected pipe is part of a larger plumbing system, you may need to drain the entire system to ensure a complete drainage. This can be done by opening the drain valve located at the lowest point of the plumbing system.
- Allow the water to fully drain from the pipe before moving on to the next step. You can test this by turning the faucets off and ensuring no water is flowing.
It’s important to exercise caution during this step, as water may be hot or under pressure. Be sure to protect yourself by wearing gloves and safety glasses, and allow the water ample time to drain completely.
Once the affected pipe is drained, you can proceed to the next step: cleaning and drying the pipe.
Step 5: Clean and dry the pipe
After draining the affected pipe, it’s crucial to clean and dry it thoroughly before proceeding with the repair. Cleaning the pipe will remove any debris or residue that could interfere with the repair process, while drying it will ensure a proper bond when applying the repair materials.
Follow these steps to clean and dry the pipe:
- Use a clean cloth or paper towel to wipe down the external surface of the pipe, removing any dirt or grime.
- If the pipe has any visible corrosion or buildup, gently scrub it off using a wire brush. Be careful not to damage or scratch the surface of the pipe while doing so.
- Next, use emery cloth or sandpaper to clean the ends of the pipe. This will help remove any residue and create a smooth surface for a secure connection.
- After cleaning, inspect the pipe for any signs of damage or cracks that may require further repair or replacement.
- Once the pipe is clean, allow it to dry completely. You can use a clean cloth or compressed air to remove any moisture remaining on the surface.
Ensuring that the pipe is clean and dry is important for the repair material to adhere properly. Any moisture or residue can compromise the effectiveness of the repair and lead to future leaks.
Remember to take your time during this step, ensuring that the pipe is thoroughly cleaned and adequately dried. This will help ensure a successful repair and prevent any complications down the line.
With the pipe cleaned and dried, you’re now ready to move on to the next step: applying pipe repair tape or epoxy putty.
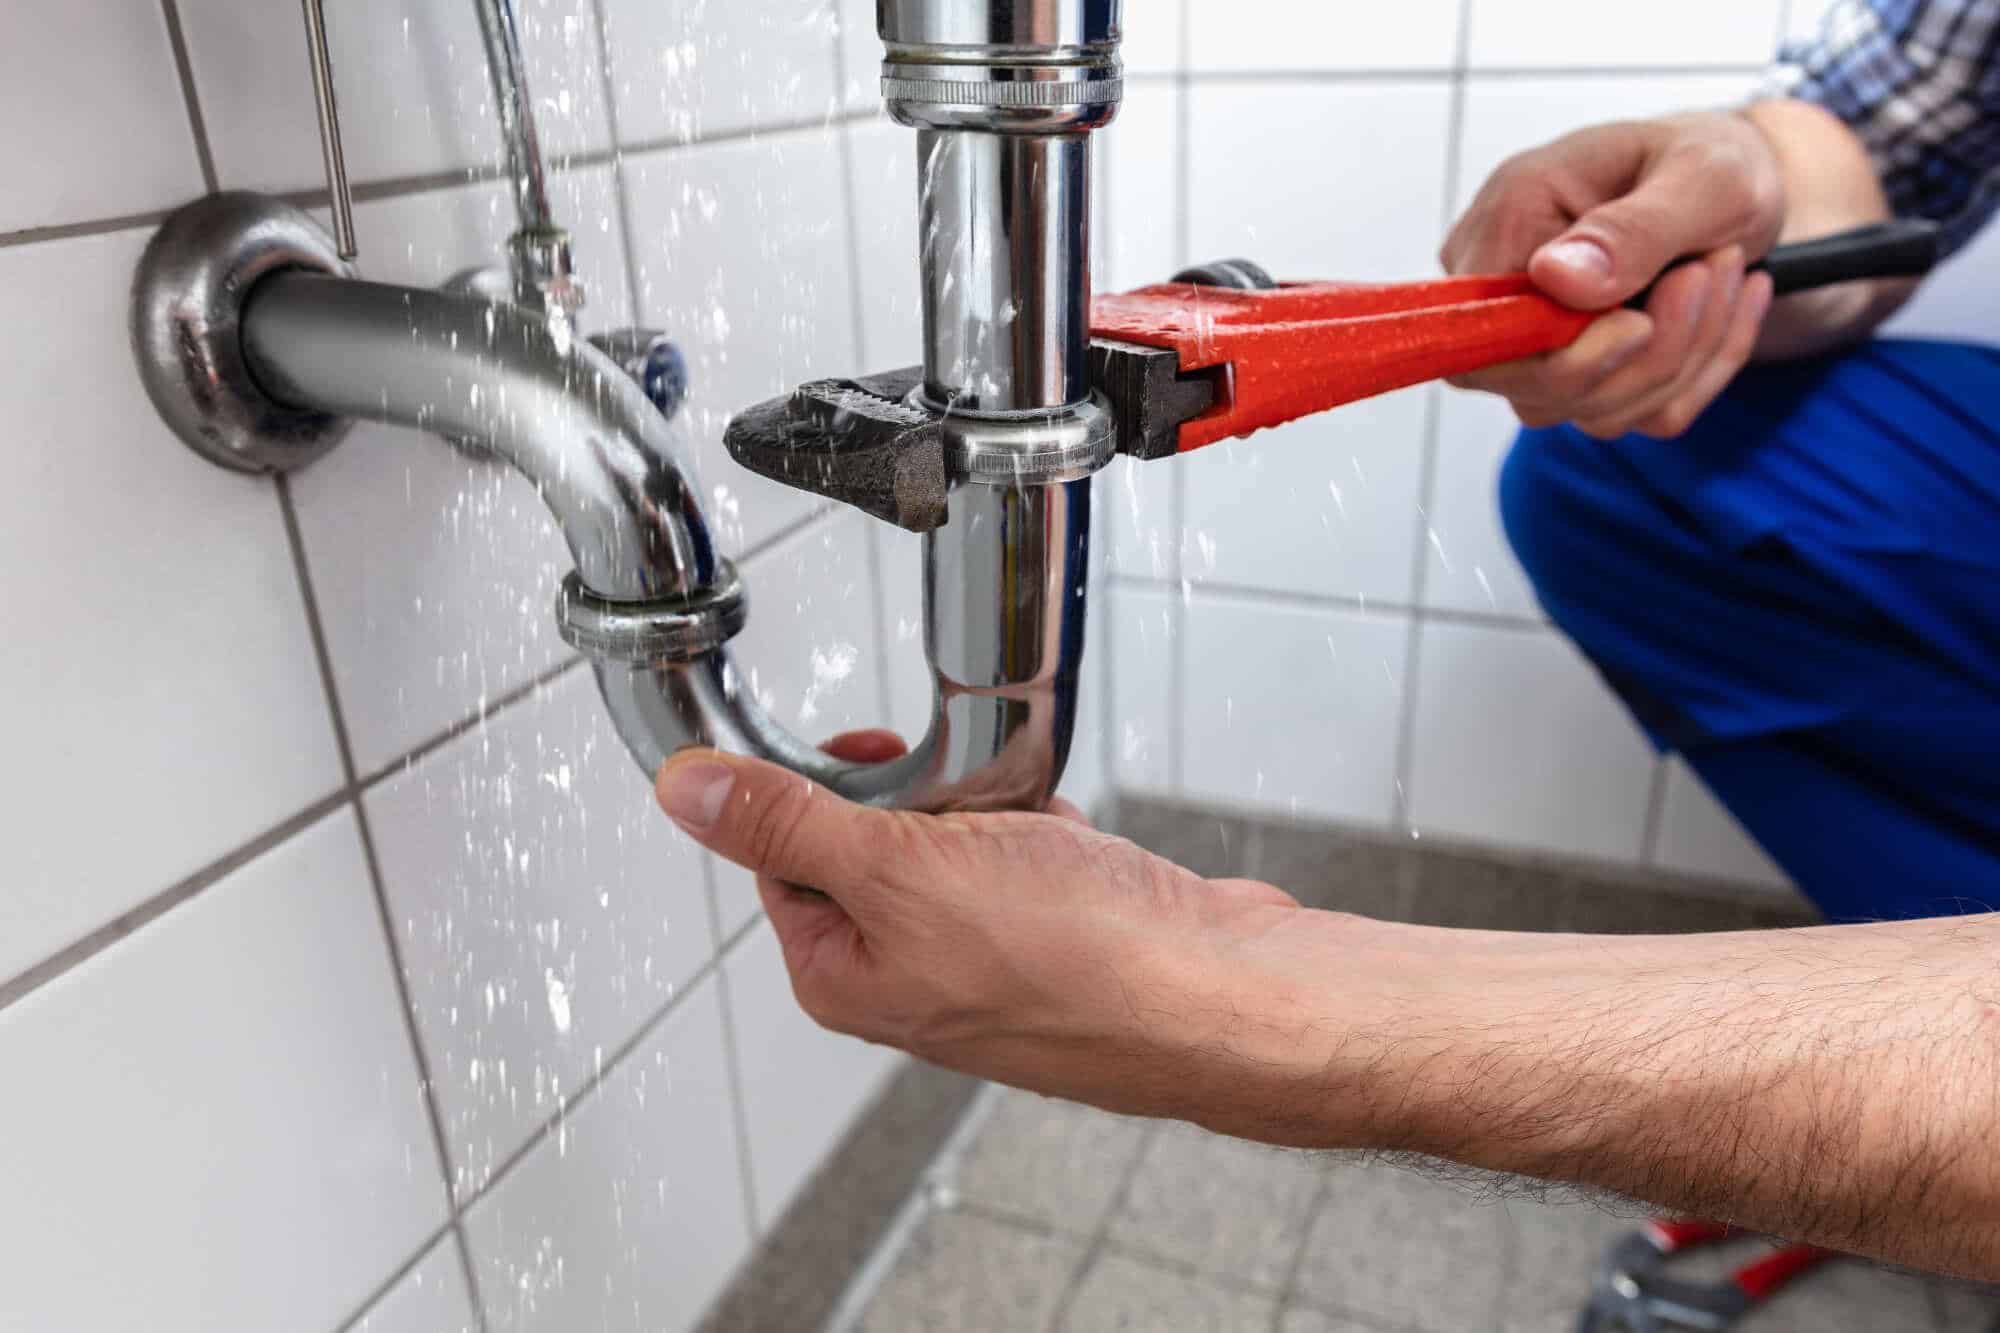
If you notice a water leak in your home, turn off the main water supply and then locate the source of the leak. Use a pipe repair clamp or a pipe repair tape to temporarily fix the leak until a professional plumber can assess and repair the damage.
Step 6: Apply pipe repair tape or epoxy putty
Now that the pipe is clean and dry, it’s time to apply the suitable repair material to fix the water leak. Depending on the type of leak and the pipe material, you can choose between pipe repair tape or epoxy putty. These options provide temporary or permanent solutions, respectively.
Follow these steps to apply pipe repair tape or epoxy putty:
- Pipe Repair Tape:
- Ensure the damaged area of the pipe is completely dry.
- Start at least two inches before the leak, and begin wrapping the pipe repair tape tightly around the affected area.
- Continue wrapping the tape in overlapping layers, stretching it slightly as you go. This will create a tight and secure seal.
- Make sure to wrap the tape several inches past the leak to ensure complete coverage.
- Smooth out any wrinkles or bubbles in the tape to ensure a tight seal.
- Once the tape is applied, firmly press it onto the pipe surface to activate its self-fusing properties.
- Epoxy Putty:
- Ensure the damaged area of the pipe is completely dry.
- Mix the epoxy putty according to the manufacturer’s instructions.
- Take a small amount of the putty and knead it until it becomes a uniform color.
- Apply the putty directly onto the leak, covering it entirely with a layer of putty.
- Smooth out the putty, ensuring that it adheres securely to the pipe surface.
- Allow the epoxy putty to cure completely, following the recommended drying time mentioned by the manufacturer.
It’s important to note that while pipe repair tape can provide a temporary fix, epoxy putty offers a more permanent solution, especially for larger or more significant leaks. The specific choice of repair material will depend on the severity of the leak and the type of pipe.
Ensure that you follow the manufacturer’s instructions when applying pipe repair tape or epoxy putty, as the process may vary slightly between different products. Additionally, take your time to apply the material carefully, ensuring a secure and tight seal.
With the repair material applied, you can now proceed to the next step: allowing the repair to set and cure.
Step 7: Allow the repair to set and cure
After applying the pipe repair tape or epoxy putty to fix the water leak, it’s important to allow the repair to set and cure properly. This will ensure a strong and long-lasting seal, minimizing the risk of future leaks.
Follow these guidelines to allow the repair to set and cure effectively:
- Refer to the manufacturer’s instructions for the specific repair material you used. They will provide guidance on the recommended setting and curing time.
- Avoid disturbing or putting pressure on the repaired area during the setting and curing process. This can compromise the integrity of the repair.
- Provide proper ventilation in the area to promote the curing process. Good airflow and ventilation can help the repair material dry and harden efficiently.
- Consider using additional support, such as clamps or braces, if necessary, to hold the repaired pipe in place during the curing process.
- Be patient and give the repair sufficient time to fully set and cure. Rushing the process can lead to a weaker seal and potential future leaks.
- Periodically check the repaired area to ensure that no water is seeping through or any additional leaks have developed. If you notice any issues, consult a professional plumber for further assistance.
It’s essential to note that the setting and curing time can vary depending on the specific repair material used and the environmental conditions. It’s best to follow the instructions provided by the manufacturer and allow ample time for the repair to cure thoroughly.
By allowing the repair to set and cure properly, you can ensure a reliable and durable fix for your water leak pipe. Once you’re confident that the repair has fully cured, you can move on to the next step: turning the water supply back on.
Step 8: Turn the water supply back on
Now that the repair has set and cured, it’s time to turn the water supply back on. This step will restore the water flow to your home and allow you to test the effectiveness of the repair.
Follow these steps to turn the water supply back on:
- Locate the main water shut-off valve that you turned off earlier in the repair process.
- Turn the shut-off valve counterclockwise (or to the left) to gradually open the water supply.
- Allow the water to flow slowly into the pipes, gradually increasing the flow to avoid any sudden pressure surges.
- Check for any signs of leaks around the repaired area or elsewhere in the plumbing system. This can be done by visually inspecting the pipes and fixtures.
- Run water from different faucets and fixtures in your home to check for any remaining leaks or abnormalities in the water flow.
- If you notice any leaks or issues, immediately turn off the water supply again and consult a professional plumber for further assistance.
It’s important to be cautious during this step and closely monitor the water flow. Keep an eye out for any signs of leaks or water abnormalities, as this can indicate that the repair needs further attention.
If you’ve successfully turned the water supply back on without any leaks or issues, congratulations! You’ve effectively repaired the water leak pipe in your home.
With the water supply restored, you can move on to the final step: checking for any remaining leaks.
Read more: How To Seal Chimney Pipe
Step 9: Check for any remaining leaks
After turning the water supply back on and completing the repair, it’s important to thoroughly check for any remaining leaks. This step will ensure that your repair was successful and that no further water damage or complications will occur.
Follow these steps to check for any remaining leaks:
- Visually inspect the repaired area and the surrounding pipes for any signs of dripping, moisture, or discoloration.
- Run water from different faucets and fixtures in your home to check for any new leaks or changes in water flow. Pay close attention to the areas where the repair was made.
- Feel the pipes with your hand, checking for any unusual warmth or moisture that may indicate a hidden leak.
- If you have access to a water leak detector or moisture meter, use it to scan the repaired area and adjacent pipes for any signs of moisture.
- Monitor the water meter to ensure it remains stable and doesn’t indicate any additional water usage or leaks.
- If you discover any new leaks or issues, immediately turn off the water supply and reassess the situation. It may be necessary to consult a professional plumber for further assistance.
Checking for any remaining leaks is a crucial final step in the repair process. Even a small, unnoticed leak can cause significant damage over time, so it’s important to be thorough in your inspection.
By diligently checking for any remaining leaks, you can have peace of mind knowing that your repair was successful and that your home is protected from water damage.
With Step 9 completed, you have successfully repaired the water leak pipes in your home. Congratulations! Remember to stay vigilant and address any future leaks promptly to prevent further damage.
If you feel unsure or uncomfortable with the repair process, it’s always a good idea to consult a licensed plumber who can assess and fix the issue. Safety should always be your top priority when dealing with plumbing problems.
Thank you for following this comprehensive guide. We hope it has been helpful in resolving your water leak pipe issue.
Conclusion
Dealing with water leak pipes in your home can be a frustrating and potentially costly issue. However, armed with the knowledge and steps provided in this comprehensive guide, you are now equipped to handle these repairs with confidence.
We started by emphasizing the importance of identifying the source of the water leak and turning off the water supply to prevent further damage. Then, we discussed the necessary tools and materials needed for the repair, followed by draining the affected pipe and cleaning it thoroughly.
Applying the appropriate repair material, such as pipe repair tape or epoxy putty, was the next step, and we also highlighted the importance of allowing the repair to set and cure effectively. Finally, we concluded with the crucial process of checking for any remaining leaks to ensure the success of your repair.
Remember, safety should always be a priority when working with water and plumbing systems. If you feel unsure or uncomfortable with the repair process, it’s best to consult a licensed plumber who can provide expert guidance and assistance.
We hope this guide has been informative and helpful in addressing your water leak pipe issues. By following the steps outlined and taking the appropriate precautions, you can save money on professional plumbing services and maintain the integrity of your home’s plumbing system.
Thank you for taking the time to read this article, and we wish you success in your home maintenance endeavors.
Frequently Asked Questions about How To Repair Water Leak Pipes In Your Home
Was this page helpful?
At Storables.com, we guarantee accurate and reliable information. Our content, validated by Expert Board Contributors, is crafted following stringent Editorial Policies. We're committed to providing you with well-researched, expert-backed insights for all your informational needs.