Home>Interior Design>How To Tile A Floor – In Easy Steps

Interior Design
How To Tile A Floor – In Easy Steps
Modified: September 1, 2024
Learn how to tile a floor in easy steps with our comprehensive guide. Discover the best techniques and tips for a stunning interior design transformation.
(Many of the links in this article redirect to a specific reviewed product. Your purchase of these products through affiliate links helps to generate commission for Storables.com, at no extra cost. Learn more)
Introduction
When it comes to transforming the look and feel of a space, few things have as big of an impact as the flooring choice. And if you’re looking for a durable and stylish option, tiling the floor is hard to beat. Whether you’re renovating your kitchen, bathroom, or any other room in your home, learning how to tile a floor can be a rewarding and cost-effective DIY project.
However, the process of tiling a floor can seem daunting at first. From gathering the right tools and materials to properly preparing the surface and applying the adhesive, there are several steps involved in achieving a professional-looking finish. But fear not! In this article, we will guide you through each step of the process, providing you with easy-to-follow instructions and valuable tips along the way.
By the end of this guide, you’ll have the knowledge and confidence to tackle your own tiling project and create a beautiful, long-lasting floor that will not only enhance the aesthetic appeal of your space but also withstand the test of time.
So, without further ado, let’s dive into the world of tiling and learn how to tile a floor in easy steps!
Key Takeaways:
- Tiling a floor is a rewarding DIY project that requires careful planning, attention to detail, and patience. By following the steps outlined in this guide and using quality materials, you can achieve a professional-looking, durable, and visually appealing tiled floor.
- Sealing the grout is an optional but highly beneficial step that can keep your grout looking fresh and beautiful for years to come. It helps prevent stains, water penetration, and dirt buildup, extending the life of your tiled floor and simplifying its maintenance.
Read more: How To Fix E2 Error In A Washing Machine
Step 1: Gather the necessary tools and materials
Before you can start tiling your floor, it’s important to gather all the necessary tools and materials. Having everything you need on hand will help you work efficiently and ensure that you have a successful project. Here’s a list of the essential items you’ll need:
- Tile cutter or wet saw: This tool is essential for cutting tiles to fit in corners and along the edges of the room. A manual tile cutter is suitable for ceramic tiles, while a wet saw is necessary for cutting porcelain or stone tiles.
- Trowel: A notched trowel is used to spread the tile adhesive evenly on the floor surface.
- Grout float: This tool is used to apply grout between the tiles and smooth it into the joints.
- Sponge: You’ll need a sponge for wiping off excess grout and cleaning the tiles during the installation process.
- Level: To ensure that your floor is properly leveled, a spirit level is essential.
- Measuring tape: Accurate measurements are crucial when planning the tile layout, so make sure you have a measuring tape handy.
- Spacers: These small plastic pieces are used to create uniform gaps between the tiles.
- Tile adhesive: Choose a high-quality adhesive suitable for the type of tile you’re using and the substrate of your floor.
- Tile grout: Select a grout color that complements your tiles and provides a durable finish.
- Primer: Depending on the type of floor surface, you may need to use a primer to ensure proper adhesion of the tile adhesive.
- Protective gear: Don’t forget to wear gloves, safety glasses, and a dust mask to protect yourself during the tiling process.
Once you have gathered all the necessary tools and materials, you’ll be well-prepared to begin tiling your floor. Ensuring that you have everything you need before you start will save you from unnecessary trips to the hardware store and allow you to focus on the task at hand.
Step 2: Prepare the floor surface
Before starting the tiling process, it’s crucial to prepare the floor surface properly. This step ensures that the tiles adhere securely and the final result is smooth and even. Here’s how to prepare the floor surface:
- Clean the floor: Begin by thoroughly cleaning the floor to remove any dirt, dust, or debris. Sweep or vacuum the area, and then use a damp mop or cloth to remove any remaining dirt or stains. Allow the floor to dry completely before moving on to the next step.
- Repair any damage: Inspect the floor for any cracks, holes, or uneven areas. If you come across any damage, fill the cracks or holes with a suitable patching compound and smooth it out with a putty knife. For uneven areas, you may need to use a self-leveling compound to create a flat surface.
- Remove baseboards or moldings (if necessary): In some cases, you may need to remove the baseboards or moldings before tiling. This allows for a clean and professional finish. Use a pry bar or a putty knife to carefully remove the baseboards, taking care not to damage them.
- Apply a primer (if necessary): Depending on the floor surface material, you may need to apply a primer to ensure proper adhesion of the tile adhesive. Follow the manufacturer’s instructions for the specific primer you’re using, and allow it to dry according to the recommended drying time.
By properly preparing the floor surface, you create a solid foundation for the tile installation. This step is essential to prevent any future issues and ensure a long-lasting and visually appealing floor.
Step 3: Plan the tile layout
Planning the tile layout is a crucial step in the tiling process. It allows you to visualize how the tiles will be positioned on the floor and ensures a balanced and aesthetically pleasing result. Here’s how to plan the tile layout:
- Measure the floor area: Use a measuring tape to determine the length and width of the floor area you’ll be tiling. Multiply these measurements to find the total square footage.
- Choose a tile pattern: Consider the style and size of the tiles you’ve selected and choose a pattern that will complement the overall design of your space. Popular patterns include straight, diagonal, herringbone, and basketweave.
- Mark the center of the room: Find the center of the room by measuring the length and width and dividing each by two. Mark this point on the floor with a pencil or chalk.
- Create guidelines: From the center point, use a straightedge and a level to draw reference lines in both directions. These lines will serve as guidelines for laying the tiles.
- Dry fit the tiles: Without applying adhesive, place a few tiles along the guidelines to get an idea of how they will fit. Make any necessary adjustments to ensure that the tiles at the edges and corners are evenly sized.
- Consider tile cuts: Take note of any areas where tiles will need to be cut, such as around doorways or fixtures. Plan the layout to minimize the number and size of cut tiles, while maintaining a balanced appearance.
- Make adjustments: If the dry fit reveals any issues or unevenness, make adjustments to the tile layout as needed. This may involve shifting the starting point or modifying the pattern slightly.
By taking the time to carefully plan the tile layout, you can avoid potential problems and ensure a visually appealing result. It’s worth investing the effort in this step to achieve a well-balanced and professionally finished floor.
Step 4: Mix the tile adhesive
Once you have planned the tile layout and are ready to start installing the tiles, the next step is to mix the tile adhesive. Properly mixing the adhesive is essential for ensuring a strong bond between the tiles and the floor. Here’s how to mix the tile adhesive:
- Read the manufacturer’s instructions: Different tile adhesives may have specific mixing ratios and procedures, so it’s important to carefully read and follow the instructions provided by the adhesive manufacturer.
- Gather the necessary tools: You’ll need a bucket and a mixing paddle or a drill with a mixing attachment to mix the adhesive.
- Pour the adhesive powder into the bucket: Measure the appropriate amount of adhesive powder according to the manufacturer’s instructions and pour it into the clean bucket.
- Add water gradually: Slowly add water to the adhesive powder while continuously mixing with the paddle or drill attachment. Mix until you achieve a smooth, lump-free consistency. Be careful not to add too much water, as this can weaken the adhesive’s bond.
- Let the adhesive rest: Allow the mixed adhesive to rest for a few minutes before applying it. This resting period, known as slaking, allows the adhesive components to fully activate and ensures better adhesion.
- Test the adhesive’s tackiness: Before applying the adhesive to the floor, test its tackiness by sticking a small piece of tile to it. If the tile easily slides off, the adhesive may be too wet and needs additional mixing. If the tile remains firmly in place, the adhesive is ready for use.
Properly mixing the tile adhesive is crucial for the success of your tiling project. A well-mixed adhesive will provide a strong bond, ensuring that your tiles stay securely in place for years to come.
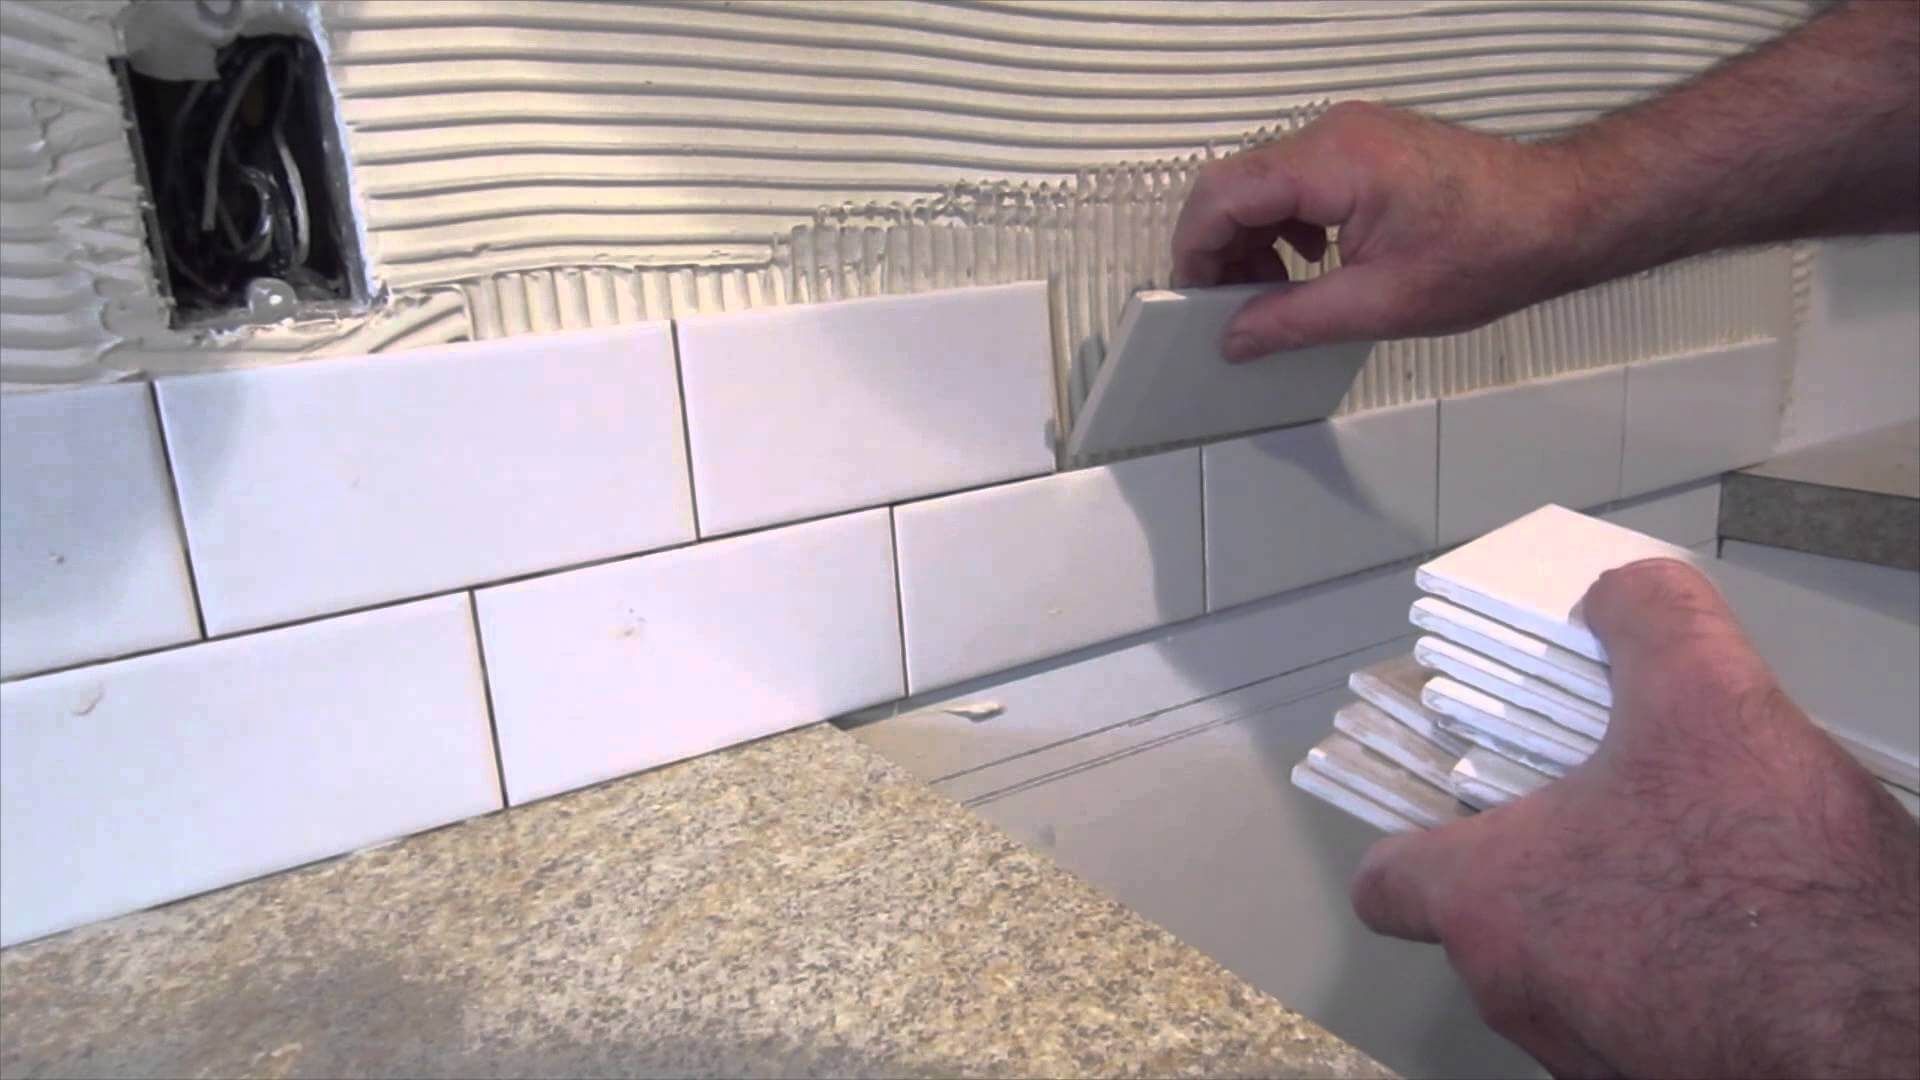
Step 5: Apply the adhesive and lay the tiles
Now that you’ve prepared the floor surface and mixed the tile adhesive, it’s time to apply the adhesive and lay the tiles. This step requires careful attention to detail to ensure that the tiles are properly aligned and securely adhered. Here’s how to apply the adhesive and lay the tiles:
- Start in a corner: Begin in a corner of the room and work your way outwards. This ensures that you’re not trapped in a corner and allows for easier movement.
- Apply adhesive with a trowel: Use the notched side of the trowel to spread a layer of adhesive onto the floor surface. Apply only as much adhesive as you can comfortably cover with tiles within 15-20 minutes to avoid the adhesive drying out before the tiles are laid.
- Create ridges in the adhesive: Once the adhesive is applied, run the notched side of the trowel over the adhesive in one direction to create ridges. These ridges help create a stronger bond between the adhesive and the tiles.
- Place the tiles: Carefully place the first tile at the corner where the guidelines intersect. Press it firmly into the adhesive and gently twist it back and forth to ensure good contact. Insert tile spacers around the edges of the tile to maintain consistent spacing.
- Continue with the remaining tiles: Place the subsequent tiles next to each other, following the guidelines and using spacers to maintain consistent spacing. Press each tile firmly into the adhesive and check for levelness with a spirit level. Adjust the tiles as needed.
- Clean excess adhesive: As you work, periodically check for and remove any excess adhesive that may squeeze up between the tiles. This will make the grouting process easier and give you a cleaner finish.
- Repeat the process: Continue applying adhesive, laying tiles, and inserting spacers until the entire floor is tiled. Work in small sections to ensure that the adhesive remains workable.
It’s important to work methodically and check the alignment and levelness of the tiles as you go along. Taking your time during this step will result in a professionally installed floor that you can be proud of.
When tiling a floor, start by ensuring the surface is clean and level to ensure a smooth and even finish. Use a notched trowel to apply the adhesive, and be sure to leave space for grout between the tiles.
Step 6: Cut tiles to fit the edges and corners
When tiling a floor, you’ll often encounter areas where full tiles won’t fit, such as along the edges and in corners. To achieve a seamless and professional-looking finish, you’ll need to cut tiles to fit these spaces. Here’s how to cut tiles to fit the edges and corners:
- Measure the area to be cut: Use a measuring tape to accurately measure the dimensions of the space where the tile needs to be cut. Remember to account for any necessary spacing.
- Mark the tile: Transfer your measurements onto the tile using a pencil or a marker. Double-check your measurements before making any cuts.
- Choose the right tool: Depending on the type of tile you’re working with, you’ll need to use an appropriate cutting tool. For ceramic tiles, a tile cutter or a scoring tool can be used. Porcelain or stone tiles may require a wet saw.
- Make the cut: Use the chosen cutting tool to carefully score or cut along the marked line. Follow the manufacturer’s instructions for the specific tool you are using. Apply steady pressure and avoid rushing to ensure clean and accurate cuts.
- Smooth the edges: After cutting the tile, use a tile file or sandpaper to smooth any rough or uneven edges.
- Test the fit: Place the cut tile in the designated area to ensure that it fits properly. Make any necessary adjustments if the tile doesn’t fit perfectly.
- Repeat for other tiles: If you have multiple tiles that require cutting, repeat the same process for each one. Take your time to ensure precise cuts.
It’s important to exercise caution when cutting tiles and to wear protective gear, such as safety glasses and gloves. Take your time and make accurate measurements to achieve clean and precise cuts. Cutting tiles may require some practice, so don’t hesitate to practice on extra tiles or seek guidance if you’re new to the process.
Step 7: Allow the adhesive to dry
After laying the tiles and completing the cutting process, it’s crucial to give the adhesive sufficient time to dry and set properly. This allows for a strong bond between the tiles and the floor. Here’s how to allow the adhesive to dry:
- Follow manufacturer’s instructions: Check the instructions provided by the adhesive manufacturer for the recommended drying time. It’s important to follow these guidelines to ensure that the adhesive sets correctly.
- Avoid foot traffic: During the drying process, avoid walking on the newly installed tiles as much as possible. Stepping on the tiles prematurely can cause them to shift or become uneven.
- Create proper ventilation: While the adhesive is drying, make sure the room is well-ventilated. This allows for proper air circulation and helps the adhesive dry more efficiently.
- Maintain consistent temperature: Keep the room at a consistent temperature throughout the drying process. Extreme temperature fluctuations can affect the adhesive’s ability to set and cure properly.
- Monitor drying progress: Check the adhesive periodically to ensure that it is drying evenly and adequately. If you notice any areas where the adhesive is not setting properly, consult the manufacturer’s instructions or seek professional advice.
- Be patient: Depending on the adhesive, the drying process may take anywhere from 24 to 48 hours or even longer. Avoid rushing the process to ensure the best possible outcome for your newly tiled floor.
Allowing the adhesive to dry completely is a critical step to ensure the longevity and stability of your tiled floor. Rushing this step can compromise the integrity of the installation, so be patient and wait for the recommended drying time.
Step 8: Grout the tiles
Once the adhesive has dried and the tiles are securely in place, it’s time to grout the tiles. Grouting not only fills the gaps between the tiles but also adds stability and enhances the overall appearance of the floor. Follow these steps to grout the tiles:
- Choose the right grout: Select a grout color that complements your tiles and suits the style of the room. Consider factors such as the tile material, desired finish, and maintenance requirements.
- Prepare the grout mixture: Follow the manufacturer’s instructions to mix the grout powder with water in a clean bucket. Mix until you achieve a smooth, paste-like consistency.
- Start in a small section: Begin by applying the grout to a small section of tiles, typically about a 3×3 foot area, working in a systematic pattern.
- Apply the grout: Use a grout float or a rubber grout trowel to spread the grout mixture diagonally across the tiles, ensuring that the gaps are completely filled. Hold the float at a 45-degree angle and press firmly. Remove any excess grout from the tile surface as you go along.
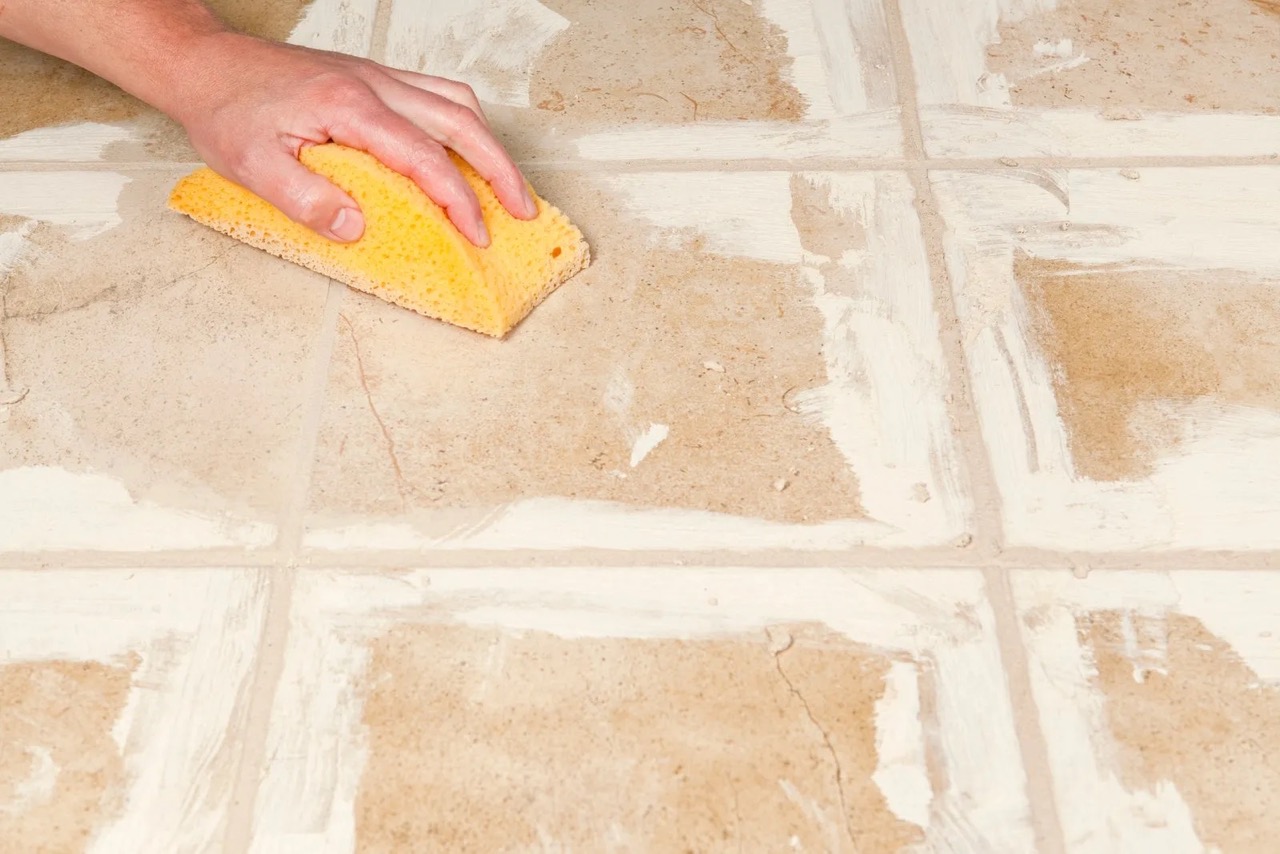
- Clean the tiles: After applying the grout to a section, use a slightly damp sponge to lightly wipe the surface of the tiles at a 45-degree angle. This removes excess grout and smoothens the grout lines. Rinse the sponge frequently to keep it clean.
- Cure and seal the grout: Allow the grout to dry for the time recommended by the manufacturer, typically around 24-48 hours. Once the grout is fully dried, consider sealing it with a grout sealer for added protection against stains and moisture.
- Final cleaning: After the grout has cured, do a final cleaning of the tiles to remove any remaining grout haze. Use a clean, dry cloth or a haze remover solution as directed by the manufacturer.
Grouting the tiles adds the finishing touch to your tiled floor. Taking the time to apply the grout carefully and clean the tiles properly will result in a polished look and ensure the longevity of your tiled floor.
Step 9: Clean and polish the tiles
After grouting the tiles and allowing them to fully cure, it’s important to clean and polish the tiles to remove any grout residue and restore their natural shine. Cleaning and polishing will give your tiled floor that final touch of beauty. Here’s how to clean and polish the tiles:
- Remove grout haze: Use a damp sponge or a haze-removing solution to gently wipe away any remaining grout haze on the tile surface. It’s important to do this within a few days of grouting before the haze becomes more difficult to remove.
- Mix a cleaning solution: Prepare a mixture of warm water and a mild detergent or a recommended tile cleaner. Avoid using harsh chemicals or abrasive cleaners that could damage the tiles.
- Apply the cleaning solution: Dip a soft sponge or mop into the cleaning solution and wring it out to remove excess moisture. Gently clean the tiles, working in small sections at a time. Avoid using excessive water that could seep into the grout lines.
- Scrub stubborn stains: For stubborn stains or grime, use a soft brush or non-abrasive scrub pad to gently scrub the affected areas. Be careful not to scrub too vigorously, especially if you have natural stone tiles.
- Rinse the tiles: After cleaning, rinse the tiles thoroughly with clean water to remove any residue from the cleaning solution. Make sure to remove all traces of soap or detergent.
- Dry the tiles: Use clean, absorbent towels or a mop to dry the tiles completely. This step is important to prevent water spots or streaks from forming on the surface.
- Apply a tile polish (optional): If desired, you can apply a tile polish or sealer to further enhance the shine and protect the tiles from stains and dirt. Follow the manufacturer’s instructions for the specific product you’re using.
Cleaning and polishing your tiles not only improves their appearance but also helps maintain their beauty for years to come. Regular maintenance and proper cleaning techniques will ensure that your tiled floor remains in pristine condition.
Step 10: Seal the grout (optional)
Sealing the grout is an optional but highly recommended step in the tiling process. Grout is porous and can absorb dirt, spills, and stains over time. Sealing the grout provides an extra layer of protection, making it easier to clean and maintain the appearance of your tiled floor. Here’s how to seal the grout:
- Wait for the grout to cure: Before applying a sealer, make sure the grout has fully cured according to the manufacturer’s instructions, typically around 7-14 days.
- Choose the right sealer: There are different types of grout sealers available, including penetrating sealers and topical sealers. Read the labels and choose the one that’s appropriate for your specific grout type and desired level of protection.
- Prepare the grout: Ensure that the grout lines are clean and free of any debris or residue. If needed, use a grout cleaner and a brush to remove any stains or dirt. Allow the grout to dry completely before applying the sealer.
- Apply the sealer: Follow the manufacturer’s instructions for the specific sealer you’re using. Using a small brush or an applicator, carefully apply the sealer to the grout lines, ensuring complete and even coverage. Be cautious to avoid getting sealer on the tile surface, as it may cause discoloration or a hazy appearance.
- Remove excess sealer: After applying the sealer, wait for the recommended amount of time specified on the product label. Then, using a clean cloth or sponge, gently wipe away any excess sealer on the tiles before it dries.
- Allow the sealer to dry: Let the sealer dry according to the manufacturer’s instructions. This timeframe can vary but is usually around 24-48 hours. Avoid any foot traffic or moisture exposure during this time to allow the sealer to fully set.
Sealing the grout helps prevent stains, water penetration, and dirt buildup, extending the life of your tiled floor and simplifying its maintenance. While sealing is optional, it is a highly beneficial step that can keep your grout looking fresh and beautiful for years to come.
Conclusion
Congratulations! You have successfully learned how to tile a floor in easy steps. By following the guidelines outlined in this article, you have gained the knowledge and confidence to tackle your own tiling project and transform the look of your space. Here’s a recap of the steps involved:
- Gather the necessary tools and materials
- Prepare the floor surface
- Plan the tile layout
- Mix the tile adhesive
- Apply the adhesive and lay the tiles
- Cut tiles to fit the edges and corners
- Allow the adhesive to dry
- Grout the tiles
- Clean and polish the tiles
- Seal the grout (optional)
Remember, tiling a floor is a rewarding and cost-effective DIY project. It requires careful planning, attention to detail, and patience. By taking your time, following the steps outlined in this guide, and using quality materials, you can achieve a professional-looking, durable, and visually appealing tiled floor that will enhance the overall aesthetic of your space.
Don’t be afraid to unleash your creativity and explore different tile patterns and designs. Whether you’re updating your kitchen, bathroom, or any other room in your home, the possibilities are endless. Take pride in your accomplishment, and enjoy the beauty and benefits of your new tiled floor for years to come.
Frequently Asked Questions about How To Tile A Floor – In Easy Steps
Was this page helpful?
At Storables.com, we guarantee accurate and reliable information. Our content, validated by Expert Board Contributors, is crafted following stringent Editorial Policies. We're committed to providing you with well-researched, expert-backed insights for all your informational needs.


0 thoughts on “How To Tile A Floor – In Easy Steps”