Home>Furniture & Design>Bathroom Fixtures>8 Amazing Shower Tile For 2025
Bathroom Fixtures
8 Amazing Shower Tile For 2025
Modified: June 10, 2025
Discover 8 stunning shower tile ideas for 2025. From timeless classics to modern marvels, find the perfect shower tile design to elevate your bathroom.
(Many of the links in this article redirect to a specific reviewed product. Your purchase of these products through affiliate links helps to generate commission for Storables.com, at no extra cost. Learn more)
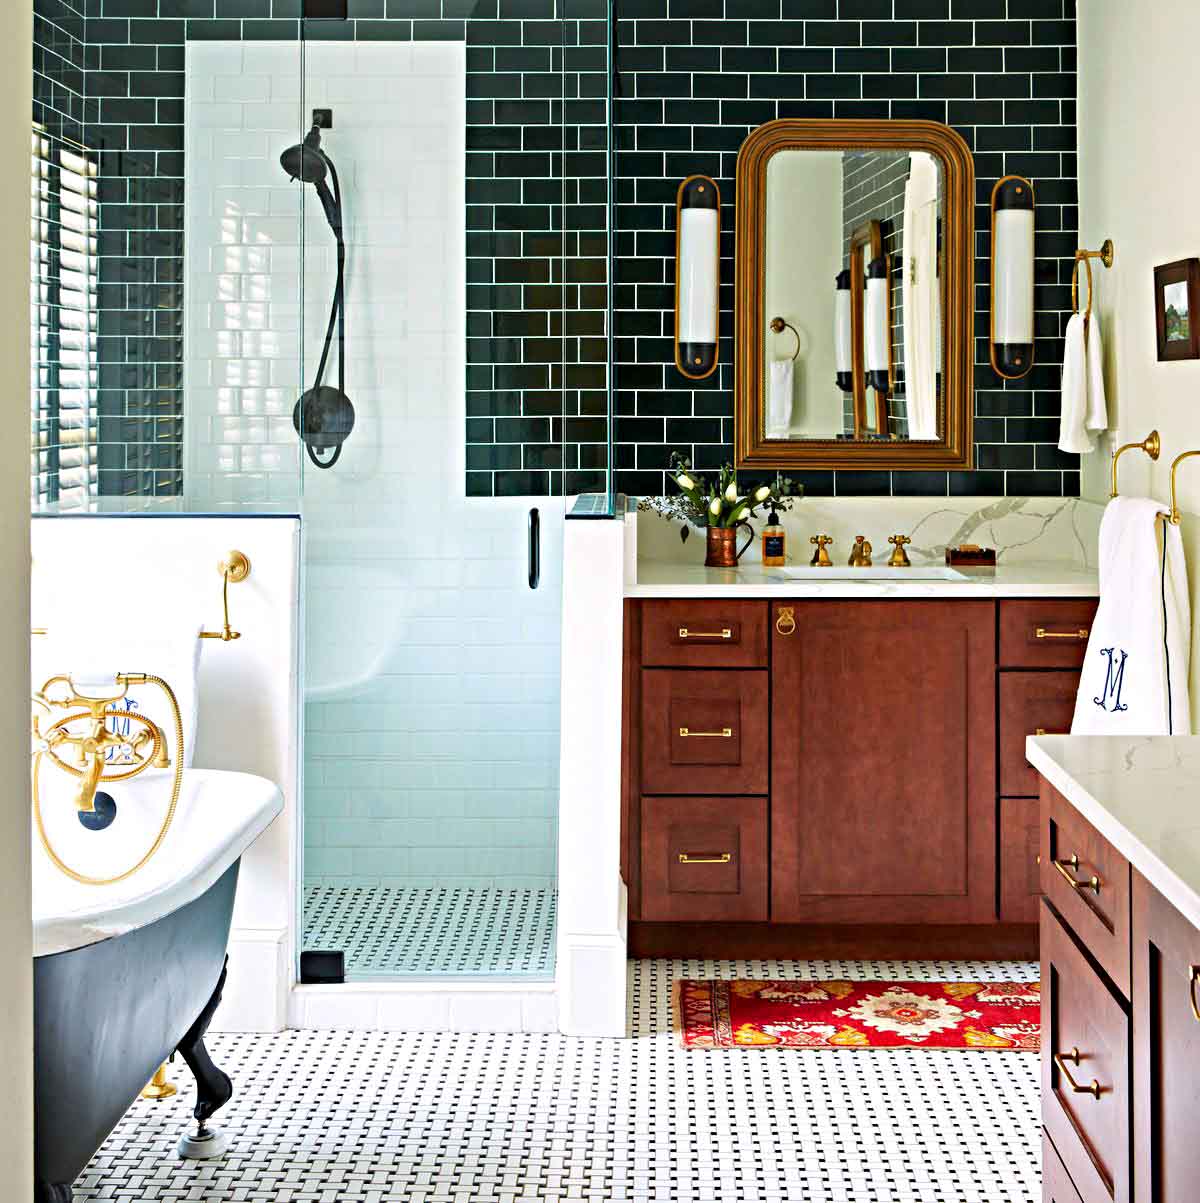
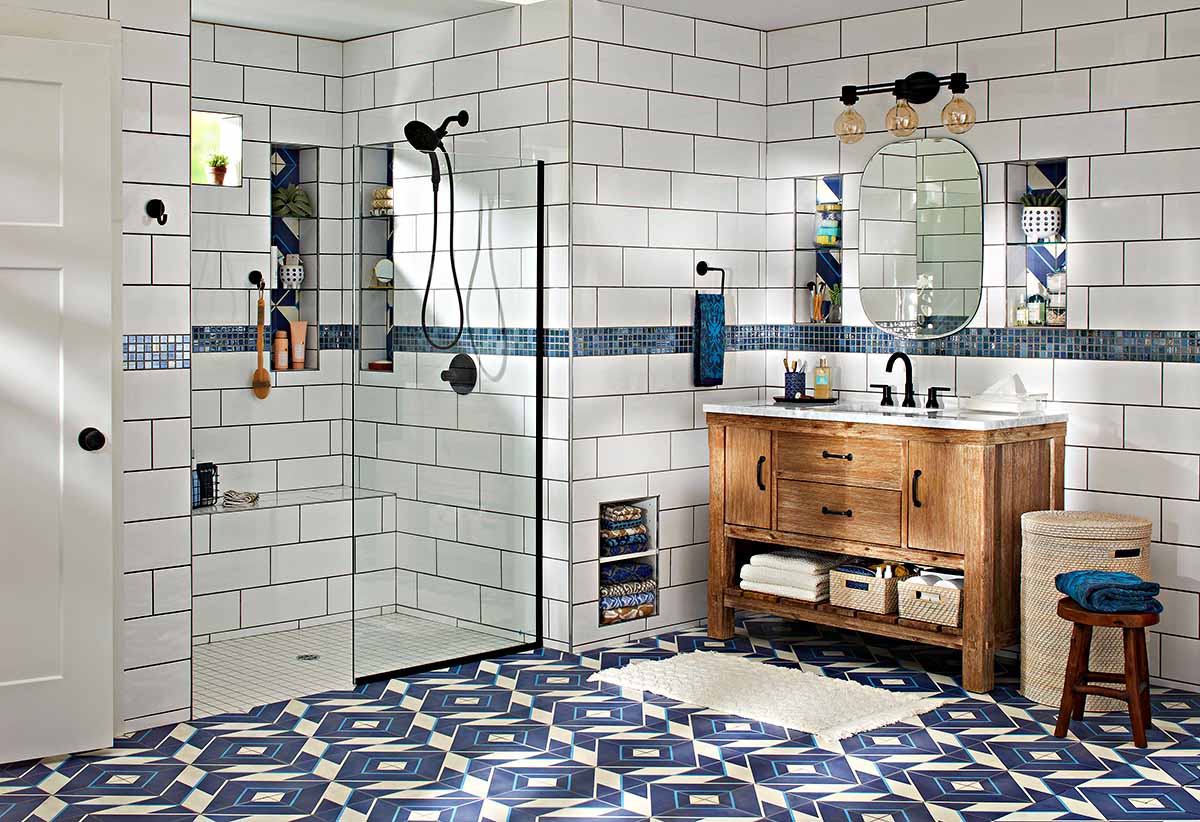
Are you looking to revamp your bathroom in 2025? One of the easiest ways to upgrade the look and feel of your shower is by choosing the perfect tiles. From bold and colorful patterns to sleek and modern designs, the right shower tile can completely transform the space. In this article, we will explore 8 amazing shower tile options that are sure to be on-trend for 2025. Whether you're a fan of minimalist neutrals, vibrant hues, or intricate mosaic patterns, there is something for everyone in the world of shower tiles. So, let's dive in and discover the top tile trends that will take your shower to the next level in 2025.

Overall Score: 8/10
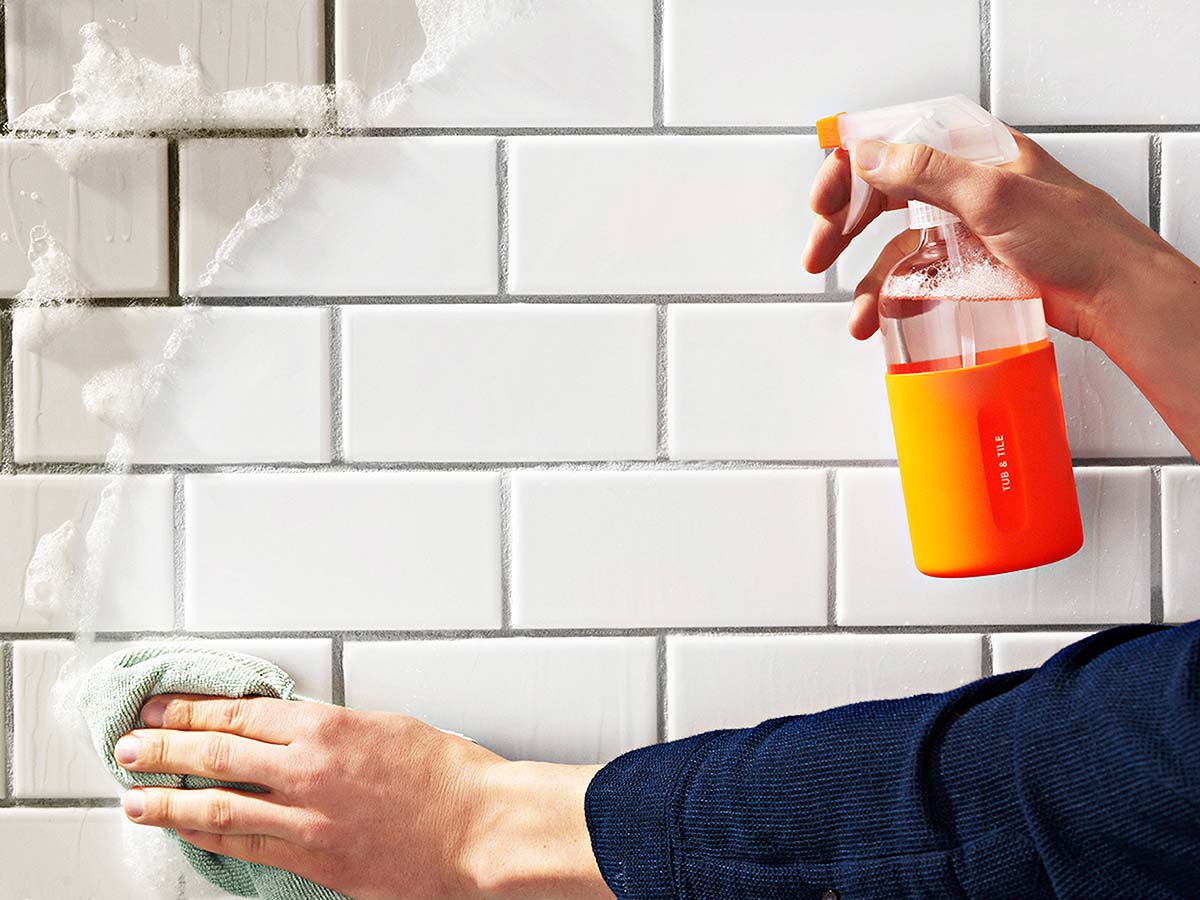
Method Daily Shower Spray Cleaner is a plant-based cleaning product that effectively cleans showers, tile, fixtures, glass, and tubs without rinsing. It dissolves and prevents soap scum, with a biodegradable formula. The Eucalyptus Mint scent provides a refreshing and non-toxic cleaning experience. The bottle is made with 100% recycled plastic, reflecting the brand's commitment to sustainability. Customers praise its ability to maintain shower cleanliness, prevent water spots, and eliminate soap scum. Some feedback regarding the strong scent and occasional need for additional cleaning. Overall, highly recommended for daily shower maintenance and a cruelty-free cleaning solution.
Key Features
- Contains (1) 28oz spray bottle of daily shower cleaner
- Made with plant-based cleaning power
- Does not require rinsing
- Biodegradable formula prevents soap scum
- Works on showers, tile, fixtures, glass and tubs
- Cruelty-free, not tested on animals
- Eucalyptus Mint scent with refreshing notes
- Bottle made with 100% recycled plastic
- Sustainable business practices
Specifications
- Dimension: 3.06Lx3.50Wx10.06H
- Size: 28 Fl Oz (Pack of 1)
Pros
- Effective for daily shower maintenance
- Prevents water spots on shower doors
- Eliminates soap scum and buildup
- Refreshing Eucalyptus Mint scent
- Bottle made with 100% recycled plastic
- Cruelty-free and environmentally friendly
Cons
- Strong scent for some users
- Occasional need for additional cleaning
Method Daily Shower Spray Cleaner is a highly effective and environmentally friendly product for maintaining shower cleanliness. Its plant-based formula is praised for preventing water spots and eliminating soap scum without rinsing. Despite some feedback about the strong scent and occasional need for additional cleaning, it is recommended for those seeking a daily maintenance cleaner with a refreshing Eucalyptus Mint scent.
")
Overall Score: 9/10
The Palisade Interlocking Vinyl Wall/Backsplash Tiles are an elegant, lightweight, and waterproof solution to update the look of any kitchen or bathroom. These easy-to-install tiles feature a decorative, photo-realistic Carrara Marble pattern, and a no-mess grout appearance. Each tile is 25.6 in. x 14.8 in. x 5 mm, with 8 panels covering approximately 21 square feet. The durable PVC material ensures moisture resistance, while a silicone sealant can further waterproof the tiles. Customer reviews highlight the high quality, professional look, and versatility of the product. However, some users noted challenges during the installation process.
Key Features
- Elegant do-it-yourself tiles with no-mess grout appearance
- Cover large areas with 25.6 in. x 14.8 in. x 5 mm panels
- Lightweight and durable PVC material
- 100% waterproof with a silicone sealant option
- Satisfaction guaranteed by Palisade
Specifications
- Color: Carrara Marble
- Dimension: 25.60Lx14.80Wx0.20H
- Size: Case of 25.6 in. x 14.8 in. Tiles
Pros
- Elegant, professional look with no-mess grout
- Large size panels for covering extensive areas
- Lightweight, durable, and 100% waterproof material
Cons
- Installation challenges noted in customer reviews
- High expense for returning products
- Difficulty in cutting the tiles
The Palisade Interlocking Vinyl Wall/Backsplash Tiles offer an affordable and elegant solution for DIY home improvement projects. Despite some installation challenges, these tiles provide a high-quality, professional look with their waterproof, lightweight, and durable design. While the return process may be costly, the satisfaction guarantee ensures a positive customer experience.

Overall Score: 8/10
The Tile Grout, 2 Pack White Grout Filler Tube, Grout Sealer is an efficient and easy-to-use solution for refreshing and renewing tile joints in your bathroom, shower, kitchen, or floor. This grout filler tube effectively prevents water and stains from remaining in the gaps while delivering a rich color. With an advanced water-based formula, it is safe to use on various surfaces. The complete kit includes everything you need for a quick and easy home improvement project. The product has received positive customer reviews for its ease of application and long-lasting results.
Key Features
- Advanced Formula
- Use Anywhere
- Safe And 3-Triple Protection
- Complete Kit
- Easy To Use
- After-Sales Service
Specifications
- Color: White
Pros
- Efficient and easy-to-use solution
- Safe on various surfaces
- Complete kit for home improvement projects
Cons
- May have slight odor during application
- Requires 24 hours to fully dry
The Tile Grout, 2 Pack White Grout Filler Tube, Grout Sealer is a highly effective and easy-to-use product for renewing and refreshing tile joints. It offers long-lasting results and has received positive customer reviews for its performance. With its advanced formula and complete kit, it provides a convenient solution for home improvement projects.

Overall Score: 7/10
Create a stunning backsplash or wall decoration with these imitation marble subway tiles that are easy to install. Made of waterproof, heat-resistant, and eco-friendly materials, these tiles are perfect for bathroom or kitchen use. The easy DIY application requires no grout, and the glossy finishing ensures a sleek, modern appearance. However, the tiles can be difficult to cut, and the shine may not be to everyone's taste.
Key Features
- PEEL AND STICK BACKSPLASH COVERAGE:2.3 mm thickness x 3.86"width x 7.80"length,4.84sqft total for 23 tiles one box
- WIDE USES PEEL AND STICK TILE:Waterproof stick on tiles bathroom wall, backsplash kitchen,interior wall decoration only
- WORTH BUYING PEEL AND STICK WALL TILES :imitation marble subway tile with glossy finishing,No broken edges,No grout..(This is imitation marbling tiles made of resin plastic, NOT real marble!)
- EASY CLEAN & MAINTAIN SUBWAY TILES:ideal peel and stick subway tile backsplash for bathroom,shower,Water proof, heat resistant,eco-friendly materials.Easy wipe to clean the dirts
- EASY DIY LARGE BACKSPLASH PEEEL AND STICK:Just peel and stick! Easy and freely cutting with utility knife or scissor. Super adhesion,can be sticked on walls or smooth surfaces( glass/metal panels,wood cabinet,wallpaper, painted wall,cement wall)
Specifications
- Color: Califonia Blue
- Dimensions: 7.80Lx3.86Wx0.04H
- Size: 23tiles/pack
Pros
- Waterproof and eco-friendly materials
- Easy to clean and maintain
- Realistic imitation marble appearance
Cons
- Difficult to cut, especially with a razor
- Shiny finish may not appeal to all
The BeNice Peel and Stick Backsplash Tiles are a practical and stylish choice for those wanting to create a modern, easy-to-clean surface in their bathroom or kitchen. While they may be challenging to cut and have a glossy finish that won’t appeal to everyone, the quality and overall appearance make them worth considering.

Overall Score: 8/10
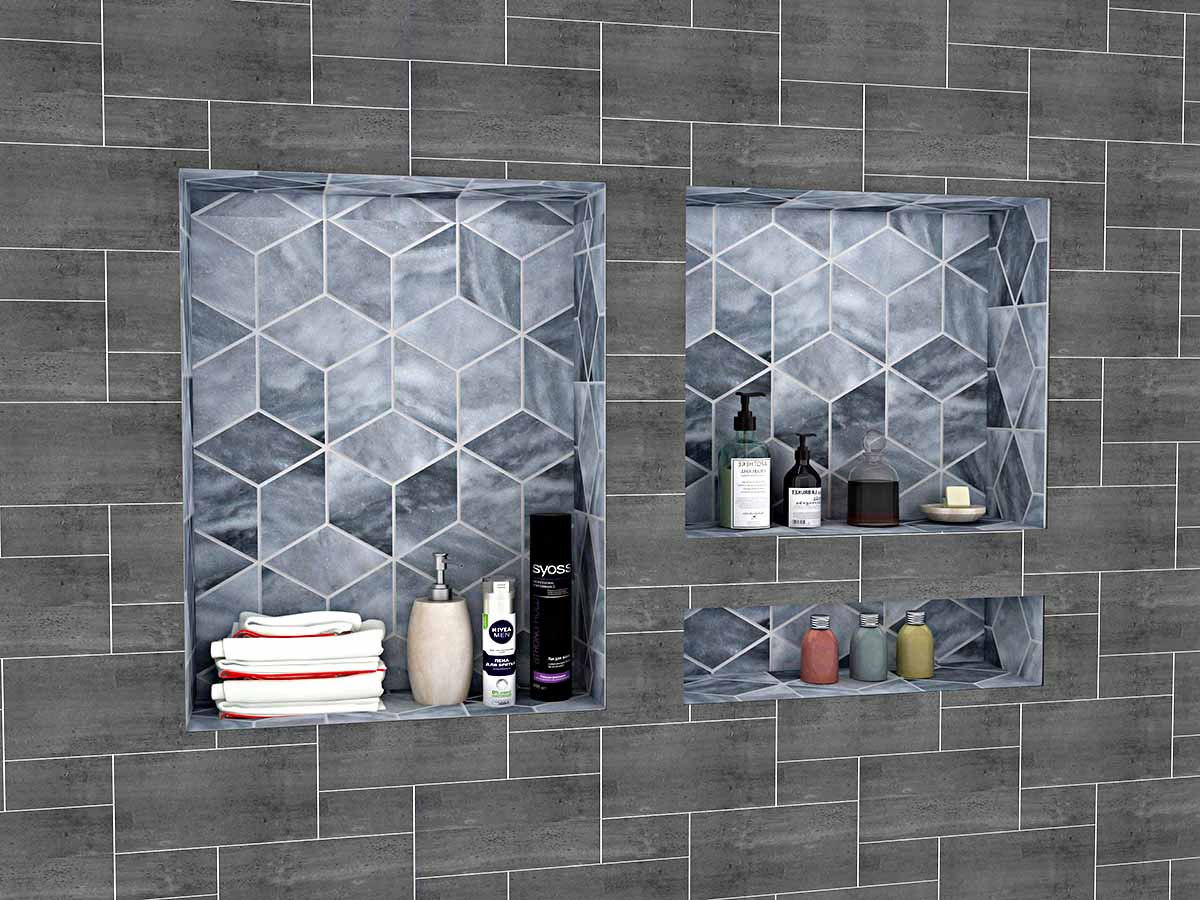
The Suteck Rectangle Shower Niche is a versatile and reliable shower shelf that is waterproof, leak-proof, and perfect for storing various bath and shower items. It is easy to install, and its sleek design adds a touch of elegance to any bathroom. The niche's durable construction ensures long-term use, and it can be installed both vertically and horizontally. Its wide usage makes it suitable for other areas of the home, such as cupboards and bookshelves. However, some users found it to be too large for small showers, and others found it challenging to tile. Overall, this niche offers convenience, functionality, and aesthetic appeal. It received a customer rating of 4.5 out of 5.
Key Features
- 17" x 25"x3.75” shower niche for convenient storage
- Square design for expanded indoor space and elegant look
- 100% waterproof and leak-proof construction
- Easy installation with over-mount or flush mount options
- Suitable for bathroom, cupboards, bookshelves, and more
Specifications
- Color: Black
- Dimension: 17.00Lx3.80Wx25.00H
- Size: 17"x25"
Pros
- Convenient and functional storage solution
- Waterproof and leak-proof construction
- Easy to install with versatile mounting options
- Suitable for various areas of the home
Cons
- May be too large for small showers
- Challenging for some users to tile
The Suteck Rectangle Shower Niche offers an excellent combination of functionality and style for bathroom storage. Its waterproof and leak-proof design, along with versatile installation options, make it a practical choice for homes. While it may be too large for some showers and challenging to tile for some users, it remains a durable and convenient solution for storing bath and shower items. Overall, this niche is a great addition to any bathroom, offering both practicality and aesthetic appeal.

Overall Score: 8/10
The Uni-Green Tile Shower Niche is a practical and elegant solution for storing bathing and showering products. Made from premium quality, durable ABS, this 16"X34" waterproof shelf is easy to install and fits any bathroom decor, providing a leak-free and hygienic environment. It can be mounted horizontally or vertically, offering a practical and elegant design. Safely store all your toiletries without having to worry about not having enough space.
Key Features
- Made from superior quality, durable ABS
- 100% leak-free and waterproof
- Easy installation with minimal material requirement
- Can be mounted either horizontally or vertically
Specifications
- Color: Yellow
- Dimension: 4.00Lx16.00Wx34.00H
- Size: 16"X34"
Pros
- Premium quality material
- Leak-free and waterproof
- Easy installation
Cons
- May not fit well in all shower designs
The Uni-Green Tile Shower Niche offers a practical and elegant solution for storing bathing and showering products. With its premium quality material and easy installation, it provides a leak-free and hygienic environment in any bathroom. While it may not fit well in all shower designs, its overall functionality and design make it a great addition to any bathroom.

Overall Score: 8/10
The VEVOR Ready to Tile Shower Seat is a solid and waterproof corner bench that offers stability and resistance to mold. Built from high-density EPS composite, it supports up to 440 lbs and is effortless to assemble. It can be cut to fit as required and comes with a 100% waterproof membrane. The bench aims to provide a relaxing and functional shower experience in any bathroom.
Key Features
- EPS Composite Construction
- 100% Waterproof Membrane
- Cut-to-fit Design
- Effortless Assembly
- Functional and Relaxing
Specifications
- Color: Grey
- Dimension: 22.40Lx16.00Wx20.00H
- Size: 22 inch
Pros
- Supports up to 440 lbs
- Waterproof membrane resistance to mold
- Effortless to assemble
- Functional and relaxing
Cons
- Foam particles when cut
- May require additional fabric for cutting
The VEVOR Ready to Tile Shower Seat offers a solid and functional addition to any shower installation or bathroom remodeling project. With its stability, waterproof membrane, and ease of assembly, it’s a great choice for those looking to enhance their bathroom experience without compromising on quality.

Overall Score: 8/10
The Uni-Green Tile Ready Shower Niche 32" Wx20 Hx4 D, Recessed Shower Shelf is a premium quality bathroom shelf made from durable ABS designed to last. It is 100% leak-free and waterproof, encouraging a hygienic environment. The shelf can be easily installed either vertically or horizontally. Its practical, elegant design allows for use in bathrooms, cupboards, bookshelves, kitchens, and more without taking up building area.
Key Features
- Combination Size: 32" W x 20"H x 4"D
- Premium quality material
- Durable & long-lasting
- Easy installation
- Practical and elegant design
Specifications
- Color: Yellow
- Dimension: 32.00Lx20.00Wx4.00H
- Size: 32"x20"x4"
Pros
- Premium quality and durability
- Leak-free and waterproof
- Easy to install
- Practical, elegant design
Cons
- Not suitable for tiling according to some users
- Few users experienced difficulties during installation
The Uni-Green Tile Ready Shower Niche 32″ Wx20 Hx4 D, Recessed Shower Shelf is an excellent choice for anyone in need of a durable, waterproof bathroom shelf. With its practical and elegant design, easy installation, and premium quality material, it promises to provide a sophisticated and hygienic solution for bathroom storage needs.
- Consider the material:
- Ceramic: Offers a wide range of options, easy maintenance, and affordable price.
- Porcelain: Durable, water-resistant, and great for high-traffic areas.
- Natural Stone: Provides a unique and luxurious look but requires more maintenance.
- Think about the size and shape:
- Standard subway tiles: Timeless and versatile.
- Mosaic tiles: Ideal for adding visual interest and texture.
- Large-format tiles: Creates a seamless and modern look.
- Evaluate the slip resistance:
- Look for tiles with a slip-resistance rating suitable for shower floors to prevent accidents.
- Consider the maintenance:
- Choose tiles that are easy to clean and maintain, especially in a wet and humid environment.
- Think about the grout:
- Consider using epoxy grout for better water resistance and less maintenance.
- Budget considerations:
- Keep in mind the cost of the tiles, installation, and any additional materials needed for the project.
- Waterproofing:
- Ensure that the shower tile and the installation process provide proper waterproofing to prevent water damage.
- Installation and maintenance costs:
- Factor in the cost of professional installation and any future maintenance to the overall budget.
- Aesthetic appeal:
- Choose tiles that complement the overall design and aesthetic of the bathroom.
- Lifespan and durability:
- Consider the durability and lifespan of the tiles to ensure they will last for years to come.
- Environmental impact:
- Look for eco-friendly options if sustainability is a priority.
- Grout color:
- Decide on a grout color that complements the tiles and enhances the overall look of the shower.
- Lighting considerations:
- Keep in mind how the tiles will interact with the lighting in the shower space.
- Unique features:
- Explore unique features such as textured tiles, patterns, or custom designs for a personalized touch.
- Compatibility with shower fixtures:
- Ensure that the chosen tiles work well with the shower fixtures and other bathroom elements.
Frequently Asked Questions about 8 Amazing Shower Tile For 2025
Not all tiles are suitable for shower use. It’s important to choose tiles specifically designed for wet and high-moisture areas to ensure durability and safety.
The ideal size depends on the look you want to achieve. Standard 3×6 inch subway tiles are classic, while large-format tiles can create a seamless and modern look.
Look for tiles with a slip-resistance rating suitable for shower floors. Proper cleaning and maintenance also play a role in preventing slippery surfaces.
It’s recommended to seal natural stone tiles to protect them from water damage and staining. Porcelain and ceramic tiles may not require sealing, but the grout should be sealed for added protection.
With proper installation and maintenance, shower tiles can last for many years. The lifespan may vary depending on the material and quality of the tiles.
Was this page helpful?
Trust Storables.com for unbiased and honest product reviews. Our reviews are rigorously assessed by our Expert Board Contributors and adhere to strict Editorial Standards. We ensure that each review is transparent and trustworthy, helping you make informed purchasing decisions.