Home>Maintenance & Safety>Child & Elderly Safety at Home>How To Pack A Booster Seat For Checked Baggage
Child & Elderly Safety at Home
How To Pack A Booster Seat For Checked Baggage
Modified: October 20, 2024
Learn how to properly pack a booster seat for checked baggage to ensure child and elderly safety at home. Follow these tips for secure and convenient travel.
(Many of the links in this article redirect to a specific reviewed product. Your purchase of these products through affiliate links helps to generate commission for Storables.com, at no extra cost. Learn more)
Introduction
When it comes to traveling with young children, ensuring their safety is a top priority. This is especially true when it comes to packing and transporting essential items such as booster seats. Whether you're embarking on a family vacation or visiting relatives, knowing how to properly pack a booster seat for checked baggage is crucial for maintaining its integrity and safety.
Booster seats play a vital role in providing young children with the necessary support and protection while traveling in vehicles. However, when it comes to air travel, packing a booster seat for checked baggage requires careful consideration and attention to detail. By following the right steps, you can ensure that the booster seat arrives at your destination in excellent condition, ready to provide the safety and comfort your child deserves.
In the following guide, we will walk you through the essential steps for properly packing a booster seat for checked baggage. From cleaning and disassembling the booster seat to selecting the right packaging materials and adhering to airline regulations, each step is designed to help you safeguard the booster seat during its journey in the cargo hold. By taking the time to pack the booster seat correctly, you can have peace of mind knowing that your child's safety equipment is well-protected and ready for use upon arrival.
So, let's delve into the details of how to pack a booster seat for checked baggage, ensuring that it remains secure and intact throughout the travel process. Whether you're a seasoned traveler or preparing for your first family trip, these guidelines will equip you with the knowledge and confidence to safeguard your child's booster seat during air travel.
Key Takeaways:
- Properly cleaning, disassembling, and securing a booster seat before packing it for checked baggage ensures it arrives safely, ready to protect your child during travel. Follow these steps for peace of mind.
- Labeling, choosing the right packaging, and checking weight and size restrictions are crucial for a smooth travel experience with a booster seat. Take proactive measures to prioritize your child’s safety and well-being.
Read more: How To Anchor A Booster Seat
Step 1: Clean the Booster Seat
Before packing a booster seat for checked baggage, it's essential to ensure that it's clean and free from any debris or stains. Cleaning the booster seat not only maintains hygiene but also prevents the transfer of dirt and grime to other items during transit. Here's how to effectively clean the booster seat:
-
Remove Fabric Covers: If your booster seat has fabric covers, carefully remove them according to the manufacturer's instructions. Most covers can be machine-washed or spot-cleaned, so be sure to check the care label for specific cleaning guidelines.
-
Vacuum Thoroughly: Use a handheld vacuum or vacuum cleaner with a brush attachment to remove crumbs, dust, and other debris from the booster seat. Pay close attention to the crevices and seams where dirt tends to accumulate.
-
Wipe Down Hard Surfaces: For plastic or hard surfaces, use a mild detergent and warm water to wipe down the entire booster seat. Ensure that the detergent is safe for the materials used in the booster seat to avoid any damage.
-
Sanitize if Necessary: If the booster seat has been in contact with illness or has visible stains, consider using a child-safe disinfectant to sanitize the surfaces. Be sure to follow the disinfectant's instructions and allow sufficient drying time.
-
Air-Dry Completely: After cleaning, allow the booster seat and fabric covers to air-dry thoroughly in a well-ventilated area. This step is crucial to prevent mold or mildew growth during transit.
By thoroughly cleaning the booster seat, you not only ensure a hygienic travel environment for your child but also prevent any potential issues that may arise from transporting a soiled or dirty booster seat. Once the booster seat is clean and dry, you can proceed to the next steps of disassembling and preparing it for packing.
Cleaning the booster seat is an essential first step in the process of preparing it for checked baggage. By following these cleaning guidelines, you can rest assured that your child's booster seat is ready to be packed securely for its journey in the cargo hold.
Step 2: Disassemble the Booster Seat
Disassembling the booster seat is a crucial step in preparing it for safe transport in checked baggage. By breaking down the components and separating them as needed, you can minimize the risk of damage and ensure that the booster seat fits securely within the packaging. Here's a detailed guide on how to disassemble the booster seat effectively:
-
Refer to the Manufacturer's Instructions: Start by consulting the manufacturer's manual or guidelines for disassembling the booster seat. Different models may have specific disassembly instructions, such as removing adjustable armrests, detachable cup holders, or other removable components. Adhering to the manufacturer's recommendations ensures that you disassemble the booster seat correctly without causing any damage.
-
Detach Removable Parts: Identify any removable parts or accessories attached to the booster seat, such as harness systems, seat pads, or additional padding. Carefully detach these components according to the manufacturer's instructions. For booster seats with adjustable features, such as height or width adjustments, ensure that these elements are returned to their original positions or removed as directed.
-
Secure Small Parts: As you disassemble the booster seat, take special care to secure small parts and hardware. Utilize resealable plastic bags or small containers to store screws, bolts, or other fasteners that are removed during the disassembly process. Label each bag or container with the corresponding components to simplify reassembly at your destination.
-
Inspect for Wear and Tear: While disassembling the booster seat, take the opportunity to inspect each component for any signs of wear, damage, or potential issues. Check for loose screws, cracked plastic parts, or fraying in the fabric covers. Identifying any concerns at this stage allows you to address them before packing the booster seat, ensuring that it remains in optimal condition for future use.
-
Organize Components for Packing: Once all removable parts are detached and secured, organize the components in a logical manner for packing. Stack or arrange the disassembled parts in a way that minimizes excess space and prevents shifting during transit. This organized approach not only conserves space but also contributes to the overall stability of the packed booster seat.
By following these steps to disassemble the booster seat, you can effectively prepare it for safe and secure packing in checked baggage. This meticulous approach not only safeguards the booster seat from potential damage but also streamlines the reassembly process upon reaching your destination. With the booster seat disassembled and ready for packing, you can proceed to the next steps of securing loose parts and selecting appropriate packaging materials.
Step 3: Secure Loose Parts
Ensuring that all loose parts of the booster seat are properly secured is essential for preventing damage and minimizing the risk of components getting lost during transit. Here's a detailed guide on how to effectively secure loose parts before packing the booster seat for checked baggage:
-
Utilize Resealable Bags or Containers: As you disassemble the booster seat, use resealable plastic bags or small containers to store any screws, bolts, nuts, or other small hardware that were removed. It's important to label each bag or container with the corresponding components to facilitate easy reassembly at your destination. This organized approach not only prevents the loss of small parts but also simplifies the unpacking process.
-
Secure Loose Straps and Harnesses: If the booster seat features adjustable straps, harnesses, or other flexible components, ensure that they are neatly secured to the main structure of the seat. Use Velcro straps or twist ties to bundle and secure any loose straps, preventing them from tangling or causing potential damage during transit.
-
Protective Padding for Fragile Parts: For components that are particularly fragile or prone to damage, such as adjustable mechanisms or delicate fabric covers, consider adding an extra layer of protective padding. This can be achieved by wrapping these parts in bubble wrap or soft cloth before securing them within the packaging. The added cushioning helps safeguard vulnerable components from impact and friction.
-
Inspect and Double-Check: Before finalizing the packing process, take a moment to inspect the disassembled components and ensure that all loose parts are properly secured. Double-check the contents of each bag or container to verify that no small hardware or essential components have been overlooked. This meticulous inspection minimizes the risk of missing parts and contributes to a seamless reassembly experience at your destination.
By meticulously securing all loose parts of the booster seat, you can significantly reduce the likelihood of damage or loss during transit. This proactive approach not only safeguards the integrity of the booster seat but also sets the stage for a smooth reassembly process upon reaching your destination. With the loose parts securely organized and protected, the booster seat is now ready to be packed using appropriate packaging materials.
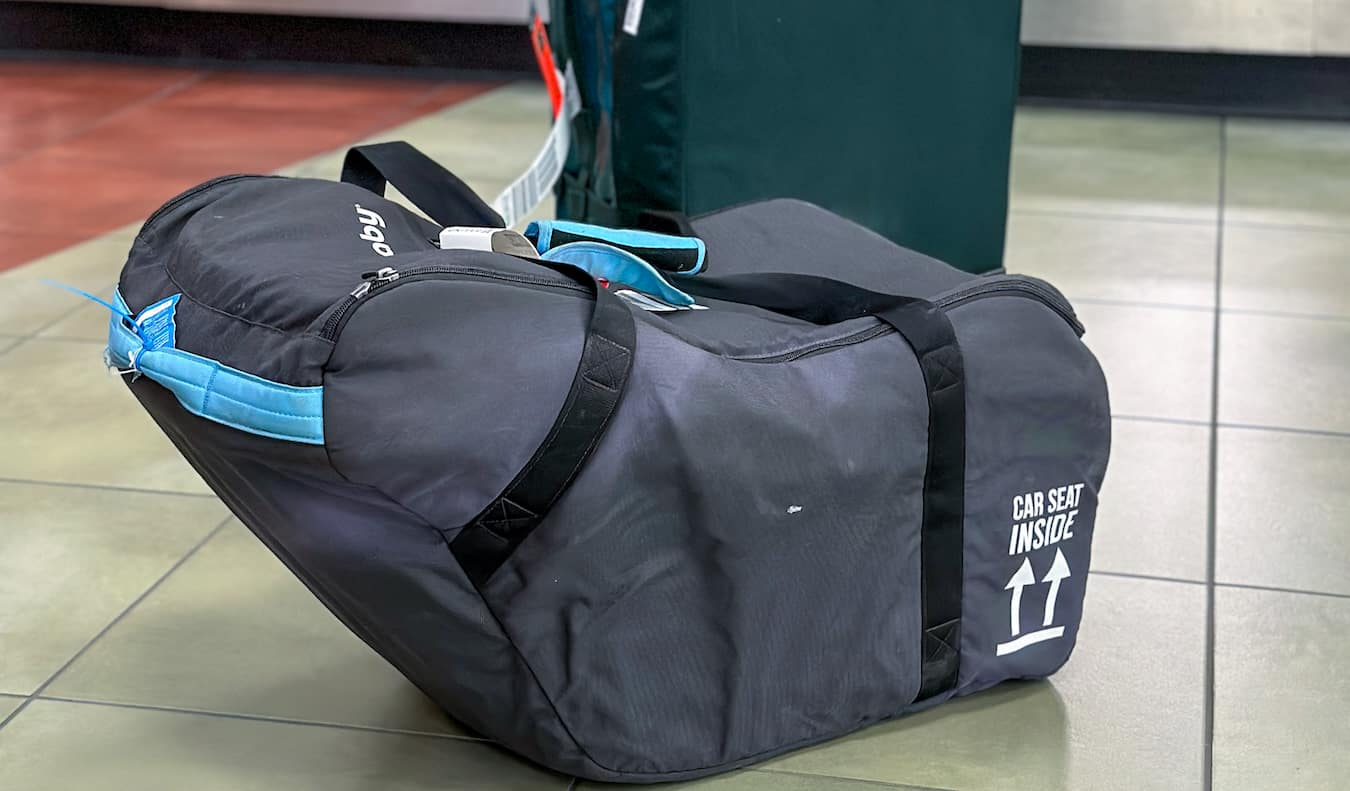
Step 4: Use a Protective Bag or Cover
Once the booster seat is cleaned, disassembled, and loose parts are secured, the next crucial step is to provide an additional layer of protection by using a suitable protective bag or cover. This step is essential for safeguarding the booster seat from potential scratches, abrasions, or exposure to external elements during its journey in checked baggage.
Here's a detailed guide on how to effectively use a protective bag or cover for the booster seat:
-
Select a Durable Bag or Cover: Choose a protective bag or cover that is durable, tear-resistant, and appropriately sized to accommodate the disassembled components of the booster seat. Opt for a material that provides a level of padding to cushion the seat and its parts from impact and friction during handling.
-
Consider Waterproof Options: If there is a possibility of the booster seat being exposed to moisture or inclement weather during transit, consider using a waterproof protective bag or cover. This additional feature helps shield the booster seat from potential water damage, especially when stored in cargo areas that may be susceptible to environmental elements.
-
Wrap Individual Components: Before placing the disassembled parts into the protective bag or cover, consider wrapping each component in soft cloth or bubble wrap for added protection. This extra layer of cushioning helps minimize the risk of impact damage and prevents components from rubbing against each other during transit.
-
Secure the Bag or Cover: Once the disassembled components are carefully placed inside the protective bag or cover, ensure that it is securely sealed or fastened to prevent any shifting or movement during handling. If using a bag with a zipper closure, double-check that it is fully closed and secure to contain the contents effectively.
-
Label the Bag or Cover: To facilitate easy identification and handling, consider labeling the protective bag or cover with essential information such as the owner's name, contact details, and a clear indication that it contains a booster seat. This labeling ensures that the booster seat is handled with care and can be easily identified upon arrival.
By using a protective bag or cover in the packing process, you provide an additional layer of defense for the booster seat, safeguarding it from potential damage and external factors during transit. This proactive measure contributes to maintaining the integrity of the booster seat and ensures that it arrives at its destination in optimal condition, ready for reassembly and use.
With the booster seat securely protected in a suitable bag or cover, the next steps involve labeling the seat and selecting the appropriate packaging materials for its safe transport in checked baggage.
Read more: How To Use A Booster Seat
Step 5: Label the Booster Seat
Labeling the booster seat is a crucial step in the process of preparing it for checked baggage. Proper labeling not only facilitates efficient handling and identification but also ensures that the booster seat receives the necessary care and attention during transit. Here's a detailed guide on how to effectively label the booster seat for its journey in checked baggage:
-
Owner's Information: Begin by securely attaching a label or tag that includes the owner's name, contact details, and destination address. This information is essential for identification and serves as a point of contact in case of any handling inquiries or if the booster seat needs to be reunited with its owner.
-
Special Handling Instructions: If the booster seat has specific handling requirements or fragile components, consider including special handling instructions on the label. For example, if there are delicate parts that require gentle handling or specific orientation during transport, clearly communicate these instructions on the label to ensure that the booster seat is treated with the necessary care.
-
Flight Details: If the booster seat is being transported as part of air travel, it's beneficial to include the flight details on the label. This may include the flight number, departure and arrival airports, as well as any connecting flight information. Providing these details can assist airline personnel in tracking and managing the booster seat's transit effectively.
-
Fragile or Child Equipment Label: In addition to owner information, consider affixing a "fragile" or "child equipment" label to the booster seat. These labels alert handling personnel to exercise caution and prioritize the safe handling of the booster seat, recognizing its importance as a child safety item.
-
Baggage Claim Information: If applicable, include the owner's baggage claim information on the label. This can be particularly useful for air travel, as it helps streamline the process of locating and retrieving the booster seat upon arrival at the destination airport.
By meticulously labeling the booster seat with the necessary information and handling instructions, you enhance its visibility, ensure proper care during transit, and streamline the retrieval process at the destination. This proactive approach contributes to the overall safety and security of the booster seat, setting the stage for a smooth and efficient journey in checked baggage.
Step 6: Choose the Right Box or Bag
Selecting the appropriate box or bag for packing the booster seat is a critical decision that directly impacts the safety and security of the item during transit. The chosen container should provide adequate protection, structural integrity, and compatibility with airline regulations. Here's a detailed guide on how to choose the right box or bag for packing the booster seat for checked baggage:
Box Selection:
-
Sturdy and Durable: When opting for a box, ensure that it is made of sturdy, durable material that can withstand the rigors of handling and transport. Corrugated cardboard boxes are often a reliable choice due to their strength and impact resistance.
-
Appropriate Size: Select a box that accommodates the disassembled components of the booster seat without excessive empty space. A snug fit minimizes movement within the box, reducing the risk of damage during transit.
-
Reinforced Corners: Look for a box with reinforced corners and edges, as these areas are particularly susceptible to impact and compression. Reinforcements enhance the structural integrity of the box, providing added protection for the booster seat.
-
Secure Closure: Choose a box with a secure closure mechanism, such as strong packing tape or adhesive strips. A properly sealed box prevents accidental opening and helps maintain the integrity of the packaging throughout the journey.
Bag Considerations:
-
Padded and Protective: If opting for a bag, select one that offers sufficient padding and protection for the booster seat. Look for bags specifically designed for transporting child safety equipment, as they often feature reinforced padding and impact-resistant materials.
-
Water-Resistant: Consider a water-resistant bag to shield the booster seat from moisture and environmental elements. This feature is particularly important for air travel, where baggage may be exposed to varying weather conditions during loading and unloading.
-
Adjustable and Secure Straps: If the bag includes straps for carrying or securing the contents, ensure that they are adjustable and securely fastened. This feature allows for a customized fit and prevents shifting of the booster seat within the bag.
Read more: How To Remove A Booster Seat
Compliance with Airline Regulations:
-
Check Size and Weight Limits: Before finalizing the selection of a box or bag, verify the size and weight restrictions imposed by the airline. Ensure that the chosen container complies with the airline's guidelines to avoid any issues during check-in and transport.
-
Review Specific Policies: Some airlines may have specific policies regarding the packaging of child safety equipment. Review the airline's guidelines to ensure that the chosen box or bag meets their requirements, including any labeling or documentation specifications.
By carefully considering these factors and selecting the right box or bag for packing the booster seat, you can ensure that it is well-protected and compliant with airline regulations. This proactive approach sets the stage for a secure and seamless journey in checked baggage, providing peace of mind for the safety of the booster seat during transit.
Step 7: Pack the Booster Seat
Packing the booster seat is a critical step that requires careful attention to detail and a methodical approach to ensure its safety and integrity during transit. Here's a comprehensive guide on how to effectively pack the booster seat for checked baggage:
Assemble the Components
Begin by arranging the disassembled components of the booster seat in a logical and organized manner. Place the main structure of the seat securely at the bottom of the chosen box or bag, ensuring that it sits flat and stable. Next, carefully position the secured loose parts, such as screws, bolts, and detached accessories, alongside the main structure. If using a bag, arrange the components to distribute weight evenly and prevent shifting during handling.
Utilize Padding and Cushioning
To provide an additional layer of protection, use soft padding and cushioning materials to fill any empty spaces within the box or bag. This can include packing peanuts, bubble wrap, or foam inserts strategically placed to support and cushion the booster seat components. Pay special attention to fragile or delicate parts, ensuring that they are surrounded by sufficient padding to minimize the risk of impact damage.
Read more: How To Turn A Car Seat Into A Booster Seat
Secure the Contents
Once the components and padding are in place, secure the contents within the box or bag to prevent movement during transit. If using a box, fill any remaining voids with additional padding to eliminate empty spaces and maintain the stability of the packed booster seat. Seal the box securely with high-quality packing tape, ensuring that all edges and seams are reinforced. For a bag, utilize adjustable straps or fastenings to secure the contents and minimize shifting.
Double-Check for Stability
Before finalizing the packing process, perform a thorough inspection to ensure that the booster seat and its components are securely positioned and well-supported within the packaging. Gently shake the box or bag to assess stability and identify any potential movement. Make any necessary adjustments to the padding or arrangement of components to enhance stability and minimize the risk of shifting during transit.
Compliance with Weight and Size Restrictions
Verify that the packed booster seat complies with the weight and size restrictions specified by the airline. If necessary, weigh the packed box or bag to ensure that it falls within the allowable limits. Adhering to these restrictions is essential to avoid any issues during check-in and transport, ensuring a smooth and hassle-free experience.
By following these detailed steps to pack the booster seat for checked baggage, you can safeguard its safety and structural integrity throughout its journey. This meticulous approach sets the stage for a secure and well-protected transit, providing peace of mind for the proper handling and arrival of the booster seat at its destination.
Step 8: Seal the Box or Bag
Sealing the box or bag effectively is a crucial step in the process of preparing the booster seat for checked baggage. A securely sealed container not only protects the contents from potential damage but also ensures that the packaging remains intact throughout the journey. Here's a detailed guide on how to seal the box or bag with precision and care:
Read more: How To Install A Cosco Booster Seat
Box Sealing:
When using a box to pack the booster seat, it's essential to employ a sealing method that provides maximum security and structural reinforcement. Here are the key steps to seal the box effectively:
-
High-Quality Packing Tape: Use high-quality packing tape that is durable and resistant to tearing. Reinforce all seams and edges of the box with multiple layers of tape to enhance its strength and integrity.
-
Secure Corners and Flaps: Pay special attention to the corners and flaps of the box, as these areas are susceptible to stress and impact during handling. Ensure that the corners are securely taped, and the flaps are tightly sealed to prevent accidental opening.
-
Uniform Tension: Apply the packing tape with uniform tension to create a consistent and secure seal. Avoid leaving any gaps or loose sections that could compromise the integrity of the packaging.
-
Double-Check Seams: After sealing the box, double-check all seams and edges to verify that they are adequately reinforced. Gently press along the taped areas to ensure that the adhesive bonds firmly with the box material.
Bag Sealing:
When using a bag to pack the booster seat, the sealing process is equally critical for maintaining the security and stability of the contents. Here's how to seal the bag effectively:
-
Zipper Closure: If the bag features a zipper closure, ensure that it is fully engaged and securely fastened. Run the zipper along the closure track multiple times to confirm that it is properly sealed from end to end.
-
Check for Snags: Inspect the zipper for any snags or obstructions that could hinder its smooth operation. Address any snags by gently realigning the zipper teeth and ensuring that they interlock seamlessly.
-
Reinforce Straps and Fastenings: If the bag includes adjustable straps or fastenings, verify that they are tightened and secured to prevent any movement of the contents. Double-check the stability of the straps to minimize shifting during handling.
-
Waterproof Sealing: For bags designed to be water-resistant, confirm that the sealing mechanisms effectively repel moisture and provide a protective barrier against environmental elements.
By meticulously sealing the box or bag with attention to detail and precision, you can fortify the packaging and safeguard the booster seat during its journey in checked baggage. This proactive approach contributes to the overall security and integrity of the packed contents, ensuring a smooth and well-protected transit experience.
Step 9: Add Fragile Stickers
Adding fragile stickers to the packed box or bag containing the booster seat is a critical measure that communicates the delicate nature of the contents to handling personnel. Fragile stickers serve as a visual indicator, prompting careful and gentle handling throughout the transit process. Here's a detailed overview of the significance and application of fragile stickers for the packed booster seat:
Importance of Fragile Stickers
Fragile stickers play a pivotal role in alerting individuals involved in the handling and transportation of baggage to exercise heightened caution and delicacy. By prominently displaying fragile stickers on the exterior of the packaging, the sensitivity and vulnerability of the booster seat are effectively communicated. This visual cue prompts handlers to prioritize the safe and gentle treatment of the package, reducing the risk of rough handling or mishaps that could compromise the integrity of the contents.
Read more: How Tall For A Backless Booster Seat
Application and Placement
When affixing fragile stickers to the packed box or bag, it's essential to ensure their prominent visibility and clear identification. Here are key considerations for the application and placement of fragile stickers:
-
Strategic Positioning: Place fragile stickers on multiple sides of the box or bag to maximize visibility from various angles. This comprehensive approach ensures that the fragile designation is unmistakably communicated, regardless of the orientation of the package during handling and storage.
-
Clear and Legible: Select fragile stickers with clear, bold lettering and unmistakable graphics. The wording and imagery should effectively convey the fragile nature of the contents, leaving no room for ambiguity. Legible stickers enhance the effectiveness of the visual cue, prompting handlers to exercise heightened care.
-
Secure Adhesion: Ensure that the fragile stickers are securely adhered to the packaging, free from wrinkles, tears, or peeling edges. A firmly affixed sticker maintains its visibility and communicates the fragile designation throughout the entirety of the transit journey.
Handling Instructions
In addition to fragile stickers, consider including handling instructions on the packaging to reinforce the message of delicate contents. Phrases such as "Handle with Care" or "Fragile – Child Safety Equipment" provide supplementary guidance to handling personnel, emphasizing the importance of gentle treatment and cautious maneuvering.
By adding fragile stickers to the packed box or bag containing the booster seat, you enhance the visibility of its delicate nature and prompt careful handling throughout the transit process. This proactive measure contributes to the overall safety and security of the booster seat, ensuring that it arrives at its destination in optimal condition, ready for immediate use.
Step 10: Check the Weight and Size Restrictions
Before finalizing the packing of the booster seat for checked baggage, it is crucial to meticulously verify the weight and size restrictions imposed by the airline. Adhering to these regulations is essential to ensure a smooth and hassle-free experience during check-in, handling, and transport. Here's a comprehensive overview of the significance and process of checking the weight and size restrictions for the packed booster seat:
Importance of Compliance
Airline weight and size restrictions for checked baggage are established to maintain safety, operational efficiency, and fair allocation of cargo space. By adhering to these restrictions, passengers contribute to the overall balance and capacity management of the aircraft's cargo hold. Compliance with weight and size limits also minimizes the risk of additional fees, delays, or logistical complications at the airport.
Read more: How To Secure A Backless Booster Seat
Verifying Weight Limits
Carefully weigh the packed box or bag containing the booster seat using a reliable luggage scale. Ensure that the total weight falls within the specified limits set by the airline. It is essential to account for the weight of the packaging materials in addition to the booster seat itself. If the weight exceeds the allowable limit, consider redistributing items or utilizing alternative packaging to achieve compliance.
Assessing Size Constraints
Measure the dimensions of the packed box or bag to confirm that it complies with the airline's size restrictions for checked baggage. This involves determining the length, width, and height of the packaging. It is crucial to account for any protruding elements or irregularities that may impact the overall dimensions. Verify that the packed booster seat fits within the specified size parameters to avoid any issues during check-in and transport.
Reviewing Airline Policies
Thoroughly review the airline's specific policies and guidelines regarding weight and size restrictions for checked baggage. Different carriers may have varying limits and regulations, including allowances for additional child safety equipment. Familiarize yourself with the airline's requirements to ensure full compliance and prevent any unforeseen challenges during the travel process.
Adjusting as Necessary
If the packed booster seat exceeds the weight or size limits, consider making adjustments to achieve compliance. This may involve redistributing items between multiple pieces of luggage, repackaging the booster seat in a more compact manner, or exploring alternative transportation options for oversized or overweight items. By proactively addressing any discrepancies, you can avoid potential complications and ensure a seamless travel experience.
By meticulously checking the weight and size restrictions for the packed booster seat, you can ensure full compliance with airline regulations and mitigate the risk of any issues during check-in and transport. This proactive approach contributes to a smooth and efficient travel experience, providing peace of mind for the secure and hassle-free transit of the booster seat in checked baggage.
Read more: Which Booster Seat Is Best?
Conclusion
In conclusion, ensuring the safe and secure packing of a booster seat for checked baggage is a vital aspect of traveling with young children. By following the comprehensive steps outlined in this guide, parents and caregivers can take proactive measures to safeguard the integrity of the booster seat and prioritize the safety of their child during transit.
From the initial step of cleaning the booster seat to the meticulous process of disassembling, securing loose parts, and selecting appropriate packaging materials, each stage is designed to minimize the risk of damage and ensure that the booster seat arrives at its destination in optimal condition. The inclusion of fragile stickers and adherence to weight and size restrictions further enhance the safety and compliance of the packed booster seat.
By emphasizing the importance of thorough cleaning, strategic disassembly, and secure packaging, this guide empowers travelers to navigate the complexities of preparing a booster seat for checked baggage with confidence and precision. The incorporation of protective measures, such as labeling, fragile stickers, and compliance verification, underscores the commitment to prioritizing child safety and well-being throughout the travel process.
Ultimately, the goal of packing a booster seat for checked baggage is to provide peace of mind for parents and caregivers, knowing that their child's safety equipment is well-protected and ready for use upon arrival. By adhering to the guidelines outlined in this guide, families can embark on their journeys with the assurance that their child's booster seat will withstand the rigors of transit and continue to serve its essential role in providing comfort and protection.
As travelers prepare for their adventures, the conscientious packing of a booster seat for checked baggage aligns with the overarching commitment to child safety and well-being. By integrating these best practices into their travel preparations, families can embark on their journeys with confidence, knowing that their child's safety equipment is safeguarded and secure throughout the travel process.
Frequently Asked Questions about How To Pack A Booster Seat For Checked Baggage
Was this page helpful?
At Storables.com, we guarantee accurate and reliable information. Our content, validated by Expert Board Contributors, is crafted following stringent Editorial Policies. We're committed to providing you with well-researched, expert-backed insights for all your informational needs.
0 thoughts on “How To Pack A Booster Seat For Checked Baggage”