Home>Technology>Security & Surveillance>How To Remove A Yale Smart Lock
Security & Surveillance
How To Remove A Yale Smart Lock
Modified: March 1, 2024
Learn how to remove a Yale smart lock for your security and surveillance needs with our step-by-step guide. Keep your home safe and secure with these expert tips.
(Many of the links in this article redirect to a specific reviewed product. Your purchase of these products through affiliate links helps to generate commission for Storables.com, at no extra cost. Learn more)
Introduction
Removing a Yale smart lock may seem like a daunting task, but with the right guidance and tools, it can be a straightforward process. Whether you're looking to replace the lock, perform maintenance, or troubleshoot an issue, knowing how to remove it properly is essential.
In this guide, we'll walk you through the step-by-step process of removing a Yale smart lock from your door. Before diving into the removal process, it's crucial to gather the necessary tools and familiarize yourself with the lock's components. With the right approach and a bit of patience, you'll be able to successfully remove the Yale smart lock without hassle.
So, let's roll up our sleeves and get ready to tackle the task at hand. With the information provided in this guide, you'll gain the confidence and know-how to remove your Yale smart lock efficiently and safely. Let's get started!
Key Takeaways:
- Removing a Yale smart lock is a manageable task with the right tools and steps. By carefully disconnecting wiring and handling components, you can safely and confidently complete the removal process.
- Before removing a Yale smart lock, gather essential tools and consider potential troubleshooting scenarios. Organizing components and preparing for reinstallation can streamline the process and set the stage for future security enhancements.
Read more: How To Reset Yale Smart Lock
Step 1: Gather Necessary Tools
Before beginning the process of removing a Yale smart lock, it's essential to gather the necessary tools to ensure a smooth and efficient removal. Here are the tools you'll need:
- Screwdriver: A screwdriver, typically Phillips or flat-head, will be required to remove the screws securing the lock to the door.
- Replacement Batteries: If you plan to replace the batteries in the smart lock, have the new batteries on hand.
- Replacement Smart Lock (Optional): If you are removing the Yale smart lock for replacement purposes, ensure that the new lock is ready for installation.
- Container: Have a container or small bag ready to store the screws and small components removed during the process. This will help prevent any pieces from getting lost.
- Work Gloves (Optional): While not essential, wearing work gloves can provide added grip and protection during the removal process.
By having these tools prepared and within reach, you can streamline the removal process and minimize any potential disruptions. With the tools in hand, you're now ready to proceed to the next step of removing the Yale smart lock from your door.
Step 2: Remove the Yale Smart Lock from the Door
Now that you have gathered the necessary tools, it’s time to begin the process of removing the Yale smart lock from the door. Follow these steps carefully to ensure a successful removal:
- Locate the Screws: Using the appropriate screwdriver, carefully remove the screws that secure the Yale smart lock to the door. Place the screws in the container or bag to keep them safe for reassembly.
- Separate the Lock: Once the screws are removed, gently separate the smart lock from the door. Be mindful of any wiring or connections that may still be attached.
- Handle the Wiring: If the smart lock is wired, carefully disconnect the wiring from the door. Take note of the connections to ensure proper reattachment if needed in the future.
- Set Aside the Smart Lock: After removing the lock from the door and handling any wiring, set the smart lock aside in a safe location. This will prevent any accidental damage during the next steps of the removal process.
By following these steps, you can safely remove the Yale smart lock from the door without causing any damage to the lock or the door itself. With the lock successfully removed, you can proceed to the next steps in the removal process, which involve disconnecting the wiring and removing the mounting plate.
Step 3: Disconnect the Wiring
After removing the Yale smart lock from the door, the next crucial step is to disconnect any wiring associated with the lock. Here’s how to proceed:
- Identify the Wiring: Carefully locate and identify the wiring connected to the smart lock. This may include power cables, data cables, or any other connections specific to the lock’s functionality.
- Handle with Care: When disconnecting the wiring, exercise caution and handle the cables gently to avoid any damage. If the wiring is secured with clips or fasteners, carefully release them to free the cables.
- Label the Wiring (Optional): If necessary, consider labeling the wiring or taking note of the connections to facilitate reinstallation or troubleshooting in the future. This extra step can be particularly helpful if the wiring is intricate or if multiple cables are involved.
- Secure the Wiring: Once the wiring is disconnected, ensure that it is secured and kept away from any potential hazards. This will prevent accidental damage and make the subsequent steps of the removal process more manageable.
By following these steps, you can safely and effectively disconnect the wiring from the Yale smart lock, preparing it for the next phase of the removal process. With the wiring handled appropriately, you can proceed confidently to the subsequent steps, which involve removing the mounting plate and addressing any troubleshooting considerations.
Before removing a Yale Smart Lock, make sure to have the necessary tools such as a screwdriver and batteries. Follow the manufacturer’s instructions carefully to avoid damaging the lock or door.
Step 4: Remove the Mounting Plate
With the wiring disconnected, the next step in the process of removing a Yale smart lock is to address the mounting plate. Follow these steps to successfully remove the mounting plate:
- Locate the Mounting Plate: Identify the mounting plate attached to the door, typically positioned behind the smart lock. The plate may be secured with screws or additional fasteners.
- Remove the Screws: Using the appropriate screwdriver, carefully remove any screws securing the mounting plate to the door. Place the screws in the designated container to prevent misplacement.
- Gently Detach the Plate: Once the screws are removed, gently detach the mounting plate from the door. Exercise caution to avoid any damage to the door’s surface during this process.
- Inspect the Area: After removing the mounting plate, take a moment to inspect the area behind the smart lock. Ensure that it is clean and free of any debris or obstructions that may hinder the installation of a new lock or affect the door’s functionality.
By following these steps, you can effectively remove the mounting plate, clearing the way for any subsequent actions such as installing a new smart lock or addressing maintenance tasks. With the mounting plate successfully removed, you’re one step closer to completing the removal process with confidence and precision.
Read more: How To Change Code On Yale Smart Lock
Step 5: Troubleshooting and Tips
As you navigate through the process of removing a Yale smart lock, it’s essential to consider potential troubleshooting scenarios and helpful tips to ensure a smooth removal process. Here are some valuable insights to guide you:
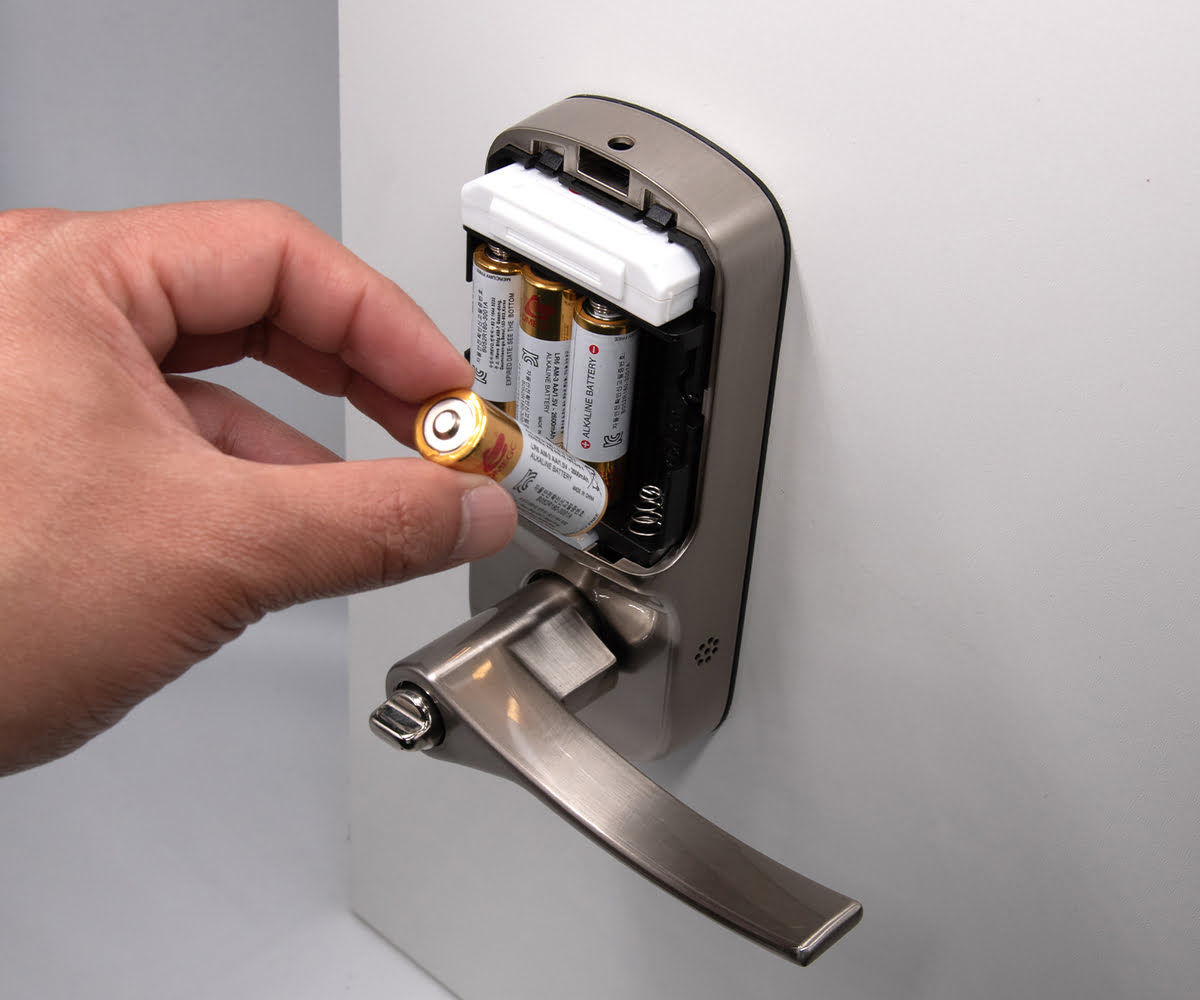
- Check for Residual Power: Before handling the wiring, verify that the smart lock is not receiving any power to prevent electrical mishaps. If the lock is battery-operated, ensure that the batteries are removed before proceeding.
- Review the Manufacturer’s Guide: Refer to the manufacturer’s guide or online resources for specific instructions on removing the Yale smart lock model you are working with. This can provide valuable insights tailored to your lock’s design.
- Inspect for Wear and Tear: While removing the lock, take the opportunity to inspect its components for any signs of wear, damage, or corrosion. Identifying such issues early can prompt timely maintenance or replacement as needed.
- Organize Components: Keep the removed screws, wiring, and components organized and labeled if necessary. This will streamline the reassembly process or facilitate troubleshooting should the need arise.
- Prepare for Reinstallation: If you intend to reinstall a smart lock or a new model, ensure that the door and surrounding components are prepared for the installation process. Address any maintenance or adjustments before proceeding.
By being mindful of these troubleshooting considerations and implementing the provided tips, you can enhance the overall removal experience and set the stage for future steps, whether it involves reinstallation, maintenance, or upgrading to a new smart lock model.
Conclusion
Congratulations! You’ve successfully navigated through the process of removing a Yale smart lock from your door. By following the step-by-step guide and utilizing the necessary tools, you’ve effectively completed the removal process with precision and care.
As you reflect on this accomplishment, consider the newfound knowledge and confidence you’ve gained in handling smart lock removal procedures. Whether you’re replacing the lock, performing maintenance, or troubleshooting issues, the ability to remove the Yale smart lock efficiently is a valuable skill.
Remember, safety and attention to detail are paramount throughout the removal process. By carefully handling the wiring, keeping track of components, and adhering to manufacturer guidelines, you’ve demonstrated a commendable approach to smart lock maintenance and removal.
As you look ahead, consider any plans for reinstallation, maintenance, or potential upgrades to a new smart lock model. Your thorough understanding of the removal process will undoubtedly serve you well in future endeavors related to home security and access control.
With the Yale smart lock successfully removed and your knowledge enriched, you’re well-equipped to tackle the next steps in your home security journey. Whether it’s installing a new smart lock, exploring advanced security features, or simply enjoying the peace of mind that comes with a well-maintained entryway, your proactive approach to smart lock maintenance sets the stage for a secure and convenient living environment.
Thank you for embarking on this removal journey with us. We hope this guide has empowered you with the insights and skills needed to handle Yale smart lock removals with confidence and ease. Here’s to a future filled with seamless home security solutions and the peace of mind that comes with a well-maintained and secure living space.
Now that you've mastered removing your Yale smart lock, why not tackle more home projects or upgrade your living space? For those eager to transform their dwelling with personal touches, our guide on DIY home improvement offers practical advice and creative ideas. If tech enhancements are more your style, consider diving into our recommendations for home automation solutions set to redefine convenience in 2024. Security-conscious homeowners will also benefit from checking out our latest list on smart home security devices, ensuring peace of mind with cutting-edge technology.
Frequently Asked Questions about How To Remove A Yale Smart Lock
Was this page helpful?
At Storables.com, we guarantee accurate and reliable information. Our content, validated by Expert Board Contributors, is crafted following stringent Editorial Policies. We're committed to providing you with well-researched, expert-backed insights for all your informational needs.


0 thoughts on “How To Remove A Yale Smart Lock”