Home>Articles>Deck Tour: Multilevel Deck With Graceful Curves
Articles
Deck Tour: Multilevel Deck With Graceful Curves
Modified: August 27, 2024
Discover the stunning design of a multilevel deck with graceful curves in this comprehensive deck tour. Explore articles on deck building and gain inspiration for your own project.
(Many of the links in this article redirect to a specific reviewed product. Your purchase of these products through affiliate links helps to generate commission for Storables.com, at no extra cost. Learn more)
Introduction
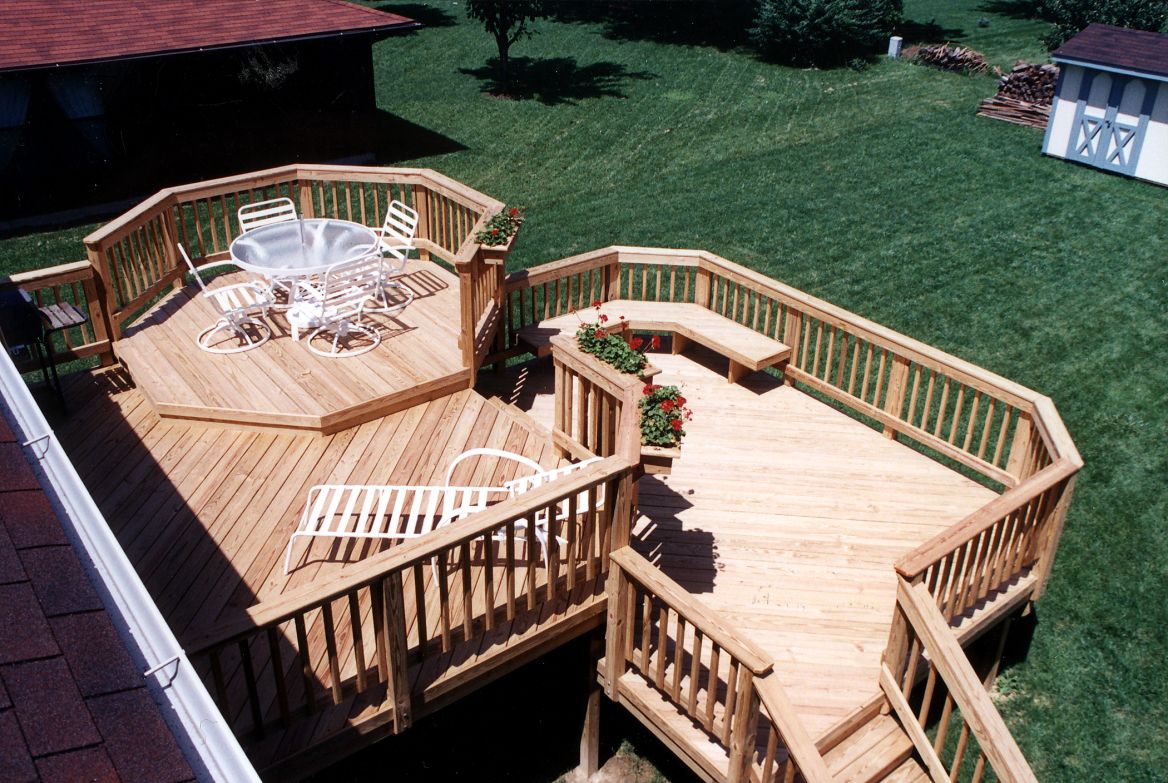
Welcome to a deck tour like no other! In this article, we will take you on a journey through a multilevel deck with graceful curves. Whether you’re a homeowner looking for inspiration or a contractor looking for design ideas, this deck will surely capture your attention.
Decks have become an essential feature of modern homes, serving as an extension of indoor living spaces into the great outdoors. They provide a space for relaxation, entertaining guests, and enjoying the beauty of nature. But why settle for a standard rectangular deck when you can create something truly unique and visually stunning?
Our deck design inspiration came from the desire to blend functionality, aesthetics, and innovation. We wanted to create a deck that not only provided ample space for different activities but also added a touch of elegance to the overall design. The result is a multilevel deck with graceful curves that stands out from the crowd.
To bring our vision to life, we carefully selected materials and tools that would ensure the deck’s durability and longevity. We also paid extra attention to the site preparation to ensure a solid foundation for the structure. Building a deck of this caliber requires meticulous planning, precise measurements, and expert craftsmanship.
Are you excited to learn more about the steps involved in creating this remarkable deck? Join us as we delve into the details of this project, from preparing the site to adding the finishing touches. Along the way, we will guide you through each stage and highlight the key considerations, techniques, and materials used.
So, grab your virtual hard hat and put on your imaginary tool belt because it’s time to embark on this incredible deck tour. Let’s explore the world of multilevel decks with graceful curves and discover how you can transform your outdoor space into a work of art.
Key Takeaways:
- Create a visually stunning and functional multilevel deck with graceful curves by drawing inspiration from nature, incorporating architectural elements, and carefully selecting materials and tools for durability and longevity.
- Enhance your outdoor living experience by adding finishing touches such as stain or paint, outdoor furniture, lighting, decorative elements, storage solutions, and shade structures to transform your multilevel deck into a stunning and inviting space.
Read more: What Size Shower Curtain For A Curved Rod
Design Inspiration
When it comes to deck design, it’s crucial to think outside the box and let your creativity flow. We drew inspiration from various sources to create a deck that would stand out and make a statement.
Nature played a significant role in shaping the design of this multilevel deck. The flowing curves mimic the organic shapes found in the surrounding landscape, seamlessly blending the deck with its natural surroundings. We wanted the deck to be an extension of the outdoor environment, creating a harmonious and inviting space.
Architectural elements also inspired us to incorporate curves into the deck’s design. The elegant lines and curves found in buildings, bridges, and sculptures served as a source of inspiration. By incorporating these architectural elements, we were able to create a deck that exudes sophistication and visual interest.
Functionality was a key consideration in the design process. We wanted to optimize every inch of space and create different areas for different purposes. The multilevel design allows for seamless transitions between the various sections of the deck, providing separate zones for dining, lounging, and entertaining.
In terms of aesthetics, we wanted the deck to be visually appealing from every angle. Incorporating curves not only adds a sense of flow and movement but also creates visual interest. The curvilinear design catches the eye and adds a touch of class to the overall appearance of the deck.
Lighting was an essential aspect of the design, as it can greatly enhance the ambiance and usability of the deck. We incorporated strategically placed lighting fixtures to highlight the curves and create a warm and inviting atmosphere. This allows the deck to be enjoyed day and night, extending its functionality well into the evening hours.
Lastly, we took into account the overall architectural style of the home. The deck needed to complement the existing design and seamlessly integrate with the overall aesthetic of the property. By carefully selecting materials, colors, and finishes that harmonize with the home’s style, we were able to create a cohesive and visually pleasing outdoor living space.
By combining inspiration from nature, architecture, functionality, aesthetics, and the existing home style, we were able to design a deck that is both visually striking and highly functional. The end result is a multilevel deck with graceful curves that seamlessly integrates into its surroundings and provides a unique outdoor experience.
Materials and Tools
Creating a multilevel deck with graceful curves requires careful consideration of the materials and tools used. The right materials will ensure the durability, aesthetics, and longevity of the deck, while the appropriate tools will help achieve precise cuts and smooth installations. Here’s a rundown of the key materials and tools used in this project:
Materials:
- Pressure-treated lumber: This is the primary material used for the deck’s structure and framing. Pressure-treated lumber is resistant to rot and decay, making it an ideal choice for outdoor applications.
- Composite decking: For the deck’s surface, we opted for composite decking boards. Composite decking offers a number of advantages, including low maintenance, durability, and resistance to fading, staining, and splintering.
- Stainless steel hardware: To ensure the deck’s longevity and structural integrity, stainless steel screws, bolts, and connectors were used for all connections. Stainless steel is highly resistant to corrosion, making it suitable for outdoor applications.
- Decking sealant: A high-quality decking sealant was applied to the composite decking boards to protect them from the elements and preserve their color and appearance.
- Lighting fixtures: Various types of lighting fixtures, such as LED deck lights and post cap lights, were used to enhance the deck’s ambiance and usability.
- Railings and balusters: Depending on the design preferences, a combination of materials such as wood, metal, or composite was used for the deck’s railings and balusters.
- Concrete mix: Concrete was used for the footings and support posts to provide a solid foundation for the deck.
Tools:
- Tape measure: Accurate measurements are crucial when planning and building a deck. A reliable tape measure is an essential tool for ensuring precise dimensions.
- Miter saw: A miter saw with a carbide-tipped blade was used for making clean, angled cuts on the lumber and decking boards.
- Circular saw: A circular saw equipped with a fine-toothed blade was used for straight cuts on the decking boards.
- Drill/driver: A power drill/driver with appropriate drill bits and screwdriver bits was used for drilling pilot holes and driving screws into the lumber and decking boards.
- Jigsaw: A jigsaw was used for cutting the curved shapes on the decking boards and railings.
- Level: A level was used to ensure that the deck was properly aligned and level during the installation process.
- Post hole digger: A post hole digger was used to dig the holes for the support posts, ensuring they were properly anchored in the ground.
- Sander: A power sander with fine-grit sandpaper was used to smooth out any rough edges on the decking boards and railings.
By selecting high-quality materials and utilizing the right tools, we were able to bring our design vision to life and create a multilevel deck with graceful curves that will withstand the test of time.
Read more: How To Make Curved Pergola Rafters
Preparing the Site
Before any construction can begin, proper site preparation is crucial to ensure a solid foundation for the deck. The following steps were taken to prepare the site:
1. Clear the area
The first step in preparing the site is to clear the area of any existing vegetation, debris, or obstacles. This includes removing plants, rocks, and any other items that may hinder the construction process.
2. Mark the boundaries
Next, mark the boundaries of the deck area using stakes and string. This will provide a clear outline and guide for the construction process.
3. Level the ground
It’s essential to ensure that the ground is level before building the deck. Use a rake or shovel to remove any high spots and fill in any low spots. This will provide a stable and even surface for the deck structure.
Read more: House Tour: Renovate And Restyle
4. Install landscape fabric
To prevent weed growth and promote drainage, install landscape fabric over the cleared and leveled ground. This will act as a barrier between the soil and the deck structure, keeping the area clean and preventing weed growth in the future.
5. Add gravel or paver base
For additional stability and proper drainage, add a layer of gravel or a paver base on top of the landscape fabric. This will ensure that water drains away from the deck and prevents any moisture-related issues.
6. Compact the base
Use a plate compactor or tamper to compact the gravel or paver base. This will create a solid and stable base for the deck structure, ensuring that it remains level and secure.
7. Check for utility lines
Before digging any holes for the deck support posts, it’s crucial to check for the presence of utility lines. Contact the local utility companies to have them mark the location of any underground lines to avoid any accidental damage during construction.
Read more: How To Install A Curved Shower Curtain Rod
8. Obtain necessary permits
Check with your local building department to determine if any permits are required for building a deck. Obtain the necessary permits before proceeding with any construction to ensure compliance with local regulations and codes.
By taking the time to properly prepare the site, you can ensure a solid foundation for your multilevel deck. This will provide stability, durability, and longevity for your deck structure, giving you peace of mind to enjoy your outdoor space for years to come.
Building the Foundation
Building a solid foundation is crucial for the stability and longevity of your deck. It provides the support and structural integrity necessary to withstand the weight and load of the deck structure. Here are the key steps involved in building the foundation for your multilevel deck:
1. Determine the placement of support posts
Using your deck plan as a guide, determine the locations for the support posts that will hold up the deck structure. Mark these locations on the ground using stakes and string.
2. Dig the post holes
Using a post hole digger or an auger, dig the holes for the support posts according to local building codes and regulations. The depth and diameter of the holes will depend on the size and height of your deck, as well as the soil conditions in your area.
3. Install the concrete footings
Once the holes are dug, it’s time to pour the concrete footings. Place a pre-cut cardboard tube or a sonotube in each hole, ensuring it is level and plumb. Then, mix and pour the concrete into the tubes, making sure they are filled to the top. Use a post level to ensure the tubes are perfectly straight and aligned.
4. Insert the support posts
Once the concrete has cured, it’s time to insert the support posts into the footing tubes. Make sure the posts are cut to the appropriate length and are level. Secure them in place by using metal post anchors or by pouring additional concrete around the post bases.
5. Connect the support beams
Attach the support beams to the support posts using appropriate hardware, such as galvanized brackets or joist hangers. Make sure the beams are level and properly aligned.
6. Install the joists
Place and attach the joists perpendicular to the support beams, ensuring they are evenly spaced. Use joist hangers or galvanized nails/screws to secure the joists in place. Check that the joists are level and properly positioned.
Read more: How To Frame A Curved Wall
7. Add additional support if needed
For larger or longer spans, additional support may be required. This can be achieved by adding additional beams or using support posts and beams of increased size. Consult with a structural engineer or follow local building codes to determine the appropriate level of support for your specific deck design.
By following these steps and ensuring proper alignment, levelness, and support, you can build a strong and stable foundation for your multilevel deck. This foundation will provide the necessary support for the rest of the construction process and ensure the structural integrity and durability of your deck for years to come.
Setting the Posts
Setting the posts is a critical step in the construction of your multilevel deck. The posts provide the vertical support for the deck structure and ensure its stability and durability. Here is a step-by-step guide on how to properly set the posts for your deck:
1. Measure and mark the post locations
Using your deck plan as a guide, measure and mark the locations for the posts on the support beams. Make sure to follow any local building codes or regulations regarding post spacing and placement.
2. Dig the post holes
Using a post hole digger or an auger, dig the holes for the posts at the marked locations. The depth and diameter of the holes will depend on the size and height of your deck, as well as the soil conditions in your area. Check local building codes for specific requirements.
Read more: How To Remove A Curved Shower Rod
3. Insert the posts
Place the posts into the holes and ensure they are positioned vertically and aligned with the support beams. Use a level to check for plumbness and make any necessary adjustments. The posts should be set firmly into the ground and provide a stable foundation for the deck structure.
4. Secure the posts
Once the posts are properly positioned, secure them to the support beams using appropriate hardware, such as galvanized brackets or post anchors. Make sure to follow the manufacturer’s instructions and use sufficient screws or fasteners to ensure a secure connection.
5. Fill the post holes
After the posts are securely fastened, fill the remaining space in the post holes with concrete or gravel. This will provide additional stability and prevent the posts from shifting or moving over time. Follow the manufacturer’s instructions for mixing and pouring the concrete, or simply backfill the holes with gravel if preferred.
6. Check post alignment
Once the concrete or gravel has cured, check the alignment of the posts again to ensure they are still plumb and aligned with the support beams. Make any necessary adjustments by carefully repositioning the posts and re-securing them to the support beams.
Read more: Why Use A Curved Shower Rod
7. Repeat for all posts
Repeat the above steps for all the posts required for your deck. Take your time to ensure each post is properly set and secured, as they play a crucial role in the overall stability and structural integrity of the deck.
By following these steps and taking the time to properly set and secure the posts, you will ensure a solid foundation for your multilevel deck. This will provide the necessary support for the rest of the construction process and ensure the longevity and safety of your deck for years to come.
Installing the Decking Boards
Installing the decking boards is an exciting step in the construction process of your multilevel deck. It’s the phase where you start to see the deck take shape, and it’s important to ensure that the boards are installed properly for both aesthetics and functionality. Here’s a step-by-step guide on how to install the decking boards:
1. Start with the outermost boards
Begin by installing the outermost boards along the perimeter of the deck. These boards will create the frame and define the shape of the deck. Make sure to leave a small gap between the boards to allow for expansion and contraction due to weather changes.
2. Use deck screws or hidden fasteners
Depending on the type of decking material you’re using, you can either use deck screws or hidden fasteners. Deck screws are a traditional method and are visible on the surface of the boards, while hidden fasteners create a seamless and clean look.
3. Pre-drill pilot holes
If using deck screws, pre-drill pilot holes to prevent the boards from splitting. Choose a drill bit that matches the diameter of your screws and drill through the decking boards before installing the screws.
4. Install the boards perpendicular to the joists
Position the decking boards perpendicular to the direction of the joists. This will provide additional strength and stability to the deck structure. Use a measuring tape or a chalk line to ensure that the boards are straight and evenly spaced.
5. Secure the boards to the joists
Using deck screws or hidden fasteners, secure the decking boards to the joists. Place the screws or fasteners near the center of each board, ensuring a secure attachment to the underlying structure.
6. Create continuity by staggering the boards
To create a visually appealing and seamless look, stagger the decking boards from one row to the next. This will prevent joints from lining up and add aesthetic appeal to the overall design of the deck.
7. Cut boards to fit around obstacles
If your deck has any obstacles such as posts or corners, you may need to cut some boards to fit properly. Use a circular saw or jigsaw to make precise cuts, ensuring a tight fit around these obstacles.
8. Check for levelness and alignment
As you install the decking boards, regularly check for levelness and alignment. Use a level to ensure that the boards are even and not sloping. Make any necessary adjustments by loosening or tightening the screws or fasteners as needed.
9. Finish with the final row of boards
Once all the boards are installed, finish with the final row along the perimeter of the deck. Make sure the last row matches the gap left between the outermost boards to maintain consistency in the deck’s appearance.
By following these steps and taking the time to properly install the decking boards, you will create a stunning and functional multilevel deck. The decking boards will provide a stable and comfortable surface for outdoor activities and enhance your overall outdoor living experience.
Adding the Curves
One of the standout features of our multilevel deck is the addition of graceful curves. Incorporating curves into your deck design adds a unique touch of elegance and visual interest. Here’s a step-by-step guide on how to add curves to your multilevel deck:
1. Plan the curves
Before diving into the construction, take the time to plan and visualize where you want the curves to be on your deck. Consider the flow of your outdoor space, the placement of furniture, and any existing landscaping. Sketch out the desired curves on paper to help you visualize the design.
2. Create a template
To ensure consistency and precision, create a template for the curves. This can be done by using a flexible material such as plywood or large cardboard pieces. Cut the template to match the desired curve, ensuring smooth and even curves throughout.
3. Trace the curve onto the decking boards
Using the template, trace the curve onto the decking boards that will be used for the curved sections of your deck. Make sure to accurately mark the curves on the boards, using a pencil or chalk, so that you can easily follow the lines during the cutting process.
4. Cut the decking boards
With the curve marked on the boards, use a jigsaw or a circular saw with a fine-toothed blade to carefully cut along the marked lines. Take your time to ensure smooth and accurate cuts, following the curve as closely as possible.
5. Test fit the boards
After cutting the boards, test fit them into place to ensure that the curves align properly and create the desired shape. Make any necessary adjustments by refining the curve with additional cuts as needed.
6. Secure the boards in place
Once the boards fit seamlessly into the curved sections, securely fasten them to the joists using the appropriate screws or hidden fasteners. Ensure that each board is level and properly aligned before securing it in place.
7. Blend the curves with the rest of the deck
To create a cohesive look, blend the curves with the straight sections of the deck. Use a sander to smooth any rough edges and create a seamless transition between the curved and straight sections. This will result in a visually pleasing and harmonious design.
By adding graceful curves to your multilevel deck, you can introduce an element of beauty and sophistication. The curves create visual interest, enhance the flow of your outdoor space, and make your deck truly unique. With proper planning and execution, the curved sections will become the focal point of your deck, leaving a lasting impression on all who experience it.
Railings and Balusters
Adding railings and balusters to your multilevel deck not only enhances the safety of the space but also adds a stylish finishing touch to the overall design. The railings provide a barrier and support for those using the deck, while the balusters add visual interest and complements the deck’s aesthetic appeal. Here’s a step-by-step guide on how to install railings and balusters on your deck:
Read more: How To Build A Deck With Composite Decking
1. Determine the railing style
Before you begin, decide on the style of railing that best complements your deck design and personal taste. There are various options to choose from, including wood, metal, glass, or composite materials. Consider the durability, maintenance requirements, and overall aesthetic impact of each choice.
2. Measure and plan
Take accurate measurements of the deck perimeter and determine the appropriate height for your railings. Follow local building codes and regulations to ensure compliance with safety standards. Sketch out a plan to visualize the placement of railing posts and balusters.
3. Install railing posts
Measure and mark the locations for the railing posts along the perimeter of the deck. Use pressure-treated lumber or metal posts as a sturdy base. Secure the posts to the deck frame using appropriate hardware, making sure they are level and plumb.
4. Attach top and bottom rails
Attach the top and bottom rails to the railing posts, ensuring a secure and level connection. Use screws or brackets designed for railings to ensure the stability of the railing system. The top rail provides a comfortable grip, while the bottom rail adds structural support.
Read more: Deck Designs: Ideas For Raised Decks
5. Determine baluster spacing
Follow local building codes or guidelines to determine the appropriate spacing between balusters. This will prevent small children or pets from slipping through the gaps while allowing for optimal visibility. Measure and mark the placement of the balusters along the railing.
6. Install balusters
Attach the balusters to the top and bottom rails using screws or baluster connectors. Ensure that each baluster is secured in place and aligned with the marked spacing. Use a level to ensure that the balusters are straight and perpendicular to the decking boards.
7. Secure the railing system
Check that all connections are secure and make any necessary adjustments to align the railing system. Double-check the levelness and stability of the railings and balusters, making sure they are properly fastened to provide a safe and secure railing system.
8. Add decorative elements (optional)
If desired, incorporate decorative elements such as post caps or ornamental accents to enhance the aesthetics of the railing system. These details can add a personal touch and elevate the overall look of your deck.
By installing railings and balusters on your multilevel deck, you ensure the safety of those utilizing the space while adding a touch of sophistication to the design. Follow these steps and consult local building codes to create a secure and visually appealing railing system that complements your deck’s style and enhances your outdoor living experience.
Read also: 8 Best Curved Room Divider For 2025
Finishing Touches
With the main construction of your multilevel deck complete, it’s time to add the finishing touches that will truly transform your outdoor space into a stunning and functional area. These final details will enhance the aesthetics, comfort, and usability of your deck, creating a space where you can relax, entertain, and enjoy the outdoors. Here are some ideas for the finishing touches:
1. Stain or paint
Consider applying a stain or paint to your deck’s surface and railings. This not only protects the wood from weather damage but also adds color and character to your deck. Choose a finish that complements your home’s exterior or the overall theme of your outdoor space.
2. Outdoor furniture
Select comfortable and durable outdoor furniture that suits your style and accommodates your needs. Whether it’s a dining set, lounge chairs, or a cozy seating area, ensure that your furniture is weather-resistant and can withstand outdoor elements. Arrange the furniture to create distinct areas for dining, lounging, and socializing.
3. Lighting
Add appropriate lighting to your deck to extend its usability into the evening hours. Consider installing deck post lights, string lights, or wall-mounted sconces. These lighting fixtures not only enhance safety but also create a warm and inviting atmosphere for nighttime enjoyment.
Read more: How To Build A Curved Range Hood
4. Outdoor rugs and cushions
Increase the comfort and style of your deck by incorporating outdoor rugs and cushions. These elements can add a pop of color and texture while providing a soft and inviting surface for your guests. Choose materials that are specifically designed for outdoor use and are resistant to moisture and fading.
5. Decorative elements
Add personal touches to your deck with decorative elements such as potted plants, outdoor artwork, or decorative screens. These features can add visual interest and create a more inviting and cohesive atmosphere. Consider your personal style and the overall theme of your outdoor space when selecting these decorative elements.
6. Storage solutions
Maximize the functionality of your deck by incorporating storage solutions. Deck boxes, storage benches, or cabinets can help you keep your outdoor essentials organized and easily accessible. Choose storage options that coordinate with your deck design and provide ample space to store items such as cushions, gardening tools, or outdoor toys.
7. Shade structures
If your deck is exposed to direct sunlight, consider adding shade structures such as pergolas, awnings, or umbrellas. These additions not only provide relief from the sun but also create a cozy and intimate atmosphere. Customize these structures with climbing plants or fabric canopies to add a touch of natural beauty.
By adding these finishing touches to your multilevel deck, you can transform it into a functional and inviting space that reflects your personal style. Take the time to carefully select and incorporate these details, and you’ll have an outdoor oasis to enjoy for years to come.
Inspired by the elegant design of our featured multilevel deck? Take your outdoor space to the next level with vibrant deck decor and smart add-ons that make any deck more inviting for outdoor living. Whether you're hosting a sunset dinner or just enjoying a quiet afternoon outside, these ideas will help transform your deck into a cozy retreat that beckons everyone outdoors. Don't miss out on creating a space where every moment becomes a cherished memory.
Frequently Asked Questions about Deck Tour: Multilevel Deck With Graceful Curves
Was this page helpful?
At Storables.com, we guarantee accurate and reliable information. Our content, validated by Expert Board Contributors, is crafted following stringent Editorial Policies. We're committed to providing you with well-researched, expert-backed insights for all your informational needs.
0 thoughts on “Deck Tour: Multilevel Deck With Graceful Curves”