Articles
How To Frame A Curved Wall
Modified: October 20, 2024
Discover valuable articles on how to frame a curved wall and learn the best techniques for achieving a flawless finish.
(Many of the links in this article redirect to a specific reviewed product. Your purchase of these products through affiliate links helps to generate commission for Storables.com, at no extra cost. Learn more)
Introduction
Welcome to our comprehensive guide on how to frame a curved wall. Curved walls can add a unique and aesthetically pleasing element to any space. Whether you are looking to create a curved accent wall or a curved partition in your home or office, this article will provide you with step-by-step instructions on how to successfully frame and construct a curved wall.
Before we dive into the details of framing a curved wall, it is important to have a basic understanding of what a curved wall is and why you might want to incorporate one into your space. Unlike traditional straight walls, curved walls are designed with a gentle curve or arc, creating a visually appealing and dynamic feature. Curved walls can be used to define different areas in an open-concept space, add architectural interest to a room, or create a unique focal point.
To successfully frame a curved wall, you will need a few tools and materials. These include:
- A measuring tape
- A pencil
- A stud finder
- A circular saw
- A jigsaw
- A power drill
- 2×4 lumber
- Wood screws
- Construction adhesive
- Drywall
- Metal corner beads
- Drywall joint compound
- Sanding tools
- Paint or wallpaper (optional)
Now that we have a basic understanding of curved walls and have gathered the necessary tools and materials, let’s move on to the step-by-step process of framing a curved wall!
Key Takeaways:
- Framing a curved wall requires careful planning, precise cutting, and attention to detail. From creating a framing template to adding finishing touches, each step contributes to a visually stunning and structurally sound result.
- By following this comprehensive guide, you can confidently tackle the construction of a curved wall. Embrace the creativity and craftsmanship involved, and enjoy the unique and aesthetically pleasing addition to your space.
Read more: How To Frame Exterior Walls
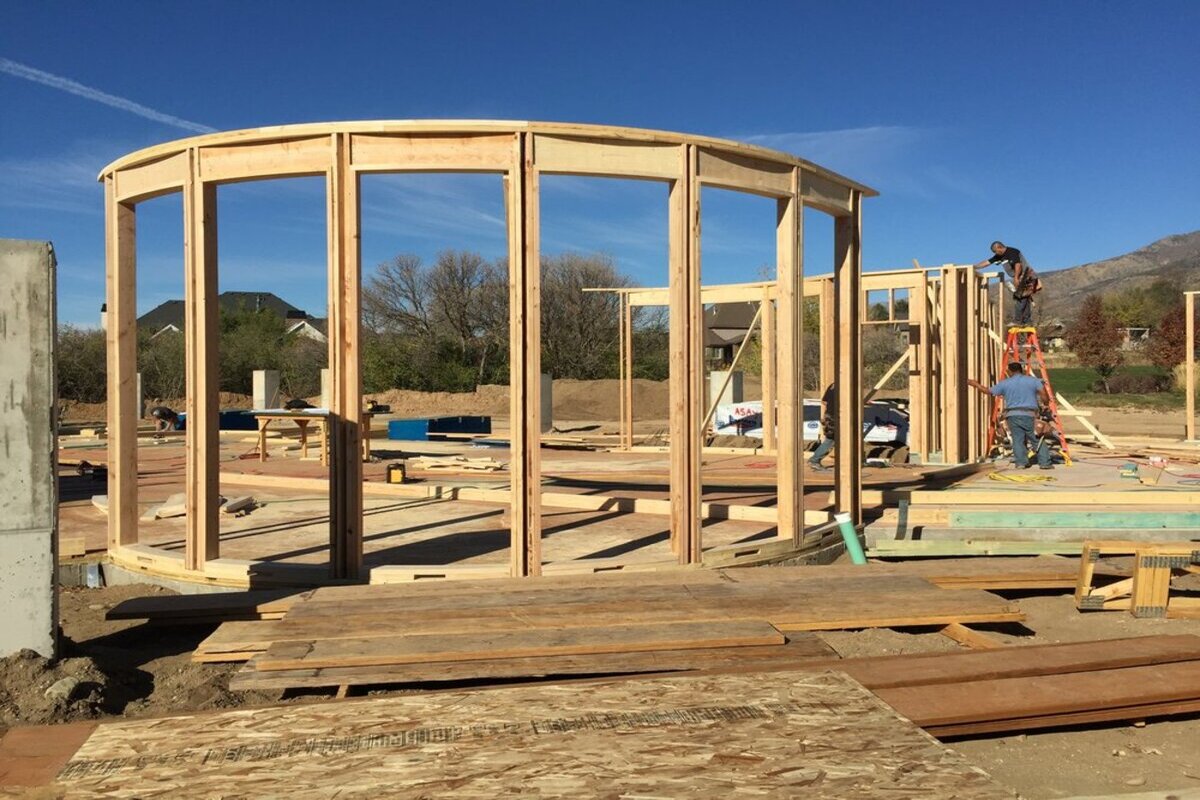
Understanding Curved Walls
Before we begin framing a curved wall, it’s important to understand the anatomy and structure of curved walls. Curved walls are typically built using a series of curved studs that are cut and assembled to create the curved shape. These curved studs are then attached to a horizontal support system and secured to the floor and ceiling.
When designing a curved wall, you’ll need to determine the radius or degree of the curve you want to achieve. This will dictate the size and shape of the curved studs. The radius is the measurement from the center of the curve to any point on its circumference. The larger the radius, the more gentle the curve will be.
Curved walls can be framed using different methods and materials. One common approach is to use 2×4 lumber to create the curved studs. These curved studs are typically cut from straight lumber using a jigsaw or circular saw. Alternatively, you can also purchase pre-formed curved studs from specialized suppliers.
When framing a curved wall, it’s important to take into account factors such as structural integrity, sound insulation, and electrical and plumbing considerations. Depending on the purpose of the curved wall, you may need to consult with a professional architect or engineer to ensure that the framing meets all building codes and requirements.
Curved walls can be constructed with various materials such as drywall, plywood, or even glass. The choice of material will depend on factors such as durability, aesthetics, and the specific requirements of your project. Whatever material you choose, it’s essential to ensure that it can bend or flex to accommodate the curves of the wall.
Curved walls also present a unique challenge when it comes to finishing. Installing drywall on a curved wall requires special techniques and materials such as flexible drywall or bending strips. Additionally, you may need to use metal corner beads to create smooth and even corners.
Now that we have a better understanding of the structure and considerations involved with curved walls, let’s move on to the step-by-step process of framing a curved wall!
Tools and Materials Needed
Before you begin framing a curved wall, it’s important to gather all the necessary tools and materials. Having everything prepared will make the process smoother and more efficient. Here’s a list of the tools and materials you will need:
- A measuring tape: This will help you accurately measure and mark the dimensions of the curved wall.
- A pencil: Essential for marking measurements and guidelines on the lumber and other materials.
- A stud finder: This tool will help you locate the existing studs in the wall if you need to anchor the curved wall to them.
- A circular saw: You’ll need a circular saw to cut the lumber for the curved wall studs.
- A jigsaw: This tool is used to cut the curvature of the studs based on your desired design.
- A power drill: Necessary for drilling holes and driving screws into the lumber.
- 2×4 lumber: This will be the primary material for constructing the curved wall studs and horizontal supports.
- Wood screws: Used to secure the lumber together during the framing process.
- Construction adhesive: Helps strengthen the joints between the lumber and provides extra stability.
- Drywall: The material used to cover and finish the curved wall.
- Metal corner beads: These are used to create smooth and even corners when drywalling.
- Drywall joint compound: Used to fill in gaps and seams between drywall sheets.
- Sanding tools: Essential for smoothing out surfaces and preparing them for finishing.
- Paint or wallpaper (optional): Used to add the final touch to your curved wall.
Make sure you have all these tools and materials ready before you start framing your curved wall. It’s important to have everything on hand to avoid delays and interruptions during the construction process.
With the necessary tools and materials at the ready, let’s move on to the step-by-step instructions on how to frame a curved wall!
Step 1: Planning the Curved Wall
Before you begin framing your curved wall, it’s crucial to plan and visualize the design. This step will help you determine the size, shape, and placement of the curved wall in your space. Here’s how you can effectively plan your curved wall:
- Choose the location: Decide where you want to install the curved wall. Consider factors such as room flow, functionality, and aesthetics.
- Measure and mark: Use a measuring tape to measure the length and height of the curved wall. Mark these dimensions on the floor and ceiling using a pencil.
- Create a template: Using a long strip of flexible material like cardboard or thin plywood, create a template by bending it to match the desired curve of the wall. Adjust the template until you are satisfied with the shape and curvature.
- Transfer the template: Once you’re happy with the template, trace its outline on the floor, ceiling, and any adjacent walls to visualize the final positioning of the curved wall.
- Consider structural support: Assess whether the existing wall can support the weight of the curved wall or if additional support will be needed. Consult with a professional if necessary.
- Plan for electrical and plumbing: If your curved wall will intersect with electrical outlets or plumbing lines, plan accordingly and ensure sufficient space is left for these components.
- Review your plan: Take a step back and review your planned curved wall design. Make any necessary adjustments or refinements before moving on to the next step.
Proper planning is essential to ensure a successful outcome when framing a curved wall. Taking the time to visualize and plan the design will save you headaches during the construction process and help you achieve the desired result.
Now that you have carefully planned your curved wall, it’s time to move on to the next step: creating the framing template.
Step 2: Creating the Framing Template
Now that you have planned the design of your curved wall, the next step is to create a framing template. This template will serve as a guide for cutting and assembling the curved wall studs. Here’s how you can create the framing template:
- Measure and mark the template: Using your measurements from Step 1, transfer the dimensions of the curved wall onto a large piece of plywood or cardboard. Use a pencil and a straightedge to draw the outline of the curved wall.
- Add cross-section lines: Divide the curved wall template into smaller sections by drawing vertical lines perpendicular to the wall outline. This will help you accurately cut the curved studs later on.
- Cut out the template: Carefully cut along the outline of the curved wall using a jigsaw or a similar cutting tool. Take your time to ensure smooth and precise cuts.
- Test the template: Once you have cut out the template, place it against the floor, ceiling, and adjacent walls to ensure that it fits properly and matches your desired curved shape. Make any necessary adjustments to the template.
- Label the template: To avoid confusion later on, label the template with the wall’s name or location. This will help you keep track of multiple templates if you are working on multiple curved walls.
- Make additional templates if needed: Depending on the complexity of your curved wall design, you may need to create multiple templates for different sections of the wall.
Creating an accurate and well-fitting framing template is crucial for achieving a professional-looking curved wall. Take your time during this step to ensure that the template matches your desired curve and dimensions.
With the framing template in hand, you are now ready to move on to the next step: cutting and assembling the curved wall studs.
Read more: How To Frame Out Basement Walls
Step 3: Cutting and Assembling the Curved Wall Studs
Now that you have your framing template ready, it’s time to cut and assemble the curved wall studs. These studs will create the curved shape of your wall. Here’s how you can cut and assemble the curved wall studs:
- Trace the template: Place the template on a piece of 2×4 lumber and trace its outline using a pencil. Repeat this step for each stud you need to cut for your curved wall.
- Cut along the traced line: Using a jigsaw or a circular saw, carefully cut along the traced line on the 2×4 lumber. Take your time to ensure smooth and accurate cuts, following the curvature of the template.
- Test the fit: Place the cut curved stud against the template to check if it matches the curve correctly. Make any necessary adjustments by trimming or reshaping the stud as needed.
- Measure and cut additional studs: Using the first stud as a reference, measure and cut additional studs for your curved wall. The number of studs will depend on the length and height of your wall, as well as the spacing you desire between each stud.
- Assemble the studs: Lay out all the curved wall studs on a flat surface, aligning them according to their top and bottom edges. Apply construction adhesive between the studs to strengthen the joints and provide extra stability.
- Screw the studs together: Use wood screws to securely attach the curved wall studs together at the top and bottom edges. Make sure to countersink the screws slightly to ensure a flush finish.
- Repeat the process: If your curved wall requires multiple layers of studs for added thickness, repeat the previous steps to create and assemble the additional layers.
Remember to take your time during this step and ensure that each stud is cut accurately and assembled securely. The precise cutting and proper assembly of the curved wall studs are crucial for the structural integrity and overall appearance of your curved wall.
Once you have cut and assembled the curved wall studs, you are ready to move on to the next step: installing the curved wall studs.
When framing a curved wall, use flexible track or pre-curved framing members to create the desired curve. This will ensure a smooth and precise result.
Step 4: Installing the Curved Wall Studs
With the curved wall studs cut and assembled, it’s time to install them and bring your curved wall to life. Follow these steps to properly install the curved wall studs:
- Start at the corner: Begin by positioning the first curved wall stud at one corner of the wall. Make sure it is aligned with the template and plumb using a level.
- Attach the stud: Secure the first stud by drilling pilot holes through the stud and into the floor and ceiling. Use wood screws to fasten the stud in place, ensuring a sturdy connection.
- Continue with the remaining studs: Place the next stud against the template and align it with the previous stud. Secure it with screws, ensuring that it is vertically plumb and parallel to the template.
- Space the studs: Leave an equal distance between each stud, typically around 16 inches on center. Use a measuring tape to ensure consistent spacing throughout the installation process.
- Trim the studs if necessary: In some cases, you may need to trim the curved wall studs to fit snugly against the template or accommodate obstacles such as corner walls or doors. Use a circular saw or jigsaw to make precise cuts.
- Check for stability: Periodically check the stability of the installed studs by pushing or lightly shaking them. If any studs feel loose, reinforce them with additional screws or construction adhesive.
- Continue installing: Repeat the process of aligning, screwing, and spacing the curved wall studs until you have completed the entire wall. Take your time to ensure that each stud is installed securely and matches the curvature of the template.
Installing the curved wall studs requires precision and attention to detail to ensure a sturdy and visually appealing result. By following these steps, you will be on your way to creating a well-constructed curved wall.
Once all the studs are installed, you can move on to the next step: adding horizontal support to the curved wall.
Step 5: Adding Horizontal Support to the Curved Wall
After installing the curved wall studs, the next step is to add horizontal support to reinforce the structure of the wall. This support system will provide stability and ensure that the curved wall remains securely in place. Follow these steps to add horizontal support to your curved wall:
- Measure and cut the horizontal support: Measure the length between the top and bottom of the curved wall and cut a piece of 2×4 lumber to this size. This horizontal support will run parallel to the floor and ceiling, providing additional strength.
- Position the horizontal support: Hold the cut horizontal support against the curved wall studs, making sure it aligns with their top and bottom edges. Use a level to ensure it is perfectly horizontal.
- Secure the horizontal support: Predrill holes through the horizontal support and into each curved wall stud. Then, use wood screws to fasten the support to the studs, ensuring a tight and secure connection.
- Add additional horizontal supports: Depending on the length and height of your curved wall, you may need to install additional horizontal supports at evenly spaced intervals. Repeat the process of measuring, cutting, positioning, and securing the supports.
- Check for stability: After installing the horizontal supports, ensure that the entire curved wall is stable and rigid. Gently push or apply slight pressure to different sections of the wall to confirm its structural integrity.
- Make adjustments if necessary: If any part of the curved wall feels weak or unstable, reinforce it by adding more screws, applying construction adhesive, or installing additional horizontal supports.
By adding horizontal support to your curved wall, you are enhancing its strength and durability. This step is crucial for maintaining the integrity of the structure, especially if the curved wall is large or serves as a load-bearing element.
With the horizontal supports securely in place, you are ready to move on to the next step: securing the curved wall to the floor and ceiling.
Step 6: Securing the Curved Wall to the Floor and Ceiling
After completing the framing and adding horizontal support to your curved wall, the next step is to secure it to the floor and ceiling. This will ensure stability and prevent any movement or shifting. Follow these steps to properly secure the curved wall:
- Measure and mark: Use a measuring tape to determine the height at which you want to secure the curved wall to the floor and ceiling. Mark these measurements on the studs using a pencil.
- Pre-drill holes: Using a small drill bit, pre-drill holes through the marked areas on the curved wall studs. This will prevent the wood from splitting when you drive the screws.
- Secure to the floor: Position the curved wall against the floor, lining it up with the marked measurements. Insert screws through the pre-drilled holes and into the floor. Use enough screws to ensure a strong and secure connection.
- Secure to the ceiling: With the curved wall in its desired position, align it with the marked measurements on the ceiling. Insert screws through the pre-drilled holes and into the ceiling, again using enough screws for a secure attachment.
- Check for plumb and level: Use a level to ensure that the curved wall is perfectly vertical (plumb) and horizontally aligned (level) with the floor and ceiling. Make any necessary adjustments by loosening the screws, repositioning the wall slightly, and then tightening the screws again.
- Reinforce with additional screws if needed: If any part of the curved wall feels unstable or wobbly, insert additional screws at strategic points to provide extra reinforcement.
Securing the curved wall to the floor and ceiling is essential for maintaining its stability and integrity. Take your time during this step to ensure a secure attachment, as it will prevent any potential movement or shifting of the wall in the future.
With the curved wall securely fastened to both the floor and ceiling, you can now move on to the next step: insulating and drywalling the curved wall.
Read more: How To Frame Large Wall Art
Step 7: Insulating and Drywalling the Curved Wall
After securing the curved wall to the floor and ceiling, the next step is to insulate and drywall the wall. This will provide both thermal insulation and a finished look to your curved wall. Follow these steps to properly insulate and drywall the curved wall:
- Measure and cut the insulation: Measure the distance between the curved wall studs and cut insulation batts to fit snugly between them. Make sure to leave a small gap at the top and bottom for air circulation.
- Insert the insulation: Place the cut insulation batts between each curved wall stud, pressing them firmly into place. This will help to reduce heat loss and improve the energy efficiency of your space.
- Secure the insulation: Use insulation staples or adhesive to secure the insulation batts to the curved wall studs. This will prevent them from shifting or sagging over time.
- Measure and cut the drywall: Measure the dimensions of the curved wall and cut the drywall sheets to fit. You may need to make vertical cuts along the drywall to match the curve of the wall.
- Install the drywall: Using drywall screws, attach the cut drywall sheets to the curved wall studs. Begin at one corner and work your way across, ensuring that the drywall is securely fastened. Leave a small gap between each sheet for expansion and contraction.
- Apply joint compound: Use a putty knife to apply drywall joint compound (mud) to the seams between the drywall sheets. Smooth it out and feather the edges for a seamless finish. Allow the joint compound to dry according to the manufacturer’s instructions.
- Sand and repeat: Once the joint compound is dry, lightly sand the surface to create a smooth and even finish. Apply additional coats of joint compound as needed, sanding in between each coat, until the seams are completely smooth and invisible.
- Install corner beads: For the curved corners of the wall, use flexible metal corner beads. Attach the corner beads with drywall screws, ensuring that they follow the curve of the wall.
- Apply joint compound to corners: Apply joint compound over the corner beads, smoothing it out and feathering the edges for a seamless transition. Allow it to dry and sand it down for a smooth finish.
Insulating and drywalling the curved wall will not only provide a clean and finished appearance, but it will also help improve the sound insulation and overall energy efficiency of your space. Take your time during this step to properly install the insulation and achieve a professional drywall finish.
With the curved wall insulated and drywalled, you are now ready for the final step: adding the finishing touches.
Step 8: Finishing Touches
Congratulations! You are almost done with framing and constructing your curved wall. Step 8 focuses on adding the finishing touches to complete the overall look and refine the details. Follow these steps to add the final touches to your curved wall:
- Inspect for any imperfections: Carefully examine the drywall seams, corners, and the overall surface for any imperfections or rough spots. Use joint compound or putty to fill in any nail holes or small gaps, and sand those areas until smooth and seamless.
- Apply texture or wallpaper (optional): Depending on your design preferences, you can choose to apply a texture to the drywall surface or install wallpaper to add depth and visual interest. Follow the manufacturer’s instructions for your chosen texture or wallpaper product.
- Prime the wall: Applying a coat of primer to the drywall surface will help to seal it and provide a good foundation for the paint or wallpaper. Use a roller or brush to apply the primer evenly and allow it to dry according to the manufacturer’s recommendations.
- Paint or wallpaper: Now it’s time to apply the final finish to your curved wall. Choose a paint color that complements your space or install wallpaper that enhances the overall aesthetic. Follow the proper techniques and instructions for your chosen paint or wallpaper application to achieve the desired result.
- Install baseboards and trim: To complete the polished look of your curved wall, install baseboards and trim along the edges. Make accurate measurements and use a miter saw or other appropriate tools to cut the baseboards to fit the curved shape of the wall.
- Clean up: After all the finishing touches are complete, carefully remove any debris or leftover materials from the construction process. Vacuum or sweep the area to ensure a clean and tidy space.
- Admire your finished curved wall: Step back and admire your newly created curved wall. Take pride in your hard work and enjoy the visual impact it brings to your space.
By adding these finishing touches, you will elevate the overall look and feel of your curved wall. The attention to detail in this step will make a significant difference in creating a professionally finished result that complements your space.
With the finishing touches complete, you have successfully framed and constructed a curved wall. Now you can enjoy the unique and visually appealing element it brings to your home or office. Congratulations on a job well done!
Remember, always follow safety precautions and consult professionals when necessary during the framing process to ensure a structurally sound and code-compliant curved wall.
Thank you for following this comprehensive guide for framing a curved wall. We hope it has been helpful and informative. Best of luck with your curved wall project!
Conclusion
Congratulations on completing the framing and construction of your curved wall! By following the step-by-step instructions outlined in this comprehensive guide, you have successfully created a unique and visually appealing feature for your space.
Throughout the process, you have learned how to plan the curved wall, create a framing template, cut and assemble the curved wall studs, secure the wall to the floor and ceiling, insulate and drywall the wall, and add the finishing touches. Each step plays a crucial role in achieving a structurally sound and aesthetically pleasing curved wall.
Framing a curved wall requires careful consideration, precision, and attention to detail. By taking the time to plan, measure, and make accurate cuts, you have successfully brought your design concept to life. The result is a stunning curved wall that adds architectural interest, defines space, and enhances the overall ambiance of your home or office.
Remember, safety is paramount during any construction project. Always use appropriate tools and materials, follow proper techniques, and consult professionals when needed. Following building codes and regulations is essential to ensure a structurally sound curved wall.
We hope that this guide has provided valuable insights and guidance to help you frame a curved wall with confidence. With your newly acquired knowledge and skills, you can now take on future projects or inspire others with your creativity.
Now it’s time to sit back, relax, and enjoy the beauty and unique appeal of your finished curved wall. Take pride in your accomplishment and the transformation it has brought to your space.
Thank you for following along, and best of luck with all your future endeavors. Happy framing!
Frequently Asked Questions about How To Frame A Curved Wall
Was this page helpful?
At Storables.com, we guarantee accurate and reliable information. Our content, validated by Expert Board Contributors, is crafted following stringent Editorial Policies. We're committed to providing you with well-researched, expert-backed insights for all your informational needs.

0 thoughts on “How To Frame A Curved Wall”