Home>Articles>Everything You Need To Know About Building A Freestanding Deck
Articles
Everything You Need To Know About Building A Freestanding Deck
Modified: August 27, 2024
Discover expert articles on building a durable and stylish freestanding deck. All the information you need to know at your fingertips.
(Many of the links in this article redirect to a specific reviewed product. Your purchase of these products through affiliate links helps to generate commission for Storables.com, at no extra cost. Learn more)
Introduction
Building a freestanding deck can be an exciting and rewarding project that adds both functionality and aesthetic appeal to your outdoor space. Whether you want to create a comfortable lounging area, an entertainment space for hosting gatherings, or simply a place to enjoy the beauty of nature, a freestanding deck provides the perfect solution.
In this comprehensive guide, we will walk you through everything you need to know about building a freestanding deck. From choosing the right location to checking local building codes and permits, gathering the necessary tools and materials, and step-by-step instructions for each stage of the construction process, we will ensure that you have all the information you need to successfully complete your deck project.
A freestanding deck is a deck that is not attached to the house or any other structure, and it stands on its own supporting structure. This type of deck offers flexibility in terms of location and allows for easy customization to suit your specific needs and preferences. Whether you have a sprawling backyard or a limited outdoor space, a freestanding deck can be designed to fit perfectly.
Before diving into the construction process, it is important to have a clear vision of what you want to achieve with your deck. Consider its intended use, the size and layout, and any additional features such as railings, stairs, or seating areas. By planning ahead, you can ensure that your deck fulfills your requirements and creates a beautiful and functional addition to your outdoor living space.
Throughout this guide, we will share expert tips and best practices to help you navigate each step of the process. We will also highlight important factors to consider, such as safety precautions, material choices, and regular maintenance, to ensure that your deck not only looks great but also stands the test of time.
So, whether you are a seasoned DIY enthusiast or a complete beginner, get ready to embark on an exciting journey of creating your own freestanding deck. Let’s dive in and bring your outdoor living dreams to life!
Key Takeaways:
- Building a freestanding deck requires careful planning, adherence to local regulations, and regular maintenance to ensure safety, longevity, and enjoyment of your outdoor space.
- From choosing the right location to installing steps and stairs, each step of the deck construction process contributes to creating a functional, beautiful, and inviting outdoor living space.
Read more: Everything You Need To Know About Ladders
Choosing the Right Location
When it comes to building a freestanding deck, choosing the right location is crucial. The location of your deck will determine not only its overall aesthetic appeal but also its functionality and usability. Here are a few factors to consider when selecting the perfect spot for your deck:
- Accessibility: Ensure that your deck is easily accessible from the main entrance of your house or any other desired entry points. This will make it convenient for you and your guests to access the deck without any hassle.
- Orientation: Take into account the direction of the sun and wind patterns in your area. If you want to enjoy the sun during specific times of the day or seek shelter from strong winds, consider positioning your deck accordingly.
- Views: If your property offers scenic views, such as a lush garden, a beautiful landscape, or a stunning cityscape, take advantage of it by positioning your deck in a way that maximizes these views. This will enhance the overall ambiance and enjoyment of your outdoor space.
- Privacy: Consider the level of privacy you desire for your deck. If you prefer a more secluded and intimate setting, choose a location that offers natural barriers, such as trees or shrubs. Alternatively, you can install privacy screens or lattice panels to create a sense of privacy.
- Utility Connections: If you plan on incorporating features such as an outdoor kitchen or a spa on your deck, ensure that the chosen location is in close proximity to utility connections, such as water and electricity.
Keep in mind that local regulations or homeowner association guidelines may also dictate where you can build your deck. It is important to familiarize yourself with any restrictions or requirements before finalizing the location.
By carefully considering these factors, you can choose a location that not only aligns with your preferences and needs but also ensures that your deck becomes an attractive and functional addition to your outdoor living space.
Checking Local Building Codes and Permits
Before you start constructing your freestanding deck, it is essential to check with your local building department and obtain the necessary permits. Building codes and regulations vary from one location to another, and it is crucial to comply with these guidelines to ensure the safety and structural integrity of your deck. Here are the steps to follow:
- Research: Start by researching your local building codes and regulations. Most building departments have their guidelines available online or can provide you with the necessary information over the phone.
- Schedule an Appointment: If needed, schedule an appointment with a building department representative to discuss your deck project. They can clarify any specific requirements or answer any questions you may have.
- Permit Application: Fill out the necessary permit application forms. These forms typically require information about the size, location, and specifications of your deck. You may also need to submit plans and drawings of your proposed deck.
- Submit Documents: Submit your permit application along with any required documents and the application fee. The building department will review your application and plans to ensure they comply with the building codes and regulations.
- Wait for Approval: Once you’ve submitted your application, you will need to wait for the building department to review and approve it. The timeframe for approval can vary, so it’s important to plan accordingly.
- Inspections: After receiving your permit, you will need to schedule inspections at various stages of the construction process. These inspections typically include foundation inspections, framing inspections, and a final inspection. It is important to follow the building department’s instructions and guidelines for scheduling inspections.
It is crucial to obtain the necessary permits and follow the building codes to ensure the safety and quality of your deck. Failure to comply with these regulations can lead to fines, delays, or even having to dismantle and rebuild your deck.
By investing the time and effort in obtaining the necessary permits and adhering to local building codes, you can ensure that your freestanding deck is built to the highest standards and provides a safe and enjoyable space for you and your family.
Gathering the Necessary Tools and Materials
Before you can start building your freestanding deck, it is important to gather all the necessary tools and materials. Having the right equipment and supplies at hand will make the construction process smoother and more efficient. Here is a list of essential tools and materials you will need:
Tools:
- Measuring tape
- Level
- Hammer
- Drill
- Circular saw
- Screwdriver
- Adjustable wrench
- Safety glasses
- Gloves
- Workbench or sawhorses
Materials:
- Pressure-treated lumber for posts, beams, and joists
- Decking boards (wood or composite)
- Concrete mix for footings
- Post anchors
- Galvanized nails or screws
- Joist hangers
- Decking screws
- Railing components
- Balusters
- Stair stringers
- Step treads
- Finishes and sealants (if desired)
Make sure to check the specific requirements and recommendations for your deck project. The size, design, and intended use of your deck may require additional tools or materials. Additionally, consider the climate and weather conditions in your area when selecting materials to ensure they are suitable for outdoor use and can withstand the elements.
Once you have gathered all the necessary tools and materials, take the time to organize and arrange them in a convenient and accessible manner. This will make it easier for you to navigate through the construction process and locate the items you need.
Remember to wear appropriate safety gear, such as safety glasses and gloves, while handling tools and materials. It is also a good idea to have a first aid kit available in case of any minor injuries.
By having all the tools and materials on hand and properly prepared, you can streamline the construction process and ensure a smooth and efficient building experience.
Clearing and Leveling the Ground
Before you start the construction of your freestanding deck, it is important to clear and level the ground where the deck will be built. Proper ground preparation is essential for ensuring a stable and long-lasting deck. Here are the steps to clear and level the ground:
1. Remove Vegetation:
Begin by removing any grass, plants, or weeds in the area where the deck will be constructed. Use a shovel, rake, or a sod cutter to strip away the vegetation. Ensure that you remove all roots and debris from the surface.
2. Check for Obstacles:
Inspect the area for any underground utilities, such as water pipes, electrical wires, or gas lines. Make sure to mark their locations so that you can avoid damaging them during the construction process. If you are unsure about the location of these utilities, contact the appropriate utility companies to come and mark them for you.
3. Level the Ground:
Using a shovel and a level, start leveling the ground. Remove any high spots and fill in any low spots to achieve a flat surface. It is important to have a level and even base to ensure the stability of your deck.
4. Install Landscape Fabric:
Consider installing landscape fabric over the cleared and leveled ground. This will help prevent the growth of weeds and plants under your deck and reduce the chances of moisture-related issues in the future. Secure the landscape fabric in place with landscape staples.
5. Add Gravel or Sand:
If the soil in your area is prone to drainage issues, consider adding a layer of gravel or sand over the landscape fabric. This will assist in drainage and provide a stable base for your deck.
Take your time with this step, as it lays the foundation for the rest of your deck construction. A well-prepared and level ground will ensure the stability and longevity of your freestanding deck.
Once the ground is cleared and leveled, you can proceed to the next steps of determining the deck size and layout. This will involve marking the locations of the deck posts and preparing them for installation, which we will cover in the next section.
Determining the Deck Size and Layout
Once you have cleared and leveled the ground, the next step in building a freestanding deck is determining the deck size and layout. Careful planning and consideration of your available space, as well as your desired use and functionality, are key factors in this step. Here’s how you can determine the deck size and layout:
1. Measure the Area:
Measure the area where you plan to build the deck. Use a measuring tape to determine the length and width of the space. Take into account any potential obstacles or features that may affect the deck’s footprint, such as trees, existing structures, or utility lines.
2. Consider Functionality:
Determine the primary purpose of your deck and how you plan to use it. Will it be used for entertaining guests, hosting outdoor meals, or simply for lounging and relaxation? Consider any additional features you might want to incorporate, such as seating areas, a barbecue station, or a hot tub, and how much space will be needed for each of these elements.
3. Allow for Flow and Circulation:
Ensure that your deck layout allows for smooth movement and circulation. Leave enough space for people to move comfortably around the deck without feeling cramped. Consider the placement of stairs or pathways to access different areas of the deck, as well as any seating arrangements or furniture placements.
4. Follow Building Codes and Regulations:
Take into account any local building codes and regulations that may specify minimum requirements for deck size, setbacks from property lines, or maximum height restrictions. It is important to adhere to these guidelines to ensure your deck is in compliance with the law and will pass inspections.
5. Transfer Measurements to the Ground:
Using stakes and string, transfer the measurements and layout of your deck onto the cleared and leveled ground. This will help you visualize the dimensions and see how it fits within the space. Adjust the layout as needed to create the desired look and functionality.
Remember that the size and layout of your deck should not only meet your needs but also be proportionate to the scale of your property. A well-designed deck will enhance the visual appeal and functionality of your outdoor space.
Once you have determined the deck size and layout, you can move on to setting the foundation posts, which we will cover in the next section of this guide.
Setting the Foundation Posts
Setting the foundation posts is a crucial step in building a freestanding deck, as it provides the structural support and stability for the entire deck. Here’s a step-by-step guide on how to set the foundation posts:
1. Mark the Post Locations:
Using the layout and measurements you determined in the previous step, mark the locations of the foundation posts on the ground. Space them according to the building code requirements and the span of your beams and joists. Typically, posts are placed every 6 to 8 feet along the perimeter of the deck.
2. Dig the Post Holes:
Using a post hole digger or an auger, dig holes at each marked location. The depth of the holes will depend on the frost line in your area and the recommendations outlined in your local building codes. Generally, a depth of 24 to 36 inches is sufficient.
3. Install Footings:
Depending on the soil conditions and the size of your deck, you may need to install footings at the bottom of each post hole. This helps distribute the weight and prevents the posts from sinking over time. Follow the recommended guidelines for footing construction, such as using concrete footings or precast concrete piers.
4. Set the Posts:
Place the posts in each hole, ensuring they are plumb and level. Use a level to check both the vertical and horizontal alignment. Brace the posts in place temporarily to hold them steady while you work on the next steps.
5. Secure the Posts:
Fill the holes around the posts with concrete mix, following the manufacturer’s instructions. Make sure the concrete is properly compacted and reaches the desired level. Use a post level to recheck the alignment and make any necessary adjustments before the concrete fully sets.
6. Allow the Cement to Cure:
Allow the concrete to cure according to the recommended time frame before moving on to the next stage of the construction process. This typically takes about 24 to 48 hours, but check the instructions on the cement bag for precise curing times.
Properly setting the foundation posts is crucial to the stability and integrity of your freestanding deck. Ensuring that the posts are level, plumb, and securely anchored will provide a solid foundation for the rest of the deck construction.
Next, we will move on to installing the joists and beams, which will provide the framework for your deck structure.
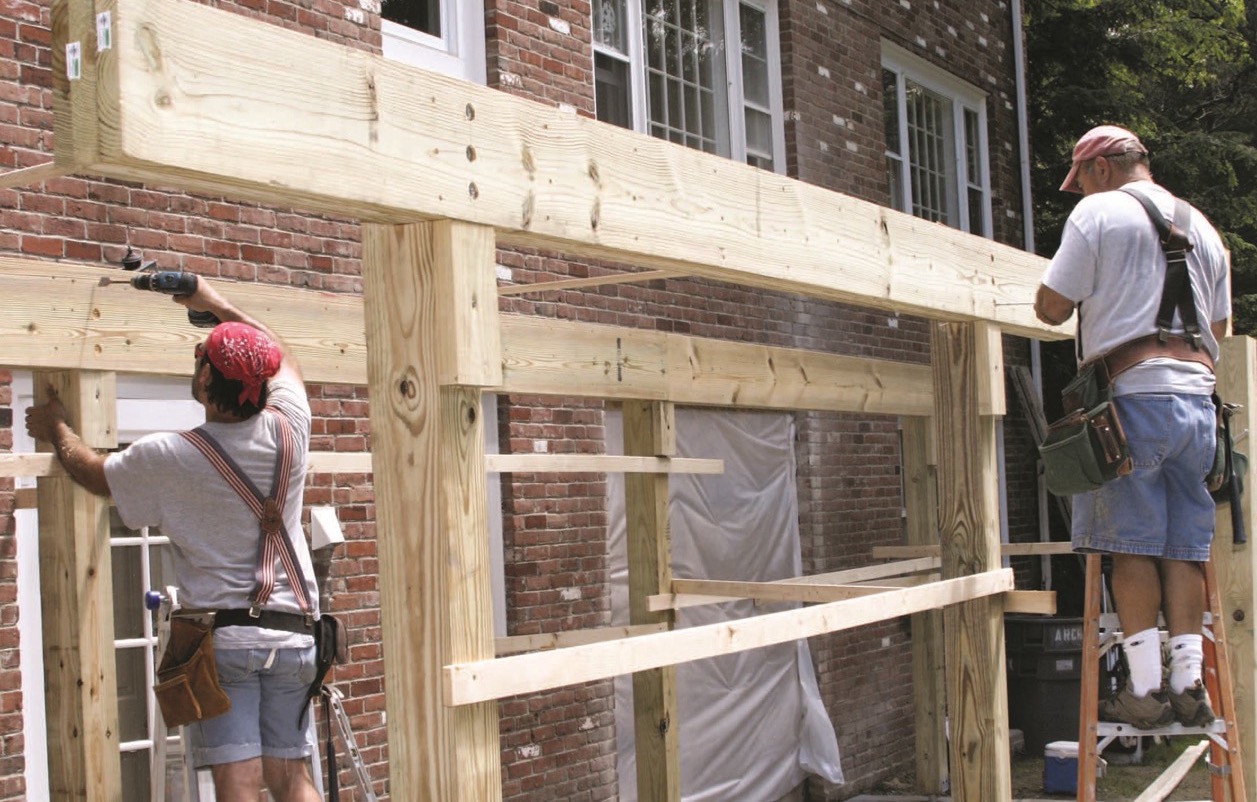
Installing the Joists and Beams
Once the foundation posts are set, it’s time to install the joists and beams, which provide the framework for your freestanding deck. Properly placed and secured joists and beams are essential for the structural integrity and stability of your deck. Follow these steps to install the joists and beams:
1. Cut and Attach Rim Joists:
Measure and cut the rim joists to the appropriate length, based on the dimensions of your deck. Use pressure-treated lumber for added durability and resistance to rot. Attach the rim joists to the outer edges of the foundation posts using exterior-grade screws or nails.
2. Install Center Support Beams:
If your deck is larger or if your local building codes require it, you may need to install center support beams. Measure and cut the beams to the appropriate length and position them perpendicular to the rim joists. Secure them to the foundation posts using appropriate brackets or hardware.
3. Attach Joist Hangers:
Install joist hangers along the rim joists and center support beams, following the manufacturer’s instructions. Ensure that they are spaced according to the building codes and the size of the joists you will be using.
4. Install the Joists:
Measure, cut, and install the joists between the rim joists and center support beams. Place the joists into the joist hangers, ensuring they fit snugly and are level. Secure them in place using appropriate nails or screws.
5. Space the Joists:
Properly space the joists according to the recommended spacing for the decking material you will be using. This will ensure the structural integrity of the deck and provide adequate support for the decking boards. Check the building codes or consult the decking material manufacturer for the recommended spacing.
6. Install Blocking (if required):
Depending on your deck design and local building codes, you may need to install blocking between the joists for added stability and to prevent warping or sagging of the deck boards. Cut the blocking to size and install it between the joists at regular intervals.
Ensure that all the joists and beams are properly aligned, level, and securely attached. This will provide a solid framework for your deck and ensure its long-lasting stability.
With the joists and beams in place, we are ready to move on to the next step of the deck construction process: attaching the decking boards.
Attaching the Decking Boards
Once the joists and beams are in place, it’s time to attach the decking boards to create the visible surface of your freestanding deck. The proper installation of decking boards is essential for the overall appearance, functionality, and longevity of your deck. Follow these steps to attach the decking boards:
1. Choose the Decking Material:
Select the decking material that best suits your preferences, budget, and maintenance requirements. Options include wood, composite, or PVC decking. Ensure that the chosen material is suitable for outdoor use and can withstand the elements.
2. Prepare the Decking Boards:
If using wood decking boards, allow them to acclimate to the outdoor environment for a few days before installation. This prevents any potential warping or shrinking of the boards once they are installed.
3. Start Installation at the Outer Edge:
Begin installation by placing the first decking board flush with the outer edge of the deck frame. Use deck screws or nails to secure the board to the joists, making sure it is level. Repeat this process for the remaining boards along the outer edge of the deck.
4. Create Proper Spacing:
Ensure proper spacing between each decking board to allow for drainage and expansion. Use spacer tools or fasteners designed for creating consistent spacing between boards. Check the manufacturer’s guidelines for the recommended spacing for your specific decking material.
5. Continue Installation:
Continue installing the remaining decking boards, working your way towards the center of the deck. Secure each board to the joists using the recommended screws or nails, ensuring they are aligned and level with the previous boards.
6. Trim the Final Board:
Measure and cut the final decking board to fit within the remaining space. Leave a small gap between the last board and the deck’s edge to allow for expansion. Secure the final board in place with screws or nails, ensuring it aligns with the rest of the boards.
7. Check for a Consistent and Level Surface:
After attaching all the decking boards, use a level or straightedge to check for a consistent and level surface. Make any necessary adjustments by removing or adding shims as needed to ensure a smooth and even deck surface.
Properly attaching the decking boards is essential for creating a beautiful and functional freestanding deck. Taking the time to ensure proper spacing, alignment, and level installation will result in a visually appealing and structurally sound deck.
With the decking boards securely attached, we can move on to the next step: adding railings and balusters to enhance the safety and aesthetics of your deck.
Adding Railings and Balusters
Adding railings and balusters to your freestanding deck not only enhances its safety but also adds a decorative element to the overall appearance. Railings provide a protective barrier and help prevent falls, while balusters, also known as spindles, are the vertical supports that hold up the railing. Here’s how to add railings and balusters to your deck:
1. Check Local Building Codes:
Before installing railings and balusters, familiarize yourself with local building codes and regulations regarding their height, spacing, and other requirements. Ensure that your design adheres to these guidelines for safety and compliance.
2. Choose the Railing Design and Material:
Select a railing design that complements the style of your deck and fits your aesthetic preferences. Railings can be made from various materials such as wood, metal, or composite. Consider the durability, maintenance, and visual appeal of each material option.
3. Determine the Railing Height and Spacing:
Measure the desired railing height based on local building code requirements. Typically, residential deck railings are between 36 and 42 inches tall. Also, determine the spacing between balusters to ensure compliance with code regulations. Common spacing ranges from 4 to 6 inches.
4. Install Railing Posts:
Attach railing posts to the deck frame using appropriate hardware or brackets. Place them at regular intervals along the perimeter of the deck and at any corners. Ensure that the posts are plumb and securely fastened to the deck structure.
5. Attach Top and Bottom Rails:
Secure the top and bottom rails to the railing posts. Use screws or nails specific to your chosen railing material. Make sure the rails are level and properly aligned. This will serve as the framework for attaching the balusters.
6. Attach the Balusters:
Install the balusters in the spaces between the top and bottom rails. Space them evenly according to the railing code requirements. Attach them securely to the rails using screws or baluster connectors. Ensure they are plumb and level as you go.
7. Cut and Install Rail Cap:
If desired, install a rail cap along the top of the railing to provide a finished and comfortable surface. Measure, cut, and attach the rail cap using appropriate fasteners. This provides a smooth grip and adds a polished look to the railing.
8. Finish and Seal the Railings:
Depending on the material of your railings, you may need to apply a finish or sealant to protect and enhance their appearance. Follow the manufacturer’s recommendations for the appropriate products and techniques for your specific railing material.
By adding railings and balusters to your freestanding deck, you create a secure and visually appealing space for enjoying the outdoors. Remember to maintain regular inspections and maintenance of the railings to ensure their long-term safety and durability.
The next step in building your deck is installing steps and stairs, which will provide convenient access to your deck. This will be covered in the following section.
Read more: What To Know About Sealing A Deck
Installing Steps and Stairs
Installing steps and stairs allows for convenient and safe access to your freestanding deck. Properly constructed steps and stairs not only enhance the functionality of your deck but also contribute to its overall aesthetic appeal. Here’s how to install steps and stairs:
1. Determine the Number of Steps:
Measure the height from the ground to the top level of your deck to determine the number of steps needed. Divide the total height by the desired height of each step to calculate the number of steps required. Ensure that the rise of each step is consistent, typically between 6 to 8 inches.
2. Mark the Staircase Location:
Mark the starting and ending points of the stairs on the deck surface. Use a tape measure, chalk line, or string to ensure a straight and even staircase. Consider the width and length of the steps, allowing ample space for comfortable footing and easy navigation.
3. Install Ground Contact Posts:
If your stairs will extend beyond the height of the deck, install ground contact posts at the bottom of the stair stringers. These posts provide additional support and stability for the stairs. Attach the posts securely to the ground using appropriate hardware.
Read more: What To Know About Building A House
4. Cut the Stringers:
Measure and cut the stair stringers according to the desired width and number of steps. Stair stringers are the diagonal supports that hold the steps in place. Use a saw or stair jig to ensure precise and accurate cuts.
5. Attach the Stringers:
Secure the stair stringers to the deck structure using appropriate brackets or hangers. Align the stringers with the marked locations on the deck and ensure they are level and plumb. Use screws or nails to attach the stringers securely to the deck frame.
6. Install the Treads and Risers:
Place the treads, which are the horizontal boards that you step on, on top of the stringers. Attach them securely using screws or nails. Install the risers, which are the vertical boards that enclose the underside of each step, by attaching them to the back of the stringers.
7. Apply Non-Slip Surface:
To enhance safety, consider applying a non-slip surface or adding adhesive strips to the treads. This will provide traction and reduce the risk of slips or falls, especially when the steps are wet or slippery.
8. Install Handrails (if required):
Check local building codes to determine if handrails are required for your stairs. If required, install handrails on both sides of the stairs to provide additional support and safety. Ensure that the handrails are at a comfortable and graspable height.
9. Perform a Safety Check:
Before using the steps and stairs, perform a thorough safety check to ensure that they are stable and secure. Test each step for stability and inspect all the connections, treads, risers, and handrails. Make any necessary adjustments or repairs to ensure the safety of anyone using the stairs.
By installing steps and stairs, you provide a functional and safe means of accessing your freestanding deck. Be sure to follow local building codes and regulations and consider the needs and abilities of those who will be using the stairs.
The next step in completing your deck project is applying finishes and sealants to protect and enhance the appearance of your deck. This will be covered in the following section.
Applying Finishes and Sealants
Applying finishes and sealants to your freestanding deck is an important step that helps protect the wood or composite material from the elements and enhances its overall appearance. Finishes can add color, richness, and UV protection, while sealants create a barrier against moisture and prevent rot. Here’s how to apply finishes and sealants to your deck:
1. Clean the Deck:
Prior to applying any finishes or sealants, thoroughly clean the deck surface to remove dirt, debris, and any existing finishes. Use a deck cleaner and a scrub brush or pressure washer to ensure a clean and smooth surface. Allow the deck to dry completely before moving on to the next step.
2. Sand the Surface (if necessary):
If there are any rough or splintered areas on your wood deck, sand them down to create a smooth and even surface. This will help the finishes and sealants adhere properly and create a more visually appealing finish.
3. Choose the Finish and Sealant:
Select finishes and sealants that are specifically formulated for outdoor use and are suitable for the material of your deck, whether it’s wood or composite. Choose a finish that matches your desired aesthetic, such as clear, semi-transparent, or solid color stains. Consider the level of UV protection and durability provided by the products.
4. Test the Finish (Optional):
Before applying the finish to the entire deck, it is recommended to test it on a small, inconspicuous area. This allows you to ensure that the color and finish outcome meet your expectations before proceeding with the full application.
5. Apply the Finish:
Using a paintbrush, roller, or sprayer, apply the finish or stain to the deck surface following the manufacturer’s instructions. Start from one end and work your way to the other, ensuring even coverage. Pay close attention to any joints, edges, and hard-to-reach areas. Allow the first coat to dry completely before applying additional coats as needed, following the recommended drying time between coats.
6. Apply the Sealant:
Once the finishes have dried, apply a waterproof sealant to protect the deck from moisture and extend its lifespan. Use a brush or a sprayer to evenly distribute the sealant, making sure to cover all exposed surfaces. Pay extra attention to areas that are prone to water pooling, such as the bottoms of posts and along the edges of the deck.
7. Regularly Maintain and Refresh:
To maintain the beauty and longevity of your deck, regularly inspect and refresh the finishes and sealants as recommended by the manufacturer. This may involve reapplying finishes and sealants every few years or as needed to ensure optimal protection.
By applying finishes and sealants, you not only improve the longevity of your deck but also enhance its appearance and protect it from the elements. Regular maintenance and refreshment will ensure its continued beauty and performance for years to come.
Now that your freestanding deck is complete, it’s important to keep up with regular maintenance and upkeep. We will cover the essential steps to ensure the longevity and enjoyment of your deck in the next section.
Regular Maintenance and Upkeep
Regular maintenance and upkeep are essential for preserving the beauty, functionality, and longevity of your freestanding deck. By following these steps, you can protect your investment and ensure that your deck continues to be a safe and enjoyable space for years to come:
1. Inspect Regularly:
Perform routine inspections of your deck to identify any issues or potential problems. Look for signs of rot, decay, loose or damaged boards, weak spots, or loose connections. Address any issues promptly to prevent further damage and ensure the safety of anyone using the deck.
2. Clean As Needed:
Regularly clean your deck to remove dirt, debris, leaves, and other organic matter. Use a broom, leaf blower, or hose to clean the surface. For tougher stains, use a deck cleaner and scrub with a brush or power washer. Avoid using harsh chemicals that may damage the decking material.
3. Repair Damaged Areas:
If you notice any loose boards, nails, or screws, or if you find any damaged or rotting wood, repair or replace them as needed. Tighten loose connections, replace damaged boards, and address any structural issues promptly to prevent further deterioration.
4. Prevent Fading:
To prevent fading and sun damage, consider using a UV protective coating or applying a deck brightener to restore the original color and vibrancy of your deck. Follow the manufacturer’s instructions and recommendations for the specific products you choose.
5. Clear Debris:
Regularly remove leaves, branches, and other debris from your deck to prevent moisture buildup and the growth of mold and mildew. Clear out any vegetation that may be growing between the decking boards or along the edges of the deck.
6. Maintain Proper Drainage:
Ensure that the deck has proper drainage to prevent water from pooling and causing damage. Clear any clogged drainage systems or gutters to allow water to flow freely away from the deck.
7. Protect from Water Damage:
Apply water repellents, stains, or sealants as recommended by the manufacturer to protect your deck from water damage. This will help prevent rotting, warping, and decay of the wood or composite material.
8. Regularly Clean and Maintain Railings:
Keep the railings clean and well-maintained by regularly wiping them down and inspecting for any loose or damaged components. Replace any balusters or railings that are loose or cracked.
9. Remove Snow and Ice:
During winter months, remove snow and ice from your deck using a plastic shovel or a broom with soft bristles. Avoid using metal shovels or sharp objects that may damage the deck surface.
10. Trim Vegetation:
Trim any overhanging branches or vegetation near your deck to prevent excess debris, shade, and moisture accumulation. This will help keep your deck clean and minimize the chances of rot or mold growth.
By following these regular maintenance practices, you can extend the life and beauty of your freestanding deck. Taking the time to address any issues promptly and keeping up with routine cleaning and maintenance will ensure that your deck remains a cherished and functional space for years to come.
Congratulations on completing your freestanding deck project! By following this comprehensive guide and implementing regular maintenance, you have created an inviting and beautiful outdoor living space to enjoy for many seasons to come.
Conclusion
Building a freestanding deck is a rewarding project that can transform your outdoor space into a functional and visually appealing area for relaxation and entertainment. By following the steps outlined in this comprehensive guide, you have learned how to create a sturdy and stylish deck that reflects your personal style and meets your specific needs.
Choosing the right location, checking local building codes and permits, gathering the necessary tools and materials, clearing and leveling the ground, determining the deck size and layout, setting the foundation posts, installing the joists and beams, attaching the decking boards, adding railings and balusters, installing steps and stairs, applying finishes and sealants, and regular maintenance and upkeep are all critical components of a successful deck construction project.
Remember, safety should always be a top priority throughout the entire construction process. Complying with local building codes, using appropriate tools and equipment, and performing regular inspections and maintenance will help ensure that your deck remains a safe and enjoyable space for years to come.
Whether you are a DIY enthusiast or hiring professionals, this guide has provided you with the knowledge and insights you need to build a freestanding deck that is both functional and aesthetically pleasing. Always refer to local regulations and consult with experts when needed to ensure your deck meets all necessary requirements.
Now that you have completed your freestanding deck, it’s time to sit back, relax, and enjoy the beauty and functionality it brings to your outdoor living space. Whether you’re hosting gatherings, enjoying lazy weekends, or simply soaking in nature’s beauty, your deck will be there to serve as a sanctuary of relaxation and joy.
Congratulations on your new freestanding deck and happy decking!
Frequently Asked Questions about Everything You Need To Know About Building A Freestanding Deck
Was this page helpful?
At Storables.com, we guarantee accurate and reliable information. Our content, validated by Expert Board Contributors, is crafted following stringent Editorial Policies. We're committed to providing you with well-researched, expert-backed insights for all your informational needs.
0 thoughts on “Everything You Need To Know About Building A Freestanding Deck”