
Articles
How Low Should Ceiling Fan Hang
Modified: October 28, 2024
Learn the ideal height for hanging a ceiling fan in this informative article. Discover tips and recommendations for maximizing comfort and efficiency.
(Many of the links in this article redirect to a specific reviewed product. Your purchase of these products through affiliate links helps to generate commission for Storables.com, at no extra cost. Learn more)
Introduction
When it comes to creating a comfortable and stylish living space, ceiling fans play a crucial role. Not only do they help circulate air and cool down a room, but they also add a decorative touch to your interior design. However, properly hanging a ceiling fan is essential to ensure optimal performance and safety.
Knowing how low a ceiling fan should hang is a common concern for homeowners and decorators. The height at which you hang a ceiling fan can affect its functionality, efficiency, and overall aesthetic appeal. In this article, we will explore the factors to consider when determining the ideal height to hang a ceiling fan and provide recommendations for different ceiling types and room sizes.
Before jumping into the specifics of hanging a ceiling fan, it’s important to note that hiring a professional electrician is always a good idea, especially if you’re not experienced with electrical work. They have the expertise to install and wire the fan correctly, ensuring your safety and avoiding potential damage to your home’s electrical system. However, if you’re confident in your DIY skills, this article will serve as a helpful guide for you to follow.
Now, let’s delve into the factors you should consider before hanging a ceiling fan and the recommended heights for different ceiling types.
Key Takeaways:
- Properly hanging a ceiling fan involves measuring ceiling height, determining blade clearance, assessing angled ceilings, considering room size, evaluating lighting and decor, and ensuring safety compliance for optimal performance and safety.
- Following manufacturer’s instructions, gathering necessary tools, and considering safety precautions are crucial for a successful ceiling fan installation. Regular maintenance and inspections help keep the fan in excellent working condition.
Factors to Consider when Hanging a Ceiling Fan
Before you start hanging a ceiling fan, there are several important factors to take into consideration. These factors will help determine the appropriate height at which to hang the fan, ensuring optimal performance and safety. Let’s explore these factors in detail:
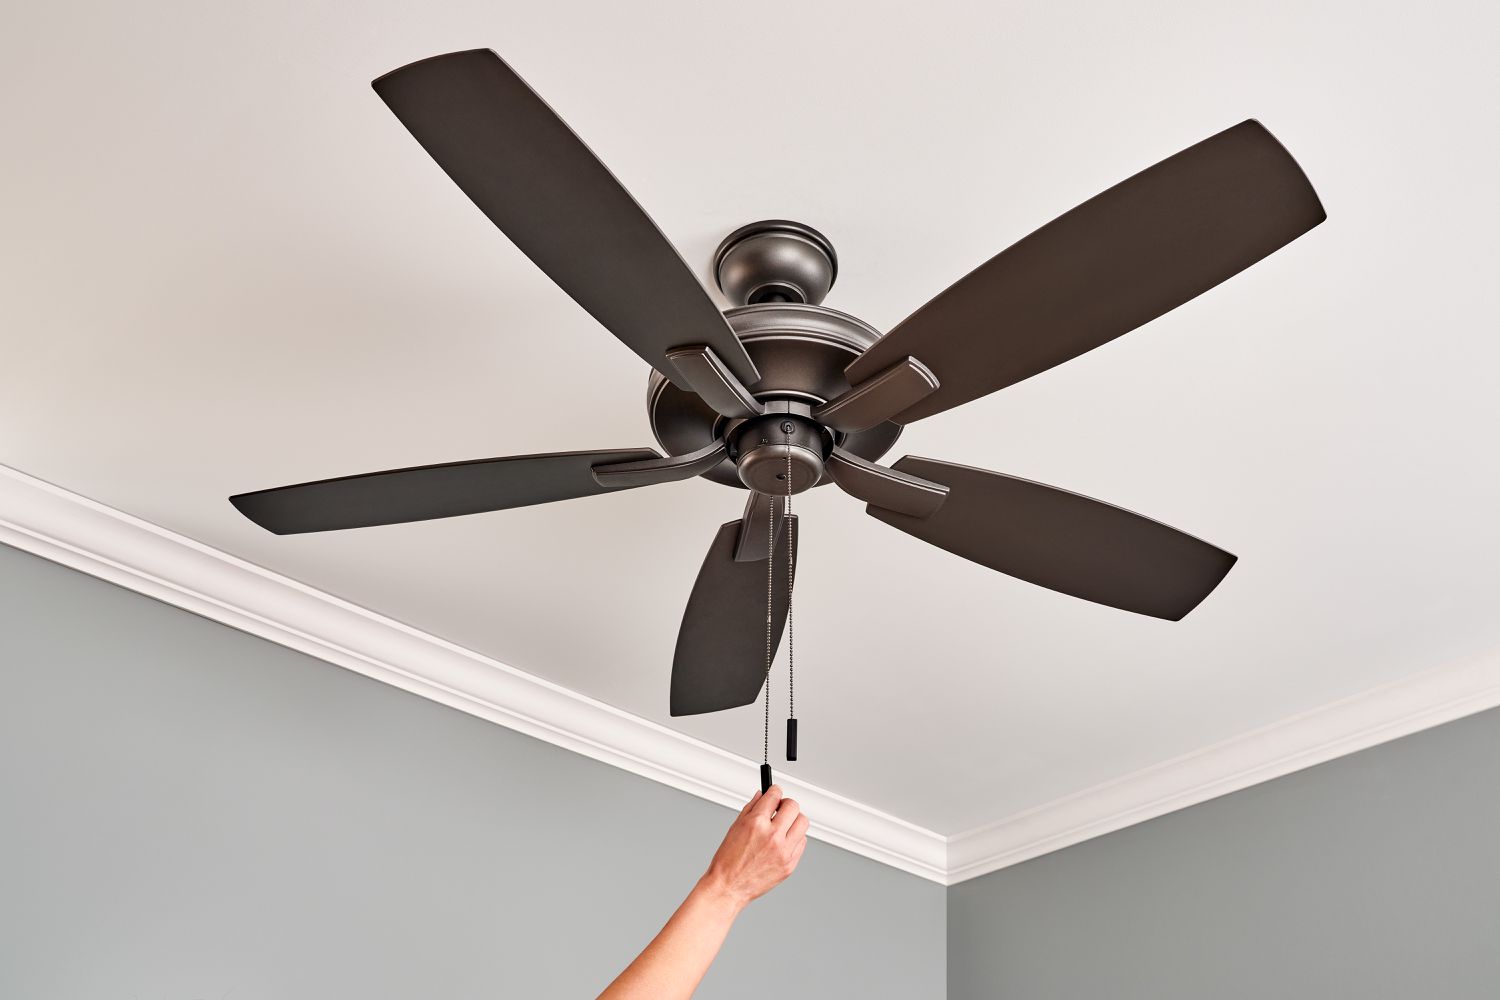
- Ceiling Height: The height of your ceiling plays a crucial role in determining how low a ceiling fan should hang. As a general rule, there should be a minimum clearance of 7 feet between the bottom of the fan blades and the floor. This ensures that tall individuals or objects will not come into contact with the rotating blades.
- Blade Clearance: Consider the height of the ceiling fan blades itself. Some ceiling fans have longer blades that require more clearance, while others have shorter blades that can hang lower. Make sure to factor in the blade length when determining the appropriate hanging height.
- Angled Ceilings: If you have an angled ceiling, also known as a vaulted or sloped ceiling, you need to take into account the slope angle when deciding how low to hang the fan. There are special mounting brackets designed for angled ceilings, allowing the fan to be installed securely and at the correct height.
- Room Size: The size of the room can also influence the height at which you hang the ceiling fan. In smaller rooms, you can hang the fan slightly lower to maximize air circulation in the limited space. In larger rooms, you may want to hang the fan higher for improved airflow distribution.
- Lighting and Decor: Consider whether your ceiling fan has integrated lighting fixtures or decorative elements. If it has lights, make sure the fan is hung at a height that provides ample illumination for the room. Additionally, if your fan has intricate or decorative details, you may want to hang it at a height that showcases these features.
- Safety Considerations: Lastly, always prioritize safety when hanging a ceiling fan. Ensure that the fan is securely mounted to the ceiling and that the electrical wiring is properly connected. Additionally, make sure there are no obstructions or hazards near the fan, such as low hanging light fixtures or furniture that could come into contact with the blades.
By taking these factors into consideration, you can determine the ideal height at which to hang your ceiling fan. Next, we will provide recommended heights for different ceiling types to help you make an informed decision.
– Ceiling Height
One of the most important factors to consider when hanging a ceiling fan is the height of your ceiling. The height will greatly impact how low the fan should hang for optimal performance and safety.
If your ceiling is of standard height, typically around 8 to 9 feet, you have the flexibility to hang the fan at a comfortable height. A good rule of thumb is to leave a minimum clearance of 7 feet between the bottom of the fan blades and the floor. This ensures that people, especially tall individuals, won’t accidentally come too close to the rotating blades. Additionally, it allows for adequate air circulation in the room without causing any discomfort. If you have a standard ceiling height, you can follow the manufacturer’s recommendations for the specific fan you are installing, as they often provide guidelines for ideal hanging height.
On the other hand, if you have a high ceiling, typically 10 feet or higher, you need to take additional considerations into account. In this case, you should hang the ceiling fan slightly lower, ensuring that it is within reach of the fan controls and any built-in lighting fixtures. Hanging the fan too high in a room with a high ceiling can make it difficult to access and control, defeating the purpose of having a ceiling fan in the first place. Again, refer to the manufacturer’s guidelines for specific recommendations based on your fan’s model and design.
For rooms with low ceilings, which are generally less than 8 feet in height, it’s crucial to choose a ceiling fan with a low-profile or flush mount design. These fans are specifically designed to hang closer to the ceiling, maximizing head clearance and preventing any obstructions. Low-profile fans are a great solution for rooms with limited ceiling height, such as basements or rooms with dropped ceilings. Make sure to measure the clearance between the blades of the fan and the floor to ensure it meets the necessary safety requirements.
Finally, if you have a sloped or vaulted ceiling, it’s important to use a special mounting bracket designed for angled ceilings. These brackets allow the fan to be securely mounted and positioned at the appropriate height, compensating for the slope of the ceiling. The angle of the ceiling will determine how low the fan can hang and what adjustments need to be made during the installation process. Ensure that the mounting bracket is compatible with your specific fan model and ceiling angle.
By taking into account the height of your ceiling, you can determine the appropriate hanging height for your ceiling fan. This will ensure optimal airflow, functionality, and safety in your living space.
– Blade Clearance
Blade clearance is another important factor to consider when hanging a ceiling fan. It refers to the distance between the bottom of the fan blades and the floor or any other objects in the room. Proper blade clearance is essential for both functionality and safety.
The length of the fan blades directly impacts the required clearance. Ceiling fans come in various blade lengths, typically ranging from 24 to 72 inches. Longer blades will require a higher hanging height to maintain sufficient blade clearance. On the other hand, shorter blades allow for a lower hanging height without compromising safety.
When determining the appropriate blade clearance, consider the activities and movement that will occur in the room. If the fan will be installed in a room with low furniture or high foot traffic, it’s advisable to hang the fan higher to ensure there is adequate clearance for people to walk under it comfortably. You don’t want anyone to accidentally bump into the blades or feel restricted in their movement.
Additionally, if you have any tall objects or fixtures in the room, such as a tall bookshelf or chandelier, make sure to account for their height when determining the blade clearance. You want to avoid any potential collisions between the rotating blades and these objects.
Another important consideration is the angle of the fan blades. Some ceiling fans have angled blades that are designed to optimize airflow and efficiency. These angled blades may require more clearance compared to fans with flat or straight blades. Refer to the manufacturer’s specifications and instructions for your specific fan model to ensure that you allow for adequate blade clearance based on the design of the fan.
Ultimately, the goal is to have a ceiling fan that provides optimal air circulation while maintaining safety in the room. By considering the length and angle of the fan blades, as well as the activities and objects within the space, you can determine the appropriate hanging height to ensure proper blade clearance.
– Angled Ceilings
If you have an angled ceiling, also known as a sloped or vaulted ceiling, hanging a ceiling fan requires special consideration. Angled ceilings can create challenges when it comes to achieving proper installation and finding the ideal hanging height.
When installing a ceiling fan on an angled ceiling, it’s crucial to use a mounting bracket specifically designed for sloped ceilings. These brackets are adjustable and allow the fan to be installed securely and at the correct angle, ensuring proper airflow and stability.
Before selecting a ceiling fan for an angled ceiling, determine the pitch or slope of the ceiling. This measurement is usually expressed as the angle of the ceiling in degrees or the ratio of rise to run (e.g., 2:12, 6:12). The pitch of the ceiling will affect the hanging height and the type of mounting bracket you need.
Once you have established the pitch of the ceiling, consider the desired hanging height. One approach is to maintain a consistent distance between the bottom of the fan blades and the floor. This can be achieved by using a downrod or extension rod that matches the slope of the ceiling. The length of the downrod is determined by the pitch of the ceiling and the desired clearance between the blades and the floor.
It’s important to note that ceiling fans on angled ceilings may appear higher or lower when viewed from different angles. Take this into account when adjusting the hanging height, as it may affect the overall aesthetics and functionality of the fan in the room.
In some cases, you may find that the angle of your ceiling is too steep or irregular to accommodate a standard ceiling fan installation. If this is the case, consider using a hugger or low-profile ceiling fan. These fans are specifically designed to be mounted close to the ceiling, making them suitable for rooms with sloped or vaulted ceilings.
Remember to always consult the manufacturer’s instructions and guidelines for your specific fan model. They will provide you with the necessary information regarding angles, mounting brackets, and hanging heights that are compatible with your ceiling type.
By using the appropriate mounting bracket and considering the pitch of your angled ceiling, you can successfully install a ceiling fan at the ideal height, providing both functionality and aesthetic appeal in your space.
– Room Size
The size of the room is an important factor to consider when determining how low a ceiling fan should hang. Room size can impact the airflow, efficiency, and overall effectiveness of the ceiling fan in providing comfort.
In smaller rooms, hanging the fan slightly lower can help maximize airflow and improve the distribution of air circulation. With limited space, you want to ensure that the fan is positioned at a height where it can effectively move the air around the room. This can help in cooling down the space and creating a more comfortable environment.
On the other hand, in larger rooms, you may want to hang the fan higher to ensure better air distribution across a wider area. A higher hanging height can help create a more balanced airflow throughout the room. Consider the size and layout of the room, as well as any architectural features or furniture arrangements that may affect the movement of air. Placing the fan at an optimal height in a larger room will help maximize its cooling potential and ensure that all occupants benefit from the air movement.
Another consideration is the presence of other cooling or heating systems in the room. If the room already has an air conditioning unit or central heating system, the hanging height of the ceiling fan can be adjusted accordingly. For example, if the air conditioning unit is located near the ceiling, hanging the fan lower can help facilitate the circulation of cool air. Conversely, if the room has a baseboard heating system, a higher hanging height for the fan can prevent interference with the warm air rising from the baseboards.
Additionally, consider the function and purpose of the room. In a bedroom, for instance, a lower hanging height for the ceiling fan can help ensure a comfortable sleep environment. In a kitchen or dining area, where cooking odors or steam may be present, a higher hanging height can prevent the fan from directly interacting with these elements.
Ultimately, the size of the room will dictate the hanging height of the ceiling fan. By taking into account the room dimensions, layout, and other cooling or heating systems, you can determine the ideal height that will enhance the fan’s performance and create a comfortable environment in the specific space.
– Lighting and Decor
When hanging a ceiling fan, it’s important to consider the lighting and decor elements of the room. These factors can influence the hanging height and overall aesthetics of the fan installation.
Many ceiling fans come equipped with integrated lighting fixtures, which can provide both functional and decorative illumination in the room. If your fan has built-in lights, you’ll want to ensure that the hanging height allows for adequate lighting coverage. Consider the height of the ceiling and the desired level of brightness in the space. Hanging the fan too high may result in insufficient lighting, while hanging it too low may create excessive glare or shadows. Finding the right balance is crucial for creating a well-lit and inviting atmosphere.
In addition to lighting, consider the overall decor of the room. Some ceiling fans are designed with decorative accents such as unique blade designs, ornate motor housings, or stylish finishes. To highlight these decorative features, you may want to hang the fan at a height that allows them to be clearly visible and admired. By positioning the fan at an optimal height, you can enhance the overall aesthetic appeal of the room.
Take into account any other elements in the room that may affect the fan installation. For example, if there are low-hanging light fixtures or ceiling beams, ensure that the ceiling fan is hung at a height that prevents any potential collisions or obstructions. The fan should blend seamlessly with the existing decor and not interfere with other design elements or functional fixtures in the room.
When choosing the hanging height for a ceiling fan with lighting and decorative features, it’s essential to strike a balance between functionality and aesthetics. Consider the lighting needs of the space and the desire to showcase the fan’s design elements. By finding the right height, you can create a visually pleasing and well-lit environment.
– Safety Considerations
Ensuring the safety of your ceiling fan installation is of utmost importance. There are several key safety considerations to keep in mind when hanging a ceiling fan.
First and foremost, always follow the manufacturer’s instructions and recommendations for installing the fan. These guidelines will provide specific details on mounting requirements, wiring procedures, and safety precautions. By adhering to the manufacturer’s instructions, you can ensure that the fan is installed correctly and safely.
It’s crucial to verify that the ceiling can support the weight of the fan. Ceiling fans can be quite heavy, especially those with additional lighting fixtures. Make sure that the electrical box and mounting bracket you are using are rated for the weight of the fan. If necessary, consult a professional electrician or a structural engineer to assess the stability of the ceiling and provide guidance on the appropriate mounting hardware.
During the installation process, be cautious of potential electrical hazards. Ensure that the power is turned off at the circuit breaker before starting any electrical work. Use appropriate safety equipment, such as insulated gloves and goggles, to protect yourself during the installation. If you don’t have experience with electrical wiring, it’s recommended to hire a licensed electrician to handle the installation and ensure safe electrical connections.
When determining the hanging height of the ceiling fan, consider the potential for injuries or accidents. Ensure that the fan is hung at a height that prevents people, especially tall individuals or objects, from coming into contact with the rotating blades. A minimum clearance of 7 feet between the bottom of the blades and the floor is generally recommended. This will help prevent accidental injuries and safeguard the well-being of occupants in the room.
Take note of any obstructions or potential hazards near the ceiling fan. Ensure that no furniture, light fixtures, or other objects are positioned directly under the fan that could interfere with its rotation. It’s also important to make sure that the fan blades have adequate space to move freely without hitting any nearby objects.
Regular maintenance and inspections are essential for maintaining the safety of your ceiling fan. Check the fan periodically to ensure that all screws and fasteners are tightly secured. Clean the fan blades regularly to prevent dust buildup, as this can affect the fan’s performance and potentially create a fire hazard. If you notice any unusual noises, wobbling, or other issues with the fan, it’s important to address them promptly to prevent any accidents or damage.
By following proper installation procedures, considering hanging height for blade clearance, and conducting routine maintenance, you can ensure the safety of your ceiling fan installation. Prioritizing safety is key to enjoying the benefits of a well-functioning and secure ceiling fan in your space.
Recommended Heights for Hanging Ceiling Fans
When it comes to hanging a ceiling fan, there are recommended heights based on different ceiling types and room sizes. These guidelines can help you determine the ideal height to ensure optimal airflow, functionality, and aesthetics in your space. Let’s explore the recommended heights for various scenarios:
- Standard Ceiling Height (8-9 feet): For rooms with a standard ceiling height, hanging the ceiling fan with a clearance of 7 feet between the bottom of the fan blades and the floor is a good starting point. This provides ample headroom for most individuals and ensures proper air circulation throughout the room. Following the manufacturer’s recommendations for your specific fan model is also advised to achieve the best performance.
- High Ceiling (10 feet or higher): In rooms with high ceilings, it is recommended to hang the ceiling fan slightly lower to ensure better accessibility and maximize airflow efficiency. A height of 8 to 9 feet between the blades and the floor should be considered to allow for easy reach of the fan controls and built-in lighting fixtures. This height strikes a balance between functionality and aesthetics, making it an ideal choice for rooms with high ceilings.
- Low Ceiling (less than 8 feet): In rooms with low ceilings, it’s important to choose a ceiling fan with a low-profile or flush mount design. These fans are specifically designed to be mounted closer to the ceiling, allowing for sufficient headroom and preventing any obstructions. Measure the clearance between the blades and the floor to ensure it meets the necessary safety requirements for low ceilings.
- Sloped or Vaulted Ceiling: When installing a ceiling fan on a sloped or vaulted ceiling, use a mounting bracket specifically designed for angled ceilings. This will allow you to adjust the angle and hang the fan securely. The height at which you hang the fan on a sloped or vaulted ceiling should maintain the recommended clearance of 7 feet between the blades and the floor, while accounting for the angle of the ceiling.
Remember that these recommended heights serve as guidelines, and it’s important to consider other factors such as blade clearance, room size, lighting, and decor. Adhering to safety considerations and following the manufacturer’s instructions for your specific fan model will ensure a properly installed ceiling fan that is both functional and visually appealing in your space.
By understanding the recommended heights for hanging ceiling fans based on different ceiling types, you can make informed decisions and enjoy the benefits of a well-placed and efficient fan in your home or office.
Read more: What Way Should Ceiling Fan Turn In Summer
– Standard Ceiling Height (8-9 feet)
For rooms with a standard ceiling height, typically ranging from 8 to 9 feet, there are recommended heights for hanging ceiling fans that ensure optimal performance and aesthetics. These guidelines help maintain a comfortable environment while providing sufficient air circulation. Here’s what you need to know:
The general rule of thumb for standard ceiling heights is to maintain a clearance of 7 feet between the bottom of the ceiling fan blades and the floor. This clearance ensures that individuals of average height can comfortably walk underneath the fan without any risk of coming into contact with the rotating blades. It also allows for adequate airflow and circulation throughout the room.
When installing a ceiling fan in a room with a standard ceiling height, it’s essential to consider the specific recommendations provided by the manufacturer for the fan model you’re using. Manufacturers often provide guidelines for the ideal hanging height to achieve optimal performance. These guidelines take into account factors such as blade length, motor efficiency, and airflow distribution.
Ensuring the recommended clearance between the blades and the floor is important not just for safety but also for the fan’s functionality. Hanging the fan at the proper height allows it to generate a steady flow of air without any obstructions, enhancing its cooling effect during warmer months and helping to distribute warm air evenly during colder months.
Additionally, consider the size and layout of the room. In larger rooms, you may want to hang the ceiling fan slightly higher to ensure adequate airflow coverage throughout the space. Conversely, in smaller rooms, you can hang the fan slightly lower to maximize the air circulation and cool the area more effectively.
Lastly, take into account any lighting or decor elements that are part of the fan. If your ceiling fan includes integrated lighting fixtures, ensure that the hanging height allows the light to be dispersed evenly without creating any glare or shadows. Similarly, if the fan has decorative elements, hanging it at an appropriate height allows the room to showcase those features and adds to the overall aesthetics.
By following the recommended heights for hanging ceiling fans in rooms with standard ceiling heights, you can optimize the performance and functionality of the fan while maintaining a safe and comfortable environment in your space.
– High Ceiling (10 feet or higher)
Rooms with high ceilings, typically measuring 10 feet or higher, require special consideration when it comes to hanging a ceiling fan. The height at which the fan is installed in these rooms can greatly impact functionality, aesthetics, and accessibility. Here are some important points to keep in mind:
Hanging the ceiling fan slightly lower in rooms with high ceilings is recommended to ensure better accessibility and to maximize airflow efficiency. A suggested height for ceiling fan installation in rooms with high ceilings is 8 to 9 feet between the bottom of the fan blades and the floor.
By hanging the fan at this lower height, you make it easier to reach the fan controls and any integrated lighting fixtures. This adjustment ensures that you can comfortably operate the fan and light without the need for additional equipment or assistance, enhancing the overall convenience of the fan installation.
Properly positioning the ceiling fan in a high-ceilinged room also helps to optimize airflow and circulation. By hanging the fan lower, it increases the proximity to the living space, allowing the air movement to reach occupants at a lower level. This is especially beneficial during warm weather when you want to cool down the room effectively.
Keep in mind that while a lower hanging height is recommended for high ceilings, you should still leave an appropriate clearance between the fan blades and the floor. A minimum of 7 feet of clearance is still advisable to ensure safe and comfortable movement within the room without any risk of contact with the rotating blades.
Consider the size and layout of the room when determining the appropriate hanging height for a ceiling fan in a high-ceilinged space. If the room is large, hanging the fan slightly higher may be necessary to ensure proper airflow distribution throughout the entire area. On the other hand, for smaller rooms, a lower hanging height may be sufficient to achieve adequate air movement and circulation.
Always refer to the manufacturer’s instructions and recommendations for the specific fan model you are installing. Each fan may have slightly different recommendations based on its design and specifications, so it’s important to follow those guidelines to achieve optimal performance and safety.
By adhering to the recommended heights for hanging ceiling fans in high-ceilinged rooms, you can enhance the functionality, accessibility, and visual appeal of the fan while maintaining a safe and comfortable environment.
Ceiling fans should hang at least 7 feet above the floor for safety and optimal air circulation. For higher ceilings, use a downrod to lower the fan to the recommended height.
– Low Ceiling (less than 8 feet)
Rooms with low ceilings, typically measuring less than 8 feet, require special considerations when hanging a ceiling fan. The height at which the fan is installed in these rooms is crucial to ensure safety, functionality, and efficient airflow. Here’s what you need to know:
In rooms with low ceilings, it’s important to choose a ceiling fan with a low-profile or flush mount design. These types of fans are specifically designed to be mounted closer to the ceiling, maximizing headroom and preventing any obstructions.
When selecting a ceiling fan for a room with a low ceiling, consider the clearance between the bottom of the fan blades and the floor. It’s essential to ensure that the hanging height allows for a sufficient clearance to prevent any risk of contact or injury from the rotating blades. A minimum clearance of 7 feet is generally recommended for safety and comfort.
The low-profile design of these fans ensures that they don’t hang too low and interfere with your movement or any furniture in the room. This type of fan is ideal for rooms with limited vertical space, such as basements, attics, or rooms with dropped or false ceilings.
Measure the available space between the ceiling and the floor to determine the proper size of the low-profile fan that will fit without obstructing the room. It’s important to select a fan with appropriately sized blades and a motor housing that allows for adequate airflow within the lower ceiling height constraints.
Make sure to follow the manufacturer’s recommendations and guidelines for installing a ceiling fan in a low-ceilinged room. Each fan may have specific requirements and instructions regarding the appropriate hanging height and clearances to ensure optimal performance and safety.
By choosing a ceiling fan with a low-profile design and ensuring the proper hanging height, you can enjoy the benefits of airflow and circulation even in rooms with limited ceiling space. These fans provide comfort without sacrificing safety or compromising the functionality of the space.
– Sloped or Vaulted Ceiling
Hanging a ceiling fan on a sloped or vaulted ceiling requires special attention to ensure proper installation and optimal performance. The unique angle of these ceilings presents challenges in determining the ideal hanging height and maintaining safe blade clearance. Here are some key points to consider:
When installing a ceiling fan on a sloped or vaulted ceiling, it’s essential to use a mounting bracket specifically designed for angled ceilings. These brackets allow for secure installation and adjustment, enabling the fan to be positioned at the correct angle.
Start by determining the exact slope or pitch angle of your ceiling. This measurement can be expressed in degrees or as a ratio of rise to run (e.g., 2:12, 6:12). Understanding the slope of the ceiling is crucial in determining the appropriate hanging height and clearance for the fan blades.
To maintain proper blade clearance, consider hanging the fan at a height that provides a 7-foot minimum clearance between the bottom of the fan blades and the floor. This ensures both safety and optimal airflow throughout the room.
Install a downrod or extension rod that matches the slope of the ceiling to achieve a consistent clearance between the blades and the floor. This will help keep the fan balanced and prevent any obstructions that could affect its performance.
Take into account the aesthetics of the room along with the functional aspects of the fan installation on a sloped or vaulted ceiling. You may want to hang the fan at a height that showcases any unique design features or decorative elements, adding to the overall visual appeal of the space.
Remember that the perceived height of the ceiling fan may vary from different angles within the room due to the slope. Take this into consideration when determining the hanging height to ensure the fan retains its aesthetic appeal when viewed from various viewpoints.
If the angle of your sloped or vaulted ceiling is too steep or irregular for a traditional ceiling fan installation, consider using a hugger or low-profile ceiling fan. These fans are designed to be mounted close to the ceiling, providing a safe and effective cooling solution for rooms with challenging ceiling angles.
Always consult the manufacturer’s instructions and guidelines for your specific fan model. They will provide specific recommendations and requirements for installing the fan on a sloped or vaulted ceiling, ensuring a secure and well-placed installation.
By using the appropriate mounting bracket and considering the unique characteristics of your sloped or vaulted ceiling, you can install a ceiling fan at an ideal height, ensuring both functionality and aesthetic appeal in your space.
Tools and Materials Needed for Hanging a Ceiling Fan
Before you begin the process of hanging a ceiling fan, it’s important to gather the necessary tools and materials. Having the right equipment on hand will make the installation process smoother and more efficient. Here are the tools and materials you will need:
Tools:
- Screwdriver (both flathead and Phillips)
- Adjustable wrench
- Pliers
- Wire strippers
- Wire cutters
- Stud finder
- Measuring tape
- Ladder or step stool (depending on the ceiling height)
- Electrical tester or voltage detector
- Drill (for pre-drilling holes, if needed)
Materials:
- Ceiling fan kit (including fan blades, motor housing, and mounting hardware)
- Mounting bracket (specifically designed for your ceiling type)
- Electrical box compatible with ceiling fans
- Wire connectors
- Electrical tape
- Wire nuts
- Downrod or extension rod (if necessary)
- Light kit (if your fan has integrated lighting)
- Screws and anchors (for securing the mounting bracket and electrical box)
When selecting a ceiling fan kit, make sure it is suitable for the size of the room and the height of the ceiling. Consider the functionality and aesthetics of the fan, including the number of blades, motor type, and any additional features such as remote control operation or variable speed options.
It’s important to choose a mounting bracket that is compatible with your specific ceiling type. Whether you have a standard, angled, or low ceiling, ensure that the mounting bracket is designed to safely and securely support the fan’s weight and accommodate the specific requirements of your ceiling.
Before starting the installation, use a stud finder to locate ceiling joists or beams. This will help you determine the optimal placement for the mounting bracket, ensuring a sturdy and secure attachment to the ceiling.
Ensure that all electrical work is performed in accordance with local codes and regulations. If you are not comfortable with electrical wiring, it’s recommended to hire a licensed electrician to do the electrical connections and ensure compliance with safety standards.
By gathering all the necessary tools and materials before starting the installation process, you will be well-prepared to hang your ceiling fan efficiently and successfully. Following the manufacturer’s instructions and using the correct equipment will help ensure a safe and properly functioning fan in your space.
Step-by-Step Guide to Hanging a Ceiling Fan
Hanging a ceiling fan may seem like a daunting task, but with the right tools and a systematic approach, it can be accomplished successfully. Follow this step-by-step guide to ensure a safe and efficient installation:
Step 1: Measure Ceiling Height
Measure the height of the ceiling to determine the appropriate hanging height for the fan. Consider the recommended clearances, such as leaving at least 7 feet between the fan blades and the floor for standard ceilings.
Step 2: Determine Blade Clearance
Assess the length and angle of the ceiling fan blades. Ensure that there is adequate clearance from the floor and any obstructions in the room. Follow the manufacturer’s recommendations and adjust the hanging height if needed.
Step 3: Assess Angled Ceiling
If installing the fan on a sloped or vaulted ceiling, use a compatible mounting bracket to ensure a secure installation at the appropriate angle. Consider the slope of the ceiling and adjust the hanging height accordingly to maintain proper clearance.
Step 4: Consider Room Size
Take into account the size of the room when determining the hanging height. In larger rooms, hanging the fan slightly higher may be necessary for optimal airflow distribution. In smaller rooms, you can hang the fan slightly lower to maximize air circulation in the limited space.
Step 5: Evaluate Lighting and Decor Options
Consider any integrated lighting fixtures or decorative features that come with the ceiling fan. Ensure that the hanging height allows for proper illumination and showcases any design elements you want to highlight.
Step 6: Ensure Safety Compliance
Prioritize safety throughout the installation process. Ensure that the ceiling can support the weight of the fan and use a compatible mounting bracket. Follow proper electrical wiring procedures and consider hiring a licensed electrician if you’re not comfortable with electrical work.
Step 7: Gather Tools and Materials
Collect all the necessary tools and materials for the installation, including screwdrivers, pliers, wire strippers, a ladder, and the ceiling fan kit. Make sure you have everything you need before starting the installation.
Step 8: Turn Off Power
Turn off the power to the room at the circuit breaker to ensure your safety while working with electrical connections. Use a voltage detector to verify that the power is indeed turned off before proceeding.
Step 9: Install Mounting Bracket and Electrical Box
Attach the mounting bracket to the ceiling using the appropriate screws and anchors. Install the electrical box compatible with ceiling fans and ensure it is securely fastened to the ceiling, aligning it with the mounting bracket.
Step 10: Wire the Ceiling Fan
Follow the manufacturer’s instructions to wire the ceiling fan. Connect the electrical wires from the fan to the corresponding wires in the electrical box, using wire nuts and electrical tape to secure the connections.
Step 11: Attach Fan Blades and Motor Housing
Attach the fan blades to the motor housing as per the manufacturer’s instructions. Ensure that each blade is securely fastened, using the provided screws or other attachment methods specified by the manufacturer.
Step 12: Secure the Fan to the Mounting Bracket
Lift the fan and carefully align it with the mounting bracket. Secure the fan to the bracket using the provided screws or any additional hardware specified by the manufacturer. Ensure that the fan is stable and balanced.
Step 13: Test the Fan
Turn the power back on at the circuit breaker and test the fan to ensure it’s functioning properly. Check for any wobbling or unusual noises. If necessary, make adjustments or tighten any loose components.
Step 14: Enjoy Your Ceiling Fan
Once you have successfully installed and tested the ceiling fan, sit back and enjoy the comfort it provides. Adjust the fan’s speed and settings according to your preferences, and take pleasure in the improved air circulation and added visual appeal it brings to your space.
Remember, if you’re unsure about any step of the installation process, consult the manufacturer’s instructions or seek the assistance of a professional electrician to ensure a safe and proper installation.
– Step 1: Measure Ceiling Height
The first step in hanging a ceiling fan is to measure the height of the ceiling. This measurement is crucial in determining the appropriate hanging height for the fan and ensuring proper functionality and safety. Here’s how to measure the ceiling height:
- Start by gathering a measuring tape or ruler that is long enough to reach the ceiling height.
- Position a ladder or step stool beneath the area where you plan to install the fan. Ensure that the ladder is sturdy and secure before climbing up.
- Stand on the ladder or step stool and extend the measuring tape or ruler vertically from the floor to the ceiling. Make sure it is parallel to the wall and as straight as possible.
- Note the measurement where the measuring tape or ruler meets the ceiling. This measurement represents the height of the ceiling.
- Repeat the measurement in multiple locations across the room to account for any variations in ceiling height. This is especially important if the room has an irregular or sloped ceiling.
- Take the average of the measurements to determine the overall height of the ceiling. This average measurement will be used as a basis for determining the appropriate hanging height of the ceiling fan.
Once you have measured the height of the ceiling, you can move on to the next step of determining the proper hanging height for the ceiling fan. Remember to consider factors such as blade clearance, room size, and any lighting or decorative elements that may affect the hanging height of the fan.
Keep in mind that these measurements should serve as a general guideline, and it’s always important to follow the manufacturer’s recommendations for the specific fan model you are installing. The manufacturer’s instructions will provide you with any specific considerations or requirements for the hanging height based on their design and specifications.
By accurately measuring the ceiling height, you will have a solid foundation for determining the appropriate hanging height of the ceiling fan, ensuring optimal performance and safety in your space.
– Step 2: Determine Blade Clearance
After measuring the ceiling height, the next step in hanging a ceiling fan is to determine the blade clearance. Blade clearance refers to the distance between the bottom of the fan blades and the floor or any obstructions in the room. It’s crucial to ensure adequate clearance to promote safe operation and prevent any incidents. Here’s how to determine the blade clearance:
- Examine the length and angle of the ceiling fan blades. Different ceiling fans come with various blade lengths, and longer blades require more clearance.
- Consider the activities and movement that will take place in the room. If the fan will be installed in an area with tall individuals or high foot traffic, you may need to increase the blade clearance to avoid any potential accidents or inconveniences.
- Take note of any potential obstructions in the room, such as low-hanging light fixtures, furniture, or other objects. These obstructions can limit the space available for the fan blades to rotate freely.
- Measure the clearance from the floor to the lowest point of the fan blades. This measurement should be at least 7 feet to ensure safe and unobstructed movement within the room.
- Make adjustments to the hanging height, if necessary, to achieve the desired blade clearance. It’s crucial to strike a balance between providing sufficient clearance and maintaining an aesthetically pleasing height for the fan.
- Refer to the manufacturer’s recommendations for the specific fan model you are installing. They may provide specific guidelines regarding the ideal hanging height and blade clearance to ensure optimal performance and safety.
By determining the blade clearance, you can ensure safe operation and prevent any potential accidents or damage that may occur if the blades come into contact with people or objects in the room.
Keep in mind that blade clearance is just one of the factors to consider when determining the hanging height of the ceiling fan. It’s important to take into account other factors such as room size, ceiling height, and any lighting or decor aspects that may affect the overall installation.
By following these steps and considering the blade clearance, you can ensure a properly installed ceiling fan that provides comfort, functionality, and peace of mind in your space.
Read more: How To Hang Ceiling Medallion
– Step 3: Assess Angled Ceiling
When hanging a ceiling fan on an angled ceiling, it’s important to assess the slope and take necessary precautions to ensure a secure and properly installed fan. An angled ceiling, also known as a sloped or vaulted ceiling, requires specific considerations to maintain safety and functionality. Follow these steps to assess an angled ceiling:
- Examine the slope of the ceiling and determine the angle at which it is inclined. This can be measured in degrees or expressed as a ratio of rise to run (e.g., 2:12, 6:12).
- Identify the type of mounting bracket suitable for your angled ceiling. There are specific brackets designed to accommodate sloped or vaulted ceilings, allowing for a secure installation at the correct angle.
- Ensure that the mounting bracket is compatible with the particular ceiling fan model you are installing. Refer to the manufacturer’s instructions for specific guidelines on the appropriate mounting bracket for your fan.
- Consider the hanging height required to maintain proper blade clearance. Due to the slope of the ceiling, the fan may need to be hung lower to achieve sufficient clearance from the floor and any potential obstructions.
- Adjust the hanging height accordingly to ensure a safe and functional installation. Refer to the manufacturer’s recommendations and any specific guidelines provided for angled ceilings.
- Take into account the aesthetic appeal of the fan installation. An angled ceiling can create a unique visual effect, and positioning the fan at the appropriate height will enhance the overall appearance of the room.
- Consult with a professional if you have any doubts or concerns regarding the installation process. They can provide guidance and expertise to ensure a proper and secure installation on your angled ceiling.
Assessing the angled ceiling is crucial in determining the correct installation process for your ceiling fan. By using a compatible mounting bracket and adjusting the hanging height to account for the slope, you can achieve a safe and visually appealing fan installation.
Remember to refer to the manufacturer’s instructions and follow their specific recommendations for installing a ceiling fan on an angled ceiling. They will provide valuable insights and guidelines to ensure a successful installation.
With careful assessment and consideration, you can confidently hang a ceiling fan on an angled ceiling, providing optimal functionality and enhancing the aesthetic appeal of your space.
– Step 4: Consider Room Size
When hanging a ceiling fan, it’s important to consider the size of the room to determine the optimal hanging height. The size of the room plays a vital role in maximizing the fan’s airflow and ensuring efficient cooling or ventilation. Follow these steps to consider the room size when hanging a ceiling fan:
- Measure the dimensions of the room, including the length, width, and height. This will give you a clear idea of the overall size of the space.
- Consider the volume of air in the room. Larger rooms require more air circulation to ensure effective cooling or ventilation. In such cases, hanging the fan slightly higher may be necessary to achieve broad and balanced airflow.
- Take into account any architectural features or furniture arrangements that may impact the distribution of air. For example, if there are obstructions such as low-hanging light fixtures or tall cabinets, you may need to adjust the hanging height to ensure unobstructed airflow.
- Assess the location and functionality of other cooling or heating systems in the room. If there is already a central air conditioning system or a heating vent near the ceiling, you may want to hang the fan slightly lower to enhance the overall air circulation.
- Balance the size of the room with the size of the fan. Choose a fan with an appropriate blade span in relation to the room size. A larger room may require a fan with a larger diameter to ensure efficient airflow coverage.
- Determine whether the room requires multiple fans for better air distribution. In exceptionally large rooms, hanging two or more fans may be necessary to achieve optimal comfort and airflow.
- Consider the aesthetics of the room. Generally, the hanging height of the fan should be visually pleasing and complement the room’s overall design. However, functionality and air circulation should be the main priority.
By considering the size of the room when hanging a ceiling fan, you can ensure that the fan operates effectively and efficiently. Proper airflow and ventilation are essential for maintaining a comfortable and enjoyable environment.
Remember to refer to the manufacturer’s recommendations for your specific fan model, as they may provide additional guidelines based on the size and dimensions of the room. By taking into account the room size, you can optimize the fan’s performance and enhance the overall comfort of the space.
– Step 5: Evaluate Lighting and Decor Options
When hanging a ceiling fan, it’s essential to consider the lighting and decor options in the room. This step ensures that the fan installation not only provides comfort and functionality but also enhances the overall aesthetic appeal of the space. Follow these steps to evaluate lighting and decor options:
- Assess the ceiling fan model you’ve chosen and determine if it includes integrated lighting fixtures. Some fans come with built-in lights that can provide both functional illumination and decorative accents.
- Consider the hanging height of the fan in relation to the ceiling. Ensure that the height allows for proper illumination throughout the room. If necessary, adjust the hanging height to achieve the desired lighting coverage.
- Evaluate the type and brightness level of the integrated lighting. Determine if it meets your requirements and complements the lighting needs of the room. Some fans offer options for dimming or adjustable lighting settings.
- Examine the overall decor and style of the room. Consider if the chosen fan complements the existing decor or serves as a statement piece. Take into account the design, color, and finish of the fan.
- Consider any specific decorative elements or features of the fan itself. Some fans have unique blade designs, motor housings, or decorative details that can enhance the overall aesthetic of the room. Adjust the hanging height to showcase these appealing features.
- Take into account the overall lighting scheme of the room. Determine if additional lighting fixtures or sources are required in conjunction with the ceiling fan to achieve the desired level of illumination.
- Ensure that the fan’s design and lighting align with the room’s intended ambiance and purpose. For example, in a bedroom, softer lighting and a more tranquil fan design may be preferred, while in a living room, a fan with brighter lighting may be desirable.
By evaluating the lighting and decor options, you can ensure that the ceiling fan installation enhances the overall look and atmosphere of the room. It allows for both functional lighting and a decorative element that complements the space’s overall design.
Remember to refer to the manufacturer’s instructions and recommendations for your specific fan model. They may provide additional guidelines on lighting installation and decor considerations based on the design and specifications of the fan.
By carefully considering the lighting and decor options, you can create a visually pleasing and inviting environment while enjoying the benefits of a ceiling fan’s comfort and functionality.
– Step 6: Ensure Safety Compliance
Ensuring safety compliance is essential when hanging a ceiling fan. It ensures proper installation, minimizes risks, and promotes a safe and functional environment. Follow these steps to ensure safety compliance:
- Refer to local building codes and regulations. Understand the specific requirements regarding electrical work and ceiling fan installations in your area.
- Choose a ceiling fan that meets safety standards. Look for fans that have undergone safety testing and certifications from recognized organizations.
- Verify the ceiling’s structural integrity. Ensure that the ceiling can support the weight of the fan and any additional lighting fixtures or accessories.
- Use a compatible mounting bracket. Select a mounting bracket that is specifically designed for your ceiling type and fan model. This ensures a secure and stable installation.
- Securely attach the mounting bracket to the ceiling. Follow the manufacturer’s instructions for proper installation, using appropriate screws and anchors if needed.
- Install an electrical box compatible with ceiling fans. Choose an electrical box that is designed to support the weight and movement of a ceiling fan.
- Perform proper electrical connections. Turn off the power at the circuit breaker and use a voltage detector to confirm the absence of electrical current. Connect the fan’s electrical wires to the corresponding wires in the electrical box, following the manufacturer’s instructions.
- Ensure a secure connection of all wires. Use wire nuts and electrical tape to properly secure and insulate the electrical connections, preventing any potential hazards.
- Check for stable and balanced installation. Once the fan is installed, ensure that it is securely attached to the mounting bracket and that it does not wobble or move excessively.
- Perform regular maintenance and inspections. Routinely check the fan for loose screws, damaged wires, or any signs of wear and tear. Clean the fan blades and motor housing to prevent dust buildup, which can affect the fan’s performance.
Always refer to the manufacturer’s instructions and guidelines for your specific fan model. They will provide detailed instructions on installation procedures and safety precautions that are specific to your fan.
When in doubt or if you lack experience in electrical work, it’s advisable to seek professional assistance from a licensed electrician. They can ensure that the installation is done correctly, in compliance with safety standards, and in accordance with local regulations.
By ensuring safety compliance, you can have peace of mind knowing that your ceiling fan is installed securely, minimizing any potential risks and providing a safe and enjoyable environment in your space.
Read more: How To Hang A Hook In The Ceiling
Conclusion
Hanging a ceiling fan is a task that requires careful consideration and attention to detail. By following the steps outlined in this guide, you can ensure a safe and successful installation that provides optimal performance, comfort, and aesthetic appeal in your space.
Starting with measuring the ceiling height and determining blade clearance, you can establish the proper hanging height for the fan. Assessing the angle of a sloped or vaulted ceiling and considering the size of the room further refine the installation process.
It’s important to evaluate the lighting and decor options, ensuring that the fan complements the room’s style and provides adequate illumination. Safety compliance is paramount throughout the process, from choosing a fan with proper certifications to securely installing the mounting bracket and electrical components.
By gathering the necessary tools and materials, following each step in a systematic manner, and considering safety precautions, you can have confidence in the installation process. Regular maintenance and inspections will help keep the fan in excellent working condition.
Remember to always consult the manufacturer’s instructions and guidelines specific to your fan model. Additionally, if you’re unsure about any aspect of the installation or electrical work, it is recommended to seek professional assistance.
In conclusion, hanging a ceiling fan involves careful planning, precise measurements, consideration of safety standards, and attention to detail. By following the comprehensive steps outlined in this guide, you can enjoy the benefits of a well-installed ceiling fan that enhances your comfort, improves air circulation, and adds a touch of style to your living space.
Ready to tackle more DIY projects around your home? If you're curious about upgrading your space further, consider learning how to replace a basic light fixture with a cooling ceiling fan. Our guide on ceiling fan installation provides all the necessary steps. For those with workshops or detached garages, extending power safely is crucial. Our detailed overview on electrical wiring will help you run overhead wires effectively, ensuring every corner of your property is well-connected and functional.
Frequently Asked Questions about How Low Should Ceiling Fan Hang
Was this page helpful?
At Storables.com, we guarantee accurate and reliable information. Our content, validated by Expert Board Contributors, is crafted following stringent Editorial Policies. We're committed to providing you with well-researched, expert-backed insights for all your informational needs.


0 thoughts on “How Low Should Ceiling Fan Hang”