Articles
How To Add D-Ring To Tool Belt
Modified: February 22, 2024
Learn how to add a durable D-ring to your tool belt with our informative articles. Enhance your efficiency and convenience on the job.
(Many of the links in this article redirect to a specific reviewed product. Your purchase of these products through affiliate links helps to generate commission for Storables.com, at no extra cost. Learn more)
Introduction
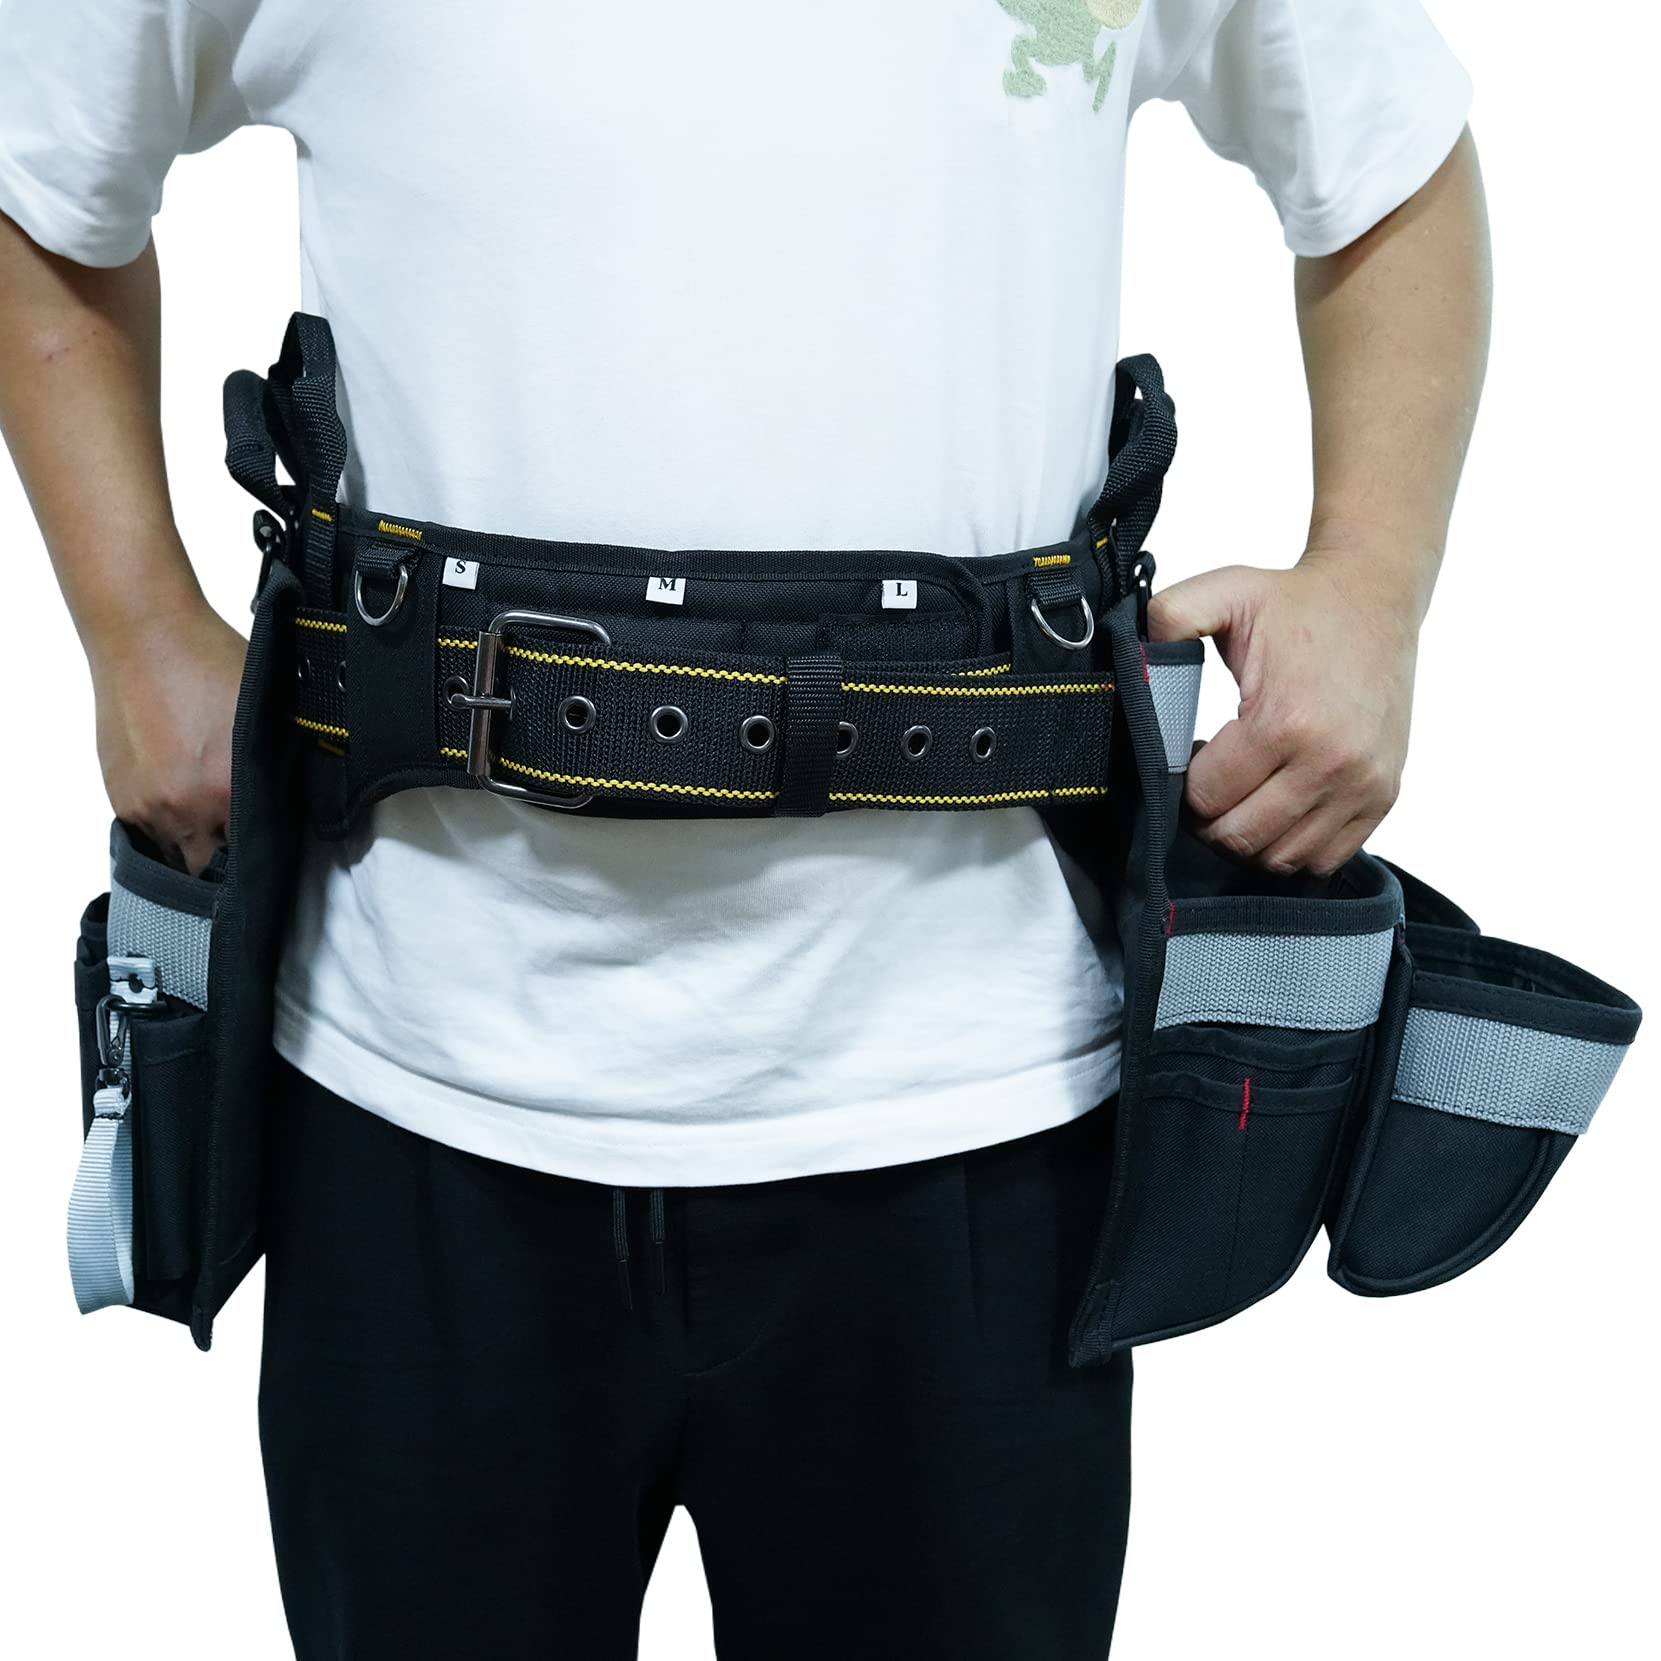
Welcome to our guide on how to add a D-ring to your tool belt. Tool belts are essential for any handyman or DIY enthusiast, providing a convenient way to carry and access your tools while working on projects. However, sometimes you may find that your tool belt doesn’t have all the features you need. That’s where adding a D-ring can come in handy.
A D-ring is a versatile accessory that can be used to attach various tools and accessories to your belt, providing easy access and keeping your hands free. Whether you need to hang a tape measure, a tool pouch, or other accessories, adding a D-ring to your tool belt can significantly enhance its functionality.
In this guide, we will walk you through the steps necessary to add a D-ring to your tool belt. We will discuss the materials you will need, the tools required, and the step-by-step process of attaching the D-ring securely. So, let’s get started!
Key Takeaways:
- Enhance Your Tool Belt Functionality
Adding a D-ring to your tool belt provides easy access to tools and accessories, keeping your hands free and making your work more efficient. - Secure Attachment for Maximum Convenience
By following the step-by-step process, you can ensure a secure and stable attachment of the D-ring, maximizing the functionality of your tool belt.
Read more: How To Add Ring Doorbell To Another Phone
Materials Needed
Before you begin adding a D-ring to your tool belt, make sure you have the following materials ready:
- A D-ring: You can find D-rings at your local hardware store or online. They come in various sizes, so choose one that suits your needs.
- Tool Belt: Ensure you have a tool belt that is suitable for attaching a D-ring. Most tool belts come with sturdy loops or attachment points where you can add the D-ring.
- Drill: You will need a drill with a suitable bit for drilling holes in your tool belt.
- Screwdriver: Depending on the type of D-ring and screws you use, you may need a screwdriver to secure the D-ring in place.
- Measuring Tape or Ruler: To ensure accurate placement of the D-ring, use a measuring tape or ruler to mark the appropriate location on your tool belt.
- Pencil or Marker: You will need a pencil or marker to mark the desired placement of the D-ring on your tool belt.
- Screws or Rivets: Depending on the design of your tool belt, you will need either screws or rivets to attach the D-ring securely.
- Optional: If your tool belt is made of leather, you may need a leather punch or awl to create holes for the screws or rivets.
Once you have gathered all the necessary materials, you are ready to move on to the next step: gathering the required tools.
Step 1: Gathering the Required Tools
Before you start adding a D-ring to your tool belt, it’s important to gather all the necessary tools. Having everything prepared beforehand will make the process smoother and more efficient. Here are the tools you will need:
- Drill: A drill is essential for creating holes in your tool belt that will accommodate the screws or rivets used to attach the D-ring.
- Screwdriver: Depending on the type of screws or rivets you choose, you will need a compatible screwdriver to secure the D-ring in place.
- Measuring Tape or Ruler: To ensure proper placement of the D-ring, use a measuring tape or ruler to mark the desired location on your tool belt.
- Pencil or Marker: You will need a pencil or marker to clearly mark the spot where you will be attaching the D-ring.
- Screws or Rivets: Depending on the design of your tool belt, you will need either screws or rivets to securely attach the D-ring. Choose screws or rivets that are suitable for the material of your tool belt.
- Optional: If your tool belt is made of leather, you may need a leather punch or awl to create holes for the screws or rivets.
Take a moment to gather and organize all the tools in a well-lit workspace. Having everything within reach will make the process more efficient and allow you to complete the task with ease.
Now that you have all the necessary tools, you are ready to move on to the next step: preparing the D-ring.
Step 2: Preparing the D-Ring
Before you attach the D-ring to your tool belt, it’s important to prepare the D-ring itself. This step involves checking the D-ring for any sharp edges, ensuring that it is clean and free from rust or debris, and making any necessary adjustments for a proper fit.
Here are the steps to prepare the D-ring:
- Inspect the D-ring: Carefully examine the D-ring to check for any sharp edges or defects. If you notice any sharp edges, use a file or sandpaper to smooth them out. This will help prevent any accidental cuts or damage to your tool belt or hands.
- Clean the D-ring: If the D-ring is dirty or has rust or debris, clean it thoroughly. You can use warm, soapy water and a soft brush to remove any dirt or grime. Dry the D-ring completely before proceeding.
- Check the Fit: Hold the D-ring against your tool belt to check the fit and ensure that it is the right size for your needs. Adjust the position of the D-ring to determine the most comfortable and convenient placement.
- Measure for Accuracy: Use a measuring tape or ruler to measure the width and height of the D-ring. Note down these measurements so that you can accurately mark the placement on your tool belt.
By taking the time to prepare the D-ring, you ensure that it is in optimal condition and ready to be attached to your tool belt. With the D-ring prepared, you are now ready to move on to the next step: marking the placement on the tool belt.
Step 3: Marking the Placement on the Tool Belt
Once you have prepared the D-ring, it’s time to mark the placement on your tool belt. This step is crucial for ensuring that the D-ring is attached at the right location, providing easy access to your tools while maintaining balance and comfort.
Follow these steps to mark the placement of the D-ring:
- Wear the Tool Belt: Put on your tool belt and adjust it to your desired tightness and position. This will allow you to accurately mark the placement of the D-ring based on your specific needs and preferences.
- Choose the Attachment Point: Determine where on your tool belt you would like to attach the D-ring. Consider factors such as accessibility and weight distribution. Some common attachment points include the sides of the tool belt or the back.
- Use a Measuring Tape: Take a measuring tape or ruler and measure the desired distance from the edge of the tool belt to the placement point of the D-ring. This will ensure consistency and accuracy in the placement of the D-ring.
- Mark the Spot: Using a pencil or marker, make a small mark on the tool belt to indicate the exact location for attaching the D-ring.
- Double-Check Placement: Step back and evaluate the marked spot to ensure it aligns with your needs. Make any necessary adjustments before proceeding to the next step.
By carefully marking the placement of the D-ring, you ensure that it will be positioned in a way that suits your working style and preferences. With the placement marked, you are now ready to move on to the next step: drilling holes in the tool belt.
When adding a D-ring to a tool belt, make sure to use heavy-duty stitching to secure it in place. This will ensure that it can withstand the weight of your tools without coming loose.
Step 4: Drilling Holes
Now that you have marked the placement of the D-ring on your tool belt, it’s time to drill the necessary holes to attach the D-ring securely. The holes will provide a means for the screws or rivets to pass through the tool belt and fasten the D-ring in place.
Follow these steps to drill the holes:
- Prepare the Drill: Attach the appropriate drill bit to your drill, ensuring it matches the size of the screws or rivets you will be using to secure the D-ring.
- Secure the Tool Belt: Lay your tool belt on a stable surface, ensuring it is held securely in place. This will prevent the tool belt from shifting or moving while drilling the holes.
- Start Drilling: Position the drill bit over the marked spot on the tool belt and slowly start drilling. Apply gentle pressure and maintain a steady hand to ensure accuracy and prevent any damage to the tool belt.
- Create Clean Holes: Continue drilling until the holes are clean and evenly sized. Avoid applying excessive force as it may result in an uneven or messy hole.
- Check Hole Size: After drilling, check the size of the holes. They should be slightly smaller than the screws or rivets to ensure a snug fit. If necessary, use a larger drill bit or a deburring tool to adjust the hole size.
Remember to take caution while drilling and wear appropriate safety gear such as safety goggles and gloves to protect yourself from debris and potential accidents.
With the holes drilled, you can now proceed to the next step: attaching the D-ring to your tool belt.
Step 5: Attaching the D-Ring
Now that you have drilled the holes in your tool belt, it’s time to attach the D-ring. This step involves securing the D-ring in place using screws or rivets, depending on the design of your tool belt and personal preference.
Follow these steps to attach the D-ring:
- Position the D-Ring: Hold the D-ring against the back of your tool belt, aligning it with the drilled holes. Ensure that the D-ring is positioned correctly and will allow for easy attachment of tools or accessories.
- Insert Screws or Rivets: Insert the screws or rivets through the holes in the tool belt and into the corresponding holes on the D-ring. Make sure to position the screws or rivets correctly, ensuring a secure fit.
- Tighten the Screws or Rivets: Using a screwdriver or a rivet tool, tighten the screws or rivets to secure the D-ring in place. Apply firm but gentle pressure, making sure not to overtighten and risk damaging the tool belt or the D-ring.
- Check the Stability: Once the screws or rivets are tightened, check the stability of the D-ring. Give it a gentle tug to ensure it is securely attached and will hold the weight of your tools or accessories without coming loose.
If your tool belt is made of leather, you may need to use a leather punch or awl to create holes for the screws or rivets. Make sure the holes are aligned with the drilled holes in the tool belt before proceeding with the attachment process.
With the D-ring securely attached to your tool belt, you are almost done. The final step is to ensure that the D-ring is properly secured and will not move or detach during use.
Step 6: Securing the D-Ring in Place
After attaching the D-ring to your tool belt, it’s crucial to ensure that it is securely fastened and will not shift or detach during use. Taking the time to properly secure the D-ring will provide peace of mind and ensure that your tools and accessories are safely held in place.
Follow these steps to secure the D-ring in place:
- Tighten Screws or Rivets: Double-check the screws or rivets that were used to attach the D-ring. Ensure they are tightened firmly but not overly tight. This will prevent any wiggle or play in the D-ring.
- Inspect for Stability: Once the screws or rivets are tightened, inspect the D-ring for stability. Give it a gentle tug and check if it remains securely in place. If you notice any movement or looseness, use a screwdriver or rivet tool to further tighten the screws or rivets.
- Test Weight Capacity: With the D-ring securely attached, test its weight capacity by hanging a tool or accessory from it. Ensure the D-ring can support the weight without bending or showing signs of strain.
- Check for Comfort: Put on the tool belt and wear it for a brief period to test the comfort and placement of the D-ring. Ensure it doesn’t dig into your body or cause any discomfort during movement.
- Make Adjustments if Needed: If you find any issues with the stability or comfort of the D-ring, make necessary adjustments. This may include tightening screws or rivets further, repositioning the D-ring, or adding additional support if required.
By ensuring that the D-ring is securely fastened and stable, you can confidently use your tool belt without worrying about tools or accessories falling off or becoming misplaced during work.
With the D-ring now secured in place, congratulations! You have successfully added a D-ring to your tool belt. The enhanced functionality provided by the D-ring will make your work more efficient and convenient.
Conclusion
Adding a D-ring to your tool belt can greatly enhance its functionality and convenience. With a D-ring attached, you can easily hang tools and accessories, keeping them within reach and your hands free while working on projects. This simple addition can make a significant difference in your efficiency and productivity.
In this guide, we walked you through the step-by-step process of adding a D-ring to your tool belt. We discussed the materials you would need, the tools required, and the necessary steps to prepare the D-ring, mark the placement on the tool belt, drill holes, attach the D-ring, and secure it in place. By following these steps, you can ensure a secure and stable attachment of the D-ring.
Remember to gather all the necessary tools and materials before starting the process. Take your time to prepare the D-ring, mark the placement accurately, and drill the holes carefully. When attaching the D-ring, tighten the screws or rivets firmly but not overly tight, and test its stability and weight capacity.
Once the D-ring is securely attached, you can enjoy the convenience of hanging tools or accessories on your tool belt, keeping them organized and easily accessible. Be sure to periodically check the D-ring’s stability and make adjustments if necessary.
Now, armed with the knowledge and steps outlined in this guide, you can confidently add a D-ring to your tool belt and maximize its functionality. Happy DIYing and may your newly enhanced tool belt serve you well in all your future projects!
Frequently Asked Questions about How To Add D-Ring To Tool Belt
Was this page helpful?
At Storables.com, we guarantee accurate and reliable information. Our content, validated by Expert Board Contributors, is crafted following stringent Editorial Policies. We're committed to providing you with well-researched, expert-backed insights for all your informational needs.


0 thoughts on “How To Add D-Ring To Tool Belt”