Home>Articles>How To Assemble An American Grandma Flower Garden Quilt
Articles
How To Assemble An American Grandma Flower Garden Quilt
Modified: August 18, 2024
Learn how to assemble an American Grandma Flower Garden Quilt with our helpful articles. Discover expert tips and tricks for creating this intricate and beautiful quilt.
(Many of the links in this article redirect to a specific reviewed product. Your purchase of these products through affiliate links helps to generate commission for Storables.com, at no extra cost. Learn more)
Introduction
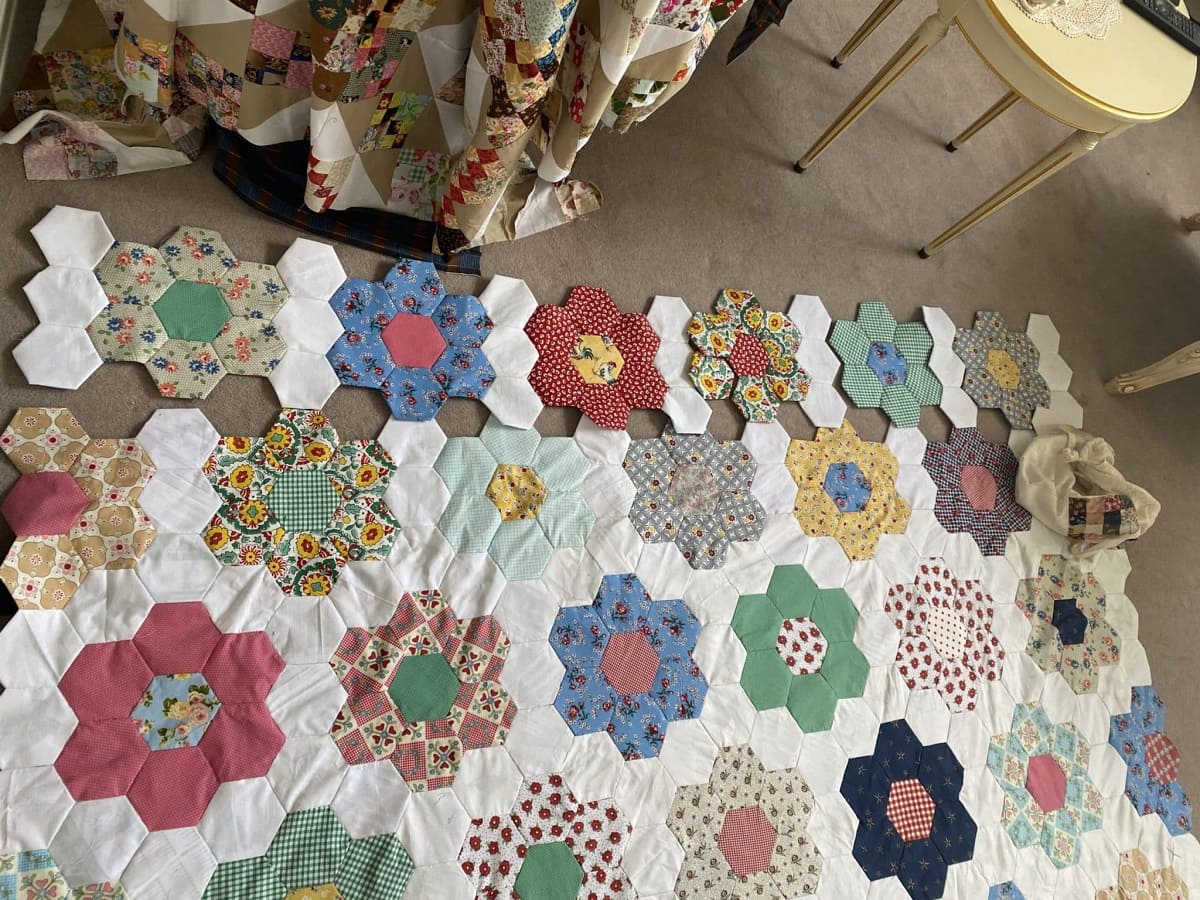
Welcome to the world of quilting, where creativity and craftsmanship combine to create beautiful and timeless pieces of art. One of the most beloved and popular quilting patterns is the American Grandma Flower Garden Quilt. This classic design features a collection of brightly colored fabric flowers arranged in a delightful garden-like pattern.
Assembling an American Grandma Flower Garden Quilt requires a combination of patience, precision, and a love for the craft. Whether you are a seasoned quilter or a beginner looking to embark on your quilting journey, this article will guide you through the step-by-step process of creating your very own masterpiece.
But before we dive into the details, let’s talk about the key elements you’ll need to consider when making your quilt. Choosing the right fabrics, gathering the necessary supplies, and understanding the various techniques involved will ensure that your finished quilt is not only visually stunning but also durable and long-lasting.
So, let’s gather our materials, unleash our creativity, and embark on this quilting adventure together as we learn how to assemble an American Grandma Flower Garden Quilt!
Key Takeaways:
- Crafting an American Grandma Flower Garden Quilt is a labor of love, requiring patience, precision, and a keen eye for fabric selection. The process involves careful cutting, meticulous assembly, and thoughtful quilting to create a timeless piece of art that embodies the spirit of nature and invokes feelings of warmth and nostalgia.
- The journey of quilting is a creative exploration, offering endless possibilities for self-expression and artistic fulfillment. By mastering the assembly of the American Grandma Flower Garden Quilt, quilters can embrace the joy of creating beautiful and functional works of art that can be cherished and passed down for generations.
Read more: How To Assemble A Quilt With Batting
Choosing Fabrics
When it comes to creating an American Grandma Flower Garden Quilt, selecting the right fabrics is crucial to achieving the desired aesthetic and overall look of the quilt. The key is to choose fabrics that not only complement each other but also reflect the vibrant and cheerful essence of a blooming flower garden.
Consider opting for a mix of floral prints in a variety of colors and scales. Look for fabrics that feature bold, bright, and vibrant patterns to capture the essence of a lively garden. Combining different sizes and types of flowers will add visual interest and depth to your quilt.
Additionally, pay attention to the fabric’s texture. Consider using fabrics with a variety of textures, such as cotton, silk, or flannel, to create a rich and diverse visual and tactile experience. Mixing different textures can add dimension and make your quilt more visually appealing.
While it is essential to choose fabrics that coordinate well together, don’t be afraid to incorporate some contrasting elements as well. Select a few fabrics in complementary colors or contrasting patterns to add visual excitement and create a dynamic quilt design.
Remember, the fabric you choose will determine the overall tone and feel of your quilt. So, take your time, explore different options, and trust your instincts when selecting fabrics for your American Grandma Flower Garden Quilt.
Gathering Supplies
Before you dive into the exciting process of assembling your American Grandma Flower Garden Quilt, it’s essential to gather all the necessary supplies. Having the right tools and materials at hand will ensure a smooth and enjoyable quilting experience.
Here’s a list of supplies you’ll need:
- Fabric – As mentioned earlier, choose a variety of floral prints in different colors and scales for your flower blocks. Make sure to have enough fabric to create the desired number of blocks and borders.
- Thread – Select a thread color that complements the fabrics you’ve chosen. Opt for a high-quality thread that is strong and durable.
- Scissors – Invest in a good pair of fabric scissors for precise cutting.
- Ruler – A clear acrylic quilting ruler will be your best friend when measuring and cutting fabric accurately.
- Rotary Cutter – This tool makes cutting fabric easier and more efficient. Make sure to get replacement blades as well.
- Pins – Use sharp quilting pins to hold your fabric pieces together during the assembly process.
- Iron and Ironing Board – Pressing your fabric before and after sewing is essential for achieving crisp and professional-looking seams.
- Seam Ripper – Mistakes happen, and a seam ripper will come in handy when you need to undo a stitch.
- Quilt Batting – Quilt batting provides the necessary loft and warmth to your quilt. Choose one that suits your desired level of thickness and warmth.
- Quilt Backing Fabric – This fabric will be used for the backside of the quilt. Select a color or pattern that complements the front of the quilt.
- Quilting Pins or Spray Basting Adhesive – These are necessary for holding the three layers of the quilt sandwich together during the quilting process.
- Binding Fabric – Choose a fabric for the binding that complements the colors and patterns in your quilt.
- Sewing Machine – A reliable sewing machine will make the quilting process more efficient. Make sure it is in good working condition with the necessary stitch settings.
By gathering these essential supplies, you’ll be well-prepared and ready to start creating your American Grandma Flower Garden Quilt. So, stock up on everything you need, and let’s move on to the next step: cutting the fabric!
Cutting the Fabric
Now that you have gathered all the necessary supplies, it’s time to embark on the first step of assembling your American Grandma Flower Garden Quilt – cutting the fabric. Accurate cutting is vital to ensure that your flower blocks fit together seamlessly, creating a cohesive and beautiful quilt.
Here’s how to proceed:
- Before you start cutting, iron your fabric to remove any wrinkles or creases. This will make it easier to measure and cut accurately.
- Refer to your quilt pattern or design plan to determine the sizes and shapes of the fabric pieces you need for your flower blocks.
- Using your ruler and rotary cutter, measure and cut out the required fabric pieces according to the pattern or design plan. Take your time to ensure precise measurements and clean cuts.
- Label each fabric piece with a removable marker or a piece of tape, indicating its position in the flower block. This will help you stay organized during the assembly process.
- Continue cutting all the required fabric pieces for each flower block, following the pattern or design plan. Maintain accuracy and be mindful of the fabric’s patterns and colors to create a visually appealing quilt.
Remember to handle your fabric with care to prevent stretching or distorting the fabric. Take breaks if needed to ensure your cuts remain accurate and consistent.
Once you have cut all the necessary fabric pieces for your flower blocks, set them aside and prepare for the exciting part – assembling the flower blocks!
Now that you have successfully cut your fabric, you are ready to take the next step in creating your American Grandma Flower Garden Quilt. Stay tuned for the upcoming sections, where we will guide you through the entire quilting process!
Assembling the Flower Blocks
Now that you have all the fabric pieces cut and labeled, it’s time to start assembling the flower blocks. This step is where you bring together the various fabric pieces to create the stunning floral designs that will make up your American Grandma Flower Garden Quilt.
Follow these steps to assemble the flower blocks:
- Refer to your quilt pattern or design plan to understand the layout and placement of the fabric pieces in each flower block.
- Take the fabric pieces for the first flower block and lay them out on your work surface, following the pattern or design plan.
- Begin sewing the fabric pieces together, one by one, following the designated seams. Use a 1/4-inch seam allowance and backstitch at the beginning and end of each seam to secure the stitches.
- Continue sewing the fabric pieces together until the first flower block is complete. Press the seams open or to one side, depending on your preference.
- Repeat this process for the remaining flower blocks, following the pattern or design plan for each one.
Take your time to ensure accurate seam allowances, precise sewing, and alignment of fabric pieces. Pay attention to matching patterns and colors to create visually appealing blocks.
As you assemble the flower blocks, don’t be afraid to get creative and try different arrangements of colors and patterns. Play with different fabric combinations to add visual interest and variety to your quilt.
Once you have completed all the flower blocks, take a moment to admire your handiwork. You are one step closer to completing your beautiful American Grandma Flower Garden Quilt!
Stay tuned for the next section, where we will guide you through arranging the blocks to create a captivating quilt design.
Read more: How To Design A Flower Garden
Arranging the Blocks
Now that you have assembled all the flower blocks, it’s time to arrange them to create a visually appealing and balanced quilt design. The arrangement of the blocks plays a significant role in the overall impact and aesthetic of your American Grandma Flower Garden Quilt.
Consider the following tips when arranging your blocks:
- Lay out your flower blocks on a design wall or a large flat surface. This will allow you to visualize how the blocks will look when sewn together.
- Experiment with various block arrangements. Rotate the blocks, mix up the colors and patterns, and create different combinations to find the arrangement that pleases your eye.
- Pay attention to the balance of colors and patterns. Ensure that no two similar fabrics are adjacent to each other in the layout, creating a harmonious and dynamic visual effect.
- Consider the flow and movement of the quilt. Arrange the blocks in a way that creates a sense of movement, as if the flowers are swaying in the wind.
- Step back and take a break if needed. Sometimes, taking a fresh look after a short break can help you see the arrangement with a new perspective.
Remember, there is no right or wrong way to arrange the blocks. It’s all about finding a design that resonates with your personal style and vision for your quilt.
Once you are satisfied with the arrangement, take a photo or make a sketch of the layout to use as a reference during the sewing process.
Now that your blocks are beautifully arranged, it’s time to start sewing them together. In the next section, we will guide you through the process of sewing the blocks together to create the quilt top.
When assembling an American Grandma Flower Garden Quilt, make sure to lay out all the pieces in the desired pattern before sewing to ensure the design is cohesive.
Sewing the Blocks Together
With your blocks arranged in a visually pleasing design, it’s time to sew them together to create the quilt top. This step will bring your American Grandma Flower Garden Quilt to life and showcase the beautiful flower blocks you have created.
Follow these steps to sew the blocks together:
- Start by sewing the blocks in each row together. Place the first two blocks right sides facing each other and align the edges. Pin them together to keep them in place.
- Using a 1/4-inch seam allowance, sew the blocks together. Backstitch at the beginning and end of each seam to secure the stitches. Repeat this process for all the blocks in the row.
- Press the seam allowances open or to one side, following your preference or the guidance of your quilt pattern.
- Continue sewing the blocks together row by row until all the blocks are connected.
- Press the completed quilt top, ensuring that all the seams are flat and smooth.
As you sew the blocks together, make sure to maintain accurate seam allowances and align the edges properly. Take your time and sew with care to ensure a neat and professional finish.
Once you have sewn all the blocks together, step back and admire how the quilt top is coming together. The colors, patterns, and arrangement will create a stunning visual display of your American Grandma Flower Garden Quilt.
Now that the quilt top is complete, it’s time to add the borders to enhance the overall design and provide a finishing touch. In the next section, we will guide you through the process of adding borders to your quilt.
Adding Borders
Adding borders to your American Grandma Flower Garden Quilt not only enhances the overall design but also provides a finished and polished look. Borders serve as a frame, highlighting the beauty of the quilt and tying all the elements together.
Follow these steps to add borders to your quilt:
- Measure the sides of your quilt top to determine the length of the border strips needed. Cut the border fabric into strips according to these measurements, adding additional length for corner mitering if desired.
- Attach the border strips to the sides of the quilt top. Place the border strip right sides facing the quilt top’s edge and align the raw edges. Pin or clip in place.
- Using a 1/4-inch seam allowance, sew the border strip to the quilt top. Press the seam allowance towards the border strip.
- Repeat the process for the top and bottom borders, measuring and cutting the border strips accordingly.
- After attaching the borders, press them flat, ensuring all the seam allowances are smooth.
- If desired, add additional borders or borders of varying widths to create more visual interest. Follow the same process of measuring, cutting, and attaching the border strips.
- Press the quilt top once more to ensure all the seams are flat and the borders are well-pressed.
When choosing border fabrics, consider either complementing the colors and patterns already present in the quilt top or using a solid color for a clean and cohesive look. The border should complement the quilt top and enhance its overall appearance.
Once the borders are added, you are one step closer to completing your American Grandma Flower Garden Quilt. The next stage is quilting the multiple layers together to create a strong and durable finished product.
Quilting the Layers
Quilting is the process of stitching the three layers of a quilt together – the quilt top, batting, and backing fabric. This not only provides stability and durability to the quilt but also adds texture and visual interest. When it comes to quilting an American Grandma Flower Garden Quilt, there are various techniques you can choose from.
Follow these steps to quilt the layers together:
- Prepare your quilt sandwich by laying the quilt backing fabric right side down, followed by the batting, and then the quilt top right side up. Smooth out any wrinkles or creases.
- Secure the layers together. You can use quilting pins or spray basting adhesive to ensure that the layers don’t shift during the quilting process.
- Choose your quilting technique. Some popular quilting methods include hand quilting, machine quilting, or a combination of both. Consider the size and complexity of your quilt and your personal preferences when deciding on the quilting technique.
- Begin quilting from the center of your quilt and work your way towards the edges. This helps prevent any puckering or bunching of the fabric.
- If you are hand quilting, use a quilting needle and quilting thread. Follow the design or pattern you have in mind, carefully stitching through all three layers.
- If you are machine quilting, select a quilting foot suitable for your machine and choose a quilting stitch pattern. Practice on a scrap fabric to get comfortable with the speed and tension settings before quilting the actual quilt.
- Continue quilting until you have completed stitching through the entire quilt. Take breaks if needed and enjoy the meditative and creative process of quilting.
When quilting, you can choose to follow the lines of the flower blocks, emphasize the floral motifs, or create your own unique design. The quilting pattern you choose will greatly influence the final look of your American Grandma Flower Garden Quilt.
Once the quilting is complete, take a moment to admire your quilt. The stitching has brought the quilt to life, enhancing its beauty and adding a wonderful texture. The next step is to bind the edges for a finished and polished look.
Read more: How To Design A Cut Flower Garden
Binding the Quilt
The final step in completing your American Grandma Flower Garden Quilt is binding the edges. Binding not only adds a clean and finished look to the quilt but also ensures that the layers are securely held together. Follow these steps to bind your quilt:
- Measure the perimeter of your quilt to determine the length of fabric needed for the binding strips. Typically, you will need enough fabric to cover all four sides of the quilt, with a few extra inches for mitering the corners.
- Cut the binding fabric into strips according to the measurements. The width of the strips can vary depending on your preference, but a common measurement is 2.5 inches.
- Join the binding strips together to create one long continuous strip. Align the ends of two strips at a 90-degree angle, right sides facing each other. Sew a diagonal seam from one corner to the other, creating a seam allowance, and trim the excess fabric. Continue joining all the strips until you have one long continuous strip.
- Press the binding strip in half lengthwise, wrong sides together, to create a fold along the entire length.
- Starting somewhere along one side of the quilt, align the raw edges of the binding strip with the raw edge of the quilt top. Pin or clip in place.
- Using a 1/4-inch seam allowance, sew the binding strip to the quilt top, backstitching at the beginning and end of the seam. Continue sewing along the entire perimeter of the quilt.
- When you approach a corner, stop stitching 1/4 inch from the edge. Fold the binding strip up, creating a 45-degree angle. Then fold it back down, aligning the fold with the edge of the next side. Continue stitching along the next side, repeating the corner mitering process for each corner.
- Once the binding is sewn to the quilt top, fold it over to the backside of the quilt. The folded edge of the binding should cover the stitching line on the quilt top.
- Secure the binding to the back of the quilt by hand stitching or machine stitching along the folded edge. Choose a matching thread color and stitch carefully to create an invisible or decorative finish.
- Take your time and ensure that the binding is securely attached and evenly distributed around the quilt.
Once the binding is complete, you have successfully finished your American Grandma Flower Garden Quilt! Give it a final press, trim any loose threads, and admire your beautiful creation.
Remember, quilting is a labor of love, and each quilt is a unique expression of creativity. Enjoy the process and take pride in the masterpiece you have created with your own hands. Your American Grandma Flower Garden Quilt is sure to be cherished for years to come!
Conclusion
Congratulations on completing your very own American Grandma Flower Garden Quilt! Through careful fabric selection, precise cutting, meticulous assembly, and thoughtful quilting, you have created a beautiful and timeless piece of art. Your quilt is a testament to your creativity, skill, and dedication to the craft of quilting.
As you survey your finished quilt, you’ll appreciate the vibrant colors, intricate floral designs, and the sense of joy and coziness it brings. The American Grandma Flower Garden Quilt embodies the spirit of nature and invokes feelings of tranquility, warmth, and nostalgia.
Now that you have mastered the process of assembling this classic quilt pattern, you can take your newfound knowledge and apply it to other quilting projects. Explore different patterns, experiment with unique fabric combinations, and continue to let your creativity guide you as you embark on future quilting endeavors.
Remember, quilting is a journey of self-expression and artistic exploration. It is an opportunity to create beautiful and functional works of art that can be cherished and passed down for generations. Embrace the process, enjoy the creative journey, and treasure the joy that quilting brings.
Whether you are gifting your American Grandma Flower Garden Quilt to a loved one or keeping it as a treasured heirloom, your quilt reflects your passion for quilting and your dedication to creating something truly special.
So, celebrate your accomplishment, embrace the warmth and beauty of your quilt, and continue to explore the wonderful world of quilting. There are endless possibilities and exciting new projects waiting to be discovered. Happy quilting!
Frequently Asked Questions about How To Assemble An American Grandma Flower Garden Quilt
Was this page helpful?
At Storables.com, we guarantee accurate and reliable information. Our content, validated by Expert Board Contributors, is crafted following stringent Editorial Policies. We're committed to providing you with well-researched, expert-backed insights for all your informational needs.


0 thoughts on “How To Assemble An American Grandma Flower Garden Quilt”