Home>Articles>How To Build A Window Box And Increase Your Home’s Curb Appeal
Articles
How To Build A Window Box And Increase Your Home’s Curb Appeal
Modified: January 5, 2024
Learn how to build a stunning window box to enhance your home's curb appeal with our insightful articles. Discover expert tips and tricks for a gorgeous garden display.
(Many of the links in this article redirect to a specific reviewed product. Your purchase of these products through affiliate links helps to generate commission for Storables.com, at no extra cost. Learn more)
Introduction
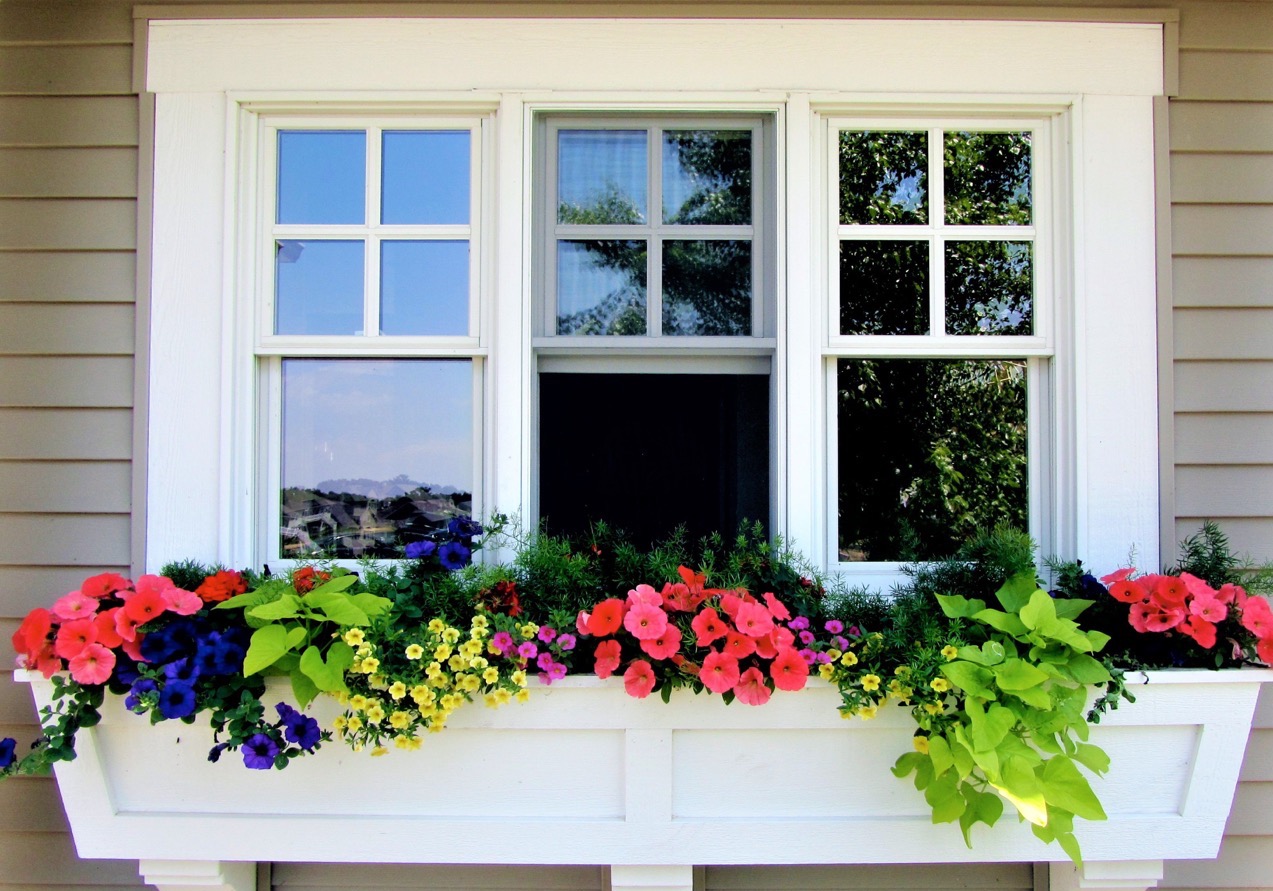
Enhancing the curb appeal of your home is a great way to make a lasting impression on visitors and potential buyers. One effective way to accomplish this is by building a window box filled with vibrant flowers and greenery. A window box not only adds beauty to your home but also serves as a miniature garden that can be easily admired from both the inside and outside. In this article, we will guide you through the step-by-step process of building a window box that will instantly enhance your home’s exterior.
Before we dive into the details, it’s important to note that building a window box requires basic carpentry skills and access to the necessary tools and materials. If you’re not comfortable with woodworking, you may want to consider hiring a professional or enlisting the help of a skilled friend or family member.
Now, let’s gather our materials and tools and get started on creating a beautiful window box that will increase your home’s curb appeal.
Key Takeaways:
- Elevate your home’s exterior with a vibrant window box garden, adding charm and curb appeal while providing a therapeutic and rewarding gardening experience.
- Building and maintaining a window box is a creative and fulfilling project that enhances your home’s aesthetic appeal, leaving a lasting impression on visitors and potential buyers.
Step 1: Gather Materials and Tools
Before you begin building your window box, it’s important to gather all the necessary materials and tools. Here’s a list of what you’ll need:
- Pressure-treated lumber or cedar planks: These will serve as the main material for your window box. Opt for a durable wood that can withstand outdoor conditions.
- Saw: You’ll need a saw to cut the wood to the desired dimensions for your window box. A circular saw or a miter saw will work well for this task.
- Tape measure: Accurate measurements are crucial in ensuring that your window box fits perfectly beneath your window. Use a tape measure to measure the width and depth of your window.
- Screws or nails: These will be used to assemble the window box. Choose screws or nails that are appropriate for outdoor use and can securely hold the wood together.
- Sandpaper: To achieve a smooth and splinter-free finish, you’ll need sandpaper to sand down any rough edges or surfaces.
- Primer and paint: For a polished look, you’ll want to prime and paint your window box. Choose a paint color that complements your home’s exterior.
- Drill: A drill will be needed to create holes for attaching the brackets that will hold your window box in place.
- Brackets or mounting hardware: Depending on the type of window you have, you’ll need brackets or mounting hardware to secure your window box to the window sill or wall.
- Soil and plants: Finally, you’ll need potting soil and your choice of plants or flowers to fill your window box. Consider selecting plants that thrive in your climate and provide vibrant colors.
Once you have gathered all the necessary materials and tools, you’re ready to move on to the next step: measuring and cutting the wood for your window box.
Step 2: Measure and Cut the Wood
Now that you have all your materials and tools ready, it’s time to measure and cut the wood for your window box. Follow these steps to ensure accurate measurements and precise cuts:
- Measure the width of your window: Use a tape measure to determine the width of your window. This measurement will be used to determine the overall width of your window box.
- Calculate the depth of your window box: Decide how far you want your window box to extend from the window. Typically, a depth of 6 to 8 inches is sufficient for planting flowers.
- Mark and cut the side pieces: Using your tape measure and a pencil, mark the dimensions for the side pieces of your window box on the lumber. Make sure to account for the width and depth measurements you calculated earlier. Once marked, carefully cut the lumber using a saw.
- Mark and cut the front and back pieces: Measure the length of the side pieces you just cut and mark this measurement on the lumber for the front and back pieces of your window box. These pieces should match the width of your window. Cut them accordingly.
Remember to always wear protective goggles and gloves when handling tools and cutting wood to ensure your safety.
Once you have cut all the necessary pieces, double-check their measurements and make any adjustments if needed. It’s important to have accurately cut pieces to ensure a sturdy and well-fitted window box.
With the wood measured and cut, you’re now ready to move on to the next step: assembling the window box.
Step 3: Assemble the Window Box
With the wood pieces cut to the correct dimensions, it’s time to assemble the window box. Follow these steps to ensure a sturdy and well-constructed box:
- Arrange the pieces: Lay out the side, front, and back pieces to get an idea of how they will fit together. Make sure the measurements align properly.
- Apply wood glue: Apply a thin layer of wood glue to the edges of the side pieces where they will join with the front and back pieces. This will help provide additional strength and stability to the joints.
- Secure with screws or nails: Once the glue is applied, use screws or nails to firmly attach the pieces together. Place the screws or nails at regular intervals along the joints to create a secure bond. Use a drill or hammer to drive in the screws or nails.
- Check for squareness: Check that the corners are at a right angle (90 degrees) to ensure the box is square. You can use a carpenter’s square or a measuring tape to check the angles.
- Repeat the process: Repeat the glue and screw/nail process for the remaining corners.
After assembling the window box, make sure to wipe away any excess wood glue with a damp cloth. Allow the glue to dry completely before proceeding to the next step.
With the window box now assembled, it’s time to move on to step 4: sanding and painting the box to give it a polished finish.
Step 4: Sand and Paint the Window Box
Now that you have assembled the window box, it’s time to give it a smooth finish and add some color. Follow these steps to sand and paint the window box:
- Sand the wood: Use sandpaper or a sanding block to smooth out any rough edges, surfaces, or imperfections on the window box. Sanding will create a clean and polished look.
- Wipe away dust: After sanding, use a damp cloth or tack cloth to wipe away any dust or debris left on the wood. This will ensure a clean surface for painting.
- Apply primer: To help the paint adhere better and provide a more durable finish, apply a coat of primer to the entire window box. Use a brush or roller to evenly apply the primer. Allow it to dry according to the manufacturer’s instructions.
- Paint the box: Once the primer is dry, it’s time to add color to your window box. Choose a paint color that complements your home’s exterior and your personal style. Use a brush or roller to apply an even coat of paint to the entire box. You may need to apply multiple coats for full coverage. Allow each coat to dry before applying the next.
- Let the paint dry: After applying the final coat of paint, allow the window box to dry completely. This will ensure that the paint cures and hardens for long-lasting durability.
Remember to work in a well-ventilated area and follow the instructions provided by the primer and paint manufacturer regarding drying times and application methods.
With the window box sanded and painted, it’s time to move on to step 5: attaching brackets to the window for proper installation.
When building a window box, make sure to use weather-resistant materials such as cedar or redwood to ensure durability and longevity.
Step 5: Attach Brackets to the Window
Now that you have sanded and painted the window box, it’s time to attach brackets to the window for proper installation. Follow these steps to securely mount the window box:
- Choose the type of brackets: Depending on the design of your window and personal preference, you can choose from various types of brackets. Common options include L-shaped brackets, decorative brackets, or brackets specifically designed for window boxes.
- Position the brackets: Determine the desired placement of the brackets beneath the window. Make sure they are evenly spaced and aligned with the window box. Use a level to ensure they are straight.
- Mark the screw hole positions: Once you have determined the position of the brackets, use a pencil or marker to mark the screw hole positions on the window sill or wall. Ensure the marks are visible and aligned with the brackets.
- Pre-drill the holes: Using a drill and an appropriate-sized drill bit, pre-drill holes at the marked positions. This will make it easier to drive in the screws or insert the mounting hardware.
- Secure the brackets: Align the brackets with the pre-drilled holes and attach them to the window sill or wall using screws or the provided mounting hardware. Use a screwdriver or drill to tighten the screws securely.
- Check the stability: Once the brackets are securely attached, double-check their stability by gently shaking them. They should be firmly in place and able to support the weight of the window box and plants.
It’s important to follow the manufacturer’s instructions when it comes to the specific installation requirements of the brackets you have chosen. If you’re unsure about the process, consult with a professional or seek guidance from a knowledgeable source.
Now that the brackets are securely attached, it’s time to move on to step 6: installing the window box.
Step 6: Install the Window Box
With the brackets securely attached to the window, it’s time to install the window box. Follow these steps to ensure a proper and secure installation:
- Place the window box on the brackets: Carefully lift the window box and position it onto the brackets. Ensure that the box rests evenly on the brackets and is centered beneath the window.
- Adjust the position if needed: Take a step back and visually assess the placement of the window box. Make any necessary adjustments to ensure it is level and aligned with the window.
- Secure the window box to the brackets: Once you are satisfied with the placement, use screws or fasteners to secure the window box to the brackets. Refer to the instructions provided by the manufacturer for specific guidelines on how to attach the box to the brackets.
- Check for stability: Gently shake the window box to check for stability. It should be securely attached to the brackets and able to hold the weight of the plants and soil.
It’s important to ensure that the window box is properly installed and safely secured. This will prevent any potential damage or accidents due to the box being loose or unstable.
With the window box now installed, it’s time to move on to step 7: adding soil and planting your favorite flowers.
Step 7: Add Soil and Plant Your Flowers
With the window box securely installed, it’s time to bring it to life by adding soil and planting your favorite flowers. Follow these steps to create a beautiful and thriving window box garden:
- Choose the right soil: Select a high-quality potting soil that is suitable for container gardening. Avoid using garden soil, as it may not provide the proper drainage and nutrients needed for potted plants.
- Fill the window box with soil: Fill the window box with the potting soil, leaving a 1-2 inch gap from the top of the box to allow space for watering.
- Prepare the plants: Before planting, gently remove each plant from its container. Loosen the roots slightly to encourage proper growth and nutrient uptake.
- Arrange the plants: Plan the layout of your plants within the window box. Consider their respective heights, colors, and growth habits to create an aesthetically pleasing arrangement.
- Plant the flowers: Dig a small hole in the soil for each plant and place it gently into the hole. Press the soil around the base of each plant to secure it in place.
- Water thoroughly: After planting, thoroughly water the window box to ensure the soil is evenly moist. This helps settle the plants and encourages healthy root development.
- Maintain proper watering and care: Regularly water your window box to keep the soil moist but not waterlogged. Monitor the moisture levels and adjust your watering routine accordingly. Additionally, provide regular fertilization and remove any spent blooms or dead foliage to encourage continuous flowering.
Remember to consider the sunlight requirements of the plants you choose and position your window box accordingly. Some plants thrive in full sun, while others prefer partial shade.
By following these steps and providing proper care, you can create a stunning window box garden that will enhance the beauty of your home’s exterior and bring joy throughout the seasons.
Now that your window box is filled with beautiful flowers, it’s time to move on to step 8: maintenance and care tips to keep your window box looking its best.
Step 8: Maintenance and Care Tips
To ensure that your window box continues to thrive and enhance the curb appeal of your home, it’s important to provide proper maintenance and care. Follow these tips to keep your window box looking its best:
- Regular watering: Check the moisture level of the soil regularly and water accordingly. Avoid overwatering, as it can lead to root rot. Water only when the top inch of soil feels dry.
- Deadheading and pruning: Remove any faded or wilted flowers by gently pinching or cutting them off. This promotes continuous blooming and keeps the plants looking tidy.
- Fertilize regularly: Apply a balanced, slow-release fertilizer according to the manufacturer’s instructions. This provides essential nutrients for the plants to grow and flower abundantly.
- Weed control: Keep an eye out for any weeds that may sprout in the window box. Regularly remove them to prevent competition for nutrients and space.
- Pest control: Inspect your plants regularly for any signs of pest infestations, such as aphids or spider mites. Take appropriate measures to control and eliminate pests to protect your window box garden.
- Pruning and reshaping: As the plants grow and fill out the window box, you may need to prune and reshape them to maintain the desired appearance. Trim back any straggly or overgrown branches to keep the plants looking neat and well-groomed.
- Seasonal updates: Consider switching out the plants in your window box with seasonal favorites to keep things fresh and interesting. This allows you to enjoy different blooms and colors throughout the year.
- Monitor for signs of stress or disease: Regularly inspect your plants for any signs of stress, such as yellowing leaves or fungal diseases. Take prompt action to address any issues before they spread to the rest of your window box garden.
By implementing these maintenance and care tips, you can ensure that your window box remains healthy, vibrant, and eye-catching throughout the seasons.
Remember to stay engaged with your window box garden, observing its growth and adjusting care as needed. With proper attention and care, your window box will continue to be a source of beauty and delight for years to come.
Congratulations on completing the steps to build and maintain your stunning window box garden!
With these maintenance and care tips in mind, you can enjoy a flourishing and aesthetically pleasing window box that enhances the overall curb appeal of your home.
Now, go ahead and sit back, relax, and take in the beauty of your blooming window box!
Read more: Upgrading Your Garage Door For Curb Appeal
Conclusion
Building a window box is a rewarding project that can greatly enhance the curb appeal of your home. By following the step-by-step process outlined in this guide, you’ve learned how to create a beautiful window box filled with vibrant flowers and greenery. From gathering the materials and tools, to measuring and cutting the wood, to assembling and painting the window box, each step has brought you closer to creating a stunning addition to your home’s exterior.
With careful installation and regular maintenance, your window box will continue to be a source of beauty and joy throughout the seasons. Remember to water and fertilize regularly, deadhead spent blooms, and keep an eye out for pests or diseases. By following these maintenance and care tips, you can ensure that your window box remains healthy and vibrant year-round.
Not only does a well-designed and well-maintained window box improve the aesthetic appeal of your home, but it also provides a miniature garden that can be appreciated from both the inside and outside. The burst of colors and greenery that your window box brings will undoubtedly leave a lasting impression on visitors and potential buyers.
So, whether you’re looking to spruce up your home for your own enjoyment or to make a positive impression on others, building a window box is an excellent choice. It allows you to exercise your creativity, showcase your gardening skills, and increase the overall curb appeal of your home. Plus, taking care of your window box garden can provide a therapeutic and rewarding experience, allowing you to connect with nature right at your window sill.
Now that you have the knowledge and steps to create a stunning window box, it’s time to get started and bring some natural beauty to your home’s exterior. Enjoy the process, embrace your creativity, and watch as your window box transforms into a captivating focal point that adds life, color, and charm to your home.
Frequently Asked Questions about How To Build A Window Box And Increase Your Home's Curb Appeal
Was this page helpful?
At Storables.com, we guarantee accurate and reliable information. Our content, validated by Expert Board Contributors, is crafted following stringent Editorial Policies. We're committed to providing you with well-researched, expert-backed insights for all your informational needs.


0 thoughts on “How To Build A Window Box And Increase Your Home’s Curb Appeal”