Articles
How To Build Pull Down Attic Stairs
Modified: October 20, 2024
Discover step-by-step articles on how to build durable and efficient pull down attic stairs. Simplify your home improvement projects with our expert guidance.
(Many of the links in this article redirect to a specific reviewed product. Your purchase of these products through affiliate links helps to generate commission for Storables.com, at no extra cost. Learn more)
Introduction
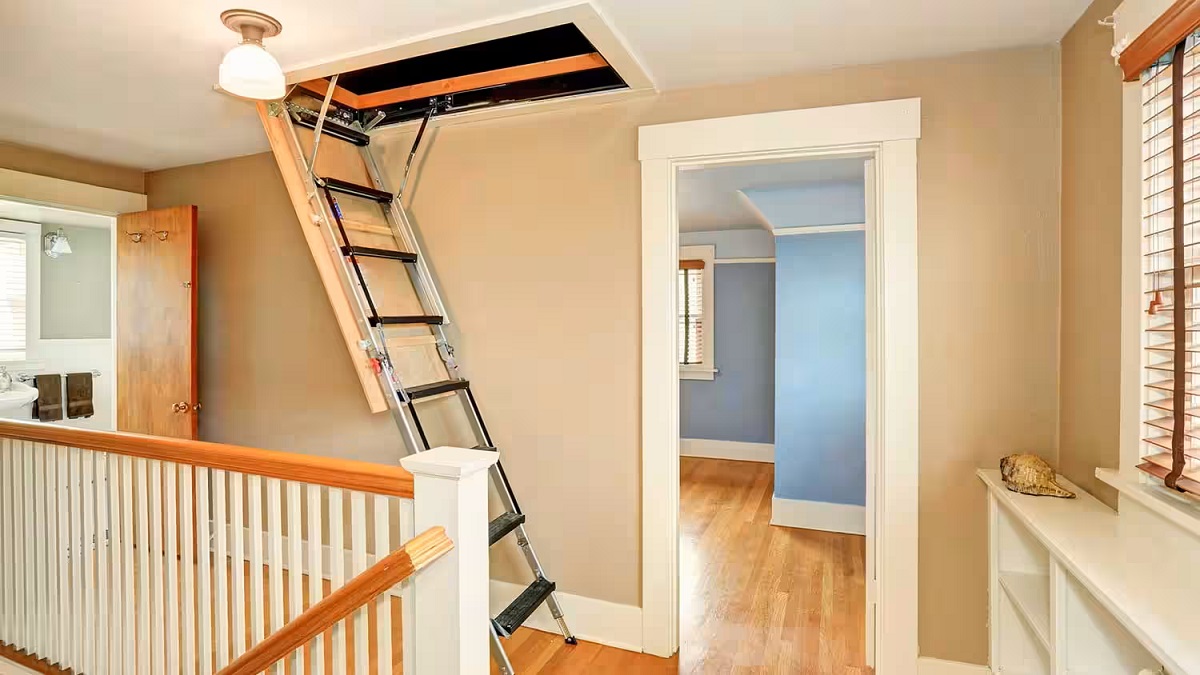
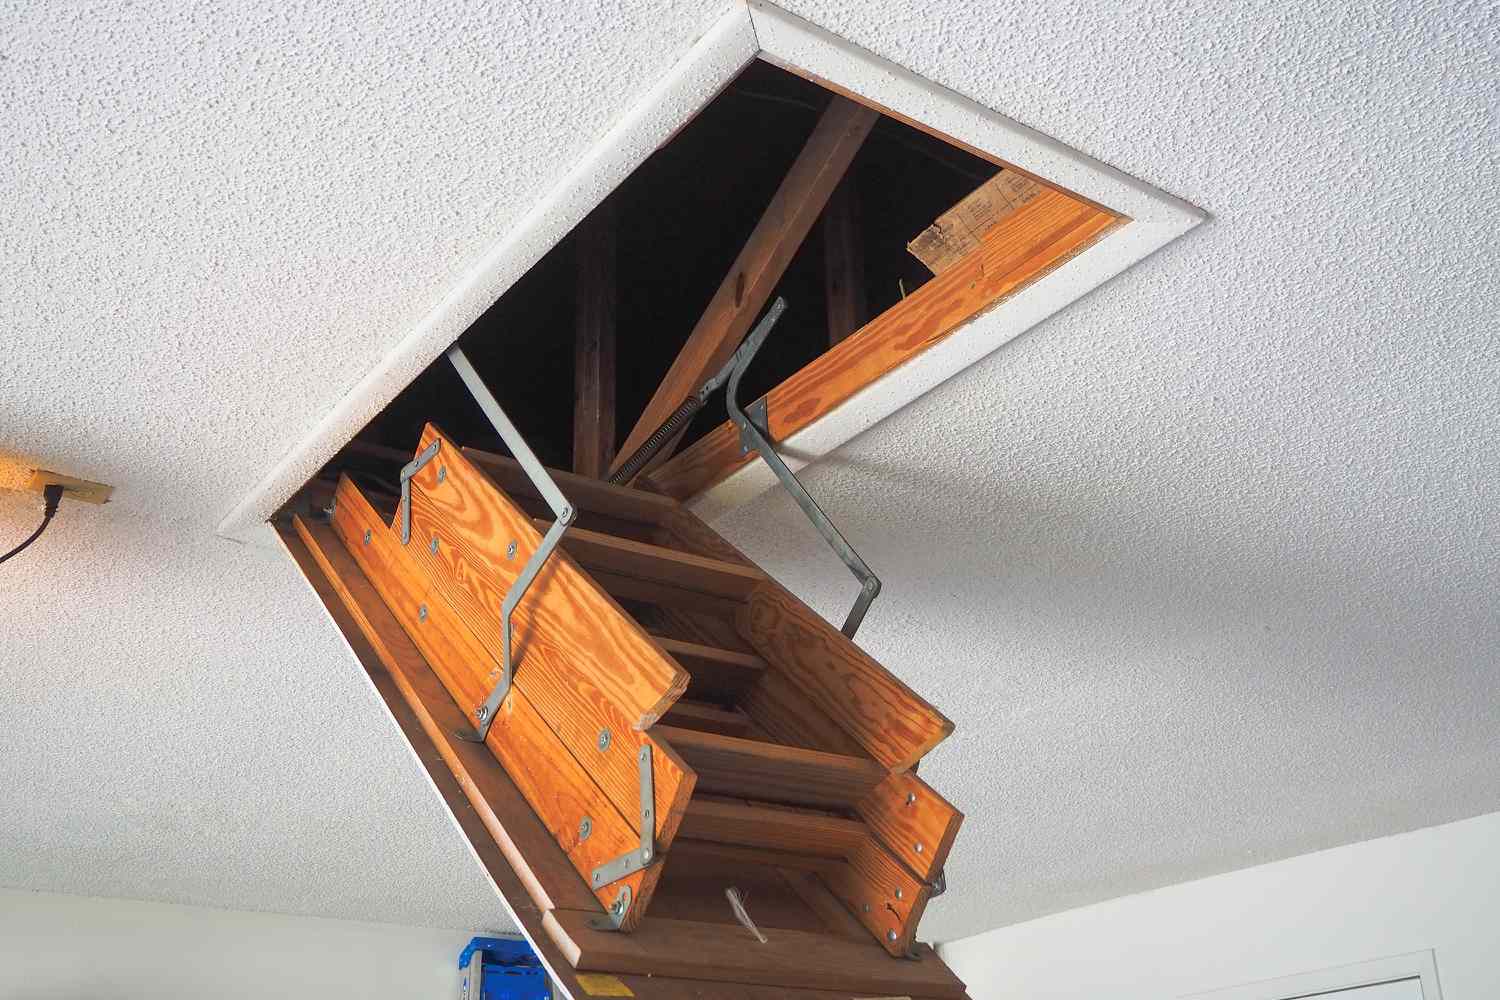
Welcome to our comprehensive guide on how to build pull-down attic stairs. If you have an attic space that you want to easily access, installing pull-down attic stairs is a great solution. These stairs provide a convenient and safe way to reach your attic without the need for a separate ladder or staircase.
By installing pull-down attic stairs, you can convert your attic into usable storage space, an extra room, or even a cozy hideaway. The process of building pull-down attic stairs may seem daunting at first, but with the right tools and a step-by-step approach, you can accomplish this task with confidence.
In this article, we will walk you through each step of the process, from measuring and planning to installing and testing the stairs. We’ll provide you with a detailed guide, along with tips and tricks to ensure that your pull-down attic stairs are safe, functional, and aesthetically pleasing.
Before you begin, it is essential to check with local building codes and regulations to ensure that you are in compliance. Additionally, make sure you have the necessary permits, if required. Safety should always be a top priority, so be sure to follow safety guidelines and use appropriate safety gear throughout the construction process.
Now, let’s dive into the step-by-step process of building pull-down attic stairs and transform your attic into a functional and accessible space!
Key Takeaways:
- Building pull-down attic stairs requires precise measurements, thorough planning, and careful preparation of the attic opening. With the right materials and tools, you can create a safe and functional access point to your attic space.
- Installing pull-down attic stairs involves constructing a sturdy staircase frame, attaching secure steps, and testing the pull-down mechanism for smooth operation. Prioritize safety, thorough testing, and adjustments to ensure reliable and convenient attic access.
Read more: How To Insulate Pull Down Attic Stairs
Step 1: Measure and Plan
Before you start building pull-down attic stairs, it’s crucial to measure your attic opening accurately and plan out the design. This step will ensure that your stairs fit properly and function smoothly. Here’s how to do it:
- Measure the Opening: Begin by measuring the dimensions of your attic opening, including the width and height. Use a measuring tape to get precise measurements. Take into account any obstructions such as pipes or wires that may affect the location or size of your stairs.
- Determine the Staircase Design: Next, decide on the type of staircase design that suits your needs and the available space. The most common designs are folding stairs and telescoping stairs. Consider factors such as the frequency of use, available headroom, and ease of installation. Make sure to choose a design that will allow you to comfortably access your attic.
- Calculate the Tread and Riser Size: Calculate the size of each step, known as the tread, and the height of each step, called the riser. The recommended tread size is around 10-12 inches, and the risers should be around 7-8 inches in height. Adjust these measurements based on the available space and personal comfort.
- Determine the Angle: Decide on the angle at which the stairs will descend. The standard angle for attic stairs is between 55 to 65 degrees, providing a comfortable slope for climbing up and down. You can use online calculators or consult a professional if you want to determine the exact angle.
- Create a Sketch or Blueprint: Once you have all the measurements and decisions in place, create a sketch or blueprint of your pull-down attic stairs. This will help you visualize the final product and serve as a reference throughout the construction process.
By measuring accurately and planning out the design, you’ll have a solid foundation for building your pull-down attic stairs. This step is essential to ensure that the stairs fit perfectly and function smoothly once they’re installed. Take your time in this phase to avoid any potential issues later on.
Step 2: Gather Materials and Tools
Once you have measured and planned out your pull-down attic stairs, it’s time to gather all the necessary materials and tools for the construction process. Having everything ready before you start will save you time and prevent unnecessary delays. Here’s a list of commonly used materials and tools:
Materials:
- Wooden boards or pre-made staircase kit
- Particleboard or plywood for the steps
- Hinges
- Pull-down mechanism
- Screws, nails, or other fasteners
- Wood glue or adhesive
- Sandpaper or sanding block
- Primer and paint
- Stain or finish (optional)
- Safety rope or chain
- Safety railings (if required by local codes)
Tools:
- Tape measure
- Saw (circular saw, jigsaw, or handsaw)
- Drill and drill bits
- Screwdriver
- Hammer
- Sanding tool
- Paintbrushes or rollers
- Clamps
- Safety goggles
- Work gloves
- Level
- Pencil or marker
Make sure you have all the necessary materials and tools on hand before you begin the construction process. Gathering these items in advance will prevent any delays or interruptions during the assembly of your pull-down attic stairs.
It is also worth noting that the specific materials and tools needed may vary depending on your chosen design and the condition of your attic. If you’re using a pre-made staircase kit, follow the manufacturer’s instructions regarding additional materials and tools required.
By being well-prepared with the right materials and tools, you’ll be ready to start building your pull-down attic stairs with confidence and efficiency.
Step 3: Prepare the Attic Opening
Before you can install the pull-down attic stairs, it’s essential to prepare the attic opening to ensure a smooth and secure fit. This step involves cleaning the area, reinforcing the structure, and making any necessary adjustments. Follow these steps to prepare the attic opening:
- Clean the Area: Start by clearing out any debris or obstructions around the attic opening. Sweep away dust and remove any loose nails or screws. A clean workspace will make it easier to work and ensure a neat installation.
- Reinforce the Structure: Check the condition of the attic opening and surrounding framing. If necessary, reinforce the structure by adding additional supports or repairing any weak areas. Make sure the framing is sturdy enough to support the weight of the stairs and the person using them.
- Remove Obstacles: Identify and remove any obstacles that might interfere with the installation process, such as electrical wires, pipes, or insulation. Ensure that there is enough clearance for the stairs to fold or slide down without obstruction.
- Measure and Mark: Measure the distance from the attic floor to the ceiling to determine the length of your pull-down attic stairs. Mark this measurement on the attic opening, ensuring that the markings are level and centered.
- Cut the Opening: Using a saw, carefully cut along the marked lines to create the opening for your pull-down attic stairs. Take your time and use proper safety precautions when operating power tools.
- Frame the Opening: Install framing around the attic opening to provide support for the stairs and create a finished look. Use wooden boards or pre-made framing material to frame the opening securely. Ensure that the frame is level and square.
- Apply Insulation (Optional): If desired, install insulation around the attic opening to improve energy efficiency and prevent drafts. Use insulation materials suitable for your climate and follow local building codes for insulation installation.
By properly preparing the attic opening, you’ll create a solid foundation for the installation of your pull-down attic stairs. Take the time to clean, reinforce, and measure the area to ensure a seamless and secure fit.
Once the attic opening is prepared, you’re ready to move on to the next step: building the staircase frame.
Step 4: Build the Staircase Frame
Now that you have prepared the attic opening, it’s time to build the staircase frame for your pull-down attic stairs. This frame will provide the structure and support for the steps. Follow these steps to build the staircase frame:
- Measure and Cut the Frame Components: Using the measurements from your plan, measure and cut the wooden boards to create the frame components for the staircase. Cut two side stringers to the desired length, ensuring they are parallel and straight.
- Attach the Stringers: Position the side stringers vertically against the attic opening frame, ensuring they are plumb. Use clamps or braces to hold them securely in place. Attach the stringers to the framing using screws or nails, ensuring a tight and stable connection.
- Add Support Brackets: To reinforce the staircase frame, add support brackets between the stringers at regular intervals. These brackets will provide additional strength and stability to the stairs. Secure them in place using screws or nails.
- Create Step Supports: Measure and cut wooden boards to serve as supports for the steps. These supports should be attached horizontally between the side stringers, ensuring they are evenly spaced. Use screws or nails to secure them firmly.
- Install a Header: Install a header board at the top of the staircase frame to provide additional support and stability. This header will be connected to the attic framing. Use screws or nails to attach it securely.
- Check for Level: Use a level to ensure that the staircase frame is plumb and level. Make any necessary adjustments to achieve a straight and balanced frame.
- Apply Wood Glue (Optional): For added strength, consider applying wood glue to the joints and connections of the staircase frame. This will create a stronger bond between the components.
Building the staircase frame is a crucial step in the construction of pull-down attic stairs. It forms the basis for the overall structure and stability of the stairs. By following these steps and ensuring precise measurements and connections, you’ll have a solid and sturdy frame ready for the next step.
Now that the staircase frame is complete, it’s time to move on to the next step: attaching the steps to the frame.
Step 5: Attach the Steps
With the staircase frame in place, it’s time to attach the steps to create functional pull-down attic stairs. The steps will provide a safe and stable surface for climbing up and down. Follow these steps to attach the steps:
- Measure and Cut Step Boards: Measure and cut the step boards from particleboard or plywood, ensuring they match the dimensions of your plan. Cut them to the desired width and depth, taking into account the calculations from Step 1.
- Position the Steps: Begin at the bottom of the staircase frame and position the first step board on the lowest set of step supports. Ensure it is centered and aligned with the frame. Use clamps or braces to hold it in place temporarily.
- Attach the Step Boards: Secure the step board to the staircase frame by driving screws or nails through the board into the step supports. Make sure the screws or nails penetrate both the board and the support securely. Repeat this process for each step board.
- Check for Level and Stability: Use a level to ensure each step board is level and aligned properly. Test the stability of each step by applying pressure to different areas. Make any necessary adjustments to ensure all steps are secure and stable.
- Apply Wood Glue (Optional): For added strength and durability, consider applying wood glue to the joints between the step boards and the step supports. This will provide a stronger bond and reduce any potential movement.
- Sand and Finish the Steps (Optional): If desired, sand the surface of the step boards to create a smooth and even finish. Apply primer and paint, or stain and finish, according to your preference. Allow the finish to dry completely before moving on.
Attaching the steps is a critical step in the construction of pull-down attic stairs. Take your time to ensure that the steps are aligned properly, level, and securely attached. This will provide a safe and sturdy staircase for easy access to your attic.
With the steps attached, you’re ready to move on to the next step: installing the pull-down mechanism.
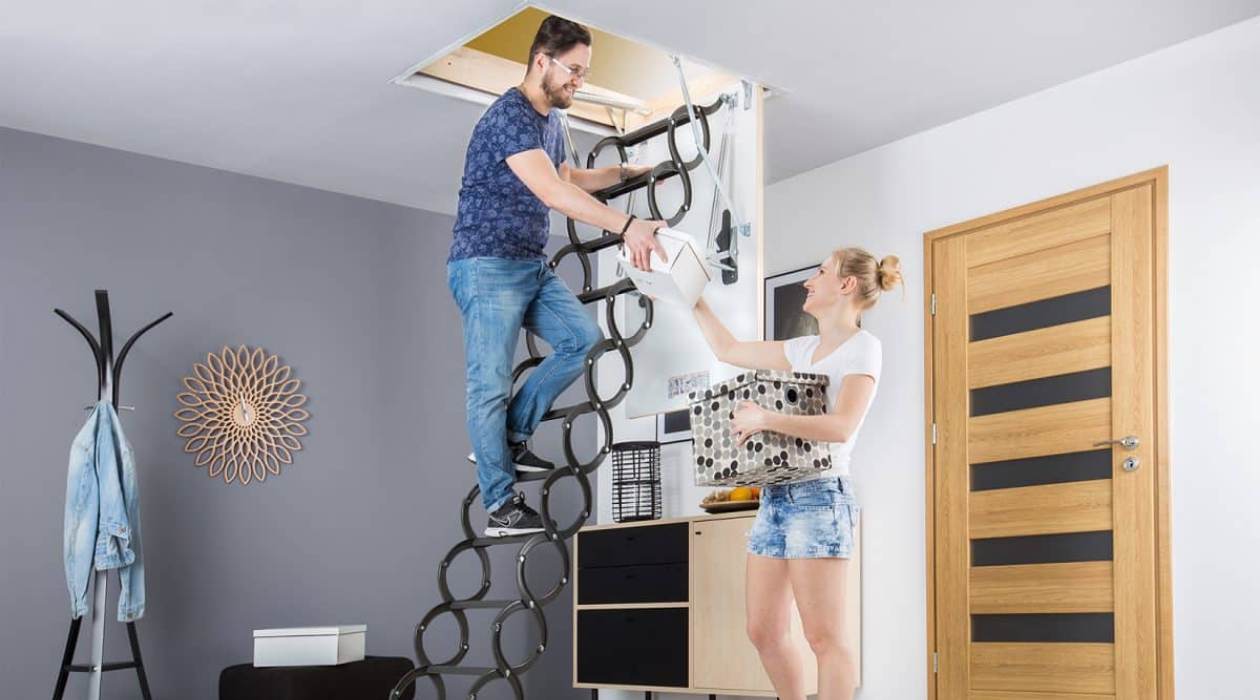
When building pull-down attic stairs, make sure to measure the opening accurately and choose a sturdy and reliable ladder system that can support the weight of the user and any items being carried up or down.
Step 6: Install the Pull Down Mechanism
Installing the pull-down mechanism is a crucial step in completing your pull-down attic stairs. This mechanism allows you to easily raise and lower the stairs, providing convenient access to your attic. Follow these steps to install the pull-down mechanism:
- Choose the Right Mechanism: Select a pull-down mechanism that is suitable for the weight and size of your stairs. Consider factors such as the weight capacity, ease of operation, and quality of the mechanism. Follow the manufacturer’s instructions for installation.
- Position the Mechanism: Position the pull-down mechanism at the top center of the staircase frame, aligned with the header board. Mark the screw hole locations on the frame and header board using a pencil or marker.
- Pre-drill Screw Holes: Use a drill and appropriate drill bit to pre-drill pilot holes on the marked locations. This will prevent the wood from splitting when you attach the mechanism with screws.
- Attach the Mechanism: With the pilot holes in place, use screws and a screwdriver or drill to securely attach the pull-down mechanism to the staircase frame and header board. Follow the manufacturer’s instructions for proper screw size and installation.
- Test the Mechanism: Test the pull-down mechanism to ensure it operates smoothly and securely. Raise and lower the stairs several times, checking for any sticking or wobbling. Make any necessary adjustments to improve the operation and stability.
- Add Safety Features (Optional): For added safety, consider installing a safety rope or chain to prevent the stairs from falling unexpectedly. Attach the rope or chain securely to the staircase frame and provide a mechanism for easy operation.
Installing the pull-down mechanism is a critical step to ensure the functionality and safety of your pull-down attic stairs. Take your time to choose the right mechanism, align it properly, and test its operation thoroughly.
Once the pull-down mechanism is installed and tested, you’re almost done! The final step is to test and make any necessary adjustments to ensure the stairs are stable and secure.
Step 7: Test and Adjust
After completing the installation of your pull-down attic stairs, it’s essential to thoroughly test and make any necessary adjustments to ensure they are safe, functional, and easy to use. Follow these steps to test and adjust your pull-down attic stairs:
- Test the Staircase Operation: Begin by testing the operation of the stairs. Pull the stairs down and ensure they extend smoothly and without any resistance. Check that the stairs lock securely in the open position.
- Ascend and Descend the Stairs: Carefully climb up and down the stairs to test their stability and weight capacity. Pay attention to any squeaks, wobbling, or loose connections. Address any issues by tightening screws, reinforcing joints, or adding additional support if necessary.
- Check Headroom and Clearance: Make sure there is sufficient headroom and clearance for moving up and down the stairs comfortably. Confirm that there are no obstructions such as pipes, wires, or insulation that may interfere with the stairs’ operation.
- Inspect Safety Features: If you installed safety features such as a safety rope or chain, ensure that they are properly installed and functioning as intended. Test their operation and make any adjustments if needed.
- Conduct a Safety Assessment: Evaluate the overall safety of the pull-down attic stairs, including the stability of the frame, the strength of the steps, and the secure attachment of the pull-down mechanism. Address any safety concerns promptly to prevent accidents or injuries.
- Make Adjustments: Based on your testing, make any necessary adjustments to improve the function and safety of the stairs. This may include tightening connections, adding additional support, or making modifications to the staircase frame or steps.
- Final Inspection: Once you have made the necessary adjustments, conduct a final inspection to ensure everything is in proper working order. Double-check all connections, fasteners, and safety features to ensure they are secure.
Testing and adjusting your pull-down attic stairs is a crucial step to ensure their safe and reliable operation. Take your time to thoroughly evaluate every aspect of the stairs and address any issues promptly. By doing so, you’ll have functional and secure pull-down attic stairs that provide easy access to your attic space.
Congratulations! With the completion of this step, your pull-down attic stairs are ready for regular use. Enjoy the convenience and accessibility they provide to your attic!
Conclusion
Congratulations on completing the construction of your pull-down attic stairs! By following this comprehensive guide, you have successfully transformed your attic into a functional and easily accessible space. Here’s a recap of the steps you’ve taken:
- Measured and planned out your project, ensuring a proper fit for your attic opening.
- Gathered all the necessary materials and tools to streamline the construction process.
- Prepared the attic opening, reinforcing the structure and creating a clean and safe workspace.
- Built the staircase frame, providing a solid foundation for the steps.
- Attached the steps, ensuring they are stable and level for comfortable climbing.
- Installed the pull-down mechanism, allowing for easy raising and lowering of the stairs.
- Tested and adjusted the stairs to ensure their safety, stability, and functionality.
With your pull-down attic stairs complete, you now have convenient access to your attic space for storage, an additional room, or any other purpose you desire. Remember to always prioritize safety, following local building codes and regulations, and using appropriate safety gear throughout the construction process.
Should you encounter any issues or have questions along the way, don’t hesitate to consult with professionals or seek guidance from experienced individuals. Building pull-down attic stairs may seem challenging, but with patience, careful planning, and attention to detail, you can achieve excellent results.
Enjoy your newly created pull-down attic stairs and make the most of your attic space. Whether it’s for additional storage, a cozy hideaway, or an extra room, your attic will now be easily accessible and fully utilized.
Thank you for following this guide, and we hope it has been helpful in your pull-down attic stairs construction journey. Cheers to your successful project!
After mastering how to build pull-down attic stairs, why not dive deeper into more DIY adventures? If you're curious about the benefits and satisfaction that come from tackling projects on your own, our article on the benefits and satisfaction of DIY projects provides compelling insights. For those looking to declutter and organize, our guide on creative and practical home storage solutions offers creative and practical tips to maximize space in every room. These reads are perfect for enhancing your living space and skills alike!
Frequently Asked Questions about How To Build Pull Down Attic Stairs
Was this page helpful?
At Storables.com, we guarantee accurate and reliable information. Our content, validated by Expert Board Contributors, is crafted following stringent Editorial Policies. We're committed to providing you with well-researched, expert-backed insights for all your informational needs.


0 thoughts on “How To Build Pull Down Attic Stairs”