
Articles
How To Build Folding Stairs
Modified: May 6, 2024
Discover expert tips and tricks in our comprehensive articles on how to build folding stairs, and start your project with confidence.
(Many of the links in this article redirect to a specific reviewed product. Your purchase of these products through affiliate links helps to generate commission for Storables.com, at no extra cost. Learn more)
Introduction
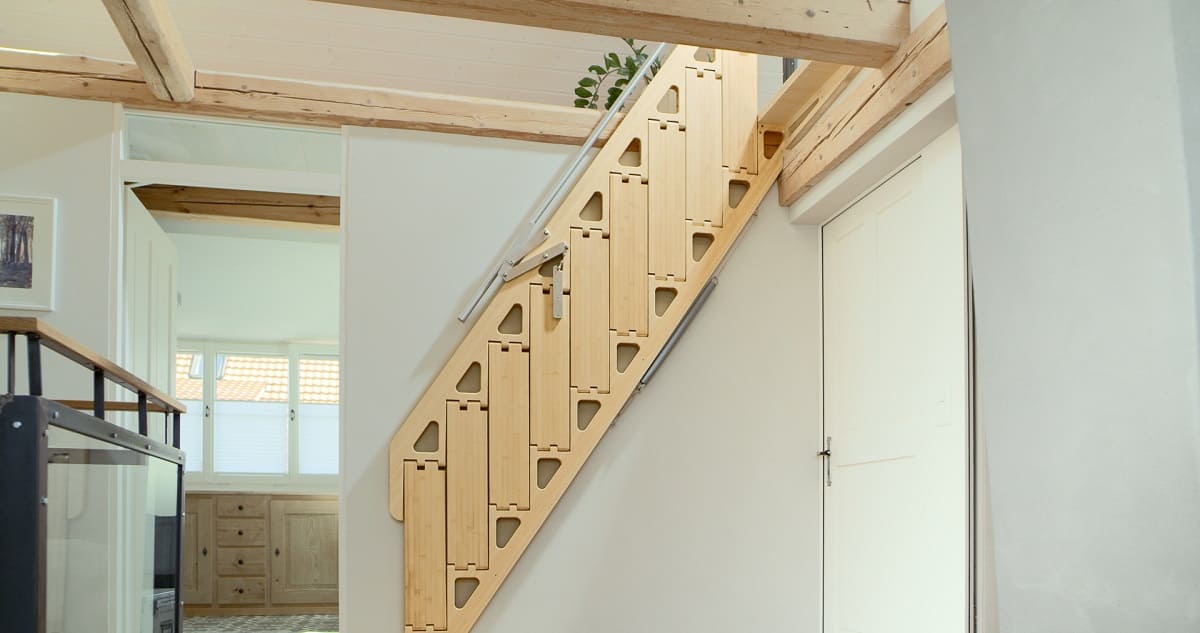
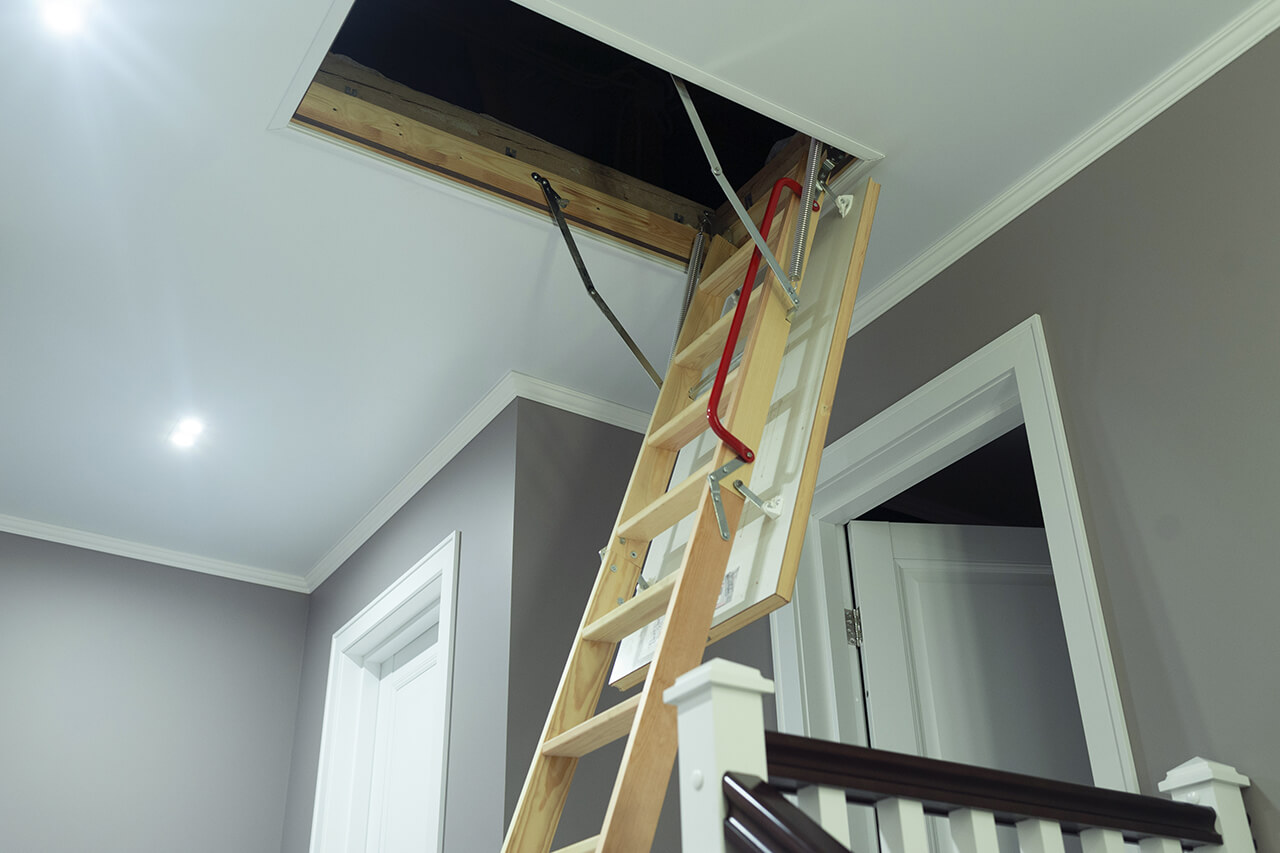
Folding stairs, also known as attic stairs or loft stairs, can be a practical and space-saving solution for accessing upper levels in your home. Whether you need to access a loft, attic, or mezzanine, building your own folding stairs can be a rewarding and cost-effective project. In this article, we will guide you through the process of building folding stairs from scratch.
Before we dive into the step-by-step instructions, it’s important to note that building folding stairs requires some carpentry skills and the use of power tools. If you’re not comfortable with woodworking or using power tools, it’s recommended to seek assistance from a professional or experienced DIYer to ensure safety and accuracy.
In addition to the tools and materials required, it’s crucial to have proper measurements and a clear plan for your folding stairs. This will ensure that the stairs fit seamlessly into the designated space and provide a safe means of access.
So, if you’re ready to take on the challenge of building your own folding stairs, let’s get started!
Key Takeaways:
- Building folding stairs from scratch is a rewarding DIY project that enhances accessibility and functionality. Prioritize safety, precise construction, and personalized finishes for a space-saving and reliable staircase.
- Seek professional assistance if not confident in carpentry skills. Accurate measurements, sturdy assembly, and proper installation ensure safe and functional folding stairs. Prioritize safety, personalize finishes, and enjoy the convenience of a DIY project.
Read also: 8 Superior Folding Stairs For 2024
Step 1: Gathering Materials and Tools
Before starting any construction project, it’s essential to gather all the necessary materials and tools. Here’s a list of what you’ll need to build your folding stairs:
Materials:
- 2×4 lumber for the frame
- Plywood for the steps
- Hinges
- Wood screws
- Wood glue
- Sandpaper
- Stain or paint (optional)
Tools:
- Tape measure
- Saw (circular saw or miter saw)
- Drill
- Driver bit
- Countersink bit
- Screwdriver
- Sanding block or electric sander
- Paintbrush or foam brush (if staining or painting)
Once you have gathered all the necessary materials and tools, ensure that you have a clean and well-lit workspace to work on. It’s essential to have a clutter-free area to prevent accidents and make the construction process smoother.
Before proceeding to the next step, double-check that you have all the materials and tools listed above. This will save you time and frustration later on when you’re in the middle of construction.
Now that you have everything you need, let’s move on to the next step: measuring and planning.
Step 2: Measuring and Planning
Accurate measurements and careful planning are crucial for building folding stairs that fit properly and function effectively. Before making any cuts or assembling the staircase frame, take the time to measure the available space and determine the dimensions of your stairs.
Start by measuring the height of the floor to the upper level where the stairs will be installed. This will help you determine the overall height of the stairs and how many steps you will need. Remember to consider the clearance required between the stairs and the ceiling or any obstacles.
Next, measure the width and depth of the space where the stairs will be installed. Ensure that there is enough room horizontally for the stairs to fold and unfold without obstruction. Additionally, consider the headroom and make sure there is adequate space for comfortable mobility when ascending or descending the stairs.
Once you have gathered the necessary measurements, transfer them to a piece of paper or use a digital design software to create a detailed plan. This plan will serve as your guide throughout the construction process and help you visualize the final result.
As you plan, consider the number of steps you want for your folding stairs. This will depend on the overall height measurement and your preference for the riser height. Keep in mind that the tread depth should be comfortable and safe for anyone using the stairs.
With the measurements and plan in hand, you’re now ready to move on to the next step: cutting the wood pieces.
Read more: How To Build Basement Stairs
Step 3: Cutting Wood Pieces
Now that you have the measurements and plan in place, it’s time to start cutting the wood pieces for your folding stairs. This step is crucial as it will determine the accuracy and stability of the staircase frame.
Begin by cutting the 2×4 lumber according to the dimensions outlined in your plan. Use a saw, such as a circular saw or miter saw, to make precise and straight cuts. Remember to wear safety goggles and follow proper safety precautions when using power tools.
Start with cutting the stringers, which are the inclined supports that will hold the steps. The number of stringers required will depend on the width of your stairs and the weight capacity you’re aiming for. Typically, two stringers are sufficient for most applications.
Next, cut the horizontal beams that will connect the stringers and provide stability to the frame. Measure and cut these beams to match the width measurement of your stairs.
Once all the necessary wood pieces are cut, use a sanding block or electric sander to smooth and round the edges. This will prevent any splinters and make the stairs safer and more comfortable to use.
After sanding, take the time to double-check the accuracy of your cuts and make any adjustments if needed. It’s crucial to have precise pieces to ensure a stable and well-aligned frame.
With the wood pieces cut and prepared, you’re ready to move on to the next step: assembling the staircase frame.
Step 4: Assembling the Staircase Frame
With the wood pieces cut to size, it’s time to assemble the staircase frame. This step involves joining the stringers and horizontal beams to create a sturdy and stable structure for your folding stairs.
Start by positioning the stringers parallel to each other with the required spacing according to your plan. Use wood screws and wood glue to attach the horizontal beams to the stringers. Make sure to align the edges and corners properly to ensure a flush and secure connection.
While assembling the frame, it’s essential to check for any wobbling or unevenness. Use a level to ensure that the frame is perfectly straight and level. Adjust as necessary by adding shims or making slight modifications to the connections.
Throughout the assembly process, periodically check the accuracy of your work by referring back to your plan and measurements. Double-check that the frame matches your intended dimensions and is square and level.
Once the frame is securely assembled, reinforce the connections by adding additional wood screws or brackets, especially at the joints. This will provide added stability and strength to the folding stairs.
Once you have completed the assembly of the staircase frame, take a moment to step back and inspect the structure. Ensure that it is sturdy, level, and aligned with your intended design.
With the staircase frame assembled, you’re now ready to move on to the next step: attaching the steps.
Step 5: Attaching the Steps
Now that you have the staircase frame securely assembled, it’s time to attach the steps. The steps will provide the surface on which you will walk when using the folding stairs.
Begin by measuring and marking the placement of the steps on the stringers. Ensure that the steps are evenly spaced and aligned with your plan. Consider the rise and run of the steps for a comfortable and safe staircase.
Once you have marked the positions, apply wood glue to the top of the stringers where the steps will be attached. This will provide an extra layer of adhesion and ensure a tight bond when securing the steps.
Place the plywood steps onto the stringers, aligning them with the markings you made. Press down firmly to ensure good contact with the wood glue. Use wood screws to secure the steps in place, driving them through the plywood and into the stringers.
As you attach each step, double-check for levelness and stability. Make any necessary adjustments to ensure consistency and proper alignment.
Once all the steps are securely attached, test the stability of the staircase by applying some pressure and gently shaking it. If you notice any wobbling or instability, reinforce the connections or add additional support.
With the steps securely attached, take a moment to step back and admire your progress. The folding stairs are starting to take shape and provide a functional means of accessing upper levels in your home.
Now that the steps are in place, it’s time to move on to the next step: installing the hinges.
Step 6: Installing the Hinges
Installing hinges is a crucial step in building folding stairs, as they allow the stairs to fold and unfold smoothly and securely. The hinges will act as the pivot points for the folding mechanism, providing flexibility and stability.
Start by determining the placement of the hinges on the stringers. Typically, two hinges are used for each step, with one positioned near the top and one near the bottom. This distribution helps distribute the weight evenly and ensures a strong and balanced folding mechanism.
Hold the hinge in position and mark the screw hole locations on both the stringer and the hinge. Use a drill with a pilot bit to make pilot holes at the marked locations. This will prevent the wood from splitting when you drive in the screws.
Once the pilot holes are made, align the hinge with the pilot holes and secure it in place using wood screws. Repeat this process for each hinge on both stringers to ensure a consistent and secure installation.
As you install the hinges, make sure they are aligned properly and sit flush against the wood. Double-check that they operate smoothly and allow the stairs to fold and unfold without any resistance or binding.
After installing all the hinges, test the folding mechanism by carefully folding and unfolding the stairs. Pay attention to any areas where the movement feels stiff or uneven. If needed, make adjustments to the hinges or connections to ensure a smooth and effortless folding operation.
With the hinges securely installed and the folding mechanism in place, you’ve made significant progress in building your folding stairs. The stairs are now ready for the next step: adding support and reinforcements.
When building folding stairs, make sure to use high-quality materials and hardware to ensure stability and safety. Double-check all measurements and angles before cutting and assembling to avoid any mistakes.
Read more: How To Build Cement Stairs
Step 7: Adding Support and Reinforcements
Adding support and reinforcements to your folding stairs is essential to ensure the structural integrity and long-term durability of the staircase. These additional elements will help distribute weight, prevent sagging, and enhance the overall stability of the stairs.
Start by reinforcing the connections between the stringers and the steps. You can do this by adding additional wood screws or brackets at key points along the length of the stringers. This will provide added support and prevent any potential movement or wobbling.
In addition to reinforcing the connections, consider installing support brackets underneath the steps. These brackets will further strengthen the structure and distribute weight evenly across the steps and stringers.
Measure and cut the support brackets according to the dimensions of your folding stairs. Position them beneath each step, ensuring that they align with the center of the step and attach securely to the stringers. Use wood screws or brackets to fasten them in place, providing additional reinforcement and stability.
If desired, you can also add diagonal braces to further enhance the strength of the folding stairs. Measure and cut the braces to fit diagonally between the stringers and steps. Attach these braces securely using wood screws or brackets.
As you add support and reinforcements, periodically test the stability and strength of the stairs. Apply pressure and gently shake the staircase to check for any signs of movement or weakness. Make any necessary adjustments or additions to ensure a sturdy and reliable structure.
With the support and reinforcements added, your folding stairs are now structurally enhanced and ready for the next step: sanding and finishing.
Step 8: Sanding and Finishing
Once the construction of the folding stairs is complete, it’s time to focus on sanding and finishing the wood surfaces. This step will not only improve the overall appearance of the stairs but also provide a smooth and comfortable surface for anyone using them.
Start by using sandpaper or an electric sander to smooth out any rough edges, splinters, or imperfections on the wood surfaces of the stairs. Sand in the direction of the wood grain to achieve the best results.
Pay extra attention to the edges of the steps and any visible joints or connections. Sand these areas thoroughly to ensure a seamless and visually appealing finish.
After sanding, remove any dust or debris from the surfaces by wiping them down with a clean cloth or using a vacuum with a brush attachment. This will prepare the wood for the finishing process.
If desired, you can choose to apply a finish to the wood surfaces of your folding stairs. This can be a stain, paint, or clear coat, depending on your personal preference and the aesthetic you want to achieve.
Before applying any finish, read and follow the manufacturer’s instructions carefully. Ensure proper ventilation in your workspace and use protective gear, such as gloves and a mask, when working with paints or stains.
Apply the chosen finish using a paintbrush or foam brush, following the direction of the wood grain. Apply thin and even coats, allowing sufficient drying time between each coat as specified by the manufacturer.
After the final coat has dried, inspect the stairs for any missed spots or uneven coverage. Touch up these areas as needed to achieve a consistent and beautiful finish.
With the sanding and finishing complete, your folding stairs are now ready for the final step: mounting them in their designated location.
Step 9: Mounting the Folding Stairs
After all the hard work in constructing and finishing your folding stairs, it’s time to mount them in their designated location. Proper installation is crucial to ensure the stability and safety of the stairs.
Before mounting the stairs, make sure you have prepared the area where they will be installed. Remove any obstacles or debris and ensure that the space is clear and safe for installation.
Start by positioning the folding stairs in the desired location, ensuring that they are aligned with the upper level and have the necessary clearance for folding and unfolding.
Use a tape measure to check for proper alignment and ensure that the stairs are centered and level. Make any necessary adjustments by shifting the position or using shims to achieve the desired positioning.
Once you are satisfied with the alignment, mark the screw hole locations on the upper level of your home. These marks will guide you in drilling pilot holes for attaching the folding stairs.
Using a drill with a pilot bit, carefully drill the pilot holes at the marked locations. Be sure to use the appropriate size of the bit and drill to the proper depth to ensure a secure and stable installation.
After drilling the pilot holes, attach the folding stairs to the upper level by driving screws through the pilot holes and into the structure of the upper level. Use the recommended screw size and length for a secure hold.
Once the folding stairs are securely mounted, test them by folding and unfolding several times to ensure smooth operation and proper alignment. Check for any signs of wobbling or instability and make any necessary adjustments.
Finally, conduct a thorough inspection of the stair installation, checking for any loose screws, connections, or other issues. Tighten any loose screws and ensure that all components are secure and functioning correctly.
Congratulations! You have successfully completed the process of building and mounting your folding stairs. Now, you can enjoy the convenience and practicality of having a functional staircase in your home.
Remember, safety should always be a priority. Make sure to follow any guidelines or recommendations provided by professionals or building codes to ensure the stairs meet safety standards.
With your folding stairs installed, you can now confidently and comfortably access the upper levels of your home. Enjoy the functional and aesthetic benefits of your DIY project!
Conclusion
Building folding stairs from scratch is a rewarding and practical project that can enhance the accessibility and functionality of your home. By following the step-by-step process outlined in this article, you can create a sturdy and space-saving staircase tailored to your specific needs.
Throughout the construction process, it’s important to prioritize safety. If you’re not confident in your carpentry skills or ability to use power tools, consider seeking assistance from a professional or experienced DIYer to ensure proper construction and installation.
Remember to carefully measure and plan your folding stairs to ensure they fit seamlessly into your space and provide a safe means of access. Precise cutting, accurate assembly, and thorough sanding and finishing will result in a beautifully crafted and functional staircase.
Adding support and reinforcements, as well as installing hinges, will provide additional strength and stability to your folding stairs, ensuring a reliable and durable structure.
Finally, the proper mounting and installation of the folding stairs are crucial. Take the time to align and level the stairs, attach them securely to the upper level, and test their functionality before considering the project complete.
Throughout the entire process, don’t forget to infuse your own creative touch and personalize your folding stairs. Choose finishes and designs that complement your home’s style and reflect your individual taste.
Now that you have completed the construction and installation of your folding stairs, it’s time to enjoy the convenience and functionality they bring to your home. Whether it’s accessing a loft, attic, or mezzanine, your DIY folding stairs will provide a reliable and space-saving solution.
Always prioritize safety when using the folding stairs and take regular maintenance and inspection to ensure their continued performance. With proper care, your folding stairs will serve you and your home for years to come.
Now that you've tackled building folding stairs, why not dive deeper into rewarding DIY projects? Our guide on DIY projects offers insights and inspiration that fuel creativity and hands-on skills. For those captivated by craftsmanship, don't miss our roundup on woodworking, highlighting the top techniques and projects for the upcoming year. And if larger-scale endeavors spark your interest, our overview of home construction trends for 2024 provides exciting ideas and innovations in building your dream space.
Frequently Asked Questions about How To Build Folding Stairs
Was this page helpful?
At Storables.com, we guarantee accurate and reliable information. Our content, validated by Expert Board Contributors, is crafted following stringent Editorial Policies. We're committed to providing you with well-researched, expert-backed insights for all your informational needs.


0 thoughts on “How To Build Folding Stairs”