Articles
How To Change Stove Top Drip Pans
Modified: February 29, 2024
Learn how to change stove top drip pans with our informative articles. Keep your stove clean and efficient with these helpful tips and tricks.
(Many of the links in this article redirect to a specific reviewed product. Your purchase of these products through affiliate links helps to generate commission for Storables.com, at no extra cost. Learn more)
Introduction
Welcome to our guide on how to change stove top drip pans. Drip pans are an essential part of your stove’s cooktop, as they help prevent spills and drips from damaging and staining the surface. Over time, these drip pans can become dirty, rusty or warped, and may need to be replaced. In this article, we will walk you through the step-by-step process of changing stove top drip pans, ensuring your stove remains in top condition for efficient and clean cooking.
Before we delve into the steps, it’s important to note that different stoves may have different designs and mechanisms for the removal and replacement of drip pans. Therefore, it’s always a good idea to consult your stove’s manual for specific instructions. However, the general process remains relatively consistent across most stove models.
In this guide, we will assume a standard electric stove with removable burner elements and drip pans. With that in mind, let’s begin!
Key Takeaways:
- Keep your stove in top condition by changing drip pans regularly. Follow safety precautions, clean thoroughly, and ensure proper alignment for optimal cooking performance.
- Gather necessary materials, turn off and unplug the stove, remove old drip pans, clean and dry thoroughly, then reassemble for a fresh and efficient cooking experience.
Read more: How To Clean Drip Pans Under Stove Burners
Step 1: Gather necessary materials
Before you start changing the stove top drip pans, make sure you have all the necessary materials and supplies. Here’s what you will need:
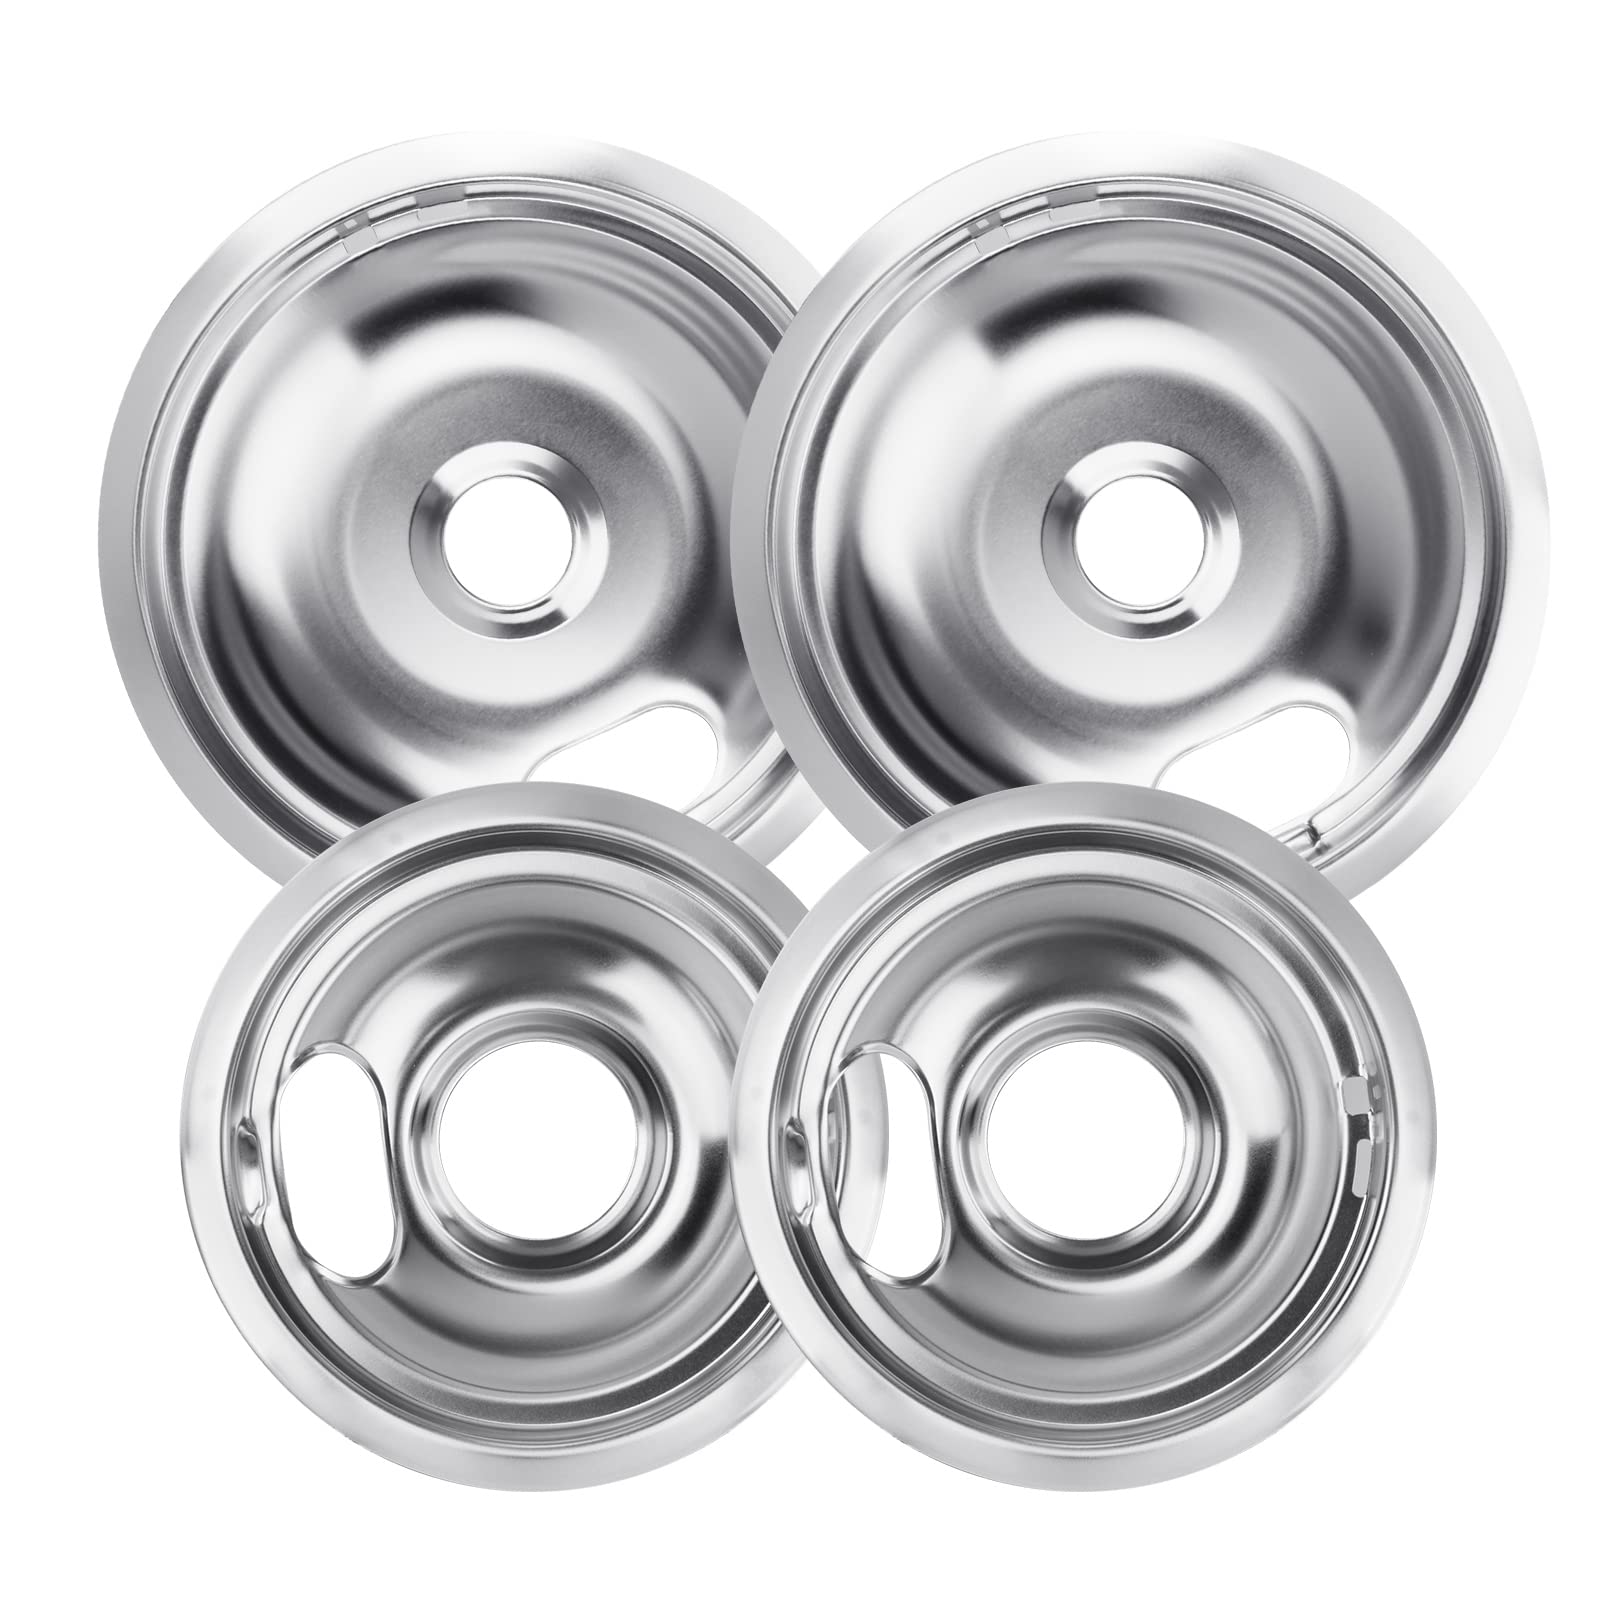
- Drip pan: Ensure you have the correct replacement drip pans that are compatible with your stove model. You can find these at appliance stores or online.
- Gloves: It’s always a good idea to wear gloves to protect your hands from any sharp edges or cleaning agents.
- Dish soap: Use a mild dish soap that is gentle on the drip pans but effective at removing grease and stains.
- Hot water: You will need hot water to soak and clean the drip pans thoroughly.
- Scrub brush: Choose a scrub brush with stiff bristles or an abrasive pad to remove stubborn stains and grime from the drip pans.
Gathering these materials in advance will ensure that you have everything you need to complete the task efficiently.
Once you have gathered all the necessary materials, you’re ready to move on to the next step – turning off and unplugging the stove.
Step 2: Turn off and unplug the stove
Before you start working on changing the stove top drip pans, it’s important to take some safety precautions. Follow these steps to ensure a safe working environment:
1. Turn off the stove: Make sure all burners are turned off and in the “off” position. This will prevent any accidental ignition or burns during the process.
2. Unplug the stove: Locate the power cord and unplug it from the electrical outlet. This step is crucial to prevent any electrical shock or injury while working on the stove.
By turning off the stove and unplugging it, you eliminate any potential hazards and create a safe space to proceed with changing the drip pans.
Now that you have taken the necessary safety measures, let’s move on to the next step – removing the burner grates.
Step 3: Remove the burner grates
Once you have turned off and unplugged the stove, it’s time to remove the burner grates. Follow these steps to safely remove them:
1. Lift the grates off the stove: Carefully grab the edges of the burner grates and lift them straight up and away from the stove. Be cautious as they might be hot or greasy.
2. Set them aside in a safe place: Find a clean and flat surface, such as a countertop or table, and place the burner grates down gently. If the grates are dirty, you can wipe them down with a damp cloth or sponge. Keep them in a secure location to prevent any accidental damage.
Removing the burner grates will provide you with better access to the drip pans underneath. With the grates out of the way, you’re ready to proceed to the next step – removing the old drip pans.
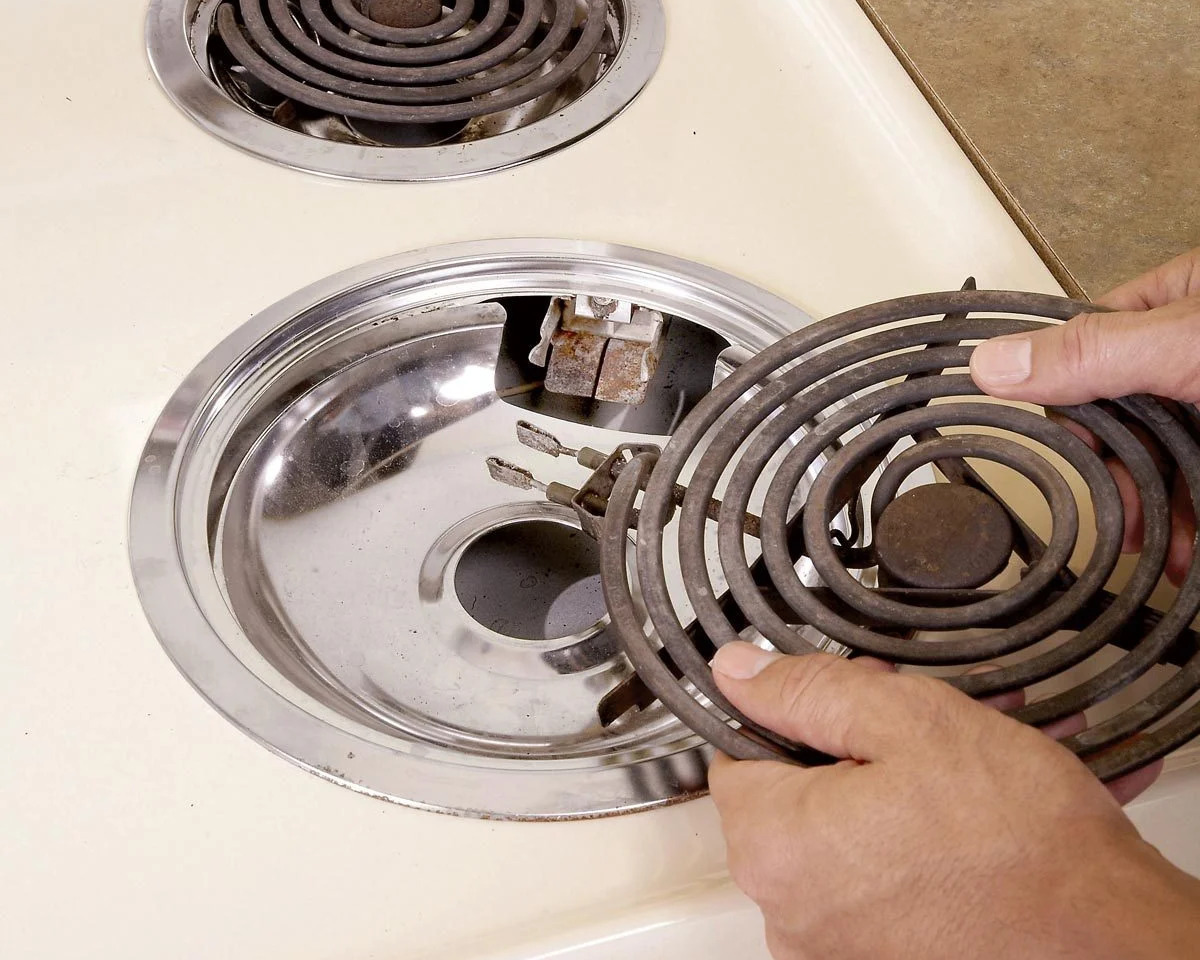
Step 4: Remove the old drip pans
With the burner grates out of the way, it’s time to remove the old drip pans from your stove top. Follow these steps to successfully remove them:
1. Lift the burner elements: Each burner on your stove top is connected to a heating element. Gently lift the burner elements straight up from the socket, being careful not to damage the electrical connections. Set them aside in a safe place, ensuring they won’t be accidentally knocked over.
2. Take out the old drip pans: With the burner elements lifted, you now have access to the old drip pans. Simply lift them out of their designated slots on the stove top. They may be greasy or dirty, but avoid touching them with bare hands to minimize contact with any accumulated residue.
3. Dispose of them properly: Once you have removed the old drip pans, it’s important to dispose of them properly. Check with your local waste management guidelines to determine the appropriate method of disposal. Some areas may allow you to recycle metal drip pans, while others may require you to dispose of them in the regular trash. Be sure to follow the necessary procedures to protect the environment and comply with any local regulations.
By removing the old drip pans, you’re making way for the new ones and ensuring a fresh and clean cooking surface. With the old drip pans safely disposed of, you’re ready to move on to the next step – cleaning the drip pans.
When changing stove top drip pans, make sure to turn off the stove and allow it to cool before removing the old pans. Use a damp cloth to clean the area before placing the new drip pans to ensure a proper fit.
Read also: 9 Amazing Refrigerator Drip Pan for 2025
Step 5: Clean the drip pans
Now that you have removed the old drip pans from your stove top, it’s time to give them a thorough cleaning. Follow these steps to effectively clean the drip pans:
1. Soak drip pans in soapy water: Fill a sink or basin with warm water and add a few drops of mild dish soap. Place the drip pans in the soapy water and allow them to soak for about 15-20 minutes. This will help loosen any accumulated grease, stains, or burnt food particles.
2. Scrub with a brush: After soaking, take a scrub brush or a sponge with abrasive properties and start scrubbing the drip pans. Pay close attention to areas with stubborn stains or buildup, applying a bit more pressure if necessary. Work your way around the entire surface of the drip pans to ensure a thorough clean.
3. Rinse thoroughly: After scrubbing, rinse the drip pans under running water to remove any soap residue and debris. Make sure to rinse both the interior and exterior of the drip pans, ensuring they are completely clean. Check for any remaining grease or stains and give them an extra scrub if needed.
By cleaning the drip pans, you’ll ensure that they are free from any dirt, grime, or food residue, allowing for better cooking performance and maintenance of your stove top.
Once the drip pans are clean and rinsed thoroughly, you’re ready to move on to the next step – drying and replacing the drip pans.
Step 6: Dry and replace the drip pans
After cleaning the drip pans, it’s important to ensure they are completely dry before replacing them. Follow these steps to dry and correctly install the new drip pans:
1. Ensure drip pans are completely dry: Use a clean towel or paper towels to pat dry the drip pans. Make sure there is no remaining moisture before placing them back on the stove top. Wet or damp drip pans can cause rust or other damage to your stove.
2. Place the new drip pans under the burners: Take the new drip pans and position them back into their designated slots on the stove top. Make sure they fit snugly and are properly aligned. Each burner should have its own corresponding drip pan.
3. Align them properly: Carefully position the drip pans so that they sit flat on the stove top surface. Ensure that the holes for the burner elements are aligned with the openings on the drip pans. This will allow for proper heat distribution during cooking.
By ensuring the drip pans are completely dry and correctly placed, you’ll optimize the performance and functionality of your stove. Well-maintained and properly aligned drip pans will help prevent any spills or drips from damaging your stove top and make for easier cleaning in the future.
With the new drip pans in place, you’re ready to proceed to the final step – reassembling the stove.
Step 7: Reassemble the stove
Now that you have successfully replaced the drip pans, it’s time to reassemble the stove. Follow these steps to put everything back in place:
1. Put the burner grates back in place: Take the cleaned burner grates and carefully place them back on top of the drip pans. Ensure that they are properly aligned and sit securely in their designated spots on the stove top.
2. Plug the stove back in: Locate the power cord that you unplugged earlier and plug it back into the electrical outlet. Ensure that the stove is securely connected to a reliable power source.
3. Turn on the stove to test: Once the stove is plugged in, turn on one of the burners to test if it heats up properly. This will ensure that the burner elements and drip pans are properly aligned and functioning correctly.
By reassembling the stove, you’ll restore its functionality and ensure that all components are properly secured. Testing the burners will give you peace of mind that the stove is working as expected.
Congratulations! You have successfully changed the stove top drip pans and reassembled your stove. Your stove is now clean, functional, and ready to be used for delicious cooking adventures.
Remember, regular cleaning and maintenance of the drip pans will help prolong the life of your stove top and ensure optimal cooking conditions. Make sure to periodically check and clean the drip pans to avoid any buildup or damage.
We hope this guide has been helpful in guiding you through the process of changing stove top drip pans. Happy cooking!
Conclusion
Changing stove top drip pans is a simple yet essential task to maintain the cleanliness and functionality of your stove. By following the step-by-step guide outlined in this article, you can easily replace the old drip pans with new ones, ensuring a fresh cooking surface and efficient performance.
Remember to gather all the necessary materials, including the correct replacement drip pans, gloves, dish soap, hot water, and a scrub brush. Taking safety precautions, such as turning off and unplugging the stove, is crucial to prevent any accidents or injuries during the process.
Removing the burner grates and old drip pans allows for easy access and cleaning. Soaking the drip pans in soapy water, scrubbing them clean, and rinsing thoroughly will help eliminate grease, stains, and food residue.
Afterward, ensure that the drip pans are completely dry before placing them back under the burners. Proper alignment of the drip pans is important for optimal heat distribution during cooking, and it helps prevent spills or drips from damaging the stove top.
Reassembling the stove by putting the burner grates back in place, plugging in the stove, and testing the burners guarantees that everything is functioning correctly.
Regular cleaning and maintenance of the drip pans will help prolong the life of your stove and ensure a clean cooking environment. By following these steps, you can easily change the stove top drip pans and keep your stove in excellent condition for years to come.
We hope this guide has been helpful in walking you through the process of changing stove top drip pans. Remember to consult your stove’s manual for specific instructions and guidelines. Happy cooking!
Frequently Asked Questions about How To Change Stove Top Drip Pans
Was this page helpful?
At Storables.com, we guarantee accurate and reliable information. Our content, validated by Expert Board Contributors, is crafted following stringent Editorial Policies. We're committed to providing you with well-researched, expert-backed insights for all your informational needs.


0 thoughts on “How To Change Stove Top Drip Pans”