Articles
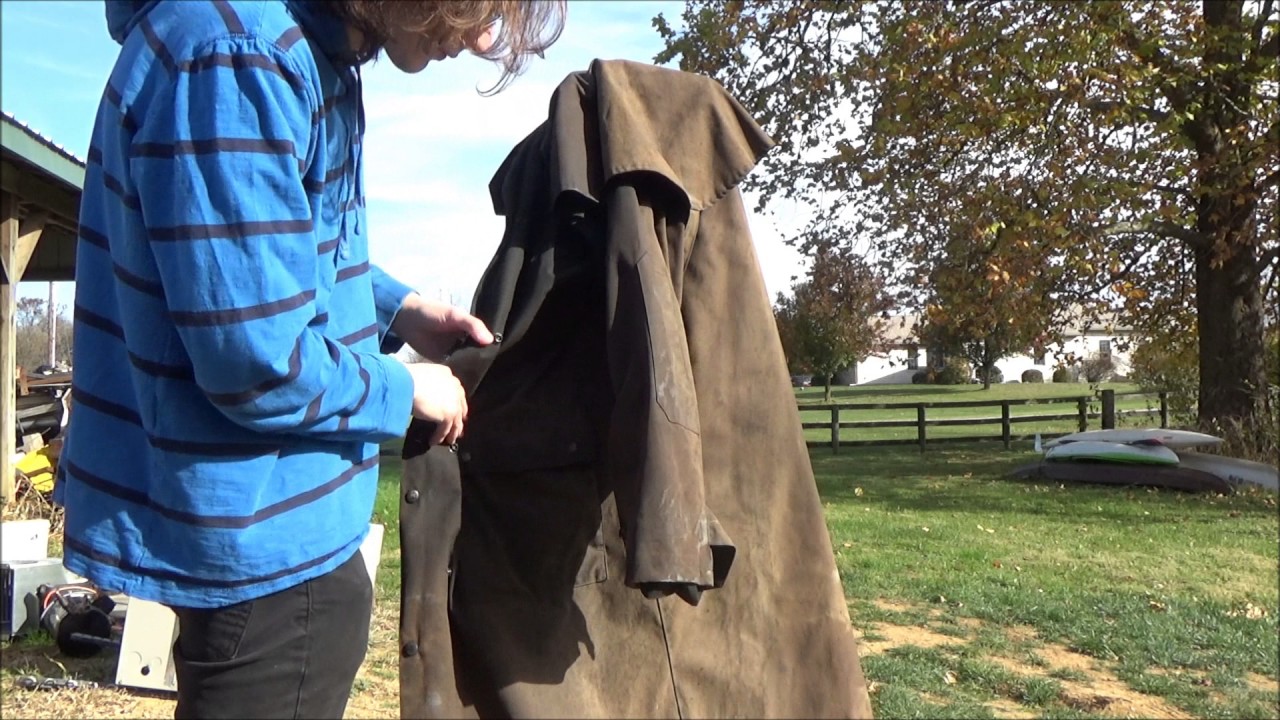
How To Clean An Oilskin Duster
Modified: January 6, 2024
Learn how to properly clean and maintain oilskin dusters with our informative articles. Ensure longevity and effectiveness of your oilskin duster with our expert tips.
(Many of the links in this article redirect to a specific reviewed product. Your purchase of these products through affiliate links helps to generate commission for Storables.com, at no extra cost. Learn more)
Introduction
Cleaning an oilskin duster is essential to ensure its longevity and maintain its effectiveness in repelling water. Oilskin dusters are popular for outdoor activities such as hiking, camping, and horseback riding due to their ability to provide protection against rain and other elements. Over time, dirt, dust, and stains can accumulate on the oilskin, diminishing its waterproofing capabilities. By following the proper cleaning steps, you can keep your oilskin duster clean and ready for your next adventure.
In this article, we will take you through a detailed guide on how to clean an oilskin duster effectively. We will provide you with the materials needed and break down step-by-step instructions to ensure that your duster is thoroughly cleaned without causing any damage to the fabric. Additionally, we will share tips on how to properly store and maintain your oilskin duster to prolong its lifespan.
So, grab your oilskin duster and let’s dive into the process of restoring its cleanliness and waterproofing abilities!
Key Takeaways:
- Properly cleaning and maintaining your oilskin duster, from spot cleaning stains to applying waterproofing wax, ensures its longevity and effectiveness in repelling water during outdoor activities. Remember to use mild soap and follow manufacturer’s instructions.
- After cleaning, ensure your oilskin duster is completely dry before storing it in a cool, dry, and well-ventilated area. Hanging it on a sturdy hanger and periodically inspecting for damage will help maintain its condition for years to come.
Read more: How To Clean A Duster
Materials Needed
Before you begin cleaning your oilskin duster, make sure you have the following materials handy:
- Mild soap or specialized oilskin cleaner
- Soft-bristle brush or sponge
- Clean, lukewarm water
- Towels or absorbent cloths
- Waterproofing wax or spray
- Hangers or a drying rack
It is important to choose a mild soap or specialized oilskin cleaner that is suitable for cleaning oilskin garments. Avoid using harsh detergents or bleach as they can damage the oilskin fabric. Additionally, ensure that you have access to clean, lukewarm water for washing and rinsing the duster.
A soft-bristle brush or sponge will help gently remove dirt and debris from the duster. It is important not to use a stiff brush or abrasive materials as they can scratch and damage the oilskin fabric.
Towels or absorbent cloths will be used to dry the duster after cleaning. It is recommended to use towels made of a soft and absorbent material to prevent any lint or debris from transferring to the duster.
Waterproofing wax or spray is a crucial element in maintaining the water-repellent properties of the oilskin duster. This will help provide a protective layer that ensures water beads up and rolls off the fabric. Choose a wax or spray specifically designed for oilskin garments for optimal results.
Lastly, hangers or a drying rack will be used to hang the duster for drying. Make sure you have a suitable space available for drying the duster where it can hang freely without any creases or wrinkles forming.
Now that you have gathered all the necessary materials, you are ready to start the process of cleaning your oilskin duster and restoring its functionality.
Step 1: Shake off Dirt and Debris
Before diving into the cleaning process, start by shaking off any loose dirt and debris from your oilskin duster. Take it outside and gently shake it to dislodge any leaves, dust, or other particles that may have accumulated on the surface.
You can also use a soft brush or a cloth to lightly brush off any stubborn dirt or cobwebs clinging to the duster. Be gentle to avoid causing any damage to the fabric.
By removing the loose dirt and debris, you prevent them from getting embedded in the fabric during the cleaning process, which can make it more challenging to remove them later on. This step will facilitate a smoother and more effective cleaning experience.
Once you have shaken off the dirt and debris, visually inspect the duster for any stains or spots that may require spot cleaning before proceeding to the next step.
It is important to note that shaking off dirt and debris is not sufficient for deep cleaning the duster. It is just the first step to prepare it for the more intensive cleaning process that follows.
Now that you have removed the loose dirt and debris, it’s time to address any stains or spots on your oilskin duster. In the next step, we will guide you on how to spot clean these areas effectively.
Step 2: Spot Clean Stains
Spot cleaning is an essential step in the oilskin duster cleaning process, especially for tackling stubborn stains or marks. This step focuses on treating specific areas rather than cleaning the entire garment.
To spot clean stains on your oilskin duster, follow these steps:
- Dampen a clean cloth or sponge with lukewarm water.
- Gently blot the stained area to wet it, taking care not to rub or scrub vigorously as it may damage the fabric.
- If the stain persists, apply a small amount of mild soap or specialized oilskin cleaner to the cloth or sponge.
- Gently dab the stained area with the soap, focusing on the stain and avoiding spreading it to surrounding areas.
- Let the soap sit on the stain for a few minutes to loosen it.
- Using a clean part of the cloth or sponge, blot the stained area to lift the dirt and soap.
- Repeat the process if necessary until the stain is no longer visible.
- Once the stain is gone, rinse the area with clean water to remove any residue of soap.
It’s important to remember that spot cleaning should only be done on specific areas that require treatment. Avoid wetting the entire duster at this stage, as it will be thoroughly washed in the next step.
If you encounter particularly stubborn stains that do not respond to spot cleaning, don’t worry. These stains may be addressed more effectively during the overall washing process.
With the stains now spot cleaned, it’s time to move on to the next step: hand washing the oilskin duster. This will ensure a thorough cleaning of the entire garment.
Step 3: Hand Wash the Duster
Hand washing the oilskin duster is the most effective way to clean the entire garment and remove any dirt, grime, or residual stains. Here’s a step-by-step guide on how to hand wash your duster:
- Fill a basin or sink with lukewarm water.
- Add a small amount of mild soap or specialized oilskin cleaner to the water. Avoid using harsh detergents or bleach as they can damage the oilskin fabric.
- Submerge the duster completely in the soapy water and gently agitate it to ensure that the soap penetrates the fabric.
- Allow the duster to soak in the soapy water for about 15-20 minutes. This will help to loosen dirt and stains.
- After soaking, use a soft-bristle brush or sponge to gently scrub the entire surface of the duster. Pay special attention to areas prone to dirt and stains, like the cuffs, collar, and pockets.
- Continue scrubbing until you are satisfied that the duster is thoroughly cleaned. Be careful not to scrub too vigorously, as it may damage the fabric.
- Once you have finished scrubbing, drain the soapy water from the basin or sink.
- Rinse the duster under clean, lukewarm water to remove any remaining soap residue. Ensure that all parts of the duster are thoroughly rinsed.
Remember to be gentle when handling the oilskin duster to avoid stretching or damaging the fabric. It is important to note that machine washing or dry cleaning is not recommended for oilskin dusters, as it can compromise the integrity and water-repellent properties of the fabric.
Now that your duster is clean and free of dirt and soap residue, it’s time to move on to the next step: rinsing.
To clean an oilskin duster, use a soft brush to remove dirt and then wipe with a damp cloth. Avoid using soap or detergent, as it can damage the oil coating. Hang to dry in a well-ventilated area.
Read more: How To Clean Dust Without A Duster
Step 4: Rinse the Duster
Rinsing the oilskin duster is an important step to ensure that all traces of soap and dirt are completely removed. Follow these steps to effectively rinse your duster:
- Fill a basin or sink with clean, lukewarm water.
- Submerge the duster in the water and gently agitate it to allow the water to penetrate the fabric and rinse away any remaining soap.
- Continue agitating the duster for a few minutes to ensure a thorough rinse.
- Drain the rinsing water from the basin or sink.
- Fill the basin or sink with fresh, clean water for a second rinse.
- Submerge the duster once again and agitate it gently to remove any traces of soap that may still be present.
- Repeat the rinsing process if necessary until the water runs clear and there are no soap suds left.
Make sure to pay attention to all parts of the duster during the rinsing process, including the cuffs, collar, and pockets. Thorough rinsing is essential to prevent any soap residue from affecting the fabric’s water-repellent properties.
Once you are confident that the duster has been thoroughly rinsed, it’s time to proceed to the next step: hanging the duster to dry.
By following these steps, you have successfully cleaned and rinsed your oilskin duster, ensuring that it is free from dirt, stains, and soap residue. Now, let’s move on to drying and waterproofing the duster in the next steps.
Step 5: Hang to Dry
Properly drying your oilskin duster is crucial to maintain its shape and functionality. Here’s how to hang it for effective drying:
- Find a well-ventilated area, preferably outdoors or in a well-ventilated room.
- Choose a hanger or a drying rack that can support the weight of the duster without stretching or distorting its shape.
- Hang the duster upside down by its collar, allowing it to hang freely.
- Avoid squeezing or wringing the duster to remove excess water, as this can damage the fabric.
- Ensure that the duster is spread out and any pockets or flaps are open to allow air to circulate and facilitate faster drying.
- Leave the duster to air dry completely. This may take several hours or even overnight, depending on the humidity level and airflow.
- Avoid exposing the duster to direct sunlight, as prolonged exposure can fade the color and weaken the fabric.
As the duster dries, it is normal to see some wrinkling or creasing. This is a natural characteristic of the oilskin fabric and can be easily smoothed out once the duster is fully dry.
Ensure that the duster is completely dry before proceeding to the next step. Drying time can vary depending on environmental conditions, so be patient and allow sufficient time for thorough drying.
With your oilskin duster successfully dried, it’s time to move on to the final step: applying waterproofing wax or spray to restore its water-repellent properties.
Step 6: Apply Waterproofing Wax
Applying waterproofing wax or spray is an important step to restore and maintain the water-repellent properties of your oilskin duster. Here’s how to apply waterproofing wax:
- Ensure that your duster is completely dry before starting the waterproofing process.
- Choose a well-ventilated area and lay your duster flat on a clean surface.
- Read and follow the instructions on the waterproofing wax or spray product you are using.
- If using waterproofing wax, soften it by warming it slightly. You can do this by rubbing the wax between your hands or placing the container in warm water for a few minutes.
- Apply the softened wax or spray evenly over the entire surface of the duster.
- Use a clean cloth or sponge to work the wax into the fabric, ensuring that it penetrates the fibers.
- Pay special attention to high-wear areas like the shoulders and elbows, as these areas may require a bit more wax for added protection.
- Allow the wax to dry on the duster as per the product instructions. Typically, this may take a few hours or overnight.
- If necessary, repeat the waterproofing process for added protection, following the instructions provided by the product manufacturer.
Remember to use waterproofing products specifically designed for oilskin garments. These products help replenish the natural oils in the fabric, ensuring its water-repellent properties remain intact.
After applying the waterproofing wax, your oilskin duster will be ready to provide optimal protection against the elements during your outdoor adventures.
With the waterproofing step complete, let’s move on to the final step: storing your oilskin duster properly to maintain its condition.
Step 7: Store Properly
Proper storage of your oilskin duster is essential to maintain its condition and extend its lifespan. Follow these steps to store your duster properly:
- Ensure that your duster is completely dry before storing it. Moisture trapped in the fabric can lead to mold or mildew growth.
- Find a cool, dry, and well-ventilated area for storage. Avoid storing the duster in humid or damp conditions.
- Do not fold the duster, as this can cause creases and damage the fabric. Instead, hang it on a sturdy hanger or a drying rack.
- If possible, cover the duster with a breathable garment bag to protect it from dust and potential damage.
- Keep the duster away from direct sunlight, as prolonged exposure can fade the color and weaken the fabric.
- Periodically inspect the duster for any signs of damage or wear, such as loose threads or torn seams. Address any issues promptly to prevent further damage.
- Avoid storing the duster near chemicals, solvents, or strong odors, as they can affect the fabric.
Proper storage ensures that your oilskin duster remains in excellent condition and ready for your next outdoor adventure. By following these storage guidelines, you can enjoy the benefits of your duster for years to come.
With that, you have completed all the necessary steps to clean and maintain your oilskin duster. By regularly cleaning, waterproofing, and storing it properly, you can ensure its longevity and effectiveness in repelling water during your outdoor activities.
Remember to periodically check the manufacturer’s recommendations for specific care instructions for your oilskin duster. Each brand may have slight variations in their recommended cleaning and maintenance methods.
Now, you can confidently put your freshly cleaned and waterproofed oilskin duster to use, knowing that it is well-prepared to keep you dry and protected in any weather conditions!
Read more: How To Clean A Swiffer Duster
Conclusion
Cleaning and maintaining your oilskin duster is essential to ensure its longevity and effectiveness in repelling water. By following the step-by-step guide outlined in this article, you can effectively clean and maintain your duster, keeping it in prime condition for your outdoor adventures.
From shaking off dirt and debris to spot cleaning stains, hand washing, rinsing, and applying waterproofing wax, each step plays a vital role in restoring your duster’s cleanliness and water-repellent properties. Remember to use mild soap or specialized oilskin cleaners, avoid harsh chemicals or bleach, and always follow the manufacturer’s instructions.
Properly drying and storing your duster is equally important. Hanging it to dry in a well-ventilated area and storing it in a cool, dry place will help prevent mold, mildew, and damage caused by improper storage conditions. Regularly inspecting your duster for any signs of damage and addressing them promptly will ensure its longevity.
By taking these steps regularly, you can enjoy the full benefits of your oilskin duster, keeping yourself dry and protected from the elements during your outdoor excursions.
Remember, each oilskin duster may have specific care instructions provided by the manufacturer, so be sure to consult those guidelines as well. Also, don’t forget to have fun and enjoy your outdoor experiences while staying comfortably protected with your clean and well-maintained oilskin duster!
Frequently Asked Questions about How To Clean An Oilskin Duster
Was this page helpful?
At Storables.com, we guarantee accurate and reliable information. Our content, validated by Expert Board Contributors, is crafted following stringent Editorial Policies. We're committed to providing you with well-researched, expert-backed insights for all your informational needs.


0 thoughts on “How To Clean An Oilskin Duster”