Articles
How To Clean Bath Faucet
Modified: February 20, 2024
Learn effective methods and tips on how to clean your bath faucet with our informative articles. Keep your faucet looking pristine and functioning smoothly.
(Many of the links in this article redirect to a specific reviewed product. Your purchase of these products through affiliate links helps to generate commission for Storables.com, at no extra cost. Learn more)
Introduction
Keeping your bath faucet clean is not only essential for maintaining a hygienic bathroom, but it also helps to ensure the smooth and efficient functioning of the faucet. Over time, mineral deposits, dirt, and grime can accumulate on the faucet handles, spout, and aerator, affecting both the appearance and performance of your bath faucet. Cleaning your bath faucet regularly not only helps it look its best but also prevents potential clogs and leaks.
In this article, we will guide you through the step-by-step process of cleaning your bath faucet, giving it a refreshed and sparkling look. We will discuss the tools and materials you will need, as well as provide detailed instructions on how to clean the faucet handles, spout, aerator, and valve cartridge. By following these simple steps, you can keep your bath faucet in optimal condition, ensuring a clean and enjoyable bathing experience.
Before we get started, please note that the specific cleaning instructions may vary depending on the type of bath faucet you have. It is always a good idea to consult the manufacturer’s guidelines or seek professional advice if you have any uncertainties.
Now, let’s gather our tools and materials, and get ready to give your bath faucet a thorough cleaning!
Key Takeaways:
- Keep your bath faucet clean to maintain hygiene and functionality. Regular cleaning prevents mineral buildup, clogs, and leaks, ensuring a pleasant bathing experience.
- Gather the necessary tools, turn off the water supply, and follow the step-by-step process to effectively clean and maintain your bath faucet. Enjoy a sparkling and well-functioning fixture!
Read more: How To Fix A Bath Faucet
Tools and Materials Needed
Before you begin cleaning your bath faucet, it is important to gather all the necessary tools and materials to ensure a smooth and efficient process. Here’s a list of what you will need:
- A soft cloth or sponge
- A toothbrush or small cleaning brush
- Dish soap or mild bathroom cleaner
- Vinegar or lemon juice
- A small wrench or pliers
- A bowl or bucket
- An old toothbrush or small wire brush
- A clean towel or rag
- Optional: rubber gloves
The soft cloth or sponge will be used for general cleaning, while the toothbrush or small cleaning brush will help to remove stubborn dirt or grime in hard-to-reach areas. Dish soap or a mild bathroom cleaner will be used to create a cleaning solution, and vinegar or lemon juice can be used as a natural cleaner for removing mineral deposits.
A small wrench or pliers may be necessary for removing certain components of the faucet, such as the aerator or valve cartridge. The bowl or bucket will be used to catch any water that may spill during the cleaning process. An old toothbrush or small wire brush can help to clean the aerator and valve cartridge in more detail. Finally, a clean towel or rag will be used for drying the faucet after cleaning.
Remember, it’s always a good idea to wear rubber gloves while cleaning to protect your hands from any harsh cleaning agents or bacteria that may be present.
Now that you have all the tools and materials ready, let’s move on to the step-by-step process of cleaning your bath faucet.
Step 1: Turn Off the Water Supply
Before you begin cleaning your bath faucet, it is important to ensure that the water supply to the faucet is turned off. This will prevent any accidental spills or leaks while you work on cleaning the various components of the faucet.
Locate the main water shut-off valve for your bathroom. This is typically found near the water meter or in a utility area. Turn the valve clockwise to shut off the water supply.
If you are unable to locate the main water shut-off valve, you can also turn off the individual valves located underneath the sink. Look for two small valves connected to the water supply lines leading to the faucet. Turn each valve clockwise to shut off the water supply.
Once you have successfully turned off the water supply, turn on the faucet to release any remaining water pressure. This will help make the cleaning process easier and prevent any potential spray or splashing.
Now that the water supply is safely turned off, you can proceed to the next steps of cleaning your bath faucet. Let’s move on to step 2: Remove any existing mineral deposits.
Step 2: Remove Any Existing Mineral Deposits
Over time, mineral deposits can build up on the surface of your bath faucet, especially if you live in an area with hard water. These mineral deposits, such as limescale, can not only affect the appearance of the faucet but also impact its functionality. In this step, we will focus on removing these stubborn mineral deposits from the faucet.
Start by soaking a soft cloth or sponge in vinegar or lemon juice. These natural acid-based cleaners are effective at breaking down mineral deposits without causing any damage to the faucet’s finish.
Gently scrub the affected areas of the faucet, focusing on the spots with visible mineral deposits. Use circular motions and apply gentle pressure to dislodge the deposits. If needed, you can also wrap the cloth or sponge around the affected areas and let it sit for a few minutes to allow the acid to work its magic.
If the mineral deposits are particularly stubborn or have built up over a long period of time, you may need to use a toothbrush or small cleaning brush to scrub the areas more vigorously. Be careful not to apply too much pressure or use abrasive cleaners, as these can scratch or damage the faucet’s surface.
Once you have thoroughly cleaned the faucet and removed the mineral deposits, rinse it with warm water to remove any remaining vinegar or lemon juice. Use a clean towel or rag to dry the faucet, ensuring that no moisture is left behind.
If there are still traces of mineral deposits on the faucet, you can repeat the cleaning process or consider using a commercial descaling product specifically designed for faucets. Be sure to follow the instructions on the product carefully and rinse the faucet thoroughly after use to remove any residue.
With the mineral deposits removed, your bath faucet will already start to look cleaner and more refreshed. In the next step, we will focus on cleaning the faucet handles and spout. Let’s move on to step 3!
Step 3: Clean the Faucet Handles and Spout
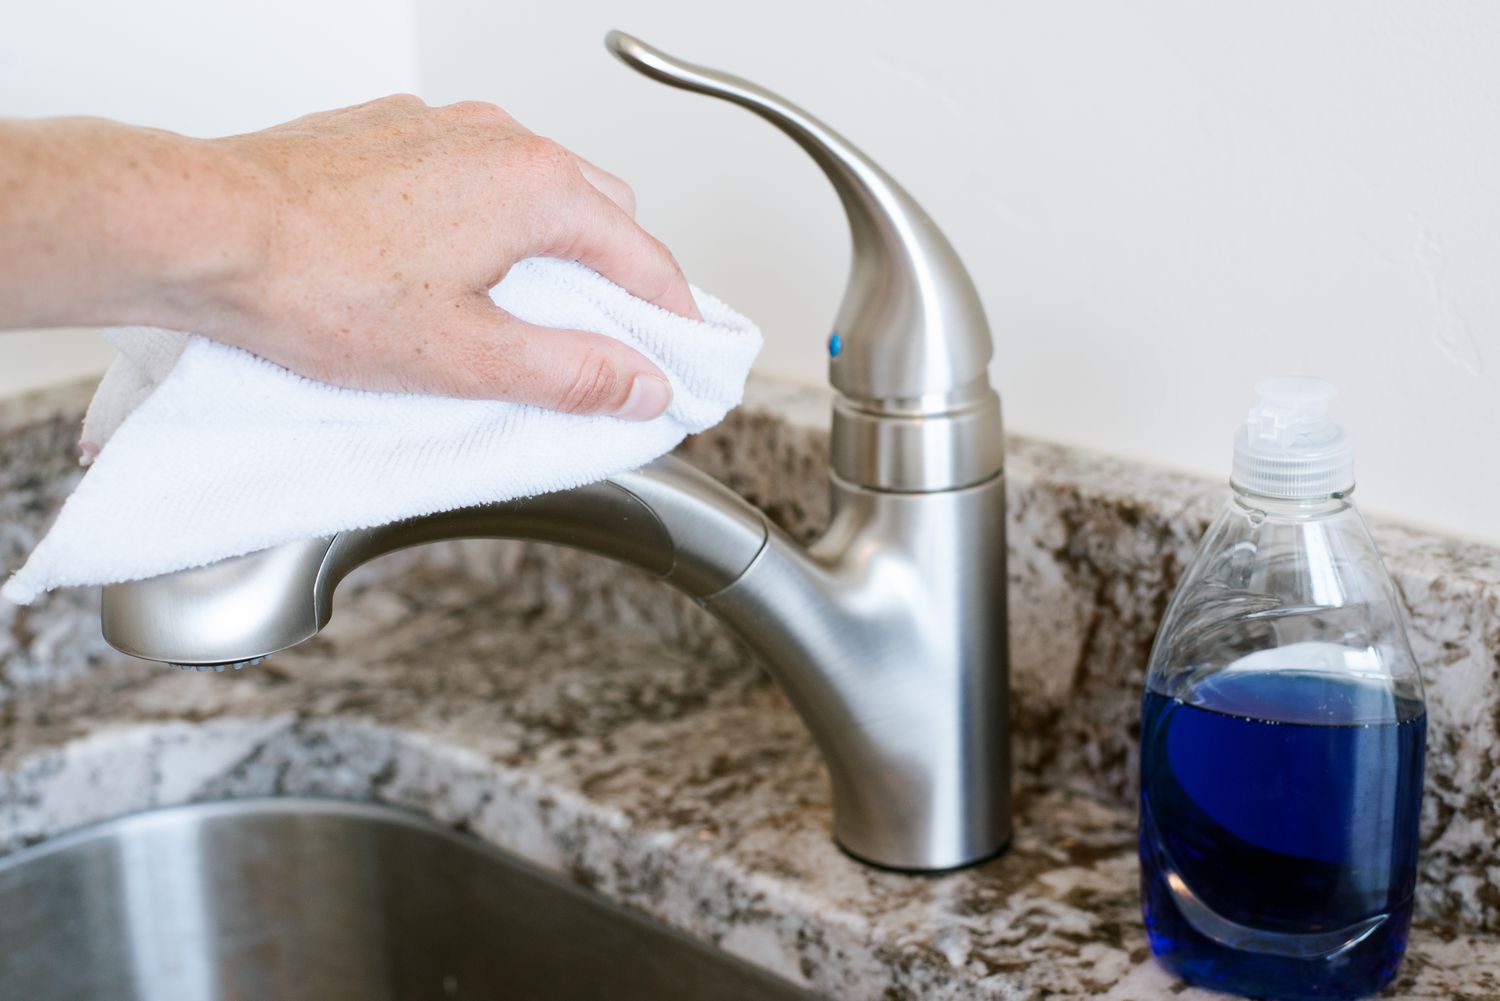
Now that you have removed the mineral deposits from your bath faucet, it’s time to focus on cleaning the faucet handles and spout. These areas can accumulate dirt, grime, and soap scum, so giving them a thorough cleaning will not only improve the appearance of your faucet but also ensure its smooth operation.
Start by creating a cleaning solution using warm water and a few drops of dish soap or a mild bathroom cleaner. Mix the solution until it is well combined.
Dip a soft cloth or sponge into the cleaning solution and gently scrub the faucet handles and spout. Pay attention to any hard-to-reach areas or crevices where dirt may have accumulated. Use circular motions and apply moderate pressure to remove any buildup.
If there are any stubborn stains or soap scum, you can use a toothbrush or small cleaning brush to scrub those areas. Ensure that the bristles of the brush are soft to prevent any scratches on the faucet’s surface.
Rinse the faucet handles and spout with warm water to remove any soap residue. Use a clean towel or rag to dry them thoroughly, ensuring no moisture is left behind.
For faucets with intricate detailing or decorative accents, pay special attention to these areas. You may need to use a toothpick or cotton swab dipped in the cleaning solution to remove any buildup in these hard-to-reach spots.
Remember that different faucet finishes require different cleaning methods. Always check the manufacturer’s guidelines for specific cleaning instructions that are suitable for your faucet’s finish. Avoid using abrasive cleaners or harsh chemicals that can damage the finish or protective coating.
With the faucet handles and spout now clean, it’s time to move on to the next step: cleaning the aerator. Let’s move on to step 4!
To clean a bath faucet, mix equal parts water and white vinegar in a spray bottle. Spray the solution onto the faucet and let it sit for a few minutes before wiping it clean with a soft cloth. This will help remove any mineral deposits and leave the faucet sparkling.
Read more: Bath Faucet Leaking When Shower Is On
Step 4: Clean the Aerator
The aerator is a small attachment located at the end of the bath faucet spout. It helps to regulate water flow by introducing air into the water stream, reducing splashing and conserving water. However, over time, the aerator can become clogged with mineral deposits, debris, and sediment, affecting water flow and even causing spitting or irregular spray patterns.
To clean the aerator, you will need to remove it from the faucet spout. Depending on your faucet model, the aerator may unscrew easily by hand or require the use of a small wrench or pliers.
Start by placing a cloth or towel over the faucet spout to prevent any damage or scratches while removing the aerator. Grip the aerator tightly with your hand or with the help of pliers if necessary, and turn it counterclockwise to unscrew it from the faucet spout.
Once the aerator is removed, you will likely see a mesh screen and a series of small rubber washers or sediment filters. Inspect them for any buildup or debris.
If the aerator is mildly dirty or clogged, you can simply rinse it under running water to remove any sediment or buildup. Use a toothbrush or small wire brush to gently scrub the mesh screen to ensure it is clear of any obstructions.
For stubborn mineral deposits, soak the aerator in a bowl or bucket filled with a mixture of equal parts vinegar and water. Let it sit for about 20-30 minutes to allow the vinegar to dissolve the mineral deposits. After soaking, rinse the aerator with water and gently scrub it with a toothbrush to remove any remaining debris.
Once the aerator is clean, reassemble it by screwing it back onto the faucet spout in a clockwise direction. Use a cloth or towel to protect the aerator and ensure a tight grip as you tighten it. Avoid overtightening to prevent any damage to the aerator or the faucet threads.
With the aerator cleaned and reattached, your bath faucet should now have improved water flow and a consistent spray pattern. In the next step, we will focus on cleaning the valve cartridge. Let’s move on to step 5!
Step 5: Clean the Valve Cartridge
The valve cartridge is an essential component of your bath faucet that controls the flow of water and allows you to adjust the temperature. Over time, mineral deposits, dirt, and debris can accumulate in the valve cartridge, leading to leaks, reduced water flow, or difficulties in adjusting the temperature correctly.
Cleaning the valve cartridge requires disassembling the faucet, so it is important to follow the manufacturer’s guidelines or seek professional help if you are unsure about the process. Keep in mind that the steps may vary depending on your faucet model.
Start by turning off the water supply to the faucet. You can refer to step 1 for instructions on how to do this.
Next, carefully remove any decorative caps or handles that cover the valve cartridge using a small wrench or pliers. Take note of their position and set them aside on a clean surface.
Once the valve cartridge is exposed, use a toothbrush or small wire brush to scrub away any debris or mineral deposits. Pay close attention to the ports and openings where water flows through. Gently brush them to ensure they are clear and free of any obstructions.
If the valve cartridge is heavily clogged or damaged, you may need to replace it. Contact your faucet manufacturer for guidance on finding the correct replacement cartridge specific to your faucet model.
After cleaning or replacing the valve cartridge, carefully reassemble the faucet by following the reverse steps of disassembly. Make sure all components are correctly aligned and securely tightened.
Once the faucet is reassembled, turn on the water supply and test the faucet for proper operation. Check for any leaks or irregular water flow. Adjust the temperature and ensure that the water flows smoothly from hot to cold.
If you encounter any issues during the cleaning or reassembly process, it is recommended to consult a professional plumber or contact the manufacturer for assistance.
Now that the valve cartridge is clean and the faucet is reassembled, your bath faucet should be in its optimal condition, with improved functionality and performance. In the next step, we will focus on reassembling the faucet components. Let’s move on to step 6!
Step 6: Reassemble the Faucet Components
After cleaning and ensuring the individual components of your bath faucet are in optimal condition, it’s time to reassemble them to complete the cleaning process. Proper reassembly is crucial for the faucet to function correctly and prevent leaks or other issues.
Start by locating the decorative caps or handles that were removed in step 5. Place them back in their original position and tighten them securely. Use a small wrench or pliers if necessary, but be careful not to overtighten and risk damaging the components.
If your faucet has any additional decorative or functional attachments, such as soap dispensers or side sprays, reattach them following the manufacturer’s instructions.
Make sure all connections and fittings are secure and aligned properly. Inspect for any loose or damaged parts and replace them if necessary.
Double-check that the aerator is securely screwed back onto the faucet spout and ensure it is positioned correctly to allow for optimal water flow.
Lastly, turn on the water supply to the faucet and let it run for a few seconds to flush out any leftover debris or air bubbles. Test both the hot and cold water handles to ensure they are functioning properly and adjust the temperature as desired.
Check for any leaks around the handles, spout, or any other connections. If you notice any leaks, carefully tighten the affected area or consider replacing any faulty gaskets or o-rings.
With all the components reassembled and the faucet properly functioning, you can now enjoy the rejuvenated and sparkling bath faucet!
In the final step, we will wrap up the cleaning process and discuss some important tips and reminders. Let’s move on to step 7!
Step 7: Test the Faucet for Proper Operation
After completing the cleaning and reassembling process, it is essential to test your bath faucet to ensure it is functioning properly. Proper testing will help identify any remaining issues and ensure that the faucet is in optimal working condition.
Start by turning on the water supply to the faucet. Gradually open both the hot and cold water handles and let the water run for a few minutes. Check for proper water flow and pressure from the spout.
Next, test the temperature adjustment. Gradually turn the handles from hot to cold and vice versa, checking that the water temperature changes accordingly. Pay attention to any sudden temperature changes or difficulties in adjusting the temperature smoothly.
Observe the faucet for any leaks or drips around the handles, spout, or any connections. Even the smallest leak should be addressed promptly to prevent water waste and potential damage.
If you notice any issues with the water flow, temperature adjustment, or leaks, double-check the connections and tighten them if necessary. Consider consulting a professional plumber or contacting the faucet manufacturer for further assistance if the issue persists.
Once you have tested and confirmed that the faucet is operating correctly, congratulate yourself on completing the cleaning process! You have successfully cleaned your bath faucet and restored it to its optimal condition.
Remember to periodically clean and maintain your bath faucet to keep it in good working condition. Regular cleaning will help prevent mineral buildup, improve water flow, and prolong the lifespan of your faucet.
Additionally, if you encounter any ongoing issues, unusual noises, or concerns with your bath faucet, it is always best to consult a professional plumber for a thorough inspection and repair if necessary.
With your bath faucet now clean and fully operational, you can enjoy a refreshing and hassle-free bathing experience. Don’t forget to regularly clean other bathroom fixtures and surfaces to maintain a clean and hygienic space.
Thank you for following this step-by-step guide on how to clean your bath faucet. Happy cleaning!
Read also: 14 Best Bath Faucet for 2025
Conclusion
Cleaning your bath faucet is an essential task for maintaining a hygienic and well-functioning bathroom. By following the step-by-step process outlined in this article, you can effectively remove mineral deposits, dirt, and grime, giving your faucet a refreshed and sparkling appearance.
Throughout the cleaning process, we discussed the importance of gathering the necessary tools and materials, turning off the water supply, removing mineral deposits, cleaning the faucet handles and spout, cleaning the aerator, and addressing any issues with the valve cartridge. We also emphasized the significance of properly reassembling the faucet components and testing the faucet for proper operation.
Regular cleaning and maintenance of your bath faucet will not only enhance its aesthetics but also improve its functionality. It can help prevent clogs, leaks, and irregular water flow, ensuring a smooth and enjoyable bathing experience.
Remember to consult the manufacturer’s guidelines for any specific cleaning instructions and recommendations based on your faucet model. If you encounter any difficulties or ongoing issues, do not hesitate to seek professional assistance from a plumber or contact the manufacturer for support.
By dedicating time and effort to clean your bath faucet, you contribute to the overall cleanliness and functionality of your bathroom. Additionally, maintaining a clean and well-maintained faucet can also increase the lifespan of the fixture, saving you from costly replacements in the long run.
We hope that this comprehensive guide has been helpful in guiding you through the process of cleaning your bath faucet. By following these steps regularly, you can ensure a clean and hygienic bathroom, providing you with a pleasant and refreshing bathing experience for years to come.
Thank you for reading, and happy faucet cleaning!
Frequently Asked Questions about How To Clean Bath Faucet
Was this page helpful?
At Storables.com, we guarantee accurate and reliable information. Our content, validated by Expert Board Contributors, is crafted following stringent Editorial Policies. We're committed to providing you with well-researched, expert-backed insights for all your informational needs.


0 thoughts on “How To Clean Bath Faucet”