Articles
How To Do A Turkey Fan Mount
Modified: February 20, 2024
Learn how to do a stunning turkey fan mount with this informative article. Get step-by-step instructions and expert tips to create a beautiful display.
(Many of the links in this article redirect to a specific reviewed product. Your purchase of these products through affiliate links helps to generate commission for Storables.com, at no extra cost. Learn more)
Introduction
Doing a turkey fan mount is a great way to preserve and display the beautiful feathers of a turkey that you’ve harvested during a hunt. It not only serves as a memento of a successful hunt, but also allows you to showcase the unique patterns and colors of the turkey’s plumage.
In this article, we will provide you with a step-by-step guide on how to do a turkey fan mount. From preparing the turkey fan to securing it in a display position, we will cover all the necessary materials and techniques needed to create a stunning turkey fan mount.
Whether you are a seasoned hunter or a novice, this guide will help you create a professional-looking turkey fan mount that you can proudly display in your home or hunting cabin.
So let’s dive in and learn how to do a turkey fan mount!
Key Takeaways:
- Preserve the memories of a successful hunt by creating a stunning turkey fan mount using a step-by-step guide. Showcase the beauty of the turkey’s plumage with precision and care.
- Enjoy the satisfaction of creating a personalized turkey fan mount and relish the memories of your memorable hunting experience for years to come. Display it proudly and maintain its appearance for longevity.
Read more: How To Preserve A Turkey Fan
Materials and Tools Needed
Before we begin the process of creating a turkey fan mount, let’s gather all the necessary materials and tools. Here’s a list of what you’ll need:
Materials:
- A harvested turkey with intact feathers
- A turkey fan mounting kit (available at hunting supply stores or online)
- A wooden plaque or frame (size and shape of your choice)
- Wood stain or paint (optional)
- Nails or screws for mounting the fan
- Wood glue
- Protective gloves
Tools:
- A sharp knife or scissors
- A cutting board or workstation
- A small paintbrush (if using wood stain or paint)
- Screwdriver or hammer (depending on the type of mounting hardware)
- Safety goggles
Make sure you have all these materials and tools on hand before proceeding with the turkey fan mount. Additionally, ensure that you are in a well-ventilated area with ample workspace to carry out the mounting process comfortably and safely.
Step 1: Preparing the Turkey Fan
Before we can mount the turkey fan, we need to properly prepare it. Follow these steps:
- Start by removing the turkey’s fan from the rest of the body. Carefully cut the fan away from the turkey’s body using a sharp knife or scissors. Take care not to damage or tear any feathers during this process.
- Once the fan is detached, inspect it for any excess flesh or fat. Use your knife or scissors to trim away any remaining tissue. Be sure to clean the fan thoroughly, removing any blood or debris.
- Next, gently spread out the fan to its full extent. Take a moment to admire the beauty of the feathers and observe their natural arrangement. It’s important to note the position and symmetry of the feathers for mounting.
- If you notice any damaged or broken feathers, you can carefully trim them with scissors. However, try to maintain the natural shape and appearance of the fan as much as possible.
- Finally, set the prepared turkey fan aside and move on to the next step: cleaning and drying.
By following these steps, you ensure that your turkey fan is in the best possible condition for mounting. Taking the time to properly prepare the fan will result in a more professional-looking display.
Read more: How Are Ceiling Fans Mounted
Step 2: Cleaning and Drying
After preparing the turkey fan, it’s important to thoroughly clean and dry it before mounting. Follow these steps:
- Fill a basin or sink with cold water. Add a small amount of mild detergent or dish soap to create a gentle cleaning solution.
- Gently submerge the turkey fan in the soapy water, swishing it around to remove any dirt, debris, or residual blood. Be careful not to agitate the feathers too vigorously to avoid damaging them.
- Rinse the turkey fan under cool running water to remove any soap residue. Gently squeeze out excess water without wringing or twisting the feathers.
- Place the damp turkey fan on a clean towel or paper towels to absorb any remaining moisture. Gently pat the feathers dry, taking care not to flatten or distort their natural shape.
- Once you’ve removed most of the moisture, set the turkey fan in a well-ventilated area to air dry completely. Avoid direct sunlight or heat sources, as they can cause the feathers to fade or become brittle.
- Allow the turkey fan to dry for at least 24 hours or until it feels completely dry to the touch.
By cleaning and properly drying the turkey fan, you ensure that it is free from any dirt or contaminants that could affect its appearance and longevity. This step is crucial in maintaining the overall quality of your turkey fan mount.
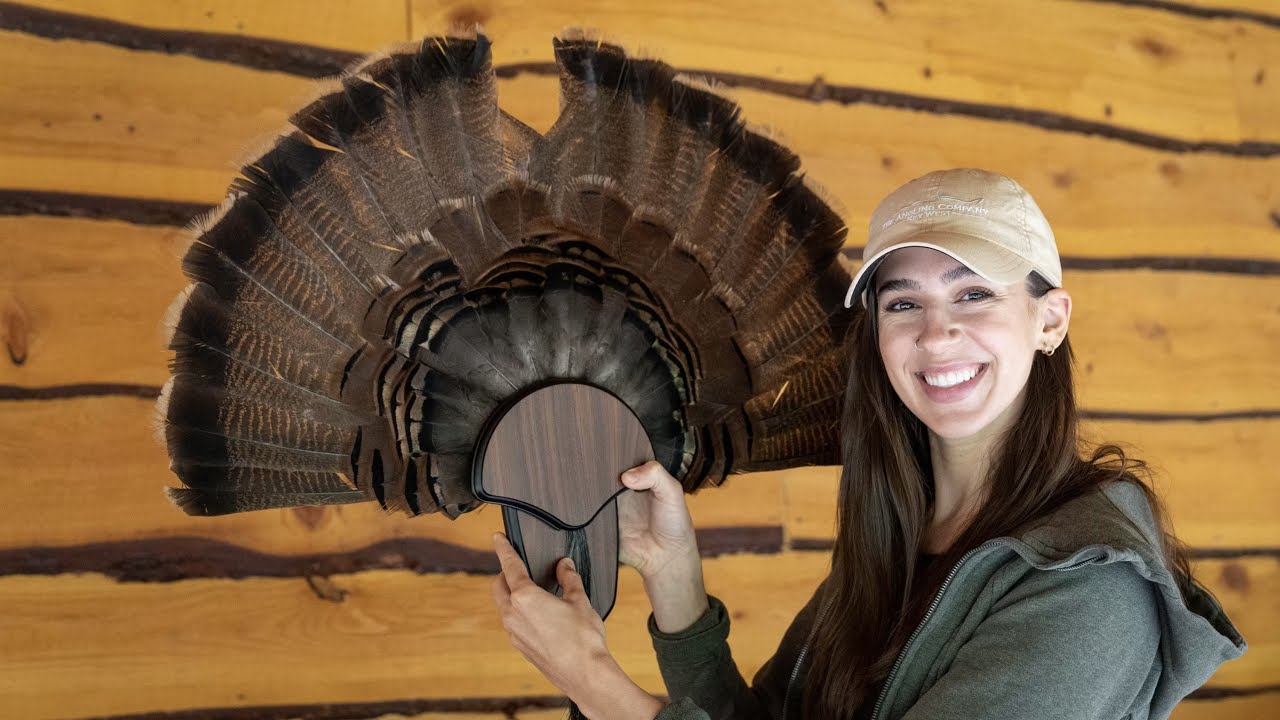
Step 3: Positioning and Mounting
Now that you have a clean and dry turkey fan, it’s time to position and mount it onto a wooden plaque or frame. Follow these steps:
- Choose a wooden plaque or frame that matches your aesthetic preference and size requirements. Make sure it is sturdy enough to support the weight of the turkey fan.
- Position the turkey fan onto the wooden plaque to determine the desired display angle and arrangement of the feathers. Take your time to find the most visually appealing position.
- Once you have determined the positioning, trace the outline of the turkey fan onto the wooden plaque using a pencil or marker. This will serve as a guide for mounting the fan in the correct position.
- If you prefer a natural wood finish, you can skip this step. However, if you want to add some color or protect the wood, you can apply wood stain or paint to the wooden plaque before attaching the fan.
- Follow the instructions provided with your turkey fan mounting kit to attach the fan to the wooden plaque. This typically involves using screws or nails to fasten the fan securely in place.
- Refer to the traced outline as a guide while positioning and securing the feathers. Make sure they align with the outline and maintain a natural, symmetrical appearance.
- Apply wood glue to the base of the shafts of the feathers to reinforce the attachment. This will ensure that the feathers remain securely in place over time.
Positioning and mounting the turkey fan is a crucial step in creating a visually appealing and stable mount. Take your time and ensure that the feathers are arranged in a pleasing manner before moving on to the next step.
When doing a turkey fan mount, make sure to carefully remove the fan from the bird, keeping the feathers in their natural position. Use a quality mounting kit and follow the instructions closely for a professional-looking display.
Step 4: Securing the Turkey Fan
After positioning the turkey fan on the wooden plaque, it’s important to secure it properly to ensure its stability and longevity. Follow these steps:
- If your turkey fan mounting kit includes straps or ties, use them to secure the base of the feathers to the wooden plaque. This will provide additional support and prevent the fan from shifting or becoming loose.
- Alternatively, you can use small nails or screws to attach the base of the feathers directly to the wooden plaque. Make sure to position them evenly and discreetly to maintain a clean and professional appearance.
- Apply a small amount of wood glue to the back of the turkey fan where it contacts the wooden plaque. This will provide extra adhesive strength and help to prevent any movement or loosening over time.
- Use a screwdriver or a hammer to ensure that any screws or nails are securely fastened. Double-check that all attachments are tight and secure before proceeding.
- Allow the wood glue to dry completely according to the manufacturer’s instructions. This will usually take a few hours, but it’s best to give it ample time to ensure a strong bond.
By properly securing the turkey fan to the wooden plaque, you ensure that it remains in place and maintains its display position. This step is crucial in creating a durable and professional-looking turkey fan mount.
Step 5: Touching up and Finishing
Now that the turkey fan is securely mounted on the wooden plaque, it’s time to add some final touches and finish the overall look of the mount. Follow these steps:
- Inspect the turkey fan and make any necessary adjustments to the position of the feathers. Rearrange them if needed to achieve the desired aesthetic appeal.
- Trim any stray or uneven feather shafts with scissors to ensure a neat and uniform appearance. Be careful not to cut too much, as it may affect the natural shape of the fan.
- If desired, you can apply a protective coating over the feathers to enhance their shine and durability. This can be done using a spray-on clear coat specifically designed for feathers.
- Consider adding decorative elements to the mount, such as a personalized nameplate or a small brass plaque with the date and details of the hunt. This can add a personal touch and make the mount even more special.
- Take a step back and examine the turkey fan mount from different angles. Make any final adjustments or touch-ups to ensure that it meets your desired level of perfection.
Once you are satisfied with the positioning and overall appearance of the turkey fan mount, it is ready to be displayed in your hunting cabin, living room, or any other suitable location. Show it off with pride and enjoy the memories of your successful hunt for years to come!
Remember to periodically clean and maintain the turkey fan mount to keep it looking its best. Dust the feathers gently with a soft brush or compressed air to remove any accumulated debris.
With the completion of Step 5, your turkey fan mount is now finished and ready to be showcased as a beautiful piece of hunting memorabilia.
Read more: What Is A Flush Mount Ceiling Fan
Conclusion
Creating a turkey fan mount is a rewarding and enjoyable way to preserve and display the feathers from a successful hunt. By following the step-by-step guide outlined in this article, you can create a stunning turkey fan mount that showcases the beauty of the turkey’s plumage.
From preparing and cleaning the turkey fan to positioning and securing it onto a wooden plaque, each step plays a crucial role in the final appearance and longevity of the mount. Taking the time to properly prepare the fan, clean it carefully, and position it with precision will result in a professional-looking display.
Remember to use the necessary materials and tools, including a turkey fan mounting kit, wooden plaque or frame, and wood glue. These items will ensure that your turkey fan mount is secure and visually appealing.
Don’t forget the final touches and finishing steps, such as trimming any stray feathers, applying a protective coating, and adding personalized elements to make the mount truly unique.
Once your turkey fan mount is complete, find a suitable location to proudly display it. Whether it’s in your hunting cabin, living room, or office, the mount will serve as a reminder of your successful hunt and provide a conversation piece for guests.
Remember to periodically clean and maintain the turkey fan mount to preserve its appearance. Dusting the feathers gently and keeping the mount away from direct sunlight or heat sources will help ensure its longevity.
Enjoy the satisfaction of creating a beautiful and personalized turkey fan mount, and relish in the memories of your memorable hunting experience for years to come.
Happy mounting!
Frequently Asked Questions about How To Do A Turkey Fan Mount
Was this page helpful?
At Storables.com, we guarantee accurate and reliable information. Our content, validated by Expert Board Contributors, is crafted following stringent Editorial Policies. We're committed to providing you with well-researched, expert-backed insights for all your informational needs.


0 thoughts on “How To Do A Turkey Fan Mount”