Articles
How To Enclose A Back Porch
Modified: May 6, 2024
Learn how to enclose a back porch with our informative articles. Find step-by-step guides and expert tips to transform your outdoor space.
(Many of the links in this article redirect to a specific reviewed product. Your purchase of these products through affiliate links helps to generate commission for Storables.com, at no extra cost. Learn more)
Introduction
Welcome to our guide on how to enclose a back porch! If you’re looking to transform your open-air space into a more versatile and usable area, enclosing your back porch is a fantastic solution. Whether you want to create a cozy retreat, extend your living space, or protect yourself from the elements, enclosing your back porch can provide you with a comfortable and functional space all year round.
Enclosing a back porch requires careful planning and consideration. From assessing the space to choosing the right materials and executing the construction, this step-by-step guide will walk you through the process of enclosing your back porch. By following these steps and utilizing some basic carpentry skills, you’ll be able to enjoy your enclosed back porch in no time!
Before embarking on this project, it’s important to visualize how you want your enclosed back porch to look and function. Will it be an extension of your living area, a peaceful retreat for relaxation, or an entertainment space for hosting friends and family? Defining your purpose for the enclosed porch will help guide your decision-making process and ensure that the end result aligns with your desired vision.
Additionally, consider any local building codes or homeowner association regulations that may apply to your area. It’s crucial to adhere to these guidelines to ensure a safe and compliant construction process.
In this guide, we’ll cover the essential steps involved in enclosing a back porch, including assessing the space, choosing the right materials, measuring and planning the enclosure, building the frame, installing the walls and roof, adding doors and windows, and finally, adding finishing touches and additional features to enhance the functionality and aesthetic appeal of your enclosed back porch.
Now let’s dive into the first step of the process: assessing the back porch.
Key Takeaways:
- Enclosing a back porch involves careful planning, material selection, and construction, resulting in a versatile and functional space that can be enjoyed year-round. From assessing the space to adding finishing touches, each step contributes to creating a customized and inviting enclosed back porch.
- The process of enclosing a back porch offers endless possibilities for transforming an open-air space into a cozy retreat, extended living area, or entertainment space. By considering factors such as layout, materials, and additional features, homeowners can create a personalized and valuable addition to their home.
Read more: What Is An Enclosed Porch
Step 1: Assessing the Back Porch
Before you begin the process of enclosing your back porch, it’s important to assess the existing structure and determine its suitability for enclosure. Here are some key considerations when assessing your back porch:
1. Size and Layout
Take measurements of your back porch to determine its size and dimensions. Consider how much space you have available and how you want to utilize it. Think about factors such as the roof height, floor level, and any existing features like steps or columns that may affect the enclosures’ design.
2. Structural Integrity
Check the condition of your back porch’s foundation, walls, and roof. Ensure that it is structurally sound and can support the additional weight of enclosure materials. If any repairs or reinforcements are needed, address them before proceeding with the enclosure project.
3. Electrical and Plumbing
If you plan on using your enclosed back porch for appliances or plumbing fixtures, consider the availability and accessibility of electrical and plumbing connections. If necessary, hire a professional to assess and make any necessary adjustments or installations.
Read more: How Much Is It To Enclose A Porch
4. Natural Light and Ventilation
Consider how much natural light and ventilation you would like in your enclosed space. Assess the orientation of your back porch and determine the best placement for windows or skylights to maximize natural light. Evaluate airflow and ventilation options to ensure a comfortable and breathable environment.
5. Privacy and Views
Take into account the privacy and views you want to maintain or enhance with the enclosure. Evaluate the surrounding landscape and neighboring properties to determine which areas need more privacy and which areas offer desirable views.
By thoroughly assessing your back porch, you can identify any potential challenges or opportunities that may arise during the enclosure process. This step will help you make informed decisions and create a solid plan for your enclosed back porch project.
Step 2: Choosing the Right Materials
Choosing the right materials for your back porch enclosure is crucial for both functionality and aesthetics. Here are some factors to consider when selecting materials:
1. Framing:
The framing material will form the structure of your enclosure. Common options include wood, aluminum, or vinyl. Wood provides a classic and versatile choice, while aluminum and vinyl offer durability and low maintenance. Consider your budget, climate conditions, and personal preferences when selecting the framing material.
Read more: How To Enclose Front Porch
2. Walls:
For the walls of your enclosure, you can choose from various materials such as glass, screens, panels, or a combination. Glass provides a clear view and protection against the elements, while screens allow for ventilation and insect protection. Panels, such as acrylic or polycarbonate, offer privacy and insulation. Consider the level of privacy, natural light, and weather resistance you desire.
3. Roofing:
The roof of your back porch enclosure is an essential component for weather protection. Popular roofing materials include shingles, metal, or polycarbonate panels. Shingles offer a traditional look and excellent durability, while metal provides longevity and low maintenance. Polycarbonate panels offer UV protection and transparency. Consider your climate conditions and desired aesthetic when selecting the roofing material.
4. Doors and Windows:
Choose doors and windows that complement the overall design and functionality of your enclosed back porch. Options include sliding or French doors, single-hung or casement windows, and skylights. Consider factors such as security, energy efficiency, and ease of use when selecting these components.
5. Finishing Touches:
Don’t forget the finishing touches to enhance the appearance and functionality of your back porch enclosure. This includes details such as trim, paint or stain, decorative elements, and lighting fixtures. Choose materials and finishes that blend well with the existing architecture and interior design of your home.
Before making any final decisions, visit a local building supply store or consult with a professional contractor to discuss your options. They can provide expert advice and help you choose the right materials based on your specific needs and budget.
Remember, selecting high-quality and durable materials will ensure that your back porch enclosure stands the test of time and provides you with a comfortable and inviting space for years to come.
Read more: How To Enclose Porch For Winter
Step 3: Measuring and Planning the Enclosure
Once you have assessed your back porch and chosen the materials, it’s time to measure and plan the enclosure. Proper planning is essential for a successful and well-designed project. Here’s how to approach this step:
1. Measure the Space:
Accurate measurements are crucial for ensuring that your enclosure fits properly. Measure the height, width, and depth of your back porch. Take note of any obstructions, such as columns or stairs, that may impact the design and placement of the enclosure.
2. Design Considerations:
Consider the layout and design of your desired enclosure. Determine the placement of walls, doors, windows, and any additional features you plan to incorporate. Think about how you want to utilize the space and ensure that the design aligns with your vision.
3. Permit Requirements:
Consult with your local building department to determine if any permits are required for your back porch enclosure. They can provide guidance on the specific regulations and codes you need to adhere to. It’s essential to obtain the necessary permits to ensure that your project is legal and meets safety standards.
Read more: Cheap Ways To Enclose A Porch
4. Create a Plan:
Use graph paper or a computer-aided design (CAD) software to create a detailed plan of your enclosure. Include dimensions, placement of walls, windows, doors, and any other features. This plan will serve as a reference throughout the construction process and help you stay organized.
5. Seek Professional Help:
If you’re unsure about the measurements or the design of your enclosure, consider seeking help from a professional contractor or architect. They have the expertise and experience to provide valuable insights and ensure that your enclosure is planned and executed correctly.
By measuring and planning your back porch enclosure meticulously, you’ll be able to proceed with the construction phase smoothly. Having a well-thought-out plan will save you time, money, and potential headaches down the road.
Step 4: Building the Frame for the Enclosure
Now that you have measured and planned your back porch enclosure, it’s time to start building the frame. The frame provides the structure and support for the walls, roof, and other components of your enclosure. Follow these steps to build the frame:
1. Gather Materials and Tools:
Collect all the necessary materials and tools for building the frame. This includes the framing material you selected, such as wood, aluminum, or vinyl, as well as measuring tape, a level, a circular saw or miter saw, a drill, screws or nails, and framing connectors.
Read more: What Is An Enclosed Porch Called
2. Mark the Layout:
Using your plan as a guide, mark the layout of your enclosure on the back porch. Use a chalk line or string to create straight lines for the walls. Double-check the measurements and alignment to ensure accuracy.
3. Cut and Install the Frame:
Using your measurements, cut the framing material to the appropriate lengths. Start by installing the bottom plates, followed by the vertical studs. Secure the frame to the floor using screws or nails, and use framing connectors for additional support between the studs and the roof.
4. Ensure Level and Square:
Check that the frame is level and square as you continue building. Use a level to ensure the vertical studs are plumb and the horizontal members are level. Adjust as needed to maintain proper alignment.
5. Add Structural Support:
Depending on the size and design of your enclosure, you may need to add additional support through cross-bracing or diagonal braces. These will help strengthen the frame and ensure its stability.
Read more: How To Turn An Enclosed Porch Into A Bedroom
6. Install Headers and Sill Plates:
For doors and windows, install headers and sill plates to provide support and help properly frame the openings. Follow the manufacturer’s instructions for installation.
7. Inspect and Secure:
Inspect the frame for any gaps, cracks, or loose connections. Make any necessary adjustments and secure the frame using screws or nails to ensure its stability and longevity.
Building the frame for your back porch enclosure is a critical step in the construction process. Take your time, follow proper construction techniques, and ensure that the frame is sturdy and well-built. Once the frame is in place, you can move on to the next step of installing the walls and roof.
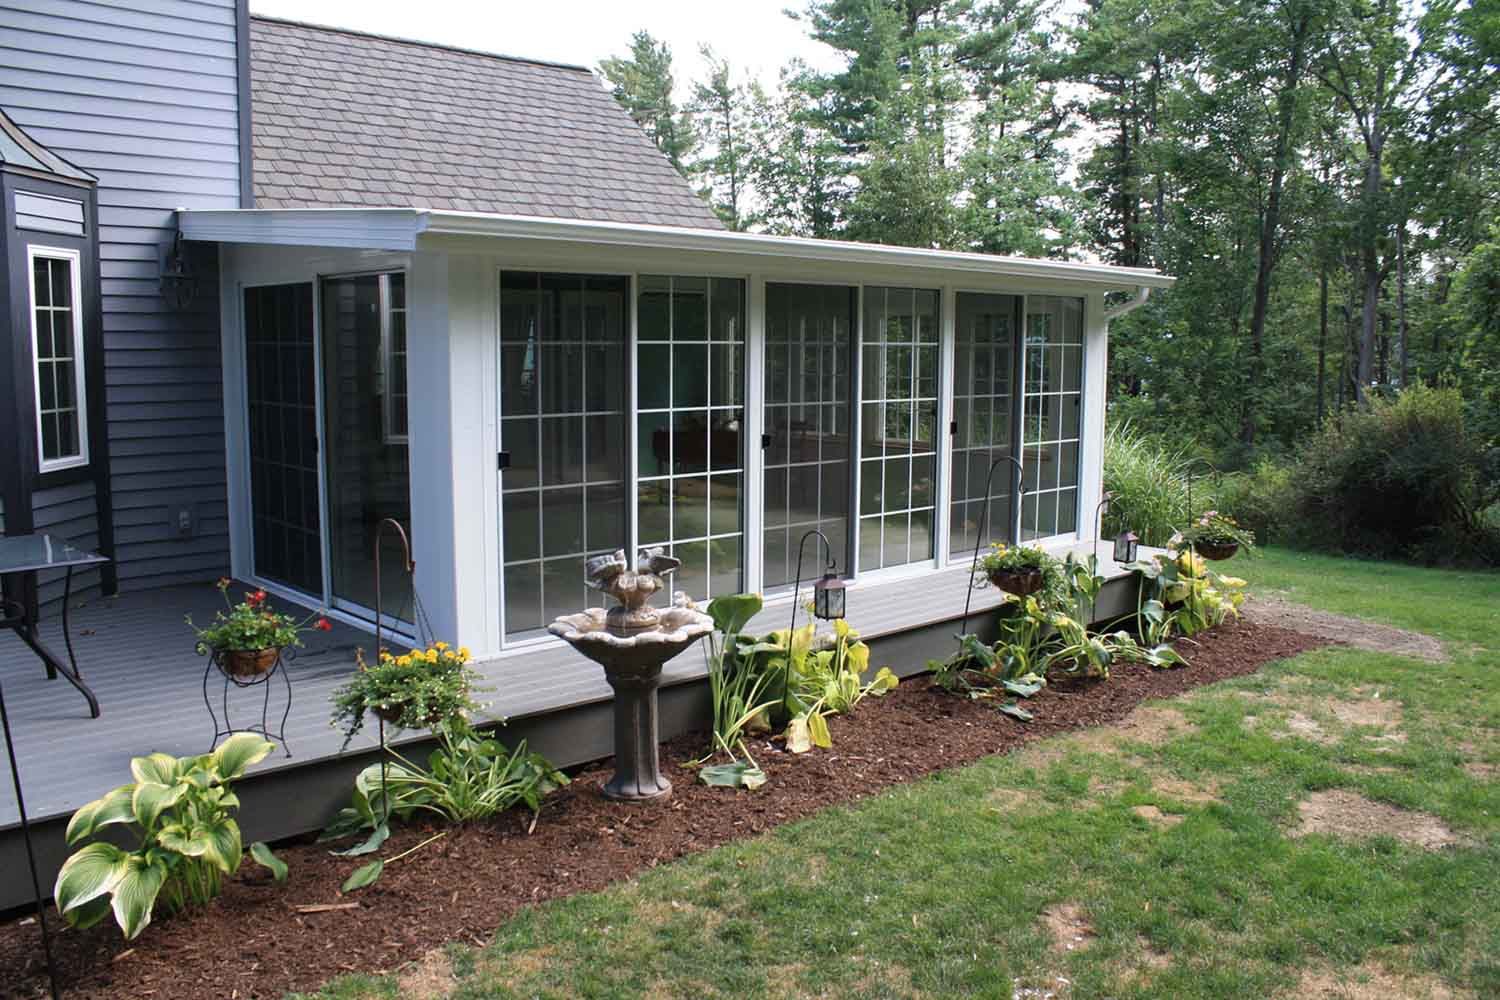
Step 5: Installing the Walls and Roof
With the frame of your back porch enclosure complete, it’s time to move on to installing the walls and roof. This step will bring your enclosure one step closer to a finished and functional space. Here’s how to proceed:
1. Prepare the Area:
Clear the workspace and ensure that the frame is clean and free of any debris. This will provide a clean surface for installing the walls and roof and make the process more efficient.
Read more: How To Stop Condensation In Enclosed Porch
2. Install the Walls:
Depending on the material you’ve chosen for the walls, follow the manufacturer’s instructions to install them. For glass panels or screens, secure them to the frame using clips or tracks. If you’re using panels, such as acrylic or polycarbonate, attach them to the frame using screws or other recommended fasteners.
3. Secure the Walls:
Once the walls are in place, make sure they are securely attached to the frame. Check for any gaps or loose areas and make adjustments as necessary. Ensure that the walls are plumb and level, using a level to guide you.
4. Install the Roof:
If you’re using roofing material such as shingles, metal, or polycarbonate panels, proceed with the installation according to the manufacturer’s instructions. Start from one end and work your way across, ensuring that each piece overlaps properly and is securely fastened.
5. Weather Sealing:
Once the walls and roof are installed, pay attention to weather sealing. This is especially important if you’re using panels or screens that require additional sealing to prevent leaks or drafts. Use caulk or weatherstripping to seal any gaps or joints to maintain a weather-resistant enclosure.
Read more: How To Decorate A Back Porch
6. Inspect for Proper Installation:
Take a thorough look at the walls and roof to ensure that they are properly installed and aligned. Check for any loose connections, gaps, or areas that may compromise the integrity of the enclosure. Make any necessary adjustments or reinforcements before proceeding to the next step.
Installing the walls and roof is a significant milestone in the construction of your back porch enclosure. It starts to resemble the final product and brings you closer to enjoying your enclosed space. Once the walls and roof are in place, you can proceed to the next step: adding doors and windows.
Step 6: Adding Doors and Windows
With the enclosure’s walls and roof installed, it’s time to focus on adding doors and windows to your back porch. Doors and windows not only contribute to the functionality of the space but also enhance its aesthetic appeal. Follow these steps to add doors and windows:
1. Determine Door Placement:
Consider the layout and flow of your back porch enclosure to determine the best placement for doors. Choose the entry points that align with your desired access and traffic patterns. Keep in mind factors such as convenience, privacy, and architectural considerations.
2. Select Door Types:
There are various door types to choose from, including sliding doors, French doors, or single-panel doors. Consider the space available, functionality, and design aesthetics when selecting your doors. Ensure that they match the overall style and design of your back porch enclosure.
Read more: How To Enclose A Balcony
3. Measure and Cut:
Measure the door opening carefully to ensure that the door will fit properly. Use a saw or other appropriate tools to cut the opening as necessary. Follow the manufacturer’s instructions for cutting and framing the door opening.
4. Install Doors:
Follow the manufacturer’s instructions to install the doors into the prepared openings. Make sure the doors are level, plumb, and operate smoothly. Secure them to the frame using the provided hardware, such as screws or hinges.
5. Consider Windows:
If you desire additional light, ventilation, or views, incorporate windows into your back porch enclosure. Choose windows that complement the design and functionality of the space. Consider factors such as type, size, placement, and energy efficiency when selecting windows.
6. Install Windows:
Follow the manufacturer’s instructions to install the windows into the designated openings. Make sure they are properly sealed and secured to prevent leakage or drafts. Test them to ensure they open and close smoothly.
Read more: How To Enclose A Pergola
7. Weatherproofing:
Once the doors and windows are installed, pay attention to weatherproofing. Apply weatherstripping or caulking around the edges to prevent drafts or water leakage. This will enhance the energy efficiency and comfort of your back porch enclosure.
Adding doors and windows to your back porch enclosure enhances its functionality and aesthetics. With careful planning and proper installation, you’ll be able to enjoy the benefits of natural light, ventilation, and convenient access to your outdoor space.
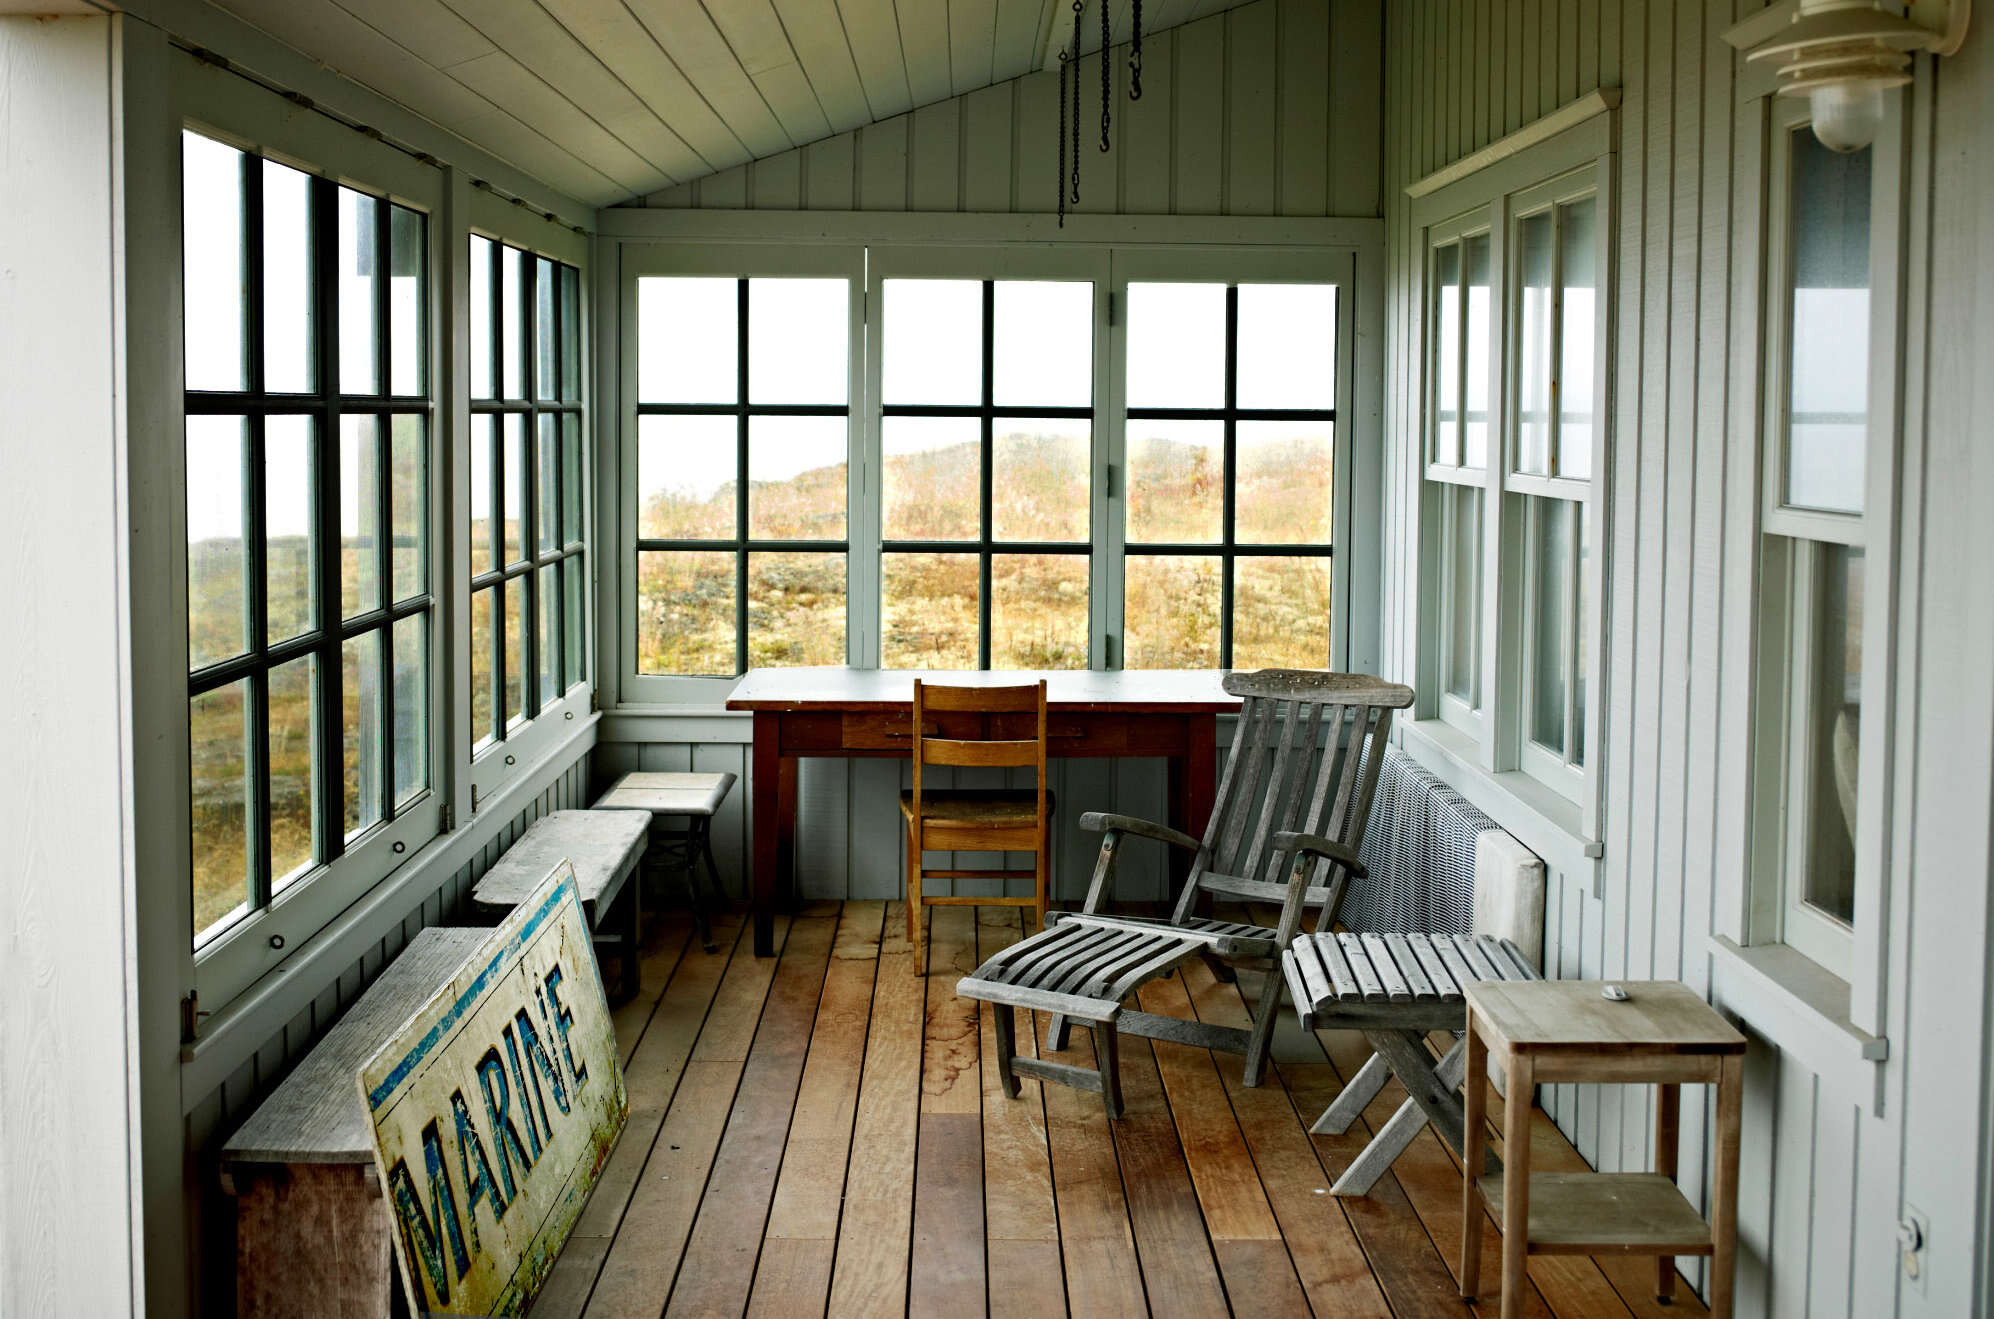
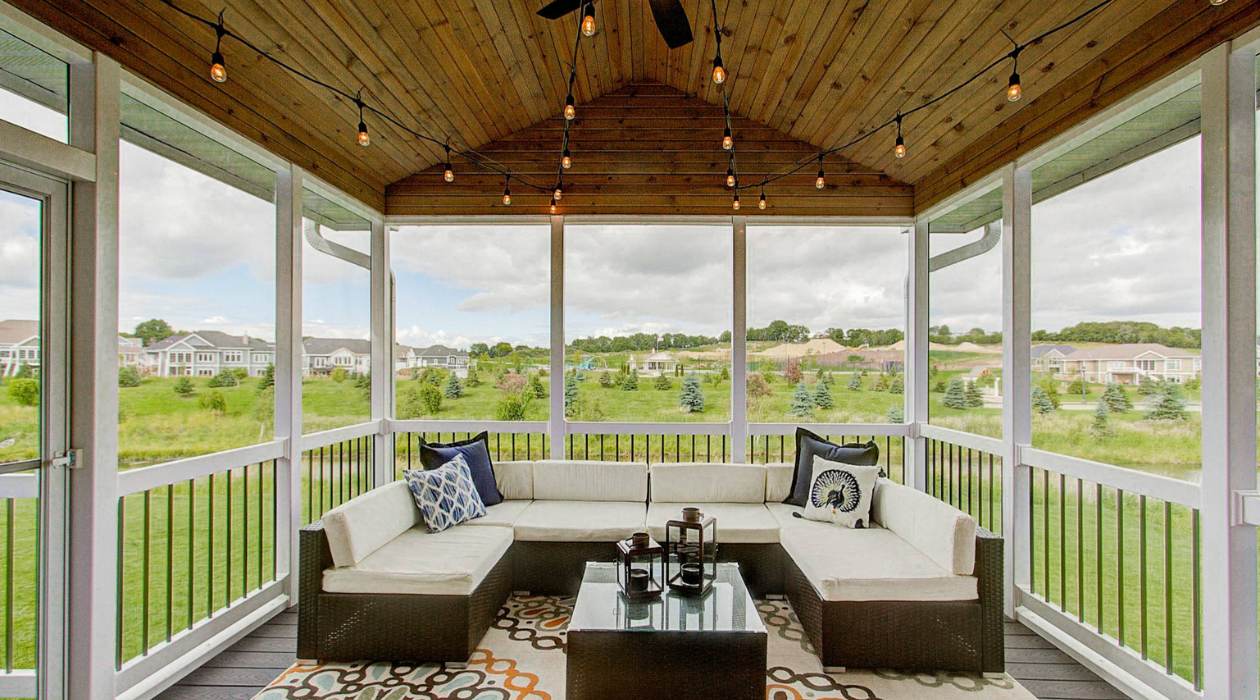
Step 7: Finishing Touches and Additional Features
As you near the completion of your back porch enclosure, it’s time to focus on the finishing touches and additional features that will enhance the overall look and functionality of the space. Here are some ideas to consider:
1. Flooring:
Select a flooring material that suits your aesthetic preferences and functional needs. Options include hardwood, tile, laminate, or outdoor-friendly materials such as composite decking or concrete pavers. Choose a material that is durable, easy to clean, and complements the design of your enclosed back porch.
2. Lighting:
Add lighting fixtures to your back porch enclosure for both practical and decorative purposes. Consider overhead lighting for general illumination, task lighting for specific areas such as a reading nook or workspace, and accent lighting to highlight architectural features or create ambiance in the evenings.
Read more: How To Enclose A Carport
3. Furnishings:
Select comfortable and weather-resistant furniture to create a cozy and inviting living space within your back porch enclosure. Arrange seating areas, dining sets, and other furnishings strategically to maximize the use of space and create a functional layout.
4. Decorative Elements:
Add a personal touch to your enclosed back porch with decorative elements such as plants, artwork, rugs, and accessories. Choose items that reflect your style and create a welcoming and comfortable atmosphere that aligns with your vision for the space.
5. Heating and Cooling:
If you plan to use your enclosed back porch throughout the year, consider heating and cooling options to ensure comfort in various seasons. This could include ceiling fans, portable heaters, or incorporating a heating and cooling system into the design of the enclosure.
6. Sound System:
If you enjoy music or entertainment, consider installing a sound system in your enclosed back porch. This will allow you to enjoy your favorite tunes or have outdoor gatherings with immersive audio experiences.
Read more: How To Enclose A Patio
7. Privacy Screens or Curtains:
If privacy is a concern, consider adding privacy screens or curtains to your back porch enclosure. These can protect you from prying eyes while still allowing airflow and natural light to enter the space. Choose options that complement the overall design and style of your enclosure.
Remember to always prioritize safety when incorporating additional features. Ensure that any electrical components are installed by a qualified professional and adhere to local building codes and regulations.
With the finishing touches and additional features in place, your back porch enclosure will be transformed into a comfortable and versatile space that brings you joy and adds value to your home.
Conclusion
Congratulations on completing the process of enclosing your back porch! By following the steps outlined in this guide, you have transformed your once-open space into a versatile and functional area that can be enjoyed all year round. Here’s a recap of what you’ve accomplished:
In the introduction, we discussed the benefits of enclosing a back porch and set the stage for the rest of the guide. We then went through the steps of assessing the back porch, choosing the right materials, measuring and planning the enclosure, building the frame, installing the walls and roof, adding doors and windows, and finally, adding finishing touches and additional features.
Throughout this process, you’ve learned the importance of careful planning, accurate measurements, and thoughtful material selection. By assessing the space and determining your desired functionality, you were able to make informed decisions about how to enclose your back porch. You measured and planned the enclosure, built a sturdy frame, installed walls and a roof for weather protection, added doors and windows for access and natural light, and put the final touches on your enclosed space.
With the completion of this project, your enclosed back porch offers endless possibilities. It can be a quiet retreat for relaxation, an extension of your living area, a home office, a place to entertain guests, or a combination of these. Customize the space to your liking by adding flooring, lighting, furnishings, and decorative elements that reflect your personal style and create a comfortable atmosphere.
Remember to maintain your back porch enclosure by keeping it clean, addressing any maintenance issues promptly, and periodically inspecting the walls, roof, doors, and windows for any signs of wear or damage.
Enjoy your newly enclosed back porch and make the most of this versatile space, no matter the season or weather conditions. Whether it’s a quiet morning coffee, a gathering with friends, or simply a place to unwind, your enclosed back porch is now a valuable addition to your home that will bring you years of enjoyment and enhance your living experience.
Now that you've learned how to enclose a back porch, why stop there? Dive into our guide on sprucing up your deck with vibrant decor for more enjoyable outdoor living. Not only will these simple add-ons uplift your space, but they'll also make it perfect for relaxation and entertainment. Curious about more enclosure options? Our detailed look into what constitutes a screened porch offers insights into another popular way to enhance your home’s outdoor areas. Both articles provide valuable tips and creative ideas to maximize the enjoyment of your exterior spaces.
Frequently Asked Questions about How To Enclose A Back Porch
Was this page helpful?
At Storables.com, we guarantee accurate and reliable information. Our content, validated by Expert Board Contributors, is crafted following stringent Editorial Policies. We're committed to providing you with well-researched, expert-backed insights for all your informational needs.
0 thoughts on “How To Enclose A Back Porch”