Articles
How To Hang Wind Chimes On Porch
Modified: August 31, 2024
Learn how to hang wind chimes on your porch with these insightful articles. Discover tips and techniques for creating a peaceful and melodic atmosphere in your outdoor space.
(Many of the links in this article redirect to a specific reviewed product. Your purchase of these products through affiliate links helps to generate commission for Storables.com, at no extra cost. Learn more)
Introduction
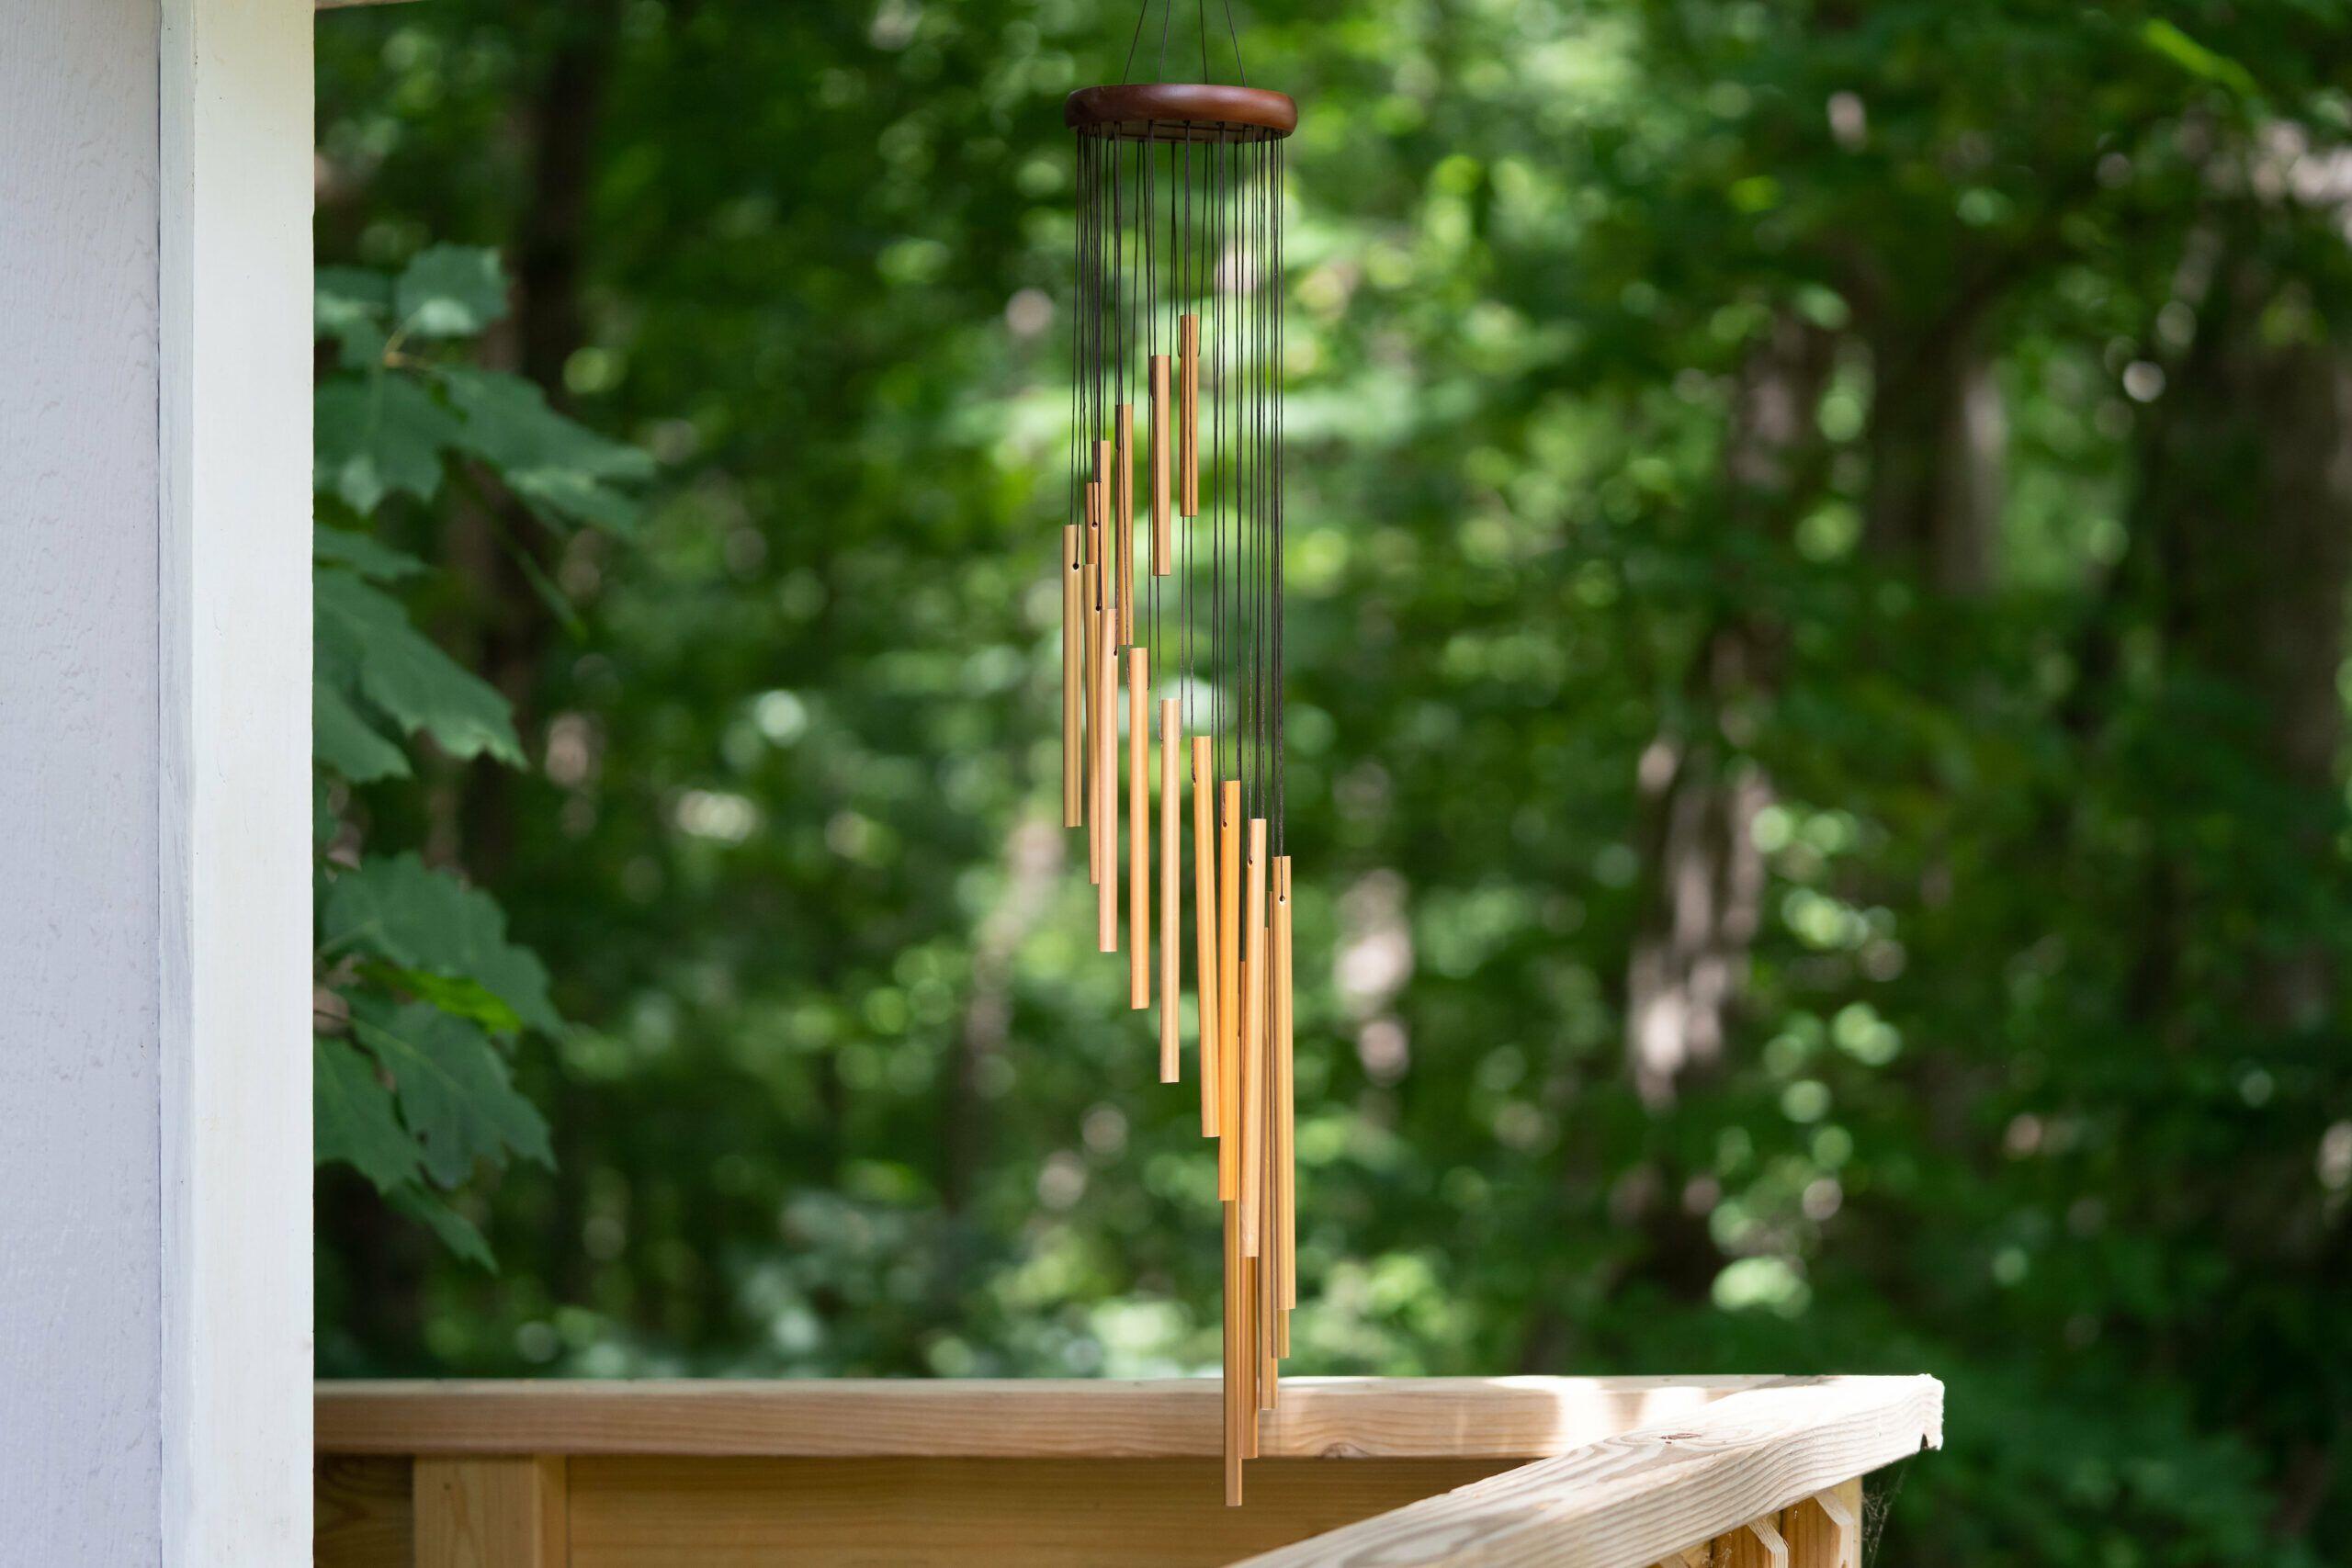
Wind chimes are not only aesthetically pleasing, but they also create a soothing and calming ambiance. Hanging wind chimes on your porch can add a touch of beauty and tranquility to your outdoor space. The gentle tinkling of the metal or wooden chimes swaying in the breeze can create a peaceful atmosphere that helps you unwind and relax.
If you’re wondering how to hang wind chimes on your porch, you’ve come to the right place. In this guide, we will walk you through the step-by-step process of hanging wind chimes, from selecting the perfect spot to enjoying the delightful sounds they produce.
Before you start, it’s important to note that the process may vary depending on the type of wind chimes you have and the structure of your porch. However, the general principles outlined in this guide will help you hang wind chimes safely and securely.
So, let’s dive in and discover how you can enhance your porch with the enchanting melodies of wind chimes!
Key Takeaways:
- Create a serene oasis on your porch by hanging wind chimes in the perfect spot, adjusting their placement, and immersing yourself in their soothing melodies for a relaxing outdoor experience.
- Transform your porch into a tranquil sanctuary with the enchanting sounds of wind chimes, embracing the gentle breeze and finding moments of reflection and relaxation amidst their soothing melodies.
Read more: How To Make Silverware Wind Chimes
Step 1: Select the Perfect Spot
The first step in hanging wind chimes on your porch is to choose the ideal location. Consider the following factors to determine the perfect spot:
- Wind Direction: Wind chimes produce soothing sounds when they catch the wind. Observe the prevailing wind direction on your porch to find an area that will allow the chimes to move freely and create pleasant melodies.
- Aesthetic Appeal: Think about the visual impact of the wind chimes. Choose a spot on your porch where the chimes will be visible and add to the overall aesthetic of the space. Consider how they will look against the backdrop of your porch décor.
- Proximity to Seating Areas: If you have an outdoor seating area on your porch or a favorite spot where you often relax, consider hanging the wind chimes nearby. This way, you can enjoy their soothing sounds while sitting comfortably.
Once you have selected the best spot for your wind chimes, move on to the next step:
Step 2: Gather the Necessary Tools and Materials
Before you begin hanging your wind chimes, make sure you have all the required tools and materials handy. Here’s a list of what you’ll need:
- Wind Chimes: Choose the wind chimes that you want to hang on your porch. Consider their material, size, and design to complement your outdoor space.
- Hanging Cord or Chain: You’ll need a strong and durable cord or chain to suspend the wind chimes. Nylon or stainless steel cords work well for outdoor use.
- Hooks or Brackets: Depending on the structure of your porch, you may need hooks or brackets to attach the wind chimes. Make sure they are sturdy and suitable for the weight of your wind chimes.
- Power Drill (if necessary): If you need to install hooks or brackets, you’ll need a power drill and the appropriate drill bits.
- Measuring Tape: To determine the length of the hanging cord, a measuring tape will come in handy.
- Pencil: Use a pencil to mark the placement of the hooks or brackets.
- Safety Gear: If you are using a power drill, remember to wear safety goggles and gloves to protect yourself.
Once you have gathered all the necessary tools and materials, you’re ready to move on to the next step of hanging your wind chimes on the porch.
Step 3: Determine the Length of the Hanging Cord
Now that you have gathered all the necessary tools and materials, it’s time to determine the length of the hanging cord for your wind chimes. Follow these steps:
- Measure the Distance: Use a measuring tape to measure the distance from the selected spot on your porch to where you want the wind chimes to hang. Take into account any obstructions or objects that the cord needs to wrap around.
- Add Extra Length: To allow for the desired height and movement of the wind chimes, add an extra 2-3 feet to the measured distance. This will ensure that the wind chimes can swing freely and create pleasing melodies.
- Cut the Cord: Using scissors or a sharp knife, cut the cord or chain to the determined length. Ensure that the cut is clean and there are no frayed edges.
Keep in mind that the length of the hanging cord may vary depending on personal preference and the specific design of your wind chimes. Experiment with different lengths to find the one that provides optimal sound and visual appeal.
Once you have determined the length of the hanging cord, you are ready to move on to the next step of attaching the cord to the wind chimes.
Step 4: Attach the Hanging Cord to the Chimes
With the length of the hanging cord determined, the next step is to attach it to your wind chimes. Follow these simple instructions:
- Inspect the Chimes: Before attaching the cord, inspect the wind chimes to ensure they are in proper condition. Check for any loose or damaged parts and make any necessary repairs.
- Locate the Hanging Loop: Look for the hanging loop or ring on the top of the wind chimes. This is where you will attach the cord.
- Thread the Cord through the Loop: Take one end of the hanging cord and thread it through the hanging loop or ring on the wind chimes. Make sure it is securely threaded to prevent the chimes from falling.
- Tie a Secure Knot: Once the cord is threaded through the loop, tie a secure knot at the end of the cord. This will ensure that the wind chimes are securely attached.
- Trim Any Excess Cord: If necessary, trim any excess cord to maintain a neat and tidy appearance.
Depending on the design of your wind chimes, they may have multiple strings or levels. Repeat the above steps for each string, making sure to maintain an even distribution and balance.
With the hanging cord securely attached to the wind chimes, you are ready to move on to the next step of actually hanging them on your porch.
Use a sturdy hook or nail to hang wind chimes on your porch, ensuring it is secure and can withstand the wind. Consider the direction of the prevailing wind to maximize the chimes’ soothing sounds.
Read more: How To Make DIY Wind Chimes At Home
Step 5: Hang the Wind Chimes on the Porch
Now that you have successfully attached the hanging cord to your wind chimes, it’s time to hang them on your porch. Follow these steps to ensure a secure and visually appealing installation:
- Locate the Hanging Spot: Go to the spot on your porch where you have decided to hang the wind chimes. Ensure that the chosen spot meets the criteria discussed in the first step (wind direction, aesthetic appeal, and proximity to seating areas).
- Prepare the Hooks or Brackets: If you are using hooks or brackets to hang the wind chimes, follow the manufacturer’s instructions to install them securely on your porch. Use a power drill and appropriate drill bits if necessary.
- Hang the Wind Chimes: Once the hooks or brackets are in place, take the end of the hanging cord and carefully hang it on the installed hook or bracket. Ensure that the cord is securely hooked to prevent the wind chimes from falling.
- Adjust the Height: Step back and assess the height of the wind chimes. Make any necessary adjustments to achieve your desired hanging height. Ensure that the wind chimes are not hanging too low to avoid potential obstructions or tripping hazards.
If your porch doesn’t have hooks or brackets, you can also consider other hanging methods such as using a sturdy tree branch, a pergola, or a specialized wind chime hanger.
Once the wind chimes are securely hung, it’s time for the next step: testing their placement and making any necessary adjustments.
Step 6: Test the Chimes’ Placement and Adjust if Needed
After hanging the wind chimes on your porch, it’s important to test their placement and make any necessary adjustments to ensure optimal sound and enjoyment. Follow these steps to fine-tune the positioning of your wind chimes:
- Step back and Listen: Take a few steps back from the wind chimes and listen to the sounds they produce. Pay attention to the volume and clarity of the chimes’ melodies.
- Observe the Movement: Observe how the wind chimes sway in the breeze. Ensure that they have enough space to move freely and create pleasant sounds without hitting any obstacles like walls, furniture, or plants.
- Experiment with Placement: If you’re not satisfied with the sound or movement of the wind chimes, try adjusting their placement. Move them slightly to different angles or positions to find the sweet spot that maximizes their musical charm.
- Consider the Surroundings: Also, take into account the surrounding elements on your porch. If there are large structures or objects that disrupt the flow of wind, you may need to adjust the wind chimes’ placement accordingly.
Remember, experimenting with the wind chimes’ placement is part of the fun! Take your time to find the perfect arrangement that provides both visual appeal and pleasant melodies.
Once you are satisfied with the placement and sound of the wind chimes, it’s time to relax and enjoy their soothing melodies on your porch.
Step 7: Enjoy the Relaxing Sounds of Your Wind Chimes
Congratulations! You have successfully hung your wind chimes on your porch. Now it’s time to sit back, relax, and enjoy the beautiful and relaxing sounds they create. Here are a few tips on how to fully immerse yourself in the soothing melodies:
- Find a Cozy Spot: Settle yourself in a comfortable chair or hammock on your porch, closest to the wind chimes. This will allow you to fully appreciate the gentle sounds they produce.
- Embrace the Breeze: Feel the gentle breeze as it passes through your porch, causing the wind chimes to come alive with melodious tunes. Take deep breaths and let the sounds and the fresh air calm your senses.
- Focus on the Chimes: As you listen to the wind chimes, try to focus your attention solely on the sounds they create. Let go of any distractions in your mind and allow yourself to be fully present in the moment.
- Create a Relaxing Environment: Enhance the relaxing experience by adding other elements to your porch, such as comfortable cushions, soft lighting, and aromatic plants. Transform your porch into a serene oasis where you can fully enjoy the wind chimes’ melodies.
- Take time for Reflection: Utilize the peaceful ambiance created by the wind chimes to engage in reflection, meditation, or simply to unwind from the stresses of the day. Allow the gentle melodies to transport you to a state of relaxation and tranquility.
Remember that wind chimes are not only decorative pieces but also tools for relaxation and mindfulness. Take the time to appreciate their melodies and embrace the sense of calm they bring to your outdoor space.
Now that you know how to hang wind chimes on your porch and fully enjoy their soothing sounds, you can continue to relish in their melodies for years to come.
Enjoy the serenity of your wind chimes and embrace the tranquility they bring to your porch!
Conclusion
Hanging wind chimes on your porch can transform your outdoor space into a peaceful and serene sanctuary. The gentle melodies created by the swaying chimes can help you relax, unwind, and reconnect with nature.
By following the step-by-step guide outlined in this article, you can easily hang wind chimes on your porch and enjoy their soothing sounds. From selecting the perfect spot to attaching the hanging cord and adjusting the placement, each step ensures a secure and visually appealing installation.
Remember to consider factors such as wind direction, aesthetic appeal, and proximity to seating areas when choosing the ideal spot for your wind chimes. Gather all the necessary tools and materials, determine the appropriate length of the hanging cord, and securely attach it to the wind chimes.
Hang the wind chimes on your porch, making necessary adjustments to optimize sound and movement. Take the time to sit back, relax, and immerse yourself in the enchanting melodies your wind chimes create.
Whether you’re enjoying a quiet moment alone, hosting friends and family, or simply sipping a warm cup of tea, the relaxing sounds of wind chimes will add a touch of tranquility to your outdoor space.
So go ahead, embrace the gentle breeze, and let the wind chimes transport you to a state of serenity. Enjoy the peaceful oasis you have created on your porch and savor the soothing melodies that fill the air.
Now that you've mastered hanging wind chimes, why not spruce up your deck for more serene outdoor sessions? Our guide on colorful decor and simple add-ons for outdoor living will give you all the savvy insights needed to transform your space into a relaxing retreat. Or maybe you're itching for a hands-on challenge? Dive into our discussion on the benefits of DIY projects and discover how taking on projects yourself adds a personal touch while saving money. Get ready, because your outdoor area is about to become the envy of the neighborhood!
Frequently Asked Questions about How To Hang Wind Chimes On Porch
Was this page helpful?
At Storables.com, we guarantee accurate and reliable information. Our content, validated by Expert Board Contributors, is crafted following stringent Editorial Policies. We're committed to providing you with well-researched, expert-backed insights for all your informational needs.


0 thoughts on “How To Hang Wind Chimes On Porch”