Articles
How To Install Turn Signal Mirrors
Modified: December 7, 2023
Learn how to install turn signal mirrors with our informative articles. Enhance your vehicle's safety and style with this simple DIY guide.
(Many of the links in this article redirect to a specific reviewed product. Your purchase of these products through affiliate links helps to generate commission for Storables.com, at no extra cost. Learn more)
Introduction
Installing turn signal mirrors is a simple and effective way to enhance the safety and functionality of your vehicle. These innovative mirrors not only provide a stylish upgrade to your car, but also serve as an extra precaution on the road, helping to improve visibility and alert other drivers of your intentions.
In this comprehensive guide, we will walk you through the step-by-step process of installing turn signal mirrors on your vehicle. Whether you are a seasoned DIY enthusiast or new to automotive modifications, these instructions will enable you to successfully complete the installation and enjoy the benefits of this valuable addition to your car.
Before we begin, let’s take a look at the tools and materials you will need for this project.
Key Takeaways:
- Enhance Safety and Style
Installing turn signal mirrors not only adds a stylish upgrade to your vehicle but also serves as an extra safety precaution, improving visibility and alerting other drivers of your intentions on the road. - Prioritize Safety and Preparation
Gathering the necessary tools, preparing the vehicle, and following safety precautions are crucial steps in successfully installing turn signal mirrors. Taking the time to prepare and ensure proper assembly and installation will result in a smooth and effective process.
Read more: How To Change Turn Signal Light Bulb
Tools and Materials Needed
Before you start installing your turn signal mirrors, it’s important to gather all the necessary tools and materials. Having everything ready beforehand will ensure a smooth and efficient installation process. Here are the tools and materials you’ll need:
- Turn Signal Mirror Kit: Make sure to purchase a high-quality turn signal mirror kit that is compatible with your vehicle make and model. It should include the necessary wiring harness, connectors, and mounting hardware.
- Basic Hand Tools: You will require a variety of basic hand tools, such as a socket set, screwdriver set, wire strippers, and pliers. These tools will be used for removing the existing mirrors and installing the new turn signal mirrors.
- Electrical Tape: Electrical tape will be used to secure and protect the wiring connections. Make sure to have enough tape to cover all the exposed wires.
- Safety Gear: It’s important to prioritize safety during the installation process. Wear safety glasses to protect your eyes and work gloves to prevent any injuries while handling tools and sharp edges.
- Electrical Test Light: An electrical test light will come in handy to check the wiring connections and ensure everything is properly installed and functioning.
- Vehicle Manual: Keep your vehicle manual handy for reference, as it may include specific instructions or precautions related to the electrical system or mirror installation.
Once you have gathered all the necessary tools and materials, you are ready to begin the installation process. In the next steps, we will guide you through the detailed process of installing your turn signal mirrors on your vehicle.
Step 1: Gather Necessary Equipment
Before you dive into the installation process, it’s crucial to gather all the necessary equipment and prepare your workspace. This will ensure a smooth and efficient installation without any interruptions. Here’s what you need to do:
- Read the Manuals: Start by carefully reading the instruction manuals that came with the turn signal mirror kit and your vehicle. Familiarize yourself with the installation process and any specific requirements or precautions.
- Clean Your Work Area: Find a well-lit and spacious area to work on your vehicle. Clear off any clutter and debris to create a clean and organized workspace. This will help prevent any accidental damage or loss of small components during the installation process.
- Organize the Equipment: Lay out all the tools and materials you gathered in the previous step. Sort them in an orderly manner, making it easier to access what you need during each stage of the installation.
- Check Compatibility: Double-check that the turn signal mirror kit is compatible with your vehicle make and model. Look for any specific requirements or restrictions mentioned in the instruction manual.
- Inspect the Mirrors: Examine the turn signal mirrors for any signs of damage or defects. Ensure that all the necessary components, such as the mirror housing, LED lights, and wiring harness, are intact and in good condition.
- Verify Wiring Compatibility: If your vehicle already has existing wiring for turn signal mirrors, ensure that it matches the connectors provided in the turn signal mirror kit. If they don’t match, you may need to purchase additional adapters or seek professional assistance.
- Get Familiar with Vehicle Wiring: If you’re not already familiar with the electrical system of your vehicle, take some time to understand its layout and wiring. This knowledge will be helpful when connecting the turn signal mirrors to the vehicle’s electrical system.
Gathering the necessary equipment and setting up your workspace properly will enable a smooth and hassle-free installation process. Once you have completed this step, you’re ready to move on to the next stage: preparing your vehicle for the turn signal mirror installation.
Step 2: Prepare the Vehicle
Before you start installing the turn signal mirrors, it’s essential to prepare your vehicle to ensure a successful and hassle-free installation. Follow these steps to prepare your vehicle:
- Park in a Safe and Well-Lit Area: Find a safe, well-lit area to park your vehicle. This will provide you with ample space and visibility to work on the installation process.
- Turn Off the Ignition: Turn off the ignition and remove the key from the ignition switch. This will prevent any accidental starting of the vehicle during the installation process.
- Engage the Parking Brake: Engage the parking brake to ensure that your vehicle remains stationary and secure throughout the installation process.
- Disconnect the Negative Battery Terminal: Locate the negative (-) battery terminal, usually marked with a minus sign. Use a wrench or socket to loosen and remove the terminal nut. Once the nut is removed, carefully disconnect the negative battery cable and set it aside. This will prevent any electrical surges or short circuits during the installation.
- Wait for Electrical Discharge: After disconnecting the battery, wait for at least 15 minutes. This will allow any residual electrical charge to dissipate and ensure your safety when working with the electrical components of your vehicle.
- Remove Obstacles: Look around your vehicle and remove any obstacles that may hinder the installation process. Make sure there is easy access to the mirrors and other areas where the installation will take place.
- Inspect and Clean the Mirror Mounting Area: Check the mirror mounting area for any dirt, debris, or damage. Clean the surface using a mild cleanser or glass cleaner and a soft cloth. Ensure that the mounting area is free of any residue that could affect the adhesion of the turn signal mirrors.
By properly preparing your vehicle, you create a safe and conducive environment for the installation of the turn signal mirrors. Taking the time to complete this step will result in a smoother and more successful installation process. Now that your vehicle is ready, you can move on to the next step: disconnecting the battery.
Step 3: Disconnect the Battery
Disconnecting the battery is a crucial step in the installation process to ensure your safety and protect the electrical components of your vehicle. Follow these steps to disconnect the battery:
- Locate the Battery: Open the hood of the vehicle and locate the battery. It is usually located in the engine compartment, towards the front of the vehicle.
- Identify the Negative Terminal: Identify the negative (-) terminal of the battery. It is typically marked with a minus sign and is usually black in color.
- Loosen the Terminal Nut: Use a wrench or socket to loosen and remove the terminal nut from the negative terminal. Turn the nut counterclockwise to loosen it, and then carefully lift the negative battery cable off the terminal.
- Safely Position the Cable: Once the negative battery cable is disconnected, safely position it away from the battery and any metal parts of the vehicle. This will prevent any accidental contact that could result in electrical shocks or short circuits.
- Secure the Cable: To ensure that the negative battery cable doesn’t accidentally reconnect during the installation process, you can secure it using a zip tie or tape. Make sure it is securely fastened and won’t interfere with your workspace.
By disconnecting the battery, you eliminate the risk of electrical shock and protect the sensitive electrical components of your vehicle. Always remember to follow safety precautions when handling the battery and keep it clear of any metal objects or flammable materials. With the battery safely disconnected, you’re ready to move on to the next step: removing the existing mirrors.
Read more: How To Turn Glass Into A Mirror
Step 4: Remove the Existing Mirrors
In this step, we will guide you through the process of removing the existing mirrors from your vehicle. Follow these steps to successfully remove the mirrors:
- Identify the Mirror Mounting Points: Carefully examine the mirror housing and locate the mounting points. These are usually small screws or bolts that secure the mirror to the vehicle. Note the position and number of mounting points for each mirror.
- Remove the Mounting Screws or Bolts: Using the appropriate socket or screwdriver, begin removing the mounting screws or bolts from each mirror. Start with one mirror at a time. Turn the screws or bolts counterclockwise to loosen them and then remove them fully.
- Support the Mirror: As you remove the mounting screws or bolts, make sure to support the mirror with your other hand to prevent it from falling or causing damage.
- Gently Pry the Mirror Off: Once the mounting screws or bolts are removed, gently pry the mirror off the vehicle. Be careful not to use excessive force or apply pressure in a way that could damage the mirror housing or surrounding trim.
- Disconnect Electrical Connections (if applicable): If your existing mirrors have any electrical connections, such as power cables or heating elements, locate the connector and carefully disconnect it. Some connectors may require you to press a release tab or squeeze the sides to detach them.
- Set Aside the Removed Mirrors: Place the removed mirrors in a safe location, away from your workspace, to prevent any accidental damage. You may want to wrap them in a soft cloth or bubble wrap to protect them from scratches or other potential harm.
- Repeat for the Other Side: Repeat the above steps for the other side of the vehicle, removing the mounting screws or bolts and disconnecting any electrical connections. Take your time and exercise caution throughout the process.
By following these steps, you will successfully remove the existing mirrors from your vehicle. Remember to keep the mounting screws or bolts and any electrical connectors in a safe place as you will need them later. With the existing mirrors removed, you are now ready to proceed to the next step: assembling the turn signal mirrors.
When installing turn signal mirrors, make sure to carefully follow the manufacturer’s instructions and use the appropriate tools for a secure and proper installation.
Step 5: Assemble the Turn Signal Mirrors
Before you install the turn signal mirrors on your vehicle, it’s important to properly assemble them. Follow these steps to assemble the turn signal mirrors:
- Unpack the Turn Signal Mirror Kit: Open the packaging of your turn signal mirror kit and take out all the components. Check that you have all the necessary parts, including the mirror housing, LED lights, wiring harness, and any additional mounting hardware.
- Attach the LED Lights: Carefully attach the LED lights to the mirror housing according to the instructions provided in the kit. The lights are usually positioned along the outer edge of the mirror and may require securing with screws or adhesive.
- Connect the Wiring Harness: Take the wiring harness provided in the kit and connect it to the LED lights. Ensure that the connectors match and securely fasten them together. Follow any specific instructions in the kit regarding the wiring connections.
- Secure the Wiring: Once the connectors are successfully connected, secure the wiring along the mirror housing using zip ties or adhesive clips. This will help prevent any loose wiring that could interfere with the installation or become damaged in the future.
- Double-Check the Assembly: Before proceeding to the installation, double-check that all the components are properly assembled and securely attached. Make sure the LED lights are aligned and functional, and the wiring is neat and organized.
By carefully following these steps, you will successfully assemble the turn signal mirrors. Take your time and ensure that all the components are securely connected and in working order. With the turn signal mirrors properly assembled, you are now ready to move on to the next step: installing the turn signal mirrors on your vehicle.
Step 6: Install the Turn Signal Mirrors
Now that you have assembled the turn signal mirrors, it’s time to install them onto your vehicle. Follow these steps to successfully install the turn signal mirrors:
- Position the Turn Signal Mirrors: Carefully position the turn signal mirrors onto the mirror mounting points on your vehicle. Ensure that they are aligned properly and seated securely.
- Insert the Mounting Screws or Bolts: Take the mounting screws or bolts that you removed earlier from the existing mirrors and insert them through the holes in the turn signal mirrors. Align the holes on the mirror housing with the corresponding holes on the vehicle.
- Tighten the Mounting Screws or Bolts: Using the appropriate socket or screwdriver, tighten the mounting screws or bolts clockwise. Ensure that they are snug but not overly tightened, as this could damage the mirror housing or strip the threads.
- Connect the Electrical Connections: If your turn signal mirrors have any electrical connections, such as power cables or integrated turn signal wires, carefully connect them to the corresponding vehicle wiring. Follow the instructions provided in the turn signal mirror kit to ensure proper connection.
- Secure the Wiring: Once the electrical connections are made, secure the wiring along the vehicle’s mirror mounting area using zip ties or adhesive clips. This will prevent any loose wiring that could interfere with the mirrors’ functionality or become damaged while driving.
- Double-Check the Installation: Step back and visually inspect the installed turn signal mirrors. Ensure that they are securely attached, aligned properly, and the wiring is properly organized. Make any necessary adjustments if needed.
By following these steps, you will successfully install the turn signal mirrors onto your vehicle. Take your time and ensure that all connections are secure and the mirrors are properly aligned. Once the turn signal mirrors are installed, you are ready to move on to the next step: reconnecting the battery.
Step 7: Reconnect the Battery
Now that you have successfully installed the turn signal mirrors, it’s time to reconnect the battery to your vehicle. Follow these steps to safely reconnect the battery:
- Locate the Battery: Open the hood of your vehicle and locate the battery. It is usually positioned in the engine compartment, towards the front of the vehicle.
- Identify the Negative Terminal: Identify the negative (-) terminal of the battery. It is typically marked with a minus sign and is usually black in color.
- Position the Negative Battery Cable: Take the negative battery cable and position it near the negative terminal of the battery. Ensure that there is no tension or strain on the cable.
- Connect the Negative Battery Cable: Carefully place the negative battery cable onto the negative terminal of the battery. Line up the terminal and cable connector, and then hand-tighten the terminal nut clockwise to secure the connection.
- Tighten the Terminal Nut: Using a wrench or socket, tighten the terminal nut on the negative battery terminal. Ensure that it is securely fastened, but be cautious not to overtighten and damage the terminal or cable.
By following these steps, you will successfully reconnect the battery to your vehicle. Ensure that the negative battery cable is securely attached to the negative terminal, and there is no loose connection. With the battery reconnected, you are ready to move on to the final step: testing the turn signal mirrors.
Read more: How To Install Fender Mirrors
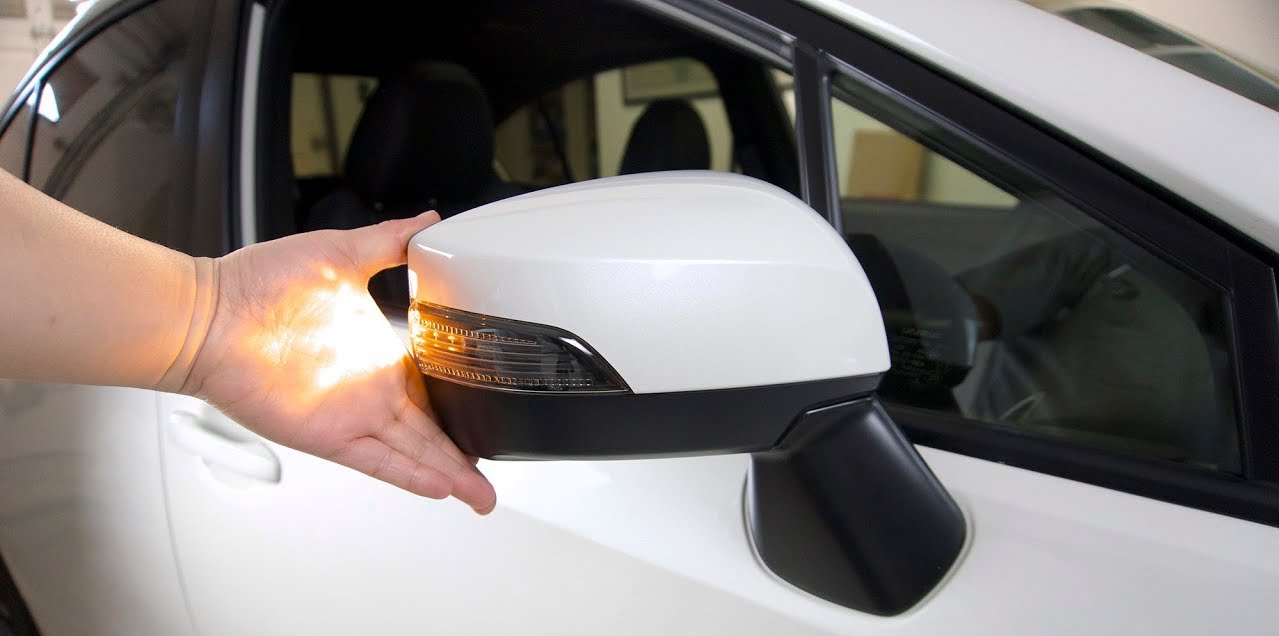
Step 8: Test the Turn Signal Mirrors
After installing the turn signal mirrors and reconnecting the battery, it’s crucial to test their functionality to ensure they are working correctly. Follow these steps to test the turn signal mirrors:
- Start the Vehicle: Start the engine of your vehicle and allow it to idle. Ensure that the turn signal lever is in the neutral position.
- Activate the Turn Signals: Activate the turn signals by using the turn signal lever. Make sure to engage both the left and right turn signals separately.
- Observe the Turn Signal Mirrors: As you activate the turn signals, carefully observe the turn signal mirrors. They should illuminate with a blinking or flashing light corresponding to the direction you’ve indicated.
- Check the Functionality: Monitor the turn signal mirrors closely to ensure that they function properly. Verify that the LED lights are bright, visible from all angles, and synchronized with the vehicle’s turn signal indicators.
- Test Other Functions (if applicable): If your turn signal mirrors have additional features, such as heating elements or power adjustments, test them to ensure they are functioning as intended.
- Perform a Visual Inspection: After testing the turn signal mirrors, visually inspect the overall appearance and functionality. Verify that the mirrors are securely attached, aligned properly, and there are no issues or abnormalities with the turn signal lights.
By following these steps, you will be able to test the turn signal mirrors and confirm their proper functionality on your vehicle. If you notice any issues or abnormalities during the testing process, double-check the wiring connections and consult the turn signal mirror’s instruction manual for troubleshooting steps.
With the turn signal mirrors successfully installed, tested, and functioning correctly, you can now enjoy the enhanced safety and functionality they provide during your journeys on the road.
Conclusion
Congratulations! You have successfully installed turn signal mirrors on your vehicle, enhancing both its style and safety. The installation process involved gathering the necessary tools and materials, preparing the vehicle, disconnecting the battery, removing the existing mirrors, assembling the turn signal mirrors, installing them, reconnecting the battery, and finally, testing their functionality.
By following the step-by-step instructions in this guide, you have taken an important step towards improving your driving experience. Turn signal mirrors not only provide an aesthetic upgrade to your vehicle, but they also serve as an additional safety feature, alerting other drivers to your intentions while on the road.
Remember, safety should always be a top priority during installation. Take your time, follow the instructions carefully, and ensure that all connections are properly secured. If you encounter any difficulties or are unsure about any part of the installation process, don’t hesitate to seek professional assistance.
After successfully installing the turn signal mirrors, take the time to appreciate the newfound functionality they offer. Enjoy the convenience and peace of mind that comes with having improved visibility and enhanced safety features on your vehicle.
Regularly inspect and maintain your turn signal mirrors to ensure they continue to function optimally. Clean and check the wiring connections periodically and be mindful of any signs of wear or damage. If you notice any issues, promptly address them to ensure your turn signal mirrors remain in good working condition.
With the installation complete, you can hit the road with confidence, knowing that your vehicle is equipped with turn signal mirrors that not only look great but also help keep you safe. Safe travels!
Frequently Asked Questions about How To Install Turn Signal Mirrors
Was this page helpful?
At Storables.com, we guarantee accurate and reliable information. Our content, validated by Expert Board Contributors, is crafted following stringent Editorial Policies. We're committed to providing you with well-researched, expert-backed insights for all your informational needs.


0 thoughts on “How To Install Turn Signal Mirrors”