Articles
How To Machine Quilt With A Walking Foot
Modified: February 24, 2024
Discover helpful articles on how to machine quilt with a walking foot and achieve beautiful results. Enhance your quilting skills with expert tips and techniques.
(Many of the links in this article redirect to a specific reviewed product. Your purchase of these products through affiliate links helps to generate commission for Storables.com, at no extra cost. Learn more)
Introduction
Quilting is a beloved craft that allows us to create beautiful and functional pieces that can be cherished for generations. There are several different methods of quilting, and one popular technique is machine quilting. Machine quilting allows for faster and more precise quilting, making it an attractive option for quilters of all skill levels.
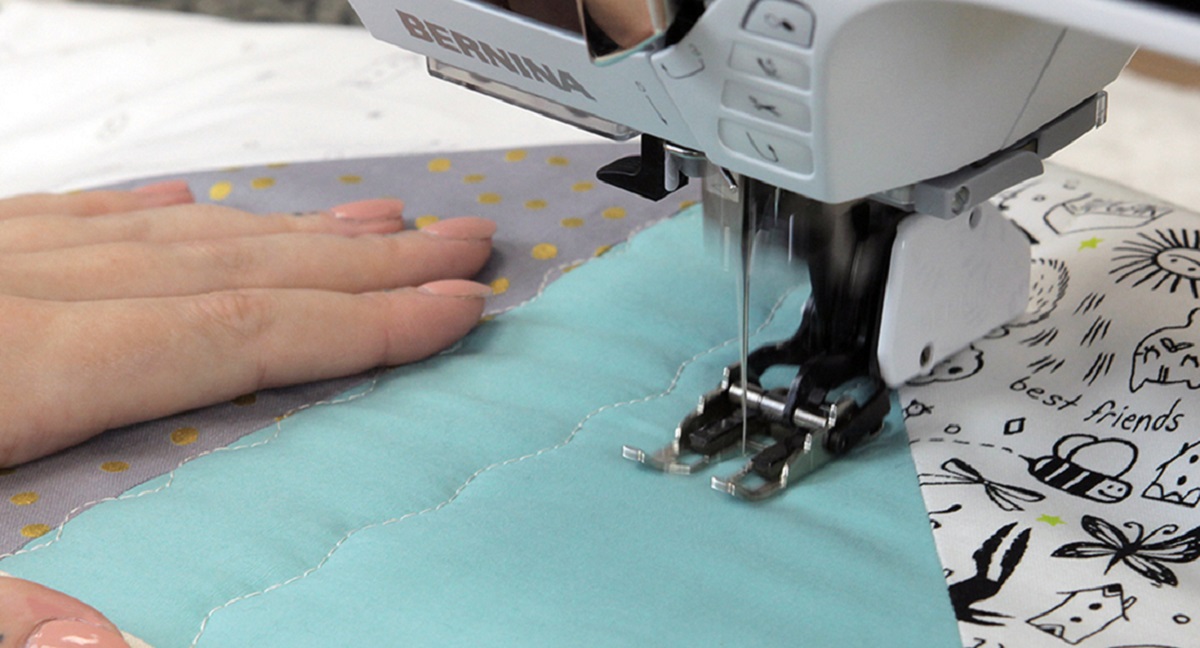
When it comes to machine quilting, using a walking foot can make a world of difference. A walking foot, also known as an even feed foot, is a specialized sewing machine foot that evenly feeds layers of fabric through the machine. Unlike a regular sewing machine foot, which only feeds the bottom layer of fabric, a walking foot feeds both the top and bottom layers simultaneously. This results in more even and professional-looking stitches, with reduced puckering and fabric shifting.
In this article, we will explore the benefits of using a walking foot for machine quilting, as well as provide step-by-step instructions on how to set up and use a walking foot for your quilting projects. We will also cover various machine quilting techniques that can be easily accomplished using a walking foot. Whether you are a beginner or an experienced quilter, this article will help you take your machine quilting skills to the next level.
Key Takeaways:
- Mastering machine quilting with a walking foot opens up a world of possibilities for creating stunning designs and textures on quilts, offering benefits for quilters of all skill levels.
- Proper preparation, selection of the right thread and needles, and troubleshooting common issues are essential for achieving professional and consistent machine quilting results with a walking foot.
What is a Walking Foot?
A walking foot, also known as an even feed foot, is a specialized sewing machine foot designed to facilitate smooth and even fabric feeding during the sewing process. It is particularly useful for quilting, as it helps to prevent the layers of fabric from shifting and puckering, resulting in more precise and professional-looking stitches.
The walking foot gets its name from the way it works. The foot has built-in feed dogs that interact with the machine’s regular feed dogs. When the machine is in use, the feed dogs move the bottom layer of fabric forward, while the walking foot’s upper feed mechanism ensures that the top layer of fabric moves in perfect sync with the bottom layer. This synchronized movement helps to prevent uneven tension and fabric distortion, resulting in smooth and even stitches.
Walking foots usually have a set of feed dogs on top of the foot that can be adjusted to match the feed dogs on the sewing machine. The foot also has a fork-like attachment at the front that grasps the fabric layers and helps to guide them through the machine. Some walking feet also come with a guide bar that can be adjusted to control the distance between rows of stitching or to help create evenly spaced quilting designs.
Walking feet are available for most sewing machine brands and models, either as a built-in feature or as an attachment that can be added to the machine. It is important to check the compatibility of the walking foot with your specific sewing machine before making a purchase.
Overall, a walking foot is a valuable tool for machine quilting, as it provides stability and control, resulting in more professional and consistent stitches. It is especially useful when working with multiple layers of fabric, such as when quilting a quilt sandwich, as it helps to prevent fabric shifting and improves stitch quality.
Benefits of Using a Walking Foot
Using a walking foot for machine quilting offers several benefits that make it a valuable tool for quilters of all skill levels. Let’s explore some of the advantages of using a walking foot:
- Even Fabric Feeding: One of the primary benefits of using a walking foot is the ability to feed both the top and bottom layers of fabric evenly. The walking foot’s synchronized feed mechanism prevents fabric shifting and puckering, resulting in smooth and even stitches throughout your quilt.
- Reduced Fabric Stretching: When quilting multiple layers of fabric, such as a quilt sandwich, it’s common for the layers to stretch or shift as you sew. The walking foot’s steady and consistent feeding action helps to minimize fabric stretching, ensuring your quilt stays flat and square.
- Improved Stitch Quality: The even feeding provided by the walking foot helps to improve the overall stitch quality of your machine quilting. The stitches will be more consistent in length and tension, giving your quilts a professional finish.
- Quilting Thick or Bulky Fabrics: Whether you’re working with thick batting or quilting through multiple layers of fabric, a walking foot can handle the challenge. The foot’s ample clearance and accurate feeding mechanism ensure that you can quilt through thick and bulky materials with ease.
- Easy Straight Line Quilting: If you’re new to machine quilting, using a walking foot makes straight line quilting a breeze. The walking foot acts as a guide, keeping your lines straight and evenly spaced. This is particularly helpful when quilting borders, sashing, or creating geometric designs.
- More Control and Precision: The walking foot provides greater control and precision over the movement of your quilt. This is especially beneficial when quilting intricate patterns or stitching in the ditch, as the walking foot helps to maintain accuracy and prevent the fabric layers from shifting.
- Versatility: While the walking foot is commonly associated with machine quilting, it can also be used for other sewing projects. It is useful for sewing on binding, attaching piping, working with slippery or stretchy fabrics, and more. The walking foot’s even feeding mechanism offers benefits beyond quilting alone.
By utilizing a walking foot for your machine quilting, you can achieve consistent stitches, prevent fabric distortion, and have more control over the quilting process. It is a worthwhile investment that can significantly enhance the quality of your quilts and make your quilting journey more enjoyable.
Set Up and Preparation
Before you start machine quilting with a walking foot, it’s important to properly set up and prepare your sewing machine and quilting workspace. Follow these steps to ensure a smooth and successful quilting experience:
- Clean and Oil Your Machine: Begin by cleaning and oiling your sewing machine according to the manufacturer’s instructions. A well-maintained machine will operate smoothly and reliably during the quilting process.
- Select the Right Walking Foot: Ensure that you have the correct walking foot for your specific sewing machine. Walking feet are available in different sizes and styles, so choose one that is compatible with your machine’s make and model.
- Attach the Walking Foot: Follow the instructions provided with your walking foot to attach it securely to your sewing machine. Most walking feet can be easily attached by snapping or screwing them onto the machine’s presser foot holder.
- Prepare Your Quilt Sandwich: Layer your quilt top, batting, and backing fabric together to create a quilt sandwich. Smooth out any wrinkles and baste the layers together by using pins, spray adhesive, or hand basting. This will prevent the layers from shifting as you quilt.
- Thread and Prepare Your Machine: Choose a high-quality quilting thread that complements your fabric and thread it onto your machine. Set your machine to a straight stitch or the desired quilting stitch pattern. Adjust the stitch length and tension as required, following the machine’s manual guidelines.
- Prepare Your Quilting Workspace: Clear a large and flat space for quilting. Ensure that you have enough room to maneuver your quilt and that there are no obstructions that could interfere with the quilting process. Consider using a large quilting table or a specialized quilting extension table to support your quilt.
- Position Your Quilt: Place your quilt on the quilting workspace, ensuring that all layers are smooth and wrinkle-free. Position the part of the quilt you want to start quilting within easy reach of the sewing machine needle.
With your sewing machine and quilting workspace set up and prepared, you are now ready to begin machine quilting with your walking foot. Follow the specific quilting techniques and tips that we will explore in the subsequent sections to achieve stunning quilted designs!
Choosing the Right Thread and Needles
When it comes to machine quilting with a walking foot, selecting the right thread and needles is crucial for achieving optimal results. The type of thread and needles you choose can impact the overall look and durability of your quilting stitches. Here are some factors to consider when choosing the right thread and needles:
- Thread Weight: The weight of the thread refers to its thickness. For machine quilting, it’s recommended to use a medium to heavy-weight thread, typically ranging from 30 to 40 weight. Thicker threads create more visible and defined quilting stitches.
- Thread Type: There are various types of threads available for quilting, such as cotton, polyester, silk, and nylon. Cotton threads are popular for their natural fiber and ability to blend well with cotton fabrics. Polyester threads offer strength and durability, making them suitable for high-traffic items like quilts and bags. Experiment with different thread types to find the one that works best for your project.
- Needle Size: Choosing the correct needle size is essential to ensure smooth and even stitching. For machine quilting, use a needle specifically designed for quilting, such as a quilting needle or topstitching needle. These needles have a sharp point and a larger eye, allowing them to penetrate through multiple layers of fabric without causing damage. A size 80/12 needle is a common choice for machine quilting.
- Thread Color: The color of the thread should complement your fabric and enhance the overall aesthetic of your quilt. You can select a thread color that matches the fabric for a subtle effect or choose a contrasting thread color to make the quilting stitches more visible. Consider experimenting with different thread colors to achieve the desired look.
- Tension Adjustment: When switching to a heavier-weight thread, it may be necessary to adjust the tension of your machine. Heavier threads may require slightly looser tension to prevent thread breakage and ensure smooth stitching. Refer to your sewing machine’s manual for instructions on how to adjust the tension correctly.
- Preventative Maintenance: As you quilt, it is important to regularly clean your machine and remove any lint or thread build-up, as it can affect the performance of your needle. This will help prevent the needle from getting scratched or damaged and ensure smooth quilting stitches.
Remember, the right combination of thread and needles will depend on your specific project and personal preferences. Don’t be afraid to experiment and try different combinations to find what works best for you. By choosing the right thread and needles, you can enhance the overall quality and visual appeal of your machine quilting.
Read more: Top Of Foot Pain When Walking Down Stairs
Marking the Quilt Design
Before you start machine quilting with a walking foot, it’s helpful to mark the design on your quilt top. Marking helps provide guidelines for your stitching, ensuring accuracy and consistency throughout the quilting process. Here are some methods and tools you can use to mark your quilt design:
- Chalk or Fabric Pencils: Chalk or fabric pencils are a popular choice for marking quilting designs. They come in various colors and can be easily wiped away or washed off after quilting. Test the marking tools on a scrap piece of fabric to ensure that they won’t leave any residue or damage the fabric.
- Water-Soluble Markers: Water-soluble markers can be used to draw temporary guidelines on your quilt top. The ink will disappear when it comes into contact with water or when the fabric is washed. It is important to ensure that the marker is completely dry before quilting to prevent any smudging or bleeding.
- Quilting Stencils and Templates: Quilting stencils and templates are pre-designed patterns that can be traced onto your quilt top. They come in a wide range of shapes and designs, allowing you to create intricate and consistent quilting motifs. Simply place the stencil or template on the fabric and mark the design with a suitable marking tool.
- Tape or Masking Tape: Tape can be used to create straight or curved lines on your quilt top. Simply apply the tape to the fabric and use it as a guide for your quilting stitches. Masking tape is a great option as it is easy to remove and leaves no residue. Be cautious not to stretch or distort the fabric when applying the tape.
- Freehand Marking: If you prefer a more organic or improvisational approach, you can opt for freehand marking. This involves drawing or sketching the quilting design directly on the fabric using a marker or pencil. Freehand marking allows for greater flexibility and creativity in your quilting motifs.
When marking your quilt design, consider the overall layout of your quilt and the specific quilting motifs you plan to use. Take into account the size and density of the design elements, as well as any borders or blocks that may require specific marking techniques.
Always mark your quilt design lightly and test the marking tools on a scrap piece of fabric before applying them to your quilt top. This will help you determine the visibility and ease of removal of the markings.
Remember, when using a walking foot, the marked lines will serve as your stitching guidelines. Take your time to accurately mark the design, as it will greatly contribute to the final outcome of your quilted project. With the quilt design marked and ready, you can now move on to various machine quilting techniques using your walking foot.
Basic Machine Quilting Techniques
Machine quilting with a walking foot opens up a world of possibilities for creating beautiful and intricate designs on your quilts. Whether you are a beginner or an experienced quilter, mastering the basic machine quilting techniques will lay the foundation for more complex and advanced quilting projects. Here are some essential techniques to get you started:
- Straight Line Quilting: Straight line quilting is one of the most common and versatile techniques. It involves stitching parallel lines across the quilt top, either vertically, horizontally, or diagonally. Use a ruler or masking tape as a guide to maintain even spacing between the lines. Straight line quilting is ideal for creating a clean and modern look.
- Stitch in the Ditch Quilting: This technique involves stitching along the seams (ditches) between the quilt blocks or pieces. Stitching in the ditch helps to secure the layers of the quilt and emphasize the block designs. Use the walking foot to follow the seam lines, ensuring that your stitches are precisely positioned in the ditch.
- Gentle Curves Quilting: Gentle curve quilting is a technique that adds flow and softness to your quilts. It involves quilting gentle curves or wavy lines across the quilt top. Start with broad curves and gradually decrease the curve size for a more intricate look. The walking foot helps maintain smooth and consistent curves.
- Echo Quilting: Echo quilting is a technique where you quilt parallel lines around a particular shape or motif. These lines are stitched at regular intervals, creating a series of echoes. Echo quilting adds depth and texture to your quilt while highlighting specific areas or designs.
- Quilting Diagonal Lines: Quilting diagonal lines is another versatile technique that can add visual interest to your quilt. Stitching diagonal lines across the quilt top creates a dynamic and modern look. Use masking tape or a ruler as a guide to ensure consistent spacing and angle between the lines.
- Quilting Parallel Lines: Parallel line quilting involves stitching rows of evenly spaced parallel lines across the quilt top. This technique is ideal for creating geometric quilt designs or emphasizing certain areas of the quilt. Again, use a ruler or masking tape as a guide to maintain accuracy and spacing between the lines.
- Quilting Angular Lines: Angular line quilting involves stitching lines at various angles across the quilt top. This technique adds movement and interest to your quilts. Experiment with different angles and intersections to create unique quilting patterns. The walking foot ensures smooth and controlled stitching along the angled lines.
Remember to practice these quilting techniques on scrap fabric or quilt sandwiches before working on your actual quilt. This will help you become familiar with the movements, speed, and tension adjustments required for each technique. Take your time and enjoy the process of transforming your quilt top into a beautifully quilted masterpiece!
Straight Line Quilting
Straight line quilting is a versatile and popular technique that can add a clean and modern look to your quilts. This technique involves stitching parallel lines across the quilt top, either vertically, horizontally, or diagonally. With a walking foot, you can achieve precise and evenly spaced straight lines with ease. Here are some steps to help you master straight line quilting:
- Prepare Your Quilt: Ensure that your quilt top, batting, and backing are properly layered, basted, and ready for quilting. Smooth out any wrinkles or puckers to create a flat surface for stitching.
- Mark Your Quilt: If you prefer, you can mark your quilt top with guidelines to follow while quilting. Use a ruler or masking tape to mark parallel lines, maintaining consistent spacing between them. Make sure your markings are light and easily removable.
- Attach Your Walking Foot: Before you begin, attach the walking foot to your sewing machine according to the manufacturer’s instructions. Ensure that it is securely in place and properly aligned with the machine’s feed dogs.
- Select the Right Stitch and Thread: Choose a straight stitch on your machine to achieve the clean lines of straight line quilting. Thread your machine with a medium to heavy-weight quilting thread that complements your fabric and desired quilt design.
- Start Stitching: Begin stitching along the marked lines, starting in the center of your quilt and working your way outwards. Take your time to ensure accuracy and maintain a consistent pace while stitching.
- Use Guides and Techniques: You can use guides like rulers or masking tape to help you keep your lines straight and evenly spaced. Place the edge of the foot against these guides for precise stitching. You can also engage the seam guides on your walking foot, if available, to maintain consistent spacing.
- Reverse Stitch at the Beginning and End: To secure your stitches, be sure to backstitch or use the reverse stitch function at the beginning and end of each line. This will prevent unraveling and ensure a strong, durable seam.
- Maintain Even Tension: Pay attention to the tension of your machine as you quilt. The quilting stitches should not be too tight or too loose. Adjust the tension as needed to achieve balanced and even stitches.
- Continue Stitching: Repeat the process, stitching parallel lines across the entire quilt top. Take breaks as needed to rest your hands and maintain your focus. Remember to adjust the markings or guides as you progress to maintain consistency throughout your quilting.
- Finish and Secure Your Quilting: Once you have completed all the straight line quilting, be sure to secure your stitching at the beginning and end of the last line. Trim any loose threads and give your quilt top a final press to smooth out any wrinkles or creases.
Straight line quilting is a great technique for showcasing the design of your quilt blocks or creating a grid-like pattern. It adds texture and dimension to your quilts while keeping the overall look clean and sophisticated. With practice and patience, you can achieve beautifully straight lines that will enhance the visual appeal of your quilted projects.
When machine quilting with a walking foot, use a quilting guide to help maintain consistent spacing between rows of stitching for a professional finish.
Stitch in the Ditch Quilting
Stitch in the ditch quilting is a technique commonly used to secure the layers of a quilt and highlight the block designs. It involves stitching along the seams (ditches) between the quilt blocks or pieces, creating a subtle and clean quilting effect. With a walking foot, you can achieve precise stitching right in the seam lines. Here’s how to master stitch in the ditch quilting:
- Prepare Your Quilt: Ensure that your quilt layers – top, batting, and backing – are properly basted together, making a quilt sandwich. Smooth out any wrinkles or puckers to create a flat surface for quilting.
- Attach Your Walking Foot: Before you begin, attach the walking foot to your sewing machine. Make sure it is securely in place and properly aligned with the machine’s feed dogs.
- Select the Right Stitch and Thread: Choose a straight stitch on your machine and thread it with a medium-weight quilting thread that matches the color of the fabric or blends well with it. This will allow your stitches to seamlessly blend into the seams.
- Start Stitching: Begin stitching along the seams between the quilt blocks, starting in the center of your quilt and working your way outwards. Place the edge of the walking foot against the seam line, allowing the foot’s guide to follow the seam as you sew.
- Keep a Slow and Steady Pace: Stitching in the ditch requires careful precision. Maintain a slow and steady pace, being mindful of maintaining a consistent distance from the seam as you sew. Take your time to ensure accuracy in your stitching.
- Backstitch at the Beginning and End: To secure your stitches and prevent unraveling, perform a few backstitches or use the reverse stitch function at the beginning and end of each stitched line.
- Adjust the Stitch Length and Tension: Test the appropriate stitch length and tension on a scrap fabric to ensure that your stitches are neither too tight nor too loose. Adjust the settings as needed to achieve a balanced and even stitch.
- Continue Stitching In the Ditch: Repeat the process, stitching in the ditch along all the seams of your quilt blocks. As you reach intersections or corners, carefully guide the fabric to maintain alignment with the seam lines.
- Handle Bulky Intersections: If you encounter bulky intersections where multiple seams meet, consider slightly angling or easing your walking foot over the thickness. This will help prevent uneven feeding and ensure smooth stitching.
- Finish and Secure Your Quilting: Once you have completed stitching in the ditch along all the seams, backstitch or use a securing technique to secure the stitching at the beginning and end of the last line. Trim any loose threads and give your quilt top a final press to smooth out any wrinkles or creases.
Stitch in the ditch quilting is an effective and versatile technique that provides stability to your quilt while accentuating the block designs. It gives a clean and professional finish to your quilting project. With practice and attention to detail, you can master the art of stitch in the ditch quilting using a walking foot.
Read more: How To Wash A Quilt In A Washing Machine
Gentle Curves Quilting
Gentle curves quilting is a technique used to add flow and softness to your quilts. It involves quilting gentle curves or wavy lines across the quilt top, creating an organic and pleasing aesthetic. With the help of a walking foot, you can achieve smooth and controlled curves. Here’s a step-by-step guide to mastering gentle curves quilting:
- Prepare Your Quilt: Ensure that your quilt layers – the top, batting, and backing – are properly basted together, creating a quilt sandwich. Smooth out any wrinkles or puckers to provide a flat surface for quilting.
- Attach Your Walking Foot: Before you begin, attach the walking foot to your sewing machine. Make sure it is securely in place and properly aligned with the machine’s feed dogs.
- Select the Right Stitch and Thread: Choose a straight stitch or a slightly elongated stitch on your machine, depending on the look you want to achieve. Thread your machine with a medium-weight quilting thread that complements your fabric and desired quilt design.
- Start Stitching: Begin stitching by quilting gentle curves or wavy lines across the quilt top. Start with broad curves and progressively decrease the curve size for a more intricate and organic look. The walking foot will help you maintain even and precise stitching as you follow the curves.
- Keep a Steady Pace: Stitch with a steady and consistent pace, allowing the foot to guide the fabric smoothly through the machine. Take your time and focus on maintaining the shape of the curves as you quilt.
- Practice on Scrap Fabric: Before you start quilting the actual quilt, practice stitching gentle curves on scrap fabric to get a feel for the movements and to test the tension and stitch length. This will help you gain confidence and improve your control over the curves.
- Backstitch or Secure at the Beginning and End: To secure your stitches, backstitch or use the reverse stitch function at the beginning and end of each line of quilting. This will prevent unraveling and ensure a strong, durable seam.
- Experiment with Pattern Variations: Feel free to vary the width and spacing of your curves or combine them with other quilting motifs to create unique designs. Play with different patterns and densities to add visual interest to your quilt.
- Continue Quilting: Repeat the process, stitching gentle curves across the entire quilt top. Take breaks as needed to rest your hands and maintain your focus. Remember to adjust the markings or guides as you progress to maintain consistency throughout your quilting.
- Finish and Secure Your Quilting: Once you have completed all the gentle curves quilting, backstitch or secure your stitching at the beginning and end of the last line. Trim any loose threads and give your quilt top a final press to smooth out any wrinkles or creases.
Gentle curves quilting adds a beautiful and flowing element to your quilts. With practice and patience, you’ll master the art of stitching gentle curves using a walking foot, creating stunning designs that enhance the overall aesthetic of your quilting projects.
Echo Quilting
Echo quilting is a versatile and eye-catching technique that involves quilting parallel lines around a specific shape or motif. By progressively quilting lines that echo the outline of the shape, you can achieve depth, texture, and emphasis on the design element. With the help of a walking foot, you can easily follow the contours of the shape and create precise and consistent echoes. Here’s a step-by-step guide to mastering echo quilting:
- Prepare Your Quilt: Ensure that your quilt layers – the top, batting, and backing – are properly basted together, creating a quilt sandwich. Smooth out any wrinkles or puckers to provide a flat surface for quilting.
- Attach Your Walking Foot: Before you begin, attach the walking foot to your sewing machine. Make sure it is securely in place and properly aligned with the machine’s feed dogs.
- Select the Right Stitch and Thread: Choose a straight stitch on your machine and thread it with a medium-weight quilting thread that complements your fabric and desired quilt design. Consider using a thread color that either blends with the fabric or provides a contrasting effect based on your preference.
- Identify the Shape or Motif: Decide on the shape or motif that you want to echo quilt. It could be a block pattern, applique, or any design element you want to highlight in your quilt.
- Start Stitching: Begin by quilting a line immediately next to the shape or motif, following the contours of the design element. This line will serve as the first echo. Use the edge of the walking foot as a guide, keeping it aligned with the shape as you sew.
- Continue Echoing: Move outward from the first line and quilt additional parallel lines, gradually spacing them evenly as you move away from the shape. The spacing between the lines can vary depending on the desired effect. Experiment with different spacing to achieve different levels of emphasis and visual interest.
- Keep a Steady and Consistent Pace: Maintain a steady speed as you quilt, ensuring uniform spacing between the echo lines. Take your time to maintain accuracy and follow the shape’s contours as closely as possible.
- Backstitch or Secure at the Beginning and End: To secure your stitches, perform a few backstitches or use the reverse stitch function at the beginning and end of each line of quilting. This will prevent unraveling and ensure a strong, durable seam.
- Repeat the Process: Repeat the process for every shape or motif that you want to echo quilt in your quilt top. Pay attention to spacing and alignment to create a consistent and visually appealing pattern across the entire quilt.
- Finish and Secure Your Quilting: Once you have completed all the echo quilting, backstitch or secure your stitching at the beginning and end of the last line. Trim any loose threads and give your quilt top a final press to smooth out any wrinkles or creases.
Echo quilting adds depth and dimension to your quilt, drawing attention to specific design elements. With practice and attention to detail, you can master this technique and create visually captivating quilts using a walking foot.
Quilting Diagonal Lines
Quilting diagonal lines is a versatile technique that adds movement and visual interest to your quilts. By stitching lines on a diagonal angle across the quilt top, you can create a dynamic and modern look. With the help of a walking foot, you can achieve precise and evenly spaced diagonal lines. Here’s how to master quilting diagonal lines:
- Prepare Your Quilt: Ensure that your quilt layers – the top, batting, and backing – are properly basted together, creating a quilt sandwich. Smooth out any wrinkles or puckers to provide a flat surface for quilting.
- Attach Your Walking Foot: Before you begin, attach the walking foot to your sewing machine. Make sure it is securely in place and properly aligned with the machine’s feed dogs.
- Select the Right Stitch and Thread: Choose a straight stitch on your machine and thread it with a medium-weight quilting thread that complements your fabric and desired quilt design.
- Mark Your Quilt: If you prefer, you can mark your quilt top with guidelines to follow while quilting. Use a ruler or masking tape to mark diagonal lines on your quilt, ensuring they are evenly spaced and at the desired angle. Alternatively, you can stitch your first line as a guide and use it to quilt subsequent lines.
- Start Stitching: Begin quilting along the first marked diagonal line or the edge of your quilt if using the first line as a guide. Position the edge of the walking foot against the marked line to maintain consistent spacing.
- Keep a Steady Pace: Stitch with a steady and consistent pace, allowing the walking foot to guide the fabric evenly through the machine. Focus on maintaining even spacing between each line as you quilt.
- Backstitch or Secure at the Beginning and End: To secure your stitches, backstitch or use the reverse stitch function at the beginning and end of each line of quilting. This will prevent unraveling and ensure a strong, durable seam.
- Continue Stitching: Repeat the process, quilting diagonal lines across the entire quilt top. Adjust the markings or guides as you progress to maintain consistency and spacing throughout your quilting.
- Handle Bulk Intersections: When quilting diagonal lines, you may encounter bulky intersections where multiple lines converge. Take your time when stitching through these areas to ensure smooth feeding and consistent stitch tension.
- Finish and Secure Your Quilting: Once you have completed all the diagonal lines of quilting, backstitch or secure your stitching at the beginning and end of the last line. Trim any loose threads and give your quilt top a final press to smooth out any wrinkles or creases.
Quilting diagonal lines adds a sense of movement and a contemporary touch to your quilts. With practice and attention to detail, you can master this technique using a walking foot, enhancing the visual appeal of your quilted projects.
Quilting Parallel Lines
Quilting parallel lines is a classic quilting technique that can add simplicity, elegance, and texture to your quilts. By stitching rows of evenly spaced parallel lines across the quilt top, you can create visually appealing designs and emphasize certain areas of the quilt. With the help of a walking foot, you can achieve precise and evenly spaced parallel lines. Here’s how to master quilting parallel lines:
- Prepare Your Quilt: Ensure that your quilt layers – the top, batting, and backing – are properly basted together, creating a quilt sandwich. Smooth out any wrinkles or puckers to provide a flat surface for quilting.
- Attach Your Walking Foot: Before you begin, attach the walking foot to your sewing machine. Make sure it is securely in place and properly aligned with the machine’s feed dogs.
- Select the Right Stitch and Thread: Choose a straight stitch on your machine and thread it with a medium-weight quilting thread that complements your fabric and desired quilt design.
- Mark Your Quilt: If you prefer, you can mark your quilt top with guidelines to follow while quilting. Use a ruler or masking tape to mark the starting points and spacing of your parallel lines. Alternatively, you can stitch your first line as a guide and use it to quilt subsequent lines.
- Start Stitching: Begin quilting along the first marked line or the edge of your quilt if using the first line as a guide. Position the edge of the walking foot against the marked line to maintain consistent spacing.
- Keep a Steady Pace: Stitch with a steady and consistent pace, allowing the walking foot to guide the fabric evenly through the machine. Focus on maintaining even spacing between each line as you quilt.
- Backstitch or Secure at the Beginning and End: To secure your stitches, backstitch or use the reverse stitch function at the beginning and end of each line of quilting. This will prevent unraveling and ensure a strong, durable seam.
- Continue Stitching: Repeat the process, quilting parallel lines across the entire quilt top. Adjust the markings or guides as you progress to maintain consistency and spacing throughout your quilting.
- Vary the Direction and Spacing: For added visual interest, consider quilting parallel lines in different directions or with varying spacing. Experiment with vertical, horizontal, or diagonal lines, or try lines that are closer together or farther apart.
- Finish and Secure Your Quilting: Once you have completed all the parallel lines of quilting, backstitch or secure your stitching at the beginning and end of the last line. Trim any loose threads and give your quilt top a final press to smooth out any wrinkles or creases.
Quilting parallel lines creates a timeless and versatile texture that can enhance the overall aesthetic of your quilt. With practice and attention to detail, you can master this quilting technique using a walking foot, allowing you to achieve professional-looking results with ease.
Read more: How To Walk In An Attic
Quilting Angular Lines
Quilting angular lines is a technique that adds energy, movement, and visual interest to your quilts. By stitching lines at various angles across the quilt top, you can create dynamic and geometric designs. With the help of a walking foot, you can achieve precise and controlled angular lines. Here’s how to master quilting angular lines:
- Prepare Your Quilt: Ensure that your quilt layers – the top, batting, and backing – are properly basted together, creating a quilt sandwich. Smooth out any wrinkles or puckers to provide a flat surface for quilting.
- Attach Your Walking Foot: Before you begin, attach the walking foot to your sewing machine. Make sure it is securely in place and properly aligned with the machine’s feed dogs.
- Select the Right Stitch and Thread: Choose a straight stitch on your machine and thread it with a medium-weight quilting thread that complements your fabric and desired quilt design.
- Mark Your Quilt: If you prefer, you can mark your quilt top with guidelines to follow while quilting. Use a ruler or masking tape to mark the starting points and angles of your angular lines. Alternatively, you can stitch your first line as a guide and use it to quilt subsequent lines.
- Start Stitching: Begin quilting along the first marked line or the edge of your quilt if using the first line as a guide. Position the edge of the walking foot against the marked line to maintain consistent spacing.
- Keep a Steady Pace: Stitch with a steady and consistent pace, allowing the walking foot to guide the fabric evenly through the machine. Focus on maintaining accurate angles and spacing between each line as you quilt.
- Backstitch or Secure at the Beginning and End: To secure your stitches, backstitch or use the reverse stitch function at the beginning and end of each line of quilting. This will prevent unraveling and ensure a strong, durable seam.
- Continue Stitching: Repeat the process, quilting angular lines across the entire quilt top. Adjust the markings or guides as you progress to maintain consistency and spacing throughout your quilting.
- Experiment with Different Angles: One of the advantages of quilting angular lines is the opportunity to explore various angles. Try stitching lines at different degrees, ranging from acute to obtuse, to create unique and striking designs.
- Combine Angular Lines with Other Quilting Techniques: To add even more interest to your quilt, consider combining angular lines with other quilting techniques. You can cross angular lines with straight line quilting, echo quilting, or gentle curves to create a rich and textured effect.
- Finish and Secure Your Quilting: Once you have completed all the angular lines of quilting, backstitch or secure your stitching at the beginning and end of the last line. Trim any loose threads and give your quilt top a final press to smooth out any wrinkles or creases.
Quilting angular lines provides a modern and graphic touch to your quilts. With practice and attention to detail, you can master this quilting technique using a walking foot, adding depth and visual impact to your quilted projects.
Troubleshooting Common Issues
Machine quilting with a walking foot can sometimes present challenges and issues along the way. Thankfully, many of these issues have simple solutions. Here are some common problems you may encounter while machine quilting with a walking foot, along with troubleshooting tips:
- Uneven Stitch Length: If you notice that your stitches are uneven in length, make sure your machine is properly threaded and your tension is adjusted correctly. Check that the walking foot is securely attached and providing even feeding. Also, maintain a consistent speed while quilting to prevent variations in stitch length.
- Fabric Puckering: Puckering occurs when the fabric layers shift or gather during quilting. To avoid this issue, ensure that your quilt layers are properly basted together and the tension of your machine is adjusted correctly. Quilt at a steady pace and use the walking foot to help feed the fabric evenly. If needed, experiment with different fabrics or batting to find a combination that reduces puckering.
- Thread Breakage: Thread breakage can be frustrating, but there are a few potential solutions. First, make sure your machine is properly threaded and the tension is adjusted appropriately. Check for any burrs or rough spots on the needle or foot that may be causing the thread to break. It can also help to use high-quality thread and a larger needle size, as well as reviewing the machine’s manual for recommended needle and thread combinations.
- Fabric Slippage: If your fabric is slipping or shifting during quilting, it may be due to insufficient tension or improper basting. Ensure that your quilt layers are securely basted together and that the machine tension is adjusted correctly. Additionally, using pins or temporary fabric adhesive can help hold the layers in place while quilting.
- Needle Breaking or Skipping Stitches: If your needle is breaking frequently or skipping stitches, it may be due to a few factors. Make sure you are using the correct needle size and type for the fabric and batting being used. Also, check that the needle is correctly installed and not dull or damaged. If the issue persists, consult your sewing machine’s manual or consider having your machine serviced.
- Irregular Tension: Inconsistent tension can lead to unbalanced stitches and a less professional finish. Ensure that your machine is properly threaded and the tension is adjusted correctly for your project. Test your tension on a scrap fabric before beginning quilting to ensure it is balanced. If needed, make small adjustments to the tension dial until you achieve an even stitch.
Remember, practice and patience are key when troubleshooting quilting issues. Take the time to make small adjustments, test on scrap fabric, and consult your sewing machine’s manual for specific guidance. With practice and experience, you will develop the skills to overcome challenges and achieve beautiful machine quilting results.
Conclusion
Machine quilting with a walking foot is a skill that can take your quilting projects to new heights. With the ability to achieve precise and even stitches, this technique offers numerous benefits for quilters of all skill levels. Through the use of straight line quilting, stitch in the ditch quilting, gentle curves quilting, echo quilting, quilting diagonal lines, quilting parallel lines, and quilting angular lines, you can create stunning designs and textures on your quilts.
Throughout this article, we’ve explored the steps and techniques involved in machine quilting with a walking foot. We’ve discussed the importance of proper set up and preparation, the significance of choosing the right thread and needles, the process of marking the quilt design, and troubleshooting common issues that may arise during the quilting process.
Whether you’re a novice quilter or an experienced one, the key to mastering machine quilting with a walking foot lies in practice, patience, and experimentation. Take the time to familiarize yourself with your machine, test different quilting patterns and thread combinations, and don’t be afraid to try new techniques and designs.
As you refine your machine quilting skills, remember that each project is a unique opportunity for creativity and self-expression. Let your imagination soar and embrace the joy of quilting. And always remember, mistakes are part of the learning process, so don’t be discouraged if things don’t go perfectly. With practice and perseverance, you will steadily improve and create quilts that you can be proud of.
So, armed with the knowledge and techniques shared in this article, go forth and embark on your next machine quilting adventure. Let your creativity flow, explore new ideas, and enjoy the therapeutic journey of bringing your quilts to life. Happy quilting!
Frequently Asked Questions about How To Machine Quilt With A Walking Foot
Was this page helpful?
At Storables.com, we guarantee accurate and reliable information. Our content, validated by Expert Board Contributors, is crafted following stringent Editorial Policies. We're committed to providing you with well-researched, expert-backed insights for all your informational needs.


0 thoughts on “How To Machine Quilt With A Walking Foot”