Articles
How To Make A Baby Crib Bed Skirt
Modified: August 22, 2024
Learn how to make a baby crib bed skirt with this step-by-step guide. Find articles and tips on creating the perfect bed skirt for your little one's nursery.
(Many of the links in this article redirect to a specific reviewed product. Your purchase of these products through affiliate links helps to generate commission for Storables.com, at no extra cost. Learn more)
Introduction
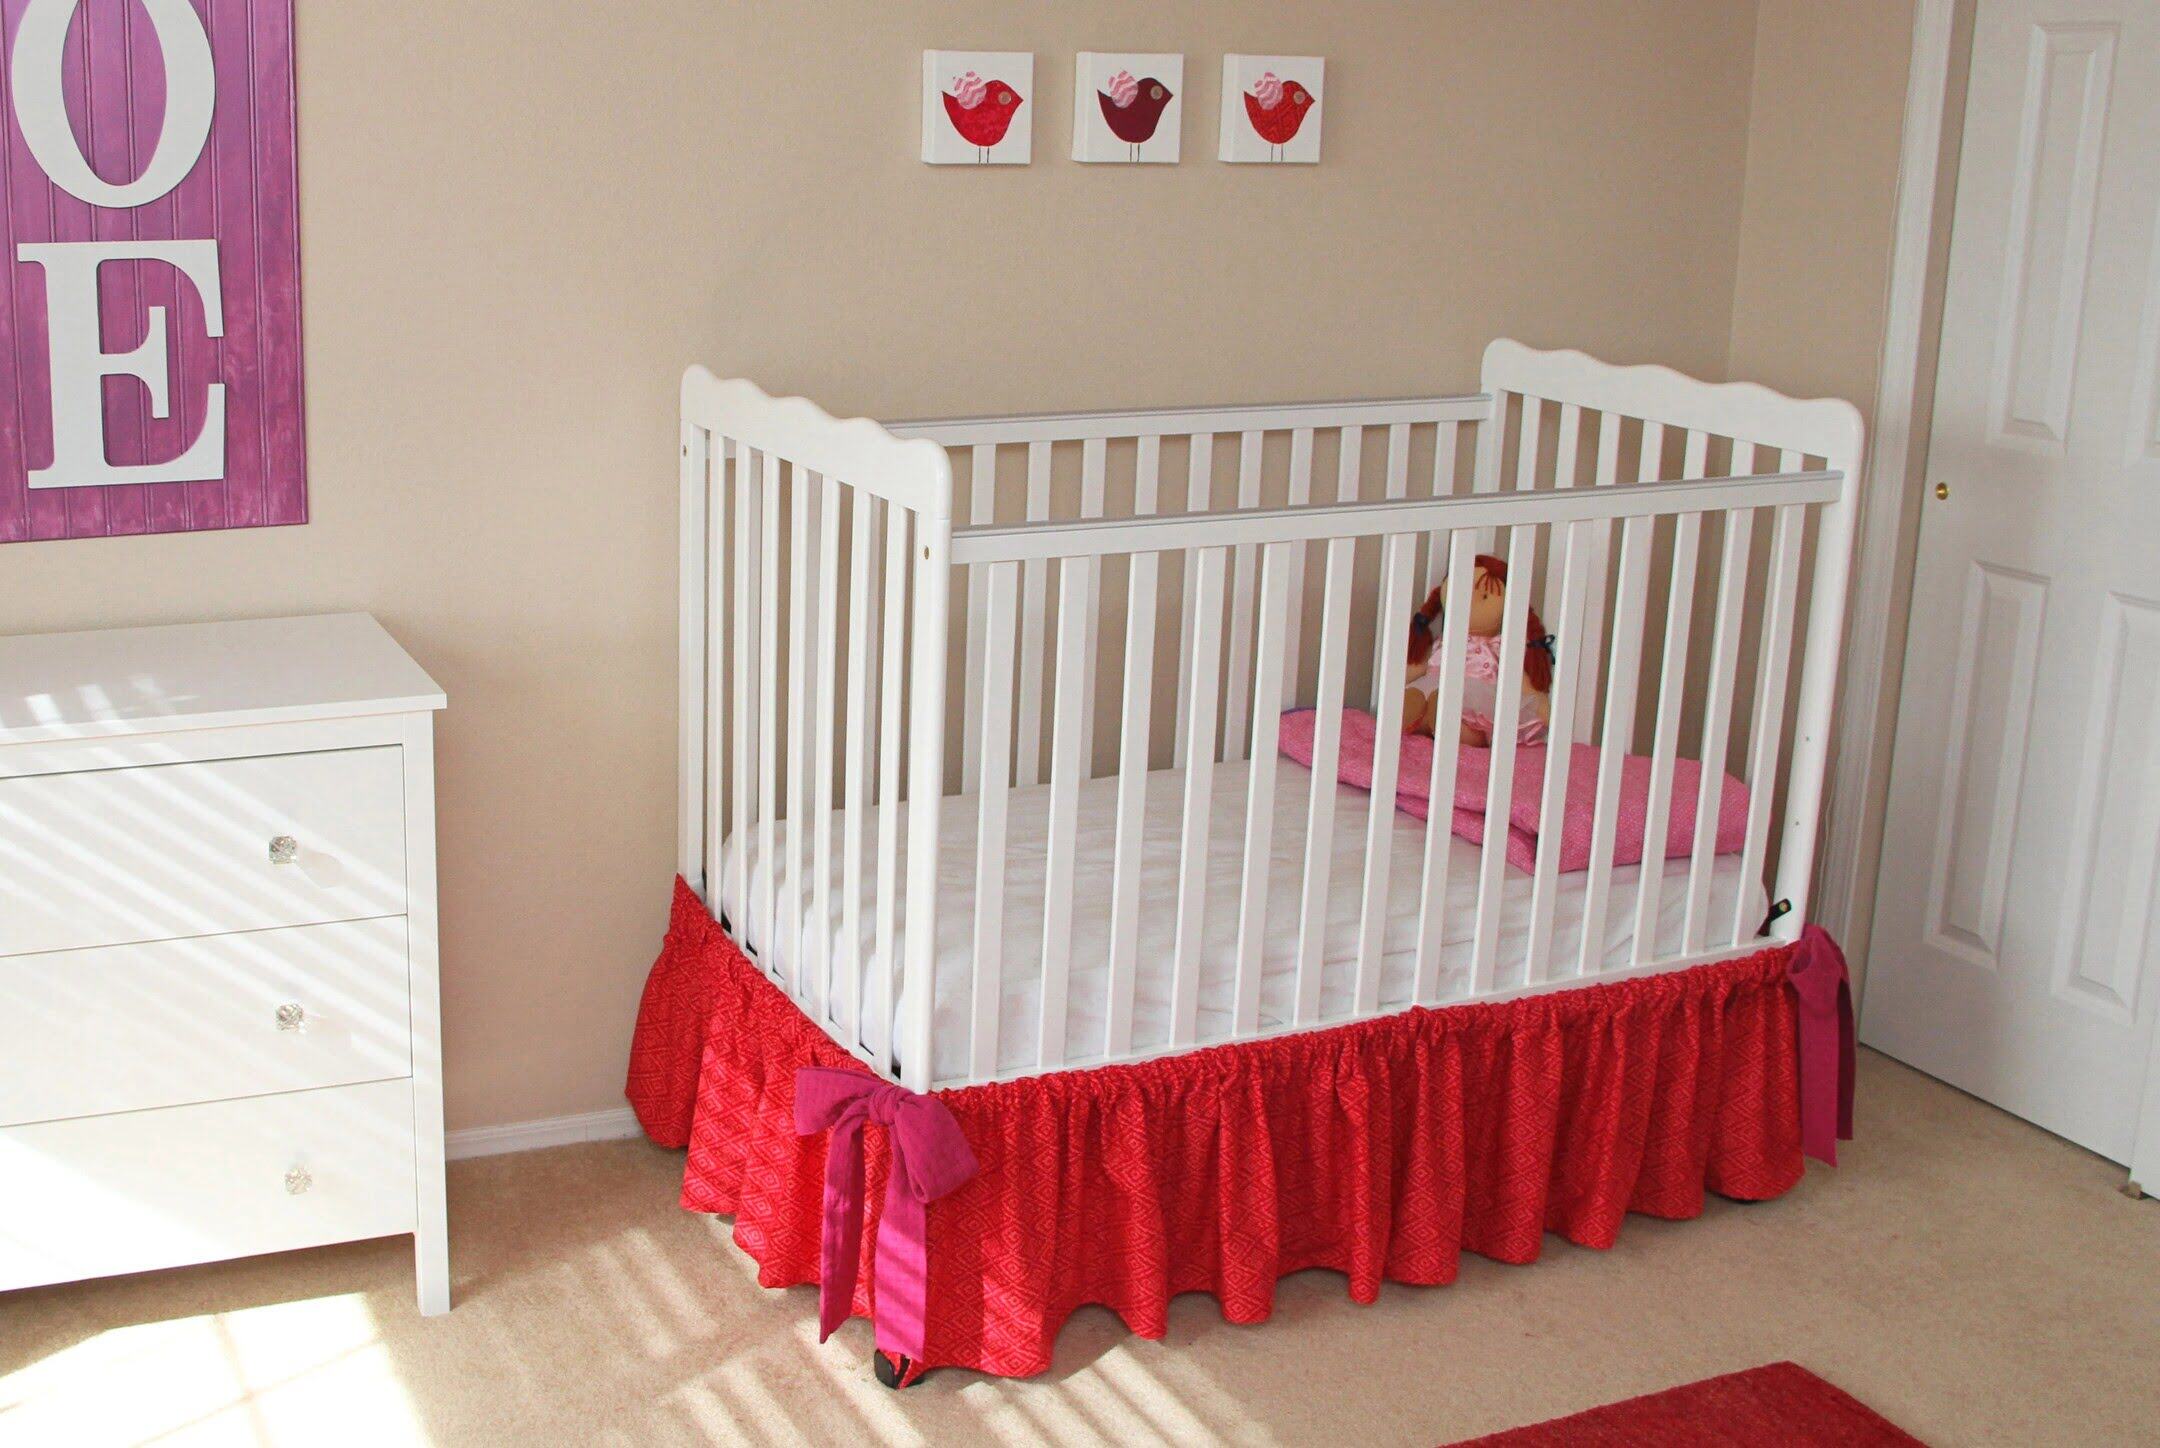
Welcome to our comprehensive guide on how to make a baby crib bed skirt. In this article, we will take you through the step-by-step process of creating a beautiful and custom bed skirt for your baby’s crib. A bed skirt not only adds a decorative touch to the nursery but also serves a practical purpose by concealing the storage space under the crib.
By making your own bed skirt, you have the freedom to choose the fabric, color, and design that perfectly matches your nursery decor. Plus, it allows you to have a unique and personalized touch in your baby’s room. Whether you are a seasoned DIY enthusiast or a beginner, this guide will provide you with all the information you need to create a bed skirt that is both functional and visually appealing.
Before we dive into the step-by-step instructions, let’s have a brief overview of what you can expect from this article. We will start by discussing the fabric options available and providing tips on selecting the right color and pattern. Then, we will move on to taking accurate measurements for a perfect fit. Next, we will guide you through cutting the fabric and sewing the bed skirt, including tips on hemming, attaching side panels, and creating seamless corner pieces. We will also explore ways to incorporate decorative elements such as pleats, ruffles, lace, or trim to enhance the bed skirt’s appearance.
Once the bed skirt is complete, we will guide you on how to attach it securely to the crib using pins or Velcro. Finally, we will wrap up with some additional tips and resources to help you maintain the bed skirt and keep it looking fresh and clean.
Now that you have an overview of what’s in store, let’s get started on creating a beautiful and functional bed skirt for your baby’s crib!
Key Takeaways:
- Create a personalized and functional baby crib bed skirt by choosing the right fabric, adding decorative elements, and securing it to the crib for a polished and organized nursery look.
- Maintain the bed skirt’s appearance by regularly inspecting, cleaning, and caring for it, ensuring it continues to enhance the beauty and functionality of the crib area.
Read more: How To Make A Pleated Crib Bed Skirt
Overview of the article
Choosing the fabric for your baby crib bed skirt is an important decision as it will determine the overall look and feel of the finished product. In this section, we will discuss various fabric options and provide tips on selecting the right color and pattern.
When it comes to fabric options, there are a few factors to consider. First, you’ll want to choose a fabric that is durable and easy to care for, as it will need to withstand regular washing and use. Cotton blends, such as cotton/polyester or cotton/bamboo, are popular choices for baby bed skirts due to their softness, breathability, and durability.
Another factor to consider is the weight of the fabric. Lighter fabrics, such as voile or lightweight cotton, are ideal for creating a light and airy look. On the other hand, heavier fabrics, like denim or upholstery fabric, can provide a more structured and formal appearance.
When selecting the color and pattern for your bed skirt, it’s helpful to consider the overall theme and color scheme of the nursery. If you’re aiming for a minimalist and modern look, solid colors like pastels or neutrals can create a clean and elegant aesthetic. If you prefer a more playful and whimsical look, consider selecting a fabric with fun patterns or motifs, such as animals, geometric shapes, or floral prints.
It’s also worth considering whether you want the bed skirt to match or contrast with the crib bedding. A matching bed skirt can create a cohesive and harmonious look, while a contrasting bed skirt can add visual interest and dimension to the crib area.
When choosing the fabric, keep in mind that it should be safe for your baby. Opt for fabrics that are hypoallergenic and free from harmful chemicals. It’s always a good idea to check the fabric label or consult with the fabric supplier to ensure that the material is suitable for a baby’s sensitive skin.
Now that you have an understanding of the different fabric options and considerations, you can move on to the next step: taking measurements for your bed skirt. Let’s dive in!
Considering various fabric options
When it comes to choosing the fabric for your baby crib bed skirt, there are several options to consider. Each fabric has its own unique characteristics and benefits. Let’s take a closer look at some popular fabric options:
- Cotton: Cotton is a natural fabric that is soft, breathable, and hypoallergenic, making it an excellent choice for baby bedding. It’s also easy to care for and comes in a wide range of colors and patterns.
- Cotton Blend: Cotton blends, such as cotton/polyester or cotton/bamboo, combine the best qualities of cotton with added durability and wrinkle resistance. They are also generally more affordable than pure cotton fabrics.
- Voile: Voile is a lightweight and semi-sheer fabric that creates a delicate and airy look. It’s ideal for creating a whimsical and ethereal bed skirt.
- Linen: Linen is a natural fabric known for its durability and breathability. It has a textured appearance that adds depth and sophistication to the bed skirt.
- Denim: Denim is a sturdy and versatile fabric that adds a casual and rustic touch to the bed skirt. It’s a great choice if you’re going for a gender-neutral or denim-themed nursery.
- Upholstery Fabric: If you’re looking for a more structured and formal look, upholstery fabric can be a good option. It’s thick, durable, and comes in a wide variety of colors and patterns.
Aside from the fabric type, you may also want to consider additional features, such as fabric treatment or specialty finishes. For example, some fabrics are treated to be stain-resistant, water-repellent, or flame-retardant, which can be beneficial in a baby’s room. However, it’s important to ensure that any treatments used are safe for your baby’s sensitive skin.
Lastly, consider the care instructions for the fabric. Ideally, you’ll want a fabric that is machine washable and easy to care for. Babies can be messy, so it’s important to choose a fabric that can withstand regular washing without losing its shape or color.
Keep in mind that the choice of fabric ultimately depends on your personal preferences, the overall theme of the nursery, and your desired level of durability and maintenance. Take your time to browse through different fabric options, and don’t be afraid to order fabric samples to see how they look and feel in person.
Now that you have a better understanding of the various fabric options, you can move on to the next step: selecting the right color and pattern for your bed skirt.
Selecting the right color and pattern
Once you have decided on the fabric type for your baby crib bed skirt, it’s time to think about the color and pattern that will best complement your nursery decor. The right color and pattern can make a significant impact on the overall look and feel of the bed skirt.
When selecting the color, consider the existing color palette in the nursery. You may want to choose a color that matches or complements the crib bedding or other decorative elements in the room. For a cohesive and harmonious look, opt for a bed skirt in a similar shade or a complementary color to the crib.
If you’re looking to add visual interest and depth to the crib area, consider choosing a contrasting color for the bed skirt. For example, if you have neutral-toned walls and bedding, a bright and bold colored bed skirt can create a focal point and add a pop of color to the nursery.
In addition to color, patterns can also play a role in enhancing the bed skirt’s overall appearance. Consider the style and theme of the nursery. If you have a whimsical or playful theme, patterns such as polka dots, stripes, or floral prints can add a fun and lively touch to the bed skirt. On the other hand, if you prefer a more sophisticated and elegant look, consider subtle patterns or elegant motifs.
When selecting patterns, be mindful of the scale and proportion. For smaller cribs, opting for smaller or more intricate patterns can create a balanced and visually appealing look. Conversely, for larger cribs, bold and larger-scale patterns can make a striking statement.
An important consideration when selecting both color and pattern is longevity. Think about whether the chosen color and pattern will complement the nursery as your child grows. If you’re planning on using the same bed skirt for an extended period, selecting a color and pattern that can transition well from a baby’s room to a toddler’s room can be a wise choice.
Finally, don’t be afraid to experiment and be creative. Mixing and matching patterns or combining different fabrics can create a unique and personalized bed skirt. It’s all about creating a bed skirt that reflects your style and complements the overall aesthetic of the nursery.
Now that you have an idea of how to select the right color and pattern, it’s time to move on to the next step: taking accurate measurements for your bed skirt.
Taking Measurements
Before you start cutting and sewing your baby crib bed skirt, it’s crucial to take accurate measurements of the crib. This will ensure that the bed skirt fits perfectly and hangs just right. In this section, we will guide you through measuring the length and width of the crib, as well as determining the desired drop length for the bed skirt.
To measure the length of the crib, start by positioning your tape measure at one end of the crib’s mattress platform. Extend the tape measure to the opposite end of the mattress platform, ensuring that it runs parallel to the side of the crib. Take note of the measurement in inches or centimeters. This measurement will determine the length of the main panel of the bed skirt.
Next, measure the width of the crib. Position your tape measure at one side of the crib’s mattress platform and extend it to the opposite side. Be sure to measure the width at the highest point of the mattress platform, where the skirt will be attached. Again, take note of the measurement in inches or centimeters. This measurement will determine the width of the main panel of the bed skirt.
After measuring the length and width of the crib, it’s time to calculate the drop length for the bed skirt. The drop length refers to how far the bed skirt will hang down from the top of the crib’s mattress platform.
Start by determining the desired length of the drop. This can vary depending on personal preference and the overall aesthetic you wish to achieve. A common drop length for crib bed skirts is around 14 to 16 inches, but you can adjust it based on your specific needs.
Once you have determined the desired drop length, measure from the top of the mattress platform to the point where you want the bed skirt to hang. Take note of this measurement as well.
When calculating the dimensions for your bed skirt, keep in mind that you will need to account for seam allowances. Typically, a 0.5 to 1-inch seam allowance is added to each edge of the fabric panels to allow for hemming and joining the pieces together.
By taking accurate measurements, you can ensure that the bed skirt fits well and looks polished when it’s attached to the crib. When in doubt, it’s always better to measure twice to make sure your measurements are correct.
Now that you have the measurements in hand, you’re ready to move on to the next step: cutting the fabric for your bed skirt.
Read also: 12 Incredible Crib Bed Skirt for 2025
Determining the desired drop length for the bed skirt
When creating a baby crib bed skirt, it’s important to determine the desired drop length. The drop length refers to how far the bed skirt will hang down from the top of the crib’s mattress platform. In this section, we will discuss how to determine the appropriate drop length and guide you through cutting the fabric for your bed skirt.
To determine the desired drop length, consider the overall look you want to achieve. A common drop length for crib bed skirts is around 14 to 16 inches, but you can adjust it based on personal preference and the style of your nursery.
Measure from the top of the crib’s mattress platform to the point where you want the bed skirt to hang. Keep in mind that the bed skirt should cover the visible space between the mattress platform and the floor, creating a clean and polished look.
When cutting the fabric for your bed skirt, it’s essential to account for seam allowances. Seam allowances are the extra fabric you need to allow for sewing seams and hems. Typically, a 0.5 to 1-inch seam allowance is added to each edge of the fabric panels.
Start by measuring and cutting the main panel of the bed skirt. The length should be equal to the length of the crib plus twice the desired drop length (to account for both the front and back sides). The width should be equal to the width of the crib plus twice the desired drop length.
Next, cut the side panels of the bed skirt. The length should be equal to the height of the crib, plus the desired drop length and seam allowance. The width should be equal to the width of the main panel plus the desired drop length and seam allowance.
In addition, you will also need to cut corner pieces for the bed skirt. The size of the corner pieces will depend on the dimensions of your crib and the desired drop length. Measure and cut four corner pieces that match the height and width of the side panels.
Ensure that you are cutting the fabric accurately and using sharp fabric scissors or a rotary cutter for clean and precise cuts. Take your time and double-check the measurements before cutting to avoid any errors.
Once you have all the fabric pieces cut, you’re ready to move on to the next step: sewing the bed skirt. In the following section, we will guide you through the process of hemming, attaching the side panels, and creating seamless corner pieces.
Preparing the fabric for cutting
Before cutting the fabric for your baby crib bed skirt, it’s important to properly prepare it to ensure accuracy and prevent any fabric mishaps. In this section, we will guide you through the process of preparing the fabric for cutting.
First, you’ll want to prewash the fabric. This step is essential because it helps to remove any sizing or chemicals that may be present in the fabric. It also allows the fabric to shrink before you start cutting and sewing, preventing any unwanted surprises later on. Follow the washing instructions provided on the fabric label and make sure to dry it thoroughly before proceeding.
Once the fabric is washed and dried, it’s a good idea to iron it to remove any wrinkles or creases. Ironing the fabric will ensure that you have a smooth surface to work with when cutting and sewing. Set your iron to the appropriate temperature based on the fabric type, and press the fabric carefully, being mindful of any pattern or print if present. If needed, use a pressing cloth to protect delicate fabrics or prints.
After ironing, you may want to stabilize the fabric with pins or pattern weights. This will help prevent the fabric from shifting or moving while you are cutting. Place the pins or weights around the edges of the fabric to hold it securely in place.
Next, double-check your measurements before cutting. Use a ruler or measuring tape to ensure that the fabric is aligned correctly and that you have the correct dimensions. Measure multiple times to be certain of the accuracy of your measurements.
When cutting the fabric, use sharp fabric scissors or a rotary cutter. Ensure that your cutting tools are clean and properly aligned to produce neat and accurate cuts. Take your time and cut along the measured lines, following the straightest edge of the fabric as a guide.
Finally, as you cut each fabric piece, organize and label them accordingly. This step will help you keep track of the various sections of your bed skirt and prevent any confusion later on during the sewing process.
By taking the time to properly prepare the fabric for cutting, you can ensure that you have the correct measurements and a clean, precise cutting process. This will contribute to the overall success and professional look of your baby crib bed skirt.
With the fabric ready, you can now start cutting the main panel, side panels, and corner pieces for your bed skirt. In the next section, we will guide you through the specific steps for cutting each fabric piece.
Cutting out the main panel of the bed skirt
Now that you have prepared the fabric, it’s time to cut out the main panel of your baby crib bed skirt. The main panel is the central piece that will cover the visible space underneath the crib. In this section, we will guide you through the steps for cutting the main panel.
1. Begin by reviewing your measurements and ensuring that the fabric is flat and free from any wrinkles or folds. Smooth out the fabric to create an even surface for cutting.
2. Using a ruler or measuring tape, mark the length and width of the main panel on the fabric. Measure twice to ensure accuracy and double-check that the measurements align with the desired dimensions of your bed skirt.
3. Once you have marked the measurements, connect the corresponding marks to create a rectangle shape for the main panel. Use a ruler or straight edge to ensure straight lines and sharp corners.
4. Confirm that the marked rectangle aligns with the dimensions you calculated earlier, including the desired drop length and seam allowances. Make any adjustments if necessary.
5. With the main panel shape outlined, carefully cut along the marked lines using sharp fabric scissors or a rotary cutter. Follow the lines closely to achieve clean and precise cuts.
6. As you cut, it’s a good idea to keep the fabric stationary and rotate it as needed to maintain a comfortable cutting position. This will help ensure accurate cuts and reduce any strain on your hand or wrist.
7. Once the main panel is cut out, set it aside and organize your fabric pieces. It’s recommended to label each piece accordingly to avoid confusion later in the sewing process.
Remember to take your time and double-check your measurements as you cut the main panel. Accuracy is key to ensuring a well-fitting and visually appealing bed skirt for your baby’s crib.
With the main panel cut out, you can move on to cutting the side panels and corner pieces. These pieces will be joined together to create the skirt portion of the bed skirt. In the following section, we will guide you through cutting the fabric for the side panels and corner pieces.
Cutting the side panels and corner pieces
Now that you have cut out the main panel of your baby crib bed skirt, it’s time to cut the fabric for the side panels and corner pieces. These pieces will be joined together to create the skirt portion of the bed skirt. In this section, we will guide you through the steps for cutting the side panels and corner pieces.
1. Start by reviewing your measurements and ensuring that the fabric is flat and free from any wrinkles. Smooth out the fabric to create an even surface for cutting.
2. Measure and mark the dimensions for the side panels on the fabric. The length should be equal to the height of the crib plus the desired drop length and seam allowance. The width should be equal to the width of the main panel plus the desired drop length and seam allowance.
3. Once you have marked the measurements, connect the corresponding marks to create a rectangle shape for the side panels. Use a ruler or straight edge to ensure straight lines and sharp corners.
4. Confirm that the rectangle shape aligns with the dimensions you calculated earlier, including the desired drop length and seam allowances. Make any adjustments if necessary.
5. With the side panel shape outlined, carefully cut along the marked lines using sharp fabric scissors or a rotary cutter. Ensure clean and precise cuts following the lines closely.
6. Repeat the same steps to cut three more side panels, so you have a total of four side panels for the bed skirt.
7. Now it’s time to cut the corner pieces. Measure and mark the dimensions for the corner pieces, which should match the height and width of the side panels.
8. Once marked, carefully cut out four corner pieces using your fabric scissors or rotary cutter. These pieces will help create seamless corners when sewing the bed skirt.
As you cut the side panels and corner pieces, double-check your measurements to ensure accuracy. It’s important that all pieces align properly for a well-fitting and visually appealing bed skirt.
Read more: How To Make A Bed Skirt
Sewing the Bed Skirt
Now that you have cut out the main panel, side panels, and corner pieces, it’s time to put them all together and start sewing your baby crib bed skirt. In this section, we will guide you through the sewing process step by step.
1. To prepare for sewing, make sure you have a sewing machine, coordinating thread, and basic sewing supplies like pins, fabric scissors, and a measuring tape.
2. Start by hemming the edges of the main panel. Fold over the raw edge of the fabric by 0.5 to 1 inch (as per your desired hem width) and press with an iron to create a crease. Repeat this folding and ironing process for all four sides of the main panel.
3. Secure the hems with pins or use clips to hold them in place. Then, stitch along the folded edge using a straight stitch on your sewing machine. Repeat this step for all four sides of the main panel.
4. Take one of the side panels and position it along the edge of the main panel, right sides together. Ensure that the raw edge of the side panel aligns with the bottom edge of the main panel. Pin or clip the side panel in place, leaving a small section at the end open for attaching the corner piece later.
5. Sew the side panel to the main panel using a straight stitch, removing the pins or clips as you go along. Remember to backstitch at the beginning and end to secure the seams. Repeat this step for the remaining three side panels.
6. Now it’s time to attach the corner pieces. Take one corner piece and position it at the open end of a side panel, aligning the raw edges. Pin or clip it in place and sew along the edge to attach the corner piece to the side panel. Repeat this step for the remaining three corners.
7. Once all the side panels and corner pieces are attached, press the seams with an iron to create a smooth and polished finish.
8. At this point, you may choose to add elastic or ribbons to secure the bed skirt to the crib. Measure and cut elastic or ribbons to fit around the crib, and sew them onto the top edge of the bed skirt, ensuring they are evenly spaced.
9. Finally, give the bed skirt a final press with the iron before attaching it to the crib.
With the sewing process complete, your baby crib bed skirt is now ready to be attached to the crib. In the next section, we will guide you through the steps for attaching the bed skirt and adding decorative elements if desired.
Hemming the edges of the main panel
One of the crucial steps in sewing your baby crib bed skirt is hemming the edges of the main panel. Hemming not only gives a neat and finished look to the bed skirt but also ensures that the fabric edges are securely enclosed. In this section, we will guide you through the process of hemming the edges of the main panel.
1. Prepare your sewing machine, coordinating thread, and basic sewing supplies such as pins, fabric scissors, and a measuring tape.
2. Start by folding over the raw edge of the fabric on one side of the main panel. The width of the hem is up to your personal preference, typically ranging from 1/2 inch to 1 inch. Align the fold with the wrong side of the fabric and press it with an iron to create a crease. This crease will serve as a guide throughout the hemming process.
3. After pressing, pin or use clips to secure the folded edge in place. Placing the pins perpendicular to the edge will prevent them from interfering with the sewing machine foot while stitching.
4. Set up your sewing machine with a straight stitch and adjust the stitch length according to your fabric’s weight and thickness. A medium stitch length of around 2.5mm is typically suitable for most fabrics.
5. Start sewing along the folded edge, removing the pins or clips as you go. Keep your stitching line close to the folded edge, ensuring the stitches catch both layers of the fabric. It’s essential to maintain a consistent seam allowance width throughout the hemming process.
6. Continue sewing until you reach the end of the side, making sure to backstitch at the beginning and end of the seam to secure the stitches. If needed, trim any excess thread.
7. Repeat the same steps of folding, pressing, pinning, and sewing for the remaining three sides of the main panel.
8. Once all four sides are hemmed, press the hemmed edges with an iron to create a crisp and professional finish. This will also help to flatten any minor puckering that may have occurred during sewing.
By hemming the edges of the main panel, you are ensuring the bed skirt’s durability and preventing fraying or unraveling of the fabric. The hemmed edges will also give a polished look to your baby crib bed skirt.
With the main panel hemmed, you can now move on to attaching the side panels and corner pieces to complete your bed skirt. In the next section, we will guide you through joining these fabric pieces to create a seamless and beautiful baby crib bed skirt.
Attaching the side panels to the main panel
Now that you have hemmed the edges of the main panel for your baby crib bed skirt, it’s time to attach the side panels. This step will bring the bed skirt together and create a cohesive look. In this section, we will guide you through the process of attaching the side panels to the main panel.
1. Begin by aligning one of the side panels with the bottom edge of the main panel, right sides together. The raw edge of the side panel should line up with the bottom edge of the main panel.
2. Pin or use clips to secure the side panel to the main panel. Start by placing pins or clips at the corners, then continue pinning or clipping along the entire length of the edge. This will help keep the fabrics in place and ensure an even and smooth attachment.
3. Sew along the pinned edge, removing the pins or clips as you go. Use a straight stitch and a seam allowance of your choice, typically ranging from 1/4 inch to 1/2 inch. Backstitch at the beginning and end of the seam to secure the stitches.
4. Once the first side panel is attached, repeat the same process for the remaining three side panels. Align each side panel with a different edge of the main panel, maintaining the right sides together and matching the raw edges.
5. As you sew each side panel, make sure to backstitch at the beginning and end of each seam to secure the stitches and prevent unraveling.
6. After attaching all four side panels, press the seams with an iron to create a smooth and professional finish. This will help the seams lie flat and prevent any puckering or wrinkling.
Attaching the side panels to the main panel brings the bed skirt together, creating a visually appealing and functional piece for your baby’s crib. The secure attachment ensures that the bed skirt stays in place without shifting or moving.
In the next section, we will guide you through the process of joining the corner pieces to create a seamless and cohesive look for your baby crib bed skirt.
Joining the corner pieces to create a seamless look
Now that you have attached the side panels to the main panel of your baby crib bed skirt, it’s time to join the corner pieces. This step will ensure that the corners of your bed skirt have a seamless and polished appearance. In this section, we will guide you through the process of joining the corner pieces.
1. Take one of the corner pieces and position it at the open end of a side panel, aligning the raw edges. The right sides of the fabric should be facing each other.
2. Pin or use clips to secure the corner piece to the side panel. Start by pinning or clipping at the edge of the fabric, then continue along the open side of the corner piece. This will help hold the fabrics in place during sewing.
3. Sew along the pinned edge, removing the pins or clips as you go. Use a straight stitch and a seam allowance of your choice, typically ranging from 1/4 inch to 1/2 inch. Backstitch at the beginning and end of the seam to secure the stitches.
4. Repeat the same process for the remaining three corner pieces, attaching them to the open ends of the remaining side panels. Ensure that the right sides of the fabric are always facing each other and that the raw edges are aligned.
5. After sewing all four corner pieces to the side panels, press the seams with an iron. This will help make the corners lie flat and give your bed skirt a seamless and polished appearance.
By joining the corner pieces, you create a continuous and seamless look for your baby crib bed skirt. This ensures that there are no visible seams at the corners, giving a professional and finished touch to the overall design.
In the next section, we will guide you through the steps of attaching elastic or ribbons to secure the bed skirt to the crib and adding decorative elements to enhance its appearance.
Read more: How To Make A Wrap-Around Bed Skirt
Attaching elastic or ribbons for securing the bed skirt
With the main construction of your baby crib bed skirt complete, it’s time to focus on attaching elastic or ribbons to secure the bed skirt to the crib. This step will ensure that the bed skirt stays in place and maintains a tidy appearance. In this section, we will guide you through attaching elastic or ribbons, as well as adding decorative elements to enhance the overall look of your bed skirt.
Attaching Elastic:
1. Measure and cut the appropriate length of elastic to fit around the crib. It should be slightly shorter than the actual measurement to allow for a snug fit. It’s recommended to use 1/2-inch to 1-inch wide elastic for this purpose.
2. Place the main panel of the bed skirt right side up. Pin or use clips to secure the elastic along the top edge of the main panel, ensuring it is evenly distributed.
3. Sew the elastic to the bed skirt using a stretch stitch or a zigzag stitch, stretching the elastic gently as you sew. This will allow the elastic to expand and contract when fitted onto the crib. Start sewing at one end of the elastic, backstitching to secure, and continue sewing along the entire length of the elastic.
4. Once the elastic is sewn in place, remove any pins or clips and give the bed skirt a final press with an iron.
Attaching Ribbons:
1. Measure and cut lengths of ribbon to fit around the crib, starting from the top edge of the bed skirt and extending to the desired length. You may need multiple ribbons depending on the size of the crib and your desired aesthetic.
2. Position the main panel of the bed skirt right side up. Align one end of a ribbon along the top edge of the bed skirt, about 1 inch from the side edge. Pin or use clips to secure the ribbon in place.
3. Sew the ribbon to the bed skirt using a straight stitch, backstitching at the beginning and end to secure the stitches. Repeat this step for each ribbon, evenly spacing them along the top edge of the bed skirt.
4. After attaching the ribbons, remove any pins or clips and give the bed skirt a final press with an iron.
Adding Decorative Elements:
If you wish, you can enhance the appearance of your bed skirt with decorative elements such as pleats, ruffles, lace, or trim. Here are a few ideas to consider:
– To add pleats, measure and mark the desired locations on the bed skirt. Fold the fabric at each marked point and secure with pins. Sew along the fold lines to create the pleats.
– To incorporate ruffles, cut strips of fabric and gather them along one edge. Attach the gathered edge to the bed skirt, allowing the ruffle to flow freely.
– Adding lace or trim along the edges of the bed skirt can create an elegant and delicate look. Sew the lace or trim onto the hem or edges of the bed skirt, ensuring it is evenly attached.
– Get creative with fabric appliques, embroidery, or decorative stitching to personalize the bed skirt and make it truly unique.
By attaching elastic or ribbons and adding decorative elements, you not only secure the bed skirt to the crib but also infuse style and personality into your baby’s nursery.
In the next section, we will guide you through the process of attaching the bed skirt to the crib, ensuring a proper fit and alignment.
Read more: What Is A Bed Skirt For
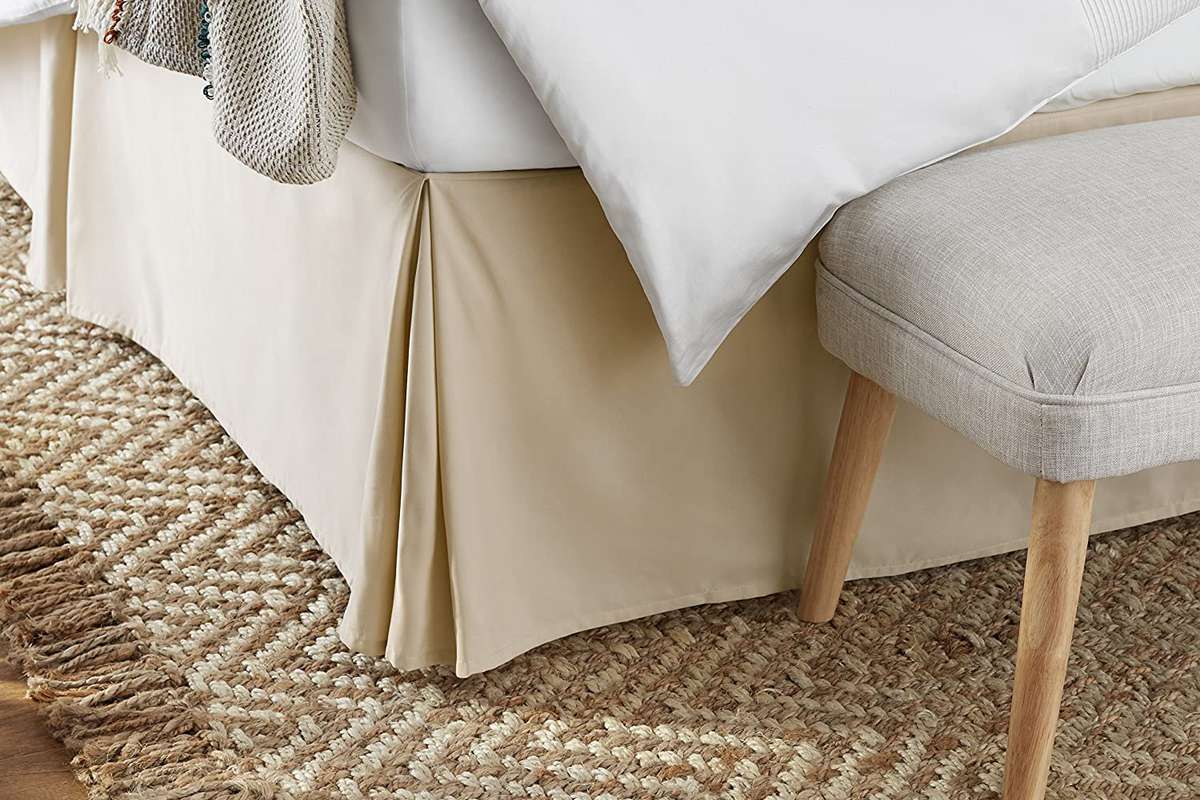
Incorporating pleats or gathers for an aesthetic touch
When it comes to adding an aesthetic touch to your baby crib bed skirt, incorporating pleats or gathers can create a beautiful and elegant look. Pleats and gathers add texture, depth, and visual interest to the bed skirt, making it a standout feature in your nursery. In this section, we will guide you through the process of incorporating pleats or gathers into your bed skirt.
Incorporating Pleats:
1. Start by deciding on the type of pleat you want to incorporate into your bed skirt. Some common options include box pleats, knife pleats, or inverted pleats.
2. Measure and mark the desired locations for the pleats on your bed skirt. Remember to account for the width of the pleat and the space between each pleat. It’s recommended to create an even number of pleats for symmetry.
3. Once the locations are marked, fold the fabric at each marked point to create the pleat. The fold lines should be aligned with the marks, and the fabric should be folded towards the wrong side of the bed skirt.
4. Secure the pleats with pins or clips to hold them in place. Make sure the pleats are uniform in size and shape.
5. Sew along the top edge of the bed skirt, securing the pleats in place. Start at one end and sew along the entire length of the bed skirt, removing the pins or clips as you go.
Incorporating Gathers:
1. Determine the location and spacing of the gathers on your bed skirt. Gathers are typically created at the top edge or lower edge of the bed skirt, depending on the desired look.
2. Measure and cut a strip of fabric that is two to three times the length of the area where the gathers will be. The width of the strip can vary depending on the desired fullness of the gathers.
3. Using a long basting stitch on your sewing machine, sew along one edge of the fabric strip. Leave a long thread tail at each end to help control the gathers.
4. Hold onto the thread tails and gently push the fabric along the thread, creating gathers evenly spaced across the length of the strip.
5. Pin or use clips to secure the gathered strip to the bed skirt, aligning the raw edges. Make sure the gathers are evenly distributed and adjust them as needed.
6. Sew the gathered strip onto the bed skirt, removing the pins or clips as you go. Use a regular stitch length to secure the gathers in place.
Incorporating pleats or gathers into your baby crib bed skirt adds a touch of elegance and sophistication. Whether you choose pleats for a structured look or gathers for a softer and more romantic feel, this detail will elevate the overall look of your bed skirt and make it a standout piece in your nursery decor.
In the next section, we will guide you through the process of attaching the bed skirt to the crib, ensuring a proper fit and alignment.
Adding ruffles, lace, or trim to enhance the bed skirt
To enhance the aesthetic appeal of your baby crib bed skirt, adding ruffles, lace, or trim can bring a touch of elegance and charm. These decorative elements can elevate the look of the bed skirt and add a beautiful and whimsical detail to your baby’s nursery. In this section, we will guide you through the process of adding ruffles, lace, or trim to enhance your bed skirt.
Read more: How To Make A Split Corner Bed Skirt
Adding Ruffles:
1. Decide where you want to add ruffles to your bed skirt. Common areas include the bottom edge or the sides of the skirt.
2. Measure and cut strips of fabric for the ruffles. The width of the strips will depend on the desired fullness and length of the ruffles. A good starting point is to cut strips that are 2-3 times the length of the area where the ruffles will be added.
3. Sew a gathering stitch along one edge of each fabric strip. This can be done by increasing the stitch length on your sewing machine and sewing near the edge, leaving long thread tails at each end.
4. Gently tug on the thread tails to gather the fabric, distributing the gathers evenly along the strip.
5. Pin or clip the gathered edge of the fabric strip to the bed skirt, aligning the raw edges. Adjust the gathers as needed to ensure even distribution.
6. Sew along the pinned edge, removing the pins or clips as you go. Use a regular stitch length to secure the ruffle onto the bed skirt.
7. Repeat this process for each section where you want to add ruffles, whether it be the bottom edge or the sides of the bed skirt.
Adding Lace or Trim:
1. Measure and cut the lace or trim to the desired length, considering any additional seam allowances.
2. Align the raw edge of the lace or trim with the desired location on the bed skirt, ensuring that it covers the raw edge of the bed skirt fabric.
3. Pin or use clips to secure the lace or trim in place.
4. Sew a straight stitch along the edge of the lace or trim, removing the pins or clips as you sew. Backstitch at the beginning and end to secure the stitches.
5. Repeat this process for each section where you want to add lace or trim, whether it be along the bottom edge or as decorative accents on the bed skirt.
Adding ruffles, lace, or trim to your baby crib bed skirt adds a touch of elegance, beauty, and personalization. Whether you opt for ruffles to create a playful and whimsical look or lace/trim to add delicate and intricate detailing, these decorative elements will enhance the overall aesthetic of your bed skirt and complement the nursery decor.
In the next section, we will guide you through the process of attaching the bed skirt to the crib, ensuring a proper fit and alignment.
Attaching the Bed Skirt to the Crib
Now that your baby crib bed skirt is complete with all the desired decorative elements, it’s time to attach it to the crib. Properly securing the bed skirt will ensure a tidy and polished look while keeping it in place. Follow these steps to attach the bed skirt to the crib:
1. Position the bed skirt around the crib, ensuring that it is evenly aligned and the bottom edge touches the floor. Make any necessary adjustments to achieve the desired fit and alignment.
2. Use pins or Velcro strips to secure the bed skirt to the crib. If using pins, insert them discreetly along the inside edge of the crib, ensuring they are hidden from view. If using Velcro, attach the strips to both the bed skirt and the crib, ensuring a secure connection.
3. Take a step back and check the bed skirt’s appearance, ensuring that it hangs evenly and covers the storage space underneath the crib. Adjust as needed to achieve a neat and balanced look.
4. Once you are satisfied with the attachment and positioning, give the bed skirt a final adjustment and smooth out any wrinkles or folds.
By securely attaching the bed skirt to the crib, you can maintain its appearance and prevent it from shifting or moving out of place. This way, you can enjoy the beauty and functionality of your custom-made bed skirt for your baby’s crib.
In the concluding section, we will provide some final thoughts and additional tips for maintaining the bed skirt.
When making a baby crib bed skirt, be sure to measure the crib’s dimensions accurately to ensure a proper fit. Use a sewing machine to create neat and durable seams, and choose a fabric that is easy to wash and gentle on baby’s skin.
Securing the bed skirt to the crib using pins or Velcro
To ensure that your baby crib bed skirt stays securely in place, you can use pins or Velcro to attach it to the crib. This will prevent the bed skirt from shifting, providing a tidy and polished look to the crib area. In this section, we will guide you through the process of securing the bed skirt to the crib using pins or Velcro.
Read more: How To Attach A Bed Skirt
Using Pins:
1. Begin by positioning the bed skirt around the crib, ensuring that it is evenly aligned and the bottom edge touches the floor.
2. Along the inside edge of the crib, insert the pins vertically, ensuring they are hidden from view. Place the pins at regular intervals, spacing them out evenly for a secure attachment.
3. For added stability, you can angle the pins slightly towards the mattress or use pins with wider heads to prevent them from slipping out.
4. Take a step back and check the appearance of the bed skirt, adjusting any wrinkles or folds as necessary.
5. Keep in mind that if you choose to use pins, you should regularly check and ensure that they are secure and not posing any safety hazards or risks to your baby.
Using Velcro:
1. Start by cutting Velcro strips into smaller segments, around 2 to 3 inches in length.
2. Attach one side of the Velcro strip to the inside of the crib, along the top edge or side of the mattress platform. Ensure the Velcro strip is evenly spaced and aligned with the corresponding side of the bed skirt.
3. Attach the other side of the Velcro strip to the bed skirt, ensuring it aligns with the Velcro strip on the crib. Secure the Velcro strip onto the bed skirt with sewing or strong fabric adhesive, following the Velcro manufacturer’s instructions.
4. Repeat this process at regular intervals around the crib, ensuring a secure attachment of the bed skirt.
5. Double-check the alignment and positioning of the bed skirt, making any necessary adjustments to achieve an even and polished appearance.
Using pins or Velcro to secure the bed skirt to the crib provides a practical solution to keep the skirt in place while allowing for easy removal and cleaning. Choose the option that best suits your needs and preferences, ensuring that the bed skirt is securely attached for safety and stability.
In the concluding section, we will provide some final thoughts and tips for maintaining the bed skirt’s appearance after it’s attached to the crib.
Ensuring proper fit and alignment
After attaching the baby crib bed skirt to the crib using pins or Velcro, it’s important to ensure a proper fit and alignment. This ensures that the bed skirt looks clean and polished, enhancing the overall aesthetic of your baby’s nursery. In this section, we will provide some tips for ensuring proper fit and alignment, as well as some final thoughts on creating and maintaining your bed skirt.
Ensuring Proper Fit and Alignment:
– Regularly check the bed skirt to ensure it remains securely attached and evenly positioned around the crib.
– Adjust the bed skirt as needed to maintain a straight and even hemline, ensuring it is not sagging or hanging too low.
– Smooth out any wrinkles or folds in the fabric to create a tidy and polished appearance.
– In the case of a drop-style bed skirt, ensure the length is consistent and covers the storage area underneath the crib evenly.
– Consider measuring the bed skirt periodically to verify it continues to fit properly and adjust as necessary.
Read more: How To Measure The Drop For A Bed Skirt
Conclusion:
Congratulations on creating a beautiful and custom baby crib bed skirt! By selecting the right fabric, taking accurate measurements, cutting and sewing with precision, and adding decorative elements, you have crafted a unique and personalized piece for your baby’s nursery.
Remember, the bed skirt not only adds an aesthetic touch but also conceals any storage space under the crib, creating a clean and organized look. By attaching it securely to the crib using pins or Velcro, you can ensure that the bed skirt stays in place, providing a cohesive and polished appearance.
Regularly inspect the bed skirt to ensure that it remains securely attached and properly fitted. Also, keep in mind that the bed skirt may need to be removed and cleaned periodically to maintain its fresh and tidy appearance.
As your baby’s nursery evolves, you can easily update the bed skirt with new fabrics, decorative elements, or designs to match the changing decor and style.
We hope this comprehensive guide has provided you with the knowledge and inspiration to create a beautiful and functional bed skirt for your baby’s crib. Enjoy the process of making and admiring your handmade creation, and may it bring joy and charm to your baby’s nursery for years to come!
Final thoughts and tips for maintaining the bed skirt
As you admire your beautifully crafted baby crib bed skirt, we would like to provide you with some final thoughts and tips on how to keep it looking fresh and maintained. With proper care and attention, your bed skirt can continue to adorn your baby’s crib for a long time. Here are some recommendations:
– Regularly inspect and clean the bed skirt to remove any dust, dirt, or stains that may accumulate over time.
– Follow the manufacturer’s instructions for caring for the fabric, including washing, drying, and ironing. Different fabrics may require specific care to maintain their appearance and durability.
– When washing the bed skirt, consider using a gentle cycle and mild detergent to prevent damage to the fabric or decorative elements.
– Avoid using harsh chemicals or bleach, as they may cause discoloration or damage to the fabric fibers.
– If the bed skirt is removable, consider washing it separately from other items to prevent tangling and potential damage.
– Iron or steam the bed skirt, if necessary, to remove any wrinkles or creases. Ensure you use the appropriate heat setting for the fabric type.
– Make it a habit to regularly check the attachment method (pins or Velcro) to ensure they remain secure and in good condition. Replace any damaged pins or Velcro as needed.
– If the bed skirt becomes worn or damaged over time, you can consider repairing or replacing specific sections to extend its lifespan.
– When storing the bed skirt, fold it carefully to prevent permanent creases or wrinkles. Store it in a clean and dry place to protect it from dust or moisture.
– Consider rotating and switching out bed skirts periodically to refresh the nursery decor and prevent excessive wear on a single bed skirt.
With these tips in mind, your baby crib bed skirt will continue to enhance the beauty and functionality of the crib area. Enjoy the delightful sight it brings to the nursery and cherish the memories it accompanies throughout your baby’s early years.
Resources
If you’re looking for additional guidance, inspiration, or supplies, here are some resources that may be helpful:
– Online tutorials and sewing blogs that offer step-by-step instructions and creative ideas for making bed skirts.
– Local fabric stores or online fabric retailers where you can find a wide selection of fabrics in various colors, patterns, and textures.
– Sewing communities and forums where you can connect with other sewing enthusiasts and exchange tips and ideas.
– Home decor magazines or websites that showcase nursery designs and trends, providing inspiration for bed skirt styles and fabric choices.
Remember to approach every step of the process with patience, creativity, and attention to detail. Enjoy the satisfaction of creating a unique and personalized bed skirt that adds a special touch to your baby’s crib.
List of recommended tools and materials
Here is a list of recommended tools and materials that you may find useful when making a baby crib bed skirt:
1. Fabric: Choose a fabric that suits your preferences and matches the nursery decor. Consider options like cotton blends, voile, linen, denim, or upholstery fabric, depending on the desired look and durability.
2. Thread: Select high-quality thread that matches or complements the color of your fabric. A polyester or cotton thread in a suitable weight will work well for most fabrics.
3. Sewing Machine: A sewing machine makes the sewing process faster and more efficient. Choose a reliable machine suitable for the fabric types you plan to work with. Ensure it has the necessary stitch settings and features for your project.
4. Fabric Scissors: Invest in a pair of sharp fabric scissors specifically used for cutting fabric. Ensure they are comfortable to hold and provide clean, precise cuts.
5. Measuring Tape: Use a flexible tape measure to accurately measure the length, width, and drop length for your bed skirt. A self-retracting tape measure with clear markings in both inches and centimeters is convenient to use.
6. Pins or Clips: These tools are essential for holding fabric layers together during sewing. Use straight pins for securing hems or attaching fabric pieces, or opt for clips that grip the fabric without leaving marks.
7. Iron and Ironing Board: A steam iron and ironing board are crucial for pressing fabric, creating crisp hems, and removing wrinkles. Ensure your iron has temperature control suitable for different fabric types.
8. Ruler or Straight Edge: A ruler or straight edge helps you draw accurate lines, mark measurements, and create straight seams. Choose one with clear markings in imperial or metric units, depending on your preference.
9. Elastic or Velcro: If desired, choose elastic or Velcro for attaching and securing the bed skirt to the crib. Measure and cut them to the appropriate length to fit your specific crib size.
10. Decorative Elements: Consider adding decorative elements like lace, trim, or fabric appliques for added visual interest. Choose options that match your fabric and complement the nursery decor.
11. Pins or Velcro: Depending on your preferred method of attachment, gather either pins or Velcro strips to secure the bed skirt to the crib. Ensure they are appropriate in size and strength for the task.
12. Optional Accessories: Additional tools that can be handy include a seam ripper (for correcting mistakes), fabric marker or chalk (for marking fabric), and a pressing cloth (to protect delicate fabrics while ironing).
Collecting these tools and materials will help ensure a smooth and efficient sewing process, allowing you to create a beautiful and well-crafted baby crib bed skirt.
Read more: How To Convert A Crib Into A Toddler Bed
Additional resources for inspiration and guidance
If you’re looking for further inspiration and guidance for creating a baby crib bed skirt, here are some additional resources that can be helpful:
1. Sewing Blogs and Websites: Explore popular sewing blogs and websites that offer tutorials, patterns, and creative ideas for making bed skirts. Some well-known sewing blogs include Tilly and the Buttons, Sewing.com, and Sew4Home. These platforms often provide step-by-step instructions, helpful tips, and fabric recommendations.
2. Online Video Tutorials: Platforms like YouTube and Vimeo host a wide array of video tutorials on sewing and crafting. You can find specific videos dedicated to creating bed skirts, demonstrating different techniques, and offering visual guidance. Watching these tutorials can provide a clearer understanding of the construction process.
3. Sewing Books: Explore sewing books that include projects and instructions specifically for baby or nursery-related items. Some popular titles include “Sew Sweet Baby Quilts” by Kristin Roylance, “Sew Modern Baby” by Angela Yosten, and “Sweetly Stitched Handmades: 18 Projects to Sew for You and Your Loved Ones” by Amy Sinibaldi. These books often offer detailed instructions, patterns, and design ideas.
4. Online Sewing Communities and Forums: Joining online sewing communities and forums can connect you with fellow sewing enthusiasts who can provide advice, insights, and support. Websites like Sewing Pattern Review and Sewing.com have active forums where you can ask questions, share your progress, and seek inspiration.
5. Fabric Stores: Visit local fabric stores or browse their websites to get hands-on experience with various fabric options. Fabric store staff can often provide guidance on suitable fabric types, colors, and patterns for bed skirts. They may also have pattern books or samples that can spark ideas for your project.
6. Social Media: Engage with sewing communities on social media platforms like Instagram and Pinterest. Search for relevant hashtags such as #sewingprojects, #bedskirtsewing, or #nurserydecor to discover a wealth of photos, tips, and tutorials shared by fellow sewers. Follow sewing influencers or join sewing groups to join the conversation and find ongoing inspiration.
Remember to adapt and personalize ideas found from these resources to match your style, preference, and the specific dimensions of your baby’s crib. Enjoy the creative process and embrace the opportunity to craft a unique and beautiful bed skirt that will add a special touch to your baby’s nursery.
Frequently Asked Questions about How To Make A Baby Crib Bed Skirt
Was this page helpful?
At Storables.com, we guarantee accurate and reliable information. Our content, validated by Expert Board Contributors, is crafted following stringent Editorial Policies. We're committed to providing you with well-researched, expert-backed insights for all your informational needs.


0 thoughts on “How To Make A Baby Crib Bed Skirt”