Articles
How To Date An Antique Steamer Trunk
Modified: February 19, 2024
Learn the best techniques and tips for dating antique steamer trunks in our informative articles. Discover valuable insights to help you assess and date your prized possessions.
(Many of the links in this article redirect to a specific reviewed product. Your purchase of these products through affiliate links helps to generate commission for Storables.com, at no extra cost. Learn more)
Introduction
Antique steamer trunks carry a certain charm and allure that harks back to a bygone era. These beautifully crafted trunks were once a staple of travel, accompanying passengers on long voyages and cross-country expeditions. Today, they have become sought-after pieces for collectors and interior enthusiasts alike.
If you’re intrigued by the idea of owning an antique steamer trunk and want to learn more about how to date and care for one, you’ve come to the right place. In this article, we will explore the fascinating world of antique steamer trunks, providing you with valuable insights on researching, identifying, and evaluating these timeless pieces of history.
Whether you stumbled upon a trunk at a flea market, inherited one from a relative, or simply appreciate their unique aesthetic, understanding how to date an antique steamer trunk is key to appreciating its value and history. By examining its features, materials, and design elements, you can unlock clues that will help piece together its origin and age.
But dating an antique steamer trunk is just the beginning – there are many other aspects to consider, such as cleaning, restoring, and caring for these treasured heirlooms. We will delve into these topics as well, equipping you with the knowledge and techniques required to keep your trunk looking its best and ensuring its longevity for generations to come.
So, if you’re ready to embark on a journey into the world of antique steamer trunks, grab your magnifying glass and let’s delve into the fascinating realm of these historic artifacts.
Key Takeaways:
- Uncover the secrets of antique steamer trunks by researching, identifying, and dating these captivating artifacts. Preserve their historical significance and embark on a journey through time as a collector or admirer.
- Care for and display antique steamer trunks with attention to detail, preserving their unique charm and historical value. Share their stories and contribute to the legacy of these treasured pieces for future generations to appreciate.
Read more: Where To Buy Steamer Trunks
Understanding Antique Steamer Trunks
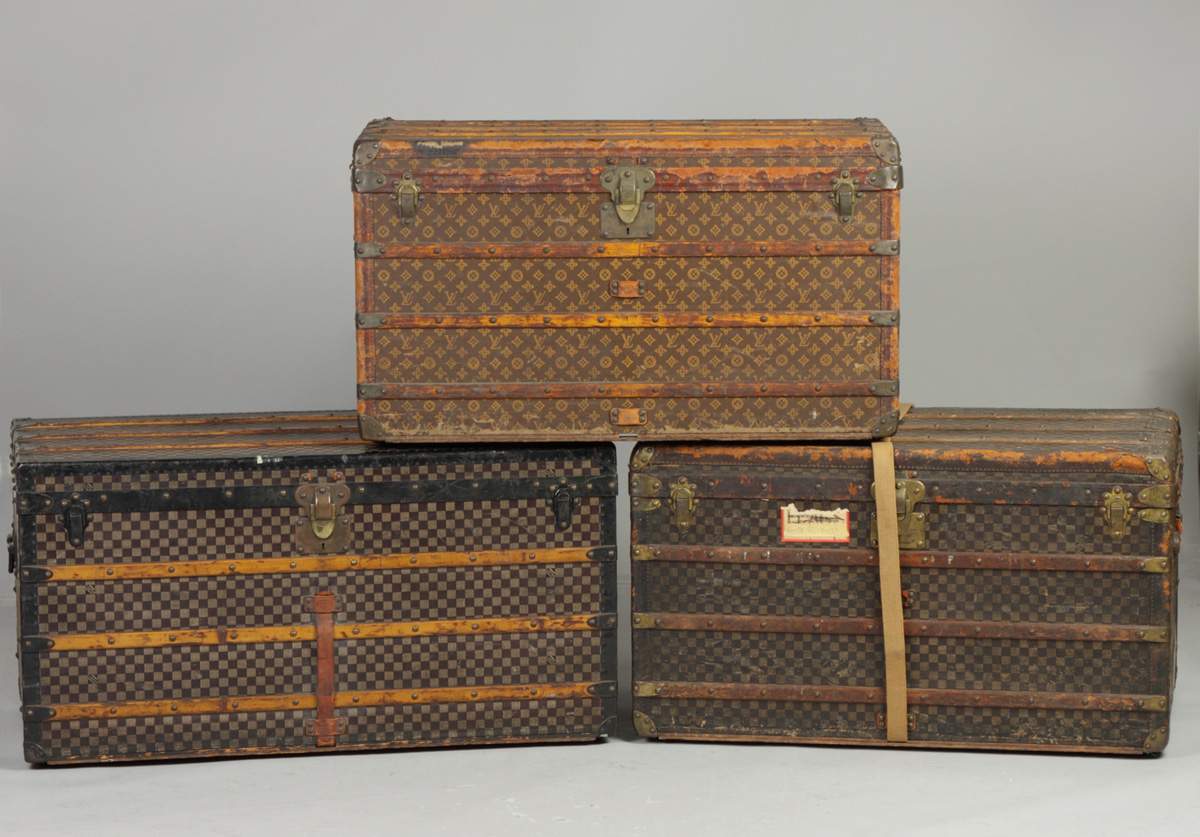
Antique steamer trunks, also known as cabin trunks or travel trunks, were originally designed to withstand the rigors of travel by steamship and train during the late 19th and early 20th centuries. They were built to be durable, functional, and stylish, catering to the needs of affluent travelers of the time.
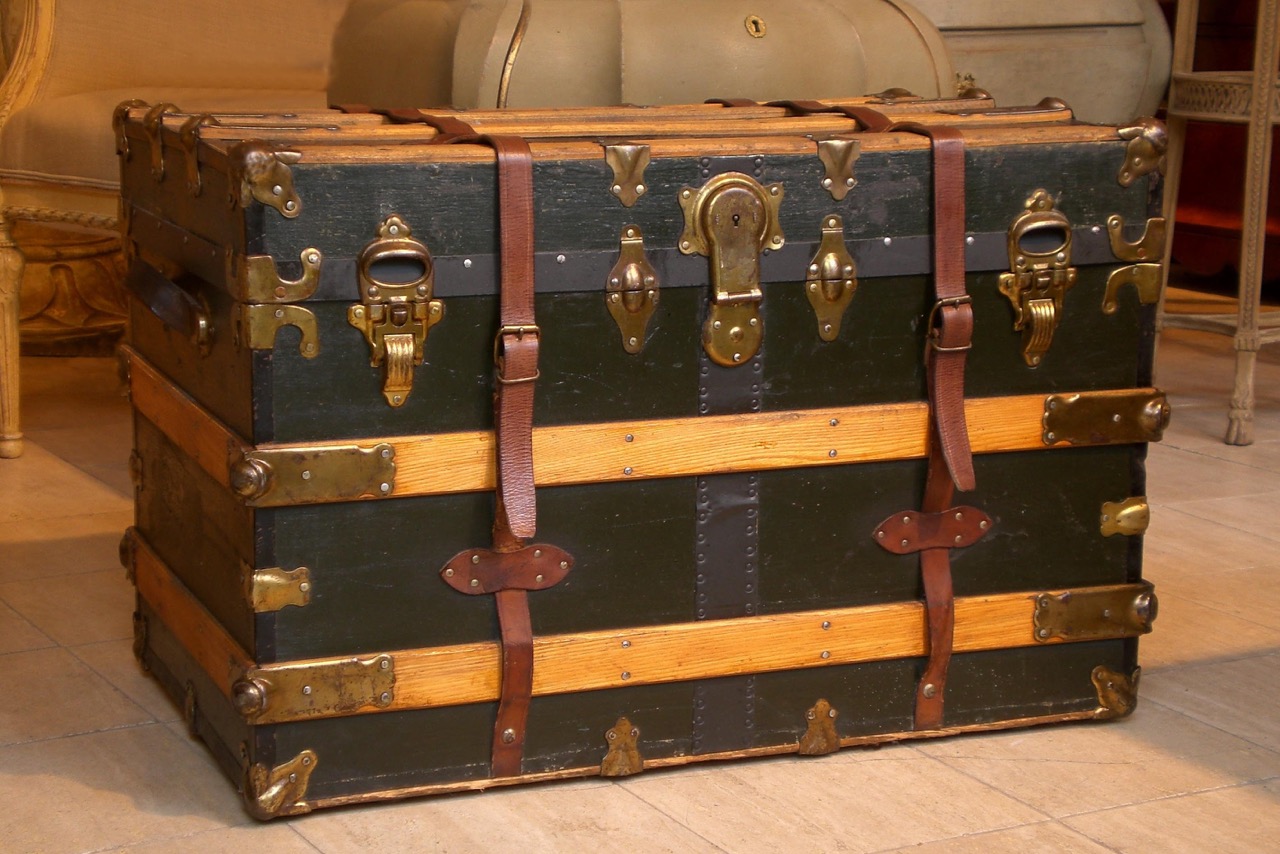
These trunks were typically made from a variety of materials, including wood, metal, and leather. The wooden frames provided structural support, while metal components such as clasps, hinges, and locks added strength and security. Leather coverings were often used to protect the trunk from moisture and abrasions during transit.
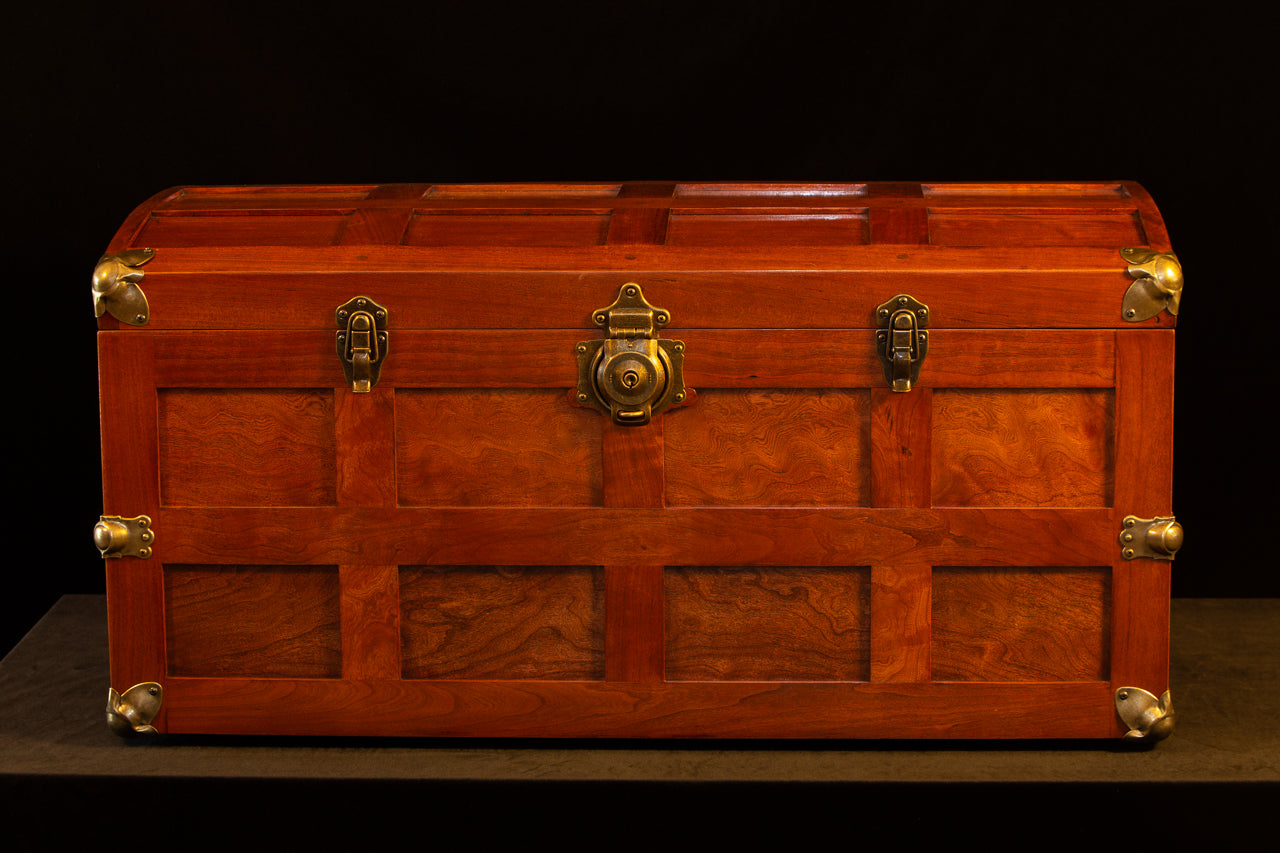
One distinguishing feature of antique steamer trunks is their distinctive shape. They are typically rectangular in shape, featuring a sloped or dome-shaped lid to allow rainwater to run off easily. This design prevented water from pooling on top of the trunk during outdoor travel, ensuring the contents remained dry.
Antique steamer trunks were also designed with practicality in mind. They often had leather handles or metal side handles, making them easy to carry or load onto a ship or train. Many trunks were equipped with removable trays or compartments to organize belongings, while others had built-in drawers to further facilitate storage.
When it comes to aesthetics, antique steamer trunks exhibit a wide range of styles and designs. Some trunks were adorned with elaborate brass or metal decorations, while others featured ornate carvings or embossed patterns on the wooden exterior. These decorative elements were often indicative of the time period and the trunk’s country of origin.
Understanding the key features of antique steamer trunks is crucial for dating and identifying them accurately. By familiarizing yourself with these characteristics, you will be better equipped to evaluate the authenticity and value of a potential purchase.
In the next section, we will delve into the process of researching and identifying these captivating artifacts, providing you with the tools to determine their age, maker, and historical significance.
Researching and Identifying Antique Steamer Trunks
Researching and identifying antique steamer trunks can be an exciting and rewarding endeavor. By delving into the history and characteristics of these trunks, you can uncover valuable information about their origins and makers.
One of the first steps in researching an antique steamer trunk is to examine any visible markings or labels. These can provide important clues about the trunk’s manufacturer, place of production, and sometimes even the specific year it was made. Look for labels on the interior or exterior of the trunk, typically found on the underside of the lid or the sides. These labels may bear the name of the trunk maker or retailer, as well as details about the materials used.
In addition to labels, look for any stamped or engraved markings on metal components such as locks, hinges, or clasps. These markings can indicate the manufacturer or patent information, providing further insights into the trunk’s age.
Another helpful resource for identifying and researching antique steamer trunks is books and online resources. There are numerous publications and websites that specialize in vintage luggage and trunk identification. These sources often feature detailed descriptions, photographs, and historical information about different trunk makers and their creations. By comparing the features and design elements of your trunk to those identified in these resources, you can gain a better understanding of its age and origin.
It’s also worth exploring collector forums and online communities dedicated to vintage trunks. Engaging with fellow enthusiasts and experts can provide valuable insights and guidance in identifying and dating your trunk. Sharing detailed photographs and descriptions can elicit helpful responses and opinions from those with experience in the field.
When researching antique steamer trunks, it’s important to consider the historical context of the trunk’s design and materials. Different time periods and geographic regions may have distinct styles and construction techniques. Understanding the popular trends and materials used during a particular era can give you a better sense of when your trunk was likely produced.
Lastly, consult with reputable antique dealers or appraisers who specialize in vintage luggage. These professionals have extensive knowledge and experience in identifying and valuing antique steamer trunks. They can provide expert opinions and guide you through the research process.
By combining information from labels, markings, books, online resources, and expert advice, you can piece together the history and identity of your antique steamer trunk. In the next section, we will explore how to evaluate the condition of an antique steamer trunk, ensuring you make informed decisions about restoration and care.
Evaluating the Condition of an Antique Steamer Trunk
When considering the purchase or restoration of an antique steamer trunk, it is essential to thoroughly evaluate its condition. Understanding the trunk’s current state will help determine the level of restoration it may require, as well as its overall value.
Begin by examining the trunk’s exterior. Look for any visible damage, such as cracks, splits, or missing pieces of wood or leather. Pay close attention to the corners and edges, as they tend to bear the brunt of wear and tear. It’s normal for antique trunks to show signs of age, but excessive damage may affect both the trunk’s structural integrity and its aesthetic appeal.
Next, assess the trunk’s hardware, including clasps, locks, hinges, and handles. Check for functionality and any signs of corrosion or damage. Original hardware, especially those with unique designs or markings, can be an indication of the trunk’s authenticity and historical value.
The interior of the trunk should also be inspected. Look for any signs of water damage, such as rotting wood, mold, or stains. Moisture can cause irreversible damage to the trunk and its contents. Additionally, check for the presence of any pests or insect infestations, such as termites or beetles, as they can further deteriorate the trunk’s condition.
Consider the overall structure and stability of the trunk. Inspect the joints and seams to ensure they are intact and firmly held together. Trunks with loose joints or weak seams may require professional repairs to prevent further damage.
Additionally, evaluate the trunk’s lid and how it closes. It should fit snugly and close securely, ensuring the contents of the trunk are protected. Warped or misaligned lids can be a sign of structural issues or previous repairs.
Take note of any existing restoration or modifications that may have been done to the trunk. While restoration does not necessarily diminish the value of an antique steamer trunk, it is important to be aware of any alterations made and evaluate their quality and impact on authenticity.
Once you have thoroughly assessed the condition of the trunk, you can make an informed decision about its restoration needs. Minor repairs, such as cleaning, polishing hardware, or replacing missing screws, can often be done by the owner. However, more extensive repairs or restoration work should be entrusted to experienced professionals to ensure the preservation of the trunk’s historical integrity.
By carefully evaluating the condition of an antique steamer trunk, you can determine the level of restoration required and fully appreciate its value and potential. In the next section, we will explore the process of cleaning and restoring an antique steamer trunk.
Cleaning and Restoring an Antique Steamer Trunk
Cleaning and restoring an antique steamer trunk is a delicate process that requires careful attention to detail and respect for its historical value. By following the right techniques and using appropriate materials, you can breathe new life into your trunk while preserving its authenticity.
The first step in cleaning an antique steamer trunk is to remove loose dirt and debris. Use a soft brush or vacuum with a brush attachment to gently remove any dust or dirt from the exterior and interior surfaces. Avoid using harsh chemicals or abrasive cleaners, as they can damage the trunk’s finish.
If the trunk has leather components, such as handles or trim, it is important to condition and protect the leather. Apply a leather conditioner using a soft cloth, following the manufacturer’s instructions. This will help prevent the leather from drying out and cracking over time.
For wooden surfaces, a mixture of mild soap and warm water can be used to clean away grime. Dip a soft cloth or sponge into the soapy water, wring out any excess liquid, and gently wipe down the trunk. Be cautious not to saturate the wood or let water seep into any cracks or joints, as this can lead to swelling and warping. After cleaning, use a dry cloth to remove any remaining moisture.
Brass or metal hardware can be polished using a non-abrasive metal polish or a mixture of vinegar and salt. Apply the polish or vinegar-salt solution to a soft cloth and gently rub the hardware in circular motions. This will remove tarnish and restore the shine. Remember to thoroughly dry the hardware after cleaning to prevent moisture damage.
When it comes to restoring the appearance of the trunk, proceed with caution. The goal is to maintain the trunk’s original character and patina. Refinishing or painting should only be considered as a last resort or if the trunk’s condition is severely compromised. If you suspect a previous refinishing, consult with a professional to determine the best course of action.
Minor repairs, such as replacing missing screws or repairing loose joints, can often be done by the owner. However, major structural or cosmetic repairs are best left to professionals experienced in antique trunk restoration. They have the expertise and knowledge to ensure that the restoration is performed correctly and in line with the trunk’s historical integrity.
Remember, the goal of cleaning and restoring an antique steamer trunk is to enhance its appearance while being mindful of its historical value. Take the time to research and consult with experts to ensure that you are using appropriate techniques and materials for the restoration process.
Next, we will explore the process of dating an antique steamer trunk, uncovering the secrets of its age and origin.
When dating an antique steamer trunk, look for manufacturer’s labels, style of hardware, and construction techniques to determine its age and origin.
Read more: How To Clean Old Steamer Trunk
Dating an Antique Steamer Trunk
Dating an antique steamer trunk is an exciting endeavor that allows you to uncover the history and origin of this captivating piece of luggage. By examining various aspects of the trunk, you can gather valuable clues that will help you determine its age and place it within a specific historical context.
One of the first steps in dating an antique steamer trunk is to examine its design and construction. Different time periods and regions have distinct styles and features that can provide insights into its age. For example, trunks from the late 19th century often have rounded or dome-shaped lids, while those from the early 20th century may feature more rectangular shapes. Additionally, the materials used and the presence of certain hardware or decorative elements can also indicate the trunk’s era of production.
Labels and markings are valuable sources of information when it comes to dating an antique steamer trunk. Look for manufacturer labels located on the interior or exterior of the trunk. These labels often include the name of the trunk maker or retailer, as well as the location of production. Some labels also provide patented dates or serial numbers that can be cross-referenced to determine the trunk’s age.
Examining the hardware of the trunk can also provide insights into its age. Pay attention to the type of locks, hinges, and other metal components. Styles and mechanisms have evolved over time, and certain types of hardware can be attributed to specific time periods. Additionally, markings and engravings on the hardware can help identify the manufacturer and narrow down the trunk’s production timeframe.
The materials used in the construction of the trunk can also give clues about its age. Early trunks were often made from solid wood, while later models may have incorporated plywood or other composite materials. Leather coverings, if present, can also vary in style and quality, reflecting the tastes and manufacturing techniques of the time.
Researching similar trunks from the same era can be a helpful tool in dating your antique steamer trunk. Look for books, online resources, and museum collections that feature trunks from specific time periods. By comparing the features, design elements, and materials of your trunk to those identified in these resources, you can gain a better understanding of its age.
It’s important to note that dating an antique steamer trunk is not an exact science. The information gathered from labels, markings, and design characteristics should be considered as a starting point for further research and analysis. Consulting with antique trunk experts or professional appraisers can provide valuable insights and help verify your findings.
By examining the design, construction, labels, markings, and materials of an antique steamer trunk, you can piece together the puzzle of its age and origin. This knowledge not only adds to the intrigue of owning a piece of history but also contributes to its overall value and appreciation.
In the next section, we will explore how to find and purchase an antique steamer trunk that suits your taste and budget.
Finding and Purchasing an Antique Steamer Trunk
If you’re eager to own an antique steamer trunk, there are various avenues you can explore to find and purchase one that suits your taste and budget. Whether you prefer the excitement of hunting for a hidden gem at flea markets and antique shops or the convenience of online shopping, there are options available to suit every collector’s preference.
One of the best ways to find an antique steamer trunk is by visiting flea markets, antique fairs, and estate sales. These events often attract vendors who specialize in vintage and antique items. Browse through their collections, taking the time to examine the trunks and inquire about their history and condition. Flea markets and antique fairs can be treasure troves of unique and affordable finds, so be prepared to spend time searching and negotiating prices.
Antique shops and vintage stores are another great resource for finding antique steamer trunks. These establishments may have a curated selection of trunks available, allowing you to browse through a range of options. The advantage of shopping in-store is the ability to physically examine the trunks, ensuring they meet your criteria in terms of condition and aesthetic appeal. Keep in mind that prices in antique shops may be higher compared to other sources due to the overhead costs involved in running a brick-and-mortar business.
Online platforms have made it easier than ever to expand your search for antique steamer trunks. Websites and online marketplaces dedicated to antique and vintage items offer a wide range of options from around the world. The advantage of online shopping is the ability to browse through a larger inventory and compare prices easily. However, be cautious when purchasing online and ensure you are buying from reputable sellers who provide detailed descriptions, photographs, and clear return policies.
Auctions can be an exciting way to acquire an antique steamer trunk. Local and online auctions offer the opportunity to bid on trunks, potentially securing a unique piece at a competitive price. Before participating in an auction, familiarize yourself with the bidding process and set a budget to avoid overpaying.
When purchasing an antique steamer trunk, consider factors such as the trunk’s condition, age, rarity, and historical significance. Look for trunks that resonate with your personal style and preferences. Whether you prefer a well-preserved trunk with minimal restoration or one that showcases its age with charming imperfections, select a trunk that speaks to you aesthetically and emotionally.
It is also worth mentioning that prices for antique steamer trunks can vary greatly depending on factors such as condition, rarity, and demand. Take the time to research market values and compare prices across different sources to ensure you’re getting a fair deal.
Lastly, it’s important to ensure proper transportation and care for your newly acquired antique steamer trunk. Consider investing in trunk straps or protective covers to safeguard it during transit and storage.
Now that you’re equipped with strategies for finding and purchasing an antique steamer trunk, it’s time to explore how to care for and display your prized possession. We will delve into these topics in the next section.
Caring for and Displaying an Antique Steamer Trunk
Once you have acquired an antique steamer trunk, caring for it properly is essential to maintain its beauty and preserve its historical significance. Here are some tips to help you care for and display your antique steamer trunk:
1. Cleaning: Regularly dust the exterior and interior surfaces of the trunk with a soft cloth or brush to remove dirt and debris. Avoid using harsh chemicals or abrasive cleaners that can damage the trunk’s finish or materials.
2. Avoid Sunlight and Moisture: Keep your trunk away from direct sunlight, as it can fade the colors and cause the materials to deteriorate over time. Additionally, protect the trunk from excessive moisture, as it can lead to warping, mold growth, and rotting of the wood.
3. Climate Control: Maintain a stable climate in the area where the trunk is displayed. Avoid extreme temperature fluctuations and high levels of humidity, as these can negatively impact the trunk’s condition.
4. Display Surface: Choose a sturdy and level surface to display your trunk. Ensure that the weight is evenly distributed to prevent stress on specific areas of the trunk.
5. Elevating the Trunk: Place the trunk on wooden blocks or a fabric-covered surface to protect it from direct contact with any potential moisture on the floor. This also allows air circulation underneath, helping to prevent issues like mold or mildew.
6. Handling with Care: When moving or handling the trunk, ensure that you lift it properly, supporting its weight evenly from both sides. Avoid dragging or placing heavy objects on top of the trunk, as this can cause unnecessary stress on the structure.
7. Avoid Restoring Unless Necessary: Unless you have expertise in trunk restoration, it’s generally advisable to avoid extensive restoration efforts. Restoring an antique trunk should be done by professionals who specialize in the preservation of historical items.
8. Regular Inspection: Periodically inspect the trunk for any signs of damage, pests, or deterioration. Address any issues promptly to prevent further damage.
9. Document and Preserve: Keep a record of the trunk’s history, including any labels, markings, or provenance. This documentation adds to its historical value and can be passed on to future generations.
10. Enjoy and Share: Display your antique steamer trunk proudly and share its story with others. The charm and history behind these trunks make for intriguing conversations and add character to any space.
By following these care guidelines and displaying your antique steamer trunk with caution and appreciation, you can ensure its longevity and contribute to the preservation of its unique charm and historical value.
With that, we conclude our journey into the world of antique steamer trunks. From understanding their design and historical significance to finding, purchasing, and caring for these captivating artifacts, we hope you now feel equipped to embark on your own adventure as a collector or admirer of these treasured pieces of history.
Remember, each antique steamer trunk has a story to tell, and it is up to us to unlock its secrets and preserve its legacy for future generations to appreciate.
Safe travels and happy collecting!
Conclusion
Antique steamer trunks hold a certain allure and charm that transport us to a bygone era of travel and adventure. These remarkable pieces of history not only serve as functional storage but also offer glimpses into the past and carry stories of their own. From their design and construction to their markings and materials, each trunk has a unique identity waiting to be unraveled.
In this comprehensive guide, we have explored the world of antique steamer trunks, delving into the fascinating aspects of researching, identifying, and dating these captivating artifacts. We have learned how to evaluate their condition, clean and restore them with care, and find and purchase trunks that suit our individual taste and budget.
Caring for and displaying an antique steamer trunk requires attention to detail, an understanding of its vulnerabilities, and a commitment to preserving its historical significance. By implementing proper cleaning and storage practices, as well as creating an optimal display environment, we can ensure the longevity and appreciation of these treasured pieces.
As collectors, enthusiasts, or admirers, we play a vital role in continuing the legacy of antique steamer trunks. By sharing their stories, appreciating their craftsmanship, and documenting their histories, we contribute to the preservation of these artifacts for future generations to enjoy.
So, whether you have just started your journey into the world of antique steamer trunks or are a seasoned collector, we hope that this guide has provided you with the knowledge, insights, and inspiration to embark on your own adventure. The hunt for that perfect trunk, the joy of uncovering its secrets, and the satisfaction of preserving its legacy await you.
Remember to approach each trunk with curiosity and respect, and let it take you on a journey through time. These pieces of history have traveled far and witnessed countless stories, and now they will become part of yours.
May your antique steamer trunks continue to captivate and inspire, and may they bring a touch of nostalgia, elegance, and wonder into your life.
Frequently Asked Questions about How To Date An Antique Steamer Trunk
Was this page helpful?
At Storables.com, we guarantee accurate and reliable information. Our content, validated by Expert Board Contributors, is crafted following stringent Editorial Policies. We're committed to providing you with well-researched, expert-backed insights for all your informational needs.


0 thoughts on “How To Date An Antique Steamer Trunk”