Articles
How To Measure A Toilet Flapper
Modified: October 18, 2024
Learn how to measure a toilet flapper with this informative article. Find out the essential steps to ensure the correct fit for your plumbing needs.
(Many of the links in this article redirect to a specific reviewed product. Your purchase of these products through affiliate links helps to generate commission for Storables.com, at no extra cost. Learn more)
Introduction
Welcome to our comprehensive guide on how to measure a toilet flapper. If you’re experiencing issues with your toilet such as constant running water or insufficient flushing power, a faulty or ill-fitting toilet flapper could be the culprit. Fortunately, measuring the toilet flapper is a straightforward process that you can easily do yourself. By accurately measuring the flapper, you’ll be able to find the right replacement and restore your toilet’s functionality in no time.
In this article, we will walk you through each step of the process, from turning off the water supply to reinstalling the toilet tank lid. We will also provide you with a list of the tools and materials you will need to successfully measure the toilet flapper. So, let’s get started and bring your toilet back to its optimal performance!
Key Takeaways:
- Properly measuring a toilet flapper is crucial for ensuring optimal functionality and finding the right replacement. It prevents water leaks, inefficient flushing, and unnecessary repairs, saving time and money in the long run.
- By accurately measuring the toilet flapper’s diameter and chain length, you can confidently select and install a replacement, restoring your toilet’s efficiency and preventing water waste and leaks.
What is a toilet flapper?
A toilet flapper is a crucial component of a toilet’s flushing system. It is a rubber or plastic valve that is attached to the flush valve at the bottom of the toilet tank. When you flush the toilet, the flapper lifts, allowing water to flow from the tank into the bowl. This creates the necessary pressure to remove waste and refill the bowl with fresh water.
Flappers come in various sizes and designs, but the most common type is a circular or disc-shaped rubber flapper. This flexible rubber flapper is connected to the flush handle with a chain or rod. When the handle is pressed, it lifts the flapper, causing water to rush into the toilet bowl.
The flapper serves a vital role in maintaining the proper flow and sealing of water in the toilet tank. It needs to provide a tight seal when the toilet is not in use to prevent water from continuously flowing into the bowl. A damaged or poorly fitting flapper can lead to several issues, such as water leaks, inefficient flushing, and increased water bills.
Understanding the different types of toilet flappers is essential when it comes to selecting the right replacement. Flappers can vary in size, shape, and composition, depending on the specific toilet model. By correctly measuring the toilet flapper, you can ensure that you choose the appropriate replacement that fits your toilet’s flushing system.
Why is it important to measure a toilet flapper?
Measuring a toilet flapper is crucial for two main reasons: ensuring proper functionality and finding the right replacement. Let’s explore why it’s essential to measure your toilet flapper before replacing it.
1. Proper functionality: A toilet flapper needs to create a watertight seal when the toilet is not in use. If the flapper is too small, it may not cover the entire flush valve opening, causing water to continuously leak into the bowl. On the other hand, if the flapper is too large, it may not fit properly or create a tight seal, resulting in inefficient flushing and water wastage. By accurately measuring the flapper, you can ensure that it matches the dimensions required for your toilet’s optimal functionality.
2. Finding the right replacement: There are countless variations of toilet flappers available in the market, each designed to fit specific toilet models and tank sizes. Measuring the flapper will help you determine its diameter, chain length, and shape, making it easier to find a replacement that matches your toilet’s requirements. Installing the wrong-sized flapper can lead to issues such as water leaks, uneven flushing, or even damaging the toilet’s flush valve. By measuring your existing flapper, you can make an informed decision and choose the correct replacement for a hassle-free installation.
Accurate measurement is vital for maintaining the longevity and efficient performance of your toilet. By ensuring a well-fitted flapper, you can prevent water waste, reduce the risk of leaks, and enjoy optimal flushing power. Additionally, choosing the right replacement based on measurements can save you time and money by avoiding the need for multiple trips to the store or ordering incorrect parts online.
To measure a toilet flapper correctly, gather a few essential tools and follow the step-by-step process outlined in the upcoming sections. It’s a straightforward procedure that anyone can perform, even with minimal plumbing experience.
Tools and materials needed
Before you begin measuring your toilet flapper, gather the following tools and materials:
- Measuring tape or ruler: You will need a measuring tool to accurately measure the diameter of the flapper.
- Paper and pen: It’s a good idea to have a notepad and pen handy to write down the measurements as you go.
- Flashlight: Since you’ll be working inside the toilet tank, a flashlight will help illuminate the area and make it easier to see the flapper and its components.
- Gloves: Wearing gloves will protect your hands from any dirt or grime that may be present in the toilet tank.
- Toilet shut-off valve: Having a functioning shut-off valve is important in case you need to temporarily stop the flow of water to the toilet during the measurement process.
- Replacement flapper (optional): If you suspect that your current flapper needs to be replaced, it’s a good idea to have a suitable replacement on hand to install once you’ve measured it.
By having these tools and materials ready, you’ll be well-prepared to measure your toilet flapper accurately and efficiently. Remember to exercise caution when working with the toilet tank components and follow the necessary safety precautions to avoid any accidents or damage to your toilet.
Step 1: Turn off the water supply
Before you start working on measuring the toilet flapper, it is essential to turn off the water supply to the toilet. This will prevent any water flow while you are performing the measurement. Follow these steps to turn off the water supply:
- Locate the shut-off valve: The shut-off valve is typically located on the wall behind or near the toilet. It is a small valve with a lever or knob.
- Turn off the water supply: Rotate the shut-off valve clockwise until it is fully closed. This will stop the flow of water to the toilet tank.
- Flush the toilet: After closing the shut-off valve, flush the toilet to remove any water that is still in the tank. This will ensure that the tank is empty before you proceed with measuring the flapper.
By turning off the water supply, you eliminate the risk of accidental water leakage or flooding while you work on measuring the toilet flapper. It is a crucial step to ensure your safety and a dry working environment.
Note: If you find that the shut-off valve is not functioning correctly or doesn’t shut off the water supply, you may need to shut off the main water supply to your house temporarily. Consult a professional plumber if you are unsure how to do this.
Read more: How To Paint Vaulted Ceiling
Step 2: Remove the toilet tank lid
With the water supply turned off, it’s time to remove the lid of the toilet tank. Follow these steps to safely remove the lid:
- Locate the lid: The toilet tank lid is typically made of porcelain or plastic and rests on top of the tank. Look for any screws, clips, or tabs that may be securing the lid in place.
- Unfasten any securing mechanisms: If the lid is held in place by screws, use a screwdriver to undo them. If it has clips or tabs, gently push or lift them to release the lid.
- Lift and remove the lid: With the securing mechanisms undone, carefully lift the lid straight up and remove it from the toilet tank. Set it aside on a stable surface where it won’t get damaged.
Removing the toilet tank lid will provide you with clear access to the inside of the tank, allowing you to locate and measure the toilet flapper accurately. Be mindful of the lid’s weight and delicate materials, as dropping or mishandling it can result in breakage.
During this step, take a moment to inspect the inside of the tank for any signs of damage, leaks, or worn-out parts. This will help you identify any additional repairs or replacements that may be necessary. If you notice any issues, it’s advisable to consult a professional plumber for assistance.
With the lid removed, you are ready to proceed to the next step of measuring the toilet flapper.
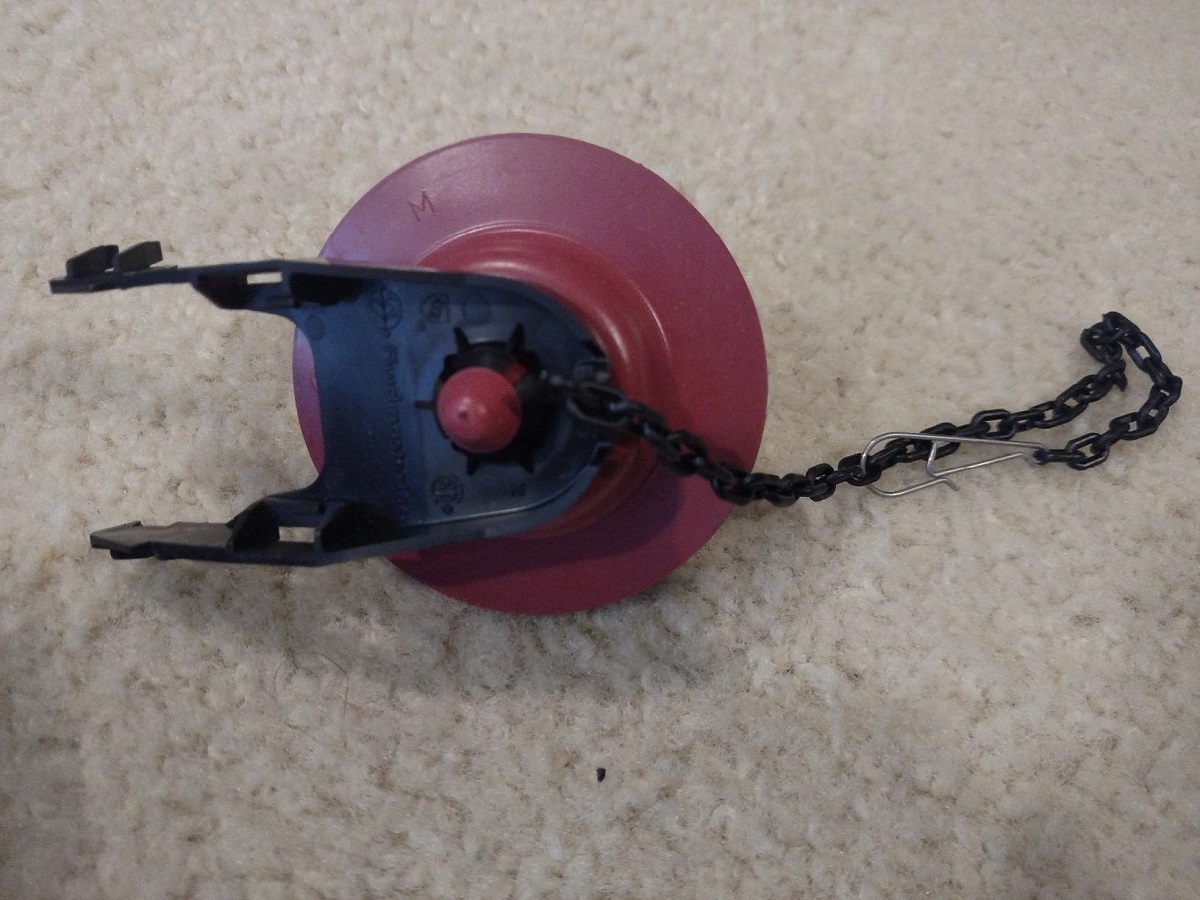
When measuring a toilet flapper, be sure to measure the diameter of the flapper and the length of the chain to ensure you get the right replacement part.
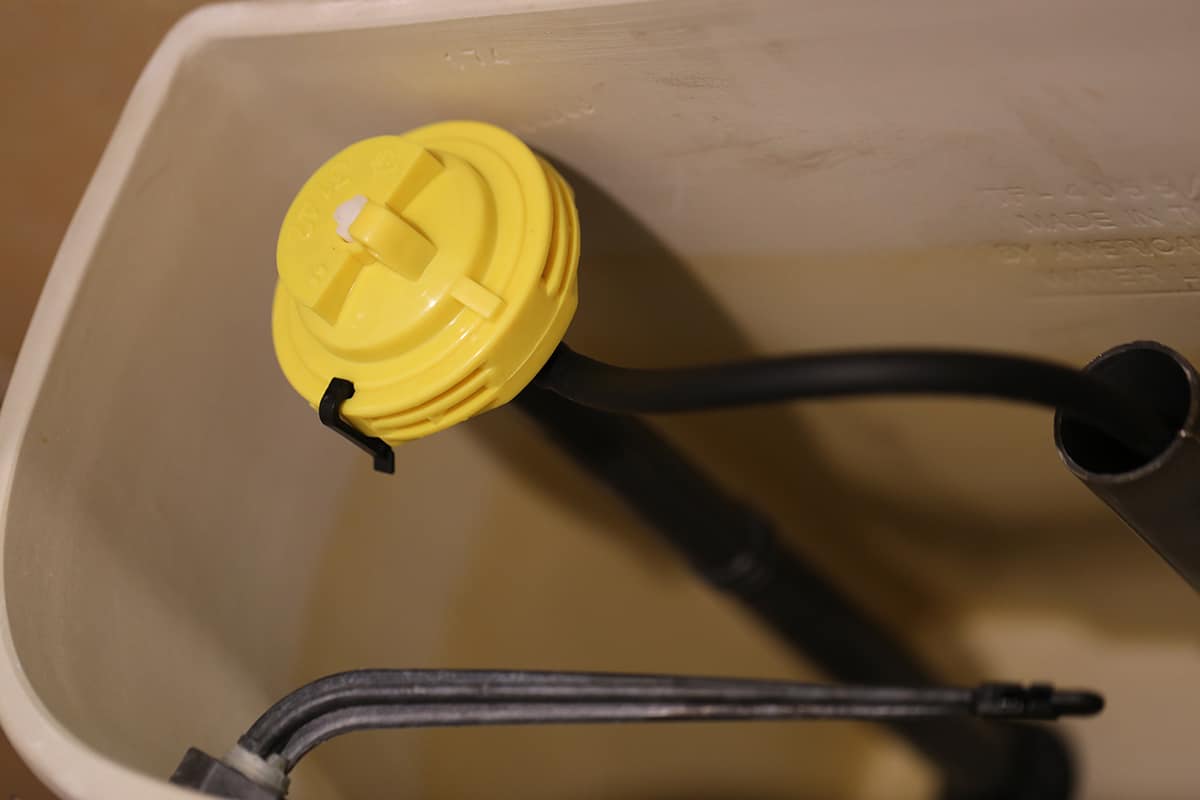
Step 3: Locate the toilet flapper
Now that you have removed the toilet tank lid, it’s time to locate the toilet flapper. The flapper is typically positioned at the bottom of the toilet tank and is connected to the flush valve. To locate the flapper, follow these steps:
- Observe the interior of the tank: Take a moment to familiarize yourself with the different components inside the toilet tank. Look for a rubber or plastic valve that covers the flush valve opening at the bottom of the tank. This valve is the flapper.
- Identify the chain or rod: The flapper is connected to the flush handle via a chain or rod. Locate the chain or rod and make note of its position and length. This information will be useful when measuring the chain in the following steps.
- Inspect the flapper: Take a close look at the flapper to check for any signs of damage, cracks, or deterioration. If the flapper appears to be in poor condition, it may need to be replaced. However, it is still important to measure the flapper accurately before purchasing a new one.
Locating the toilet flapper is crucial as it allows you to identify the specific measurements needed for a replacement. By understanding the position and condition of the flapper, you can ensure a proper fit and optimal performance when installing a new one.
Once you have located the flapper, proceed to the next step to measure its diameter and chain length.
Step 4: Measure the toilet flapper diameter
Measuring the diameter of the toilet flapper is essential to ensure that you choose the correct replacement. Follow these steps to measure the flapper diameter accurately:
- Prepare the measuring tool: Use a measuring tape or ruler to measure the diameter of the flapper. Make sure the measuring tool is long enough to span the entire diameter of the flapper.
- Find the widest point of the flapper: Identify the widest part of the flapper, which is the outer edge that forms a circle. This is the area you will be measuring.
- Place the measuring tool: Gently place the measuring tape or ruler across the widest point of the flapper. Ensure that the measuring tool is aligned perpendicular to the flapper’s surface.
- Read the measurement: Take note of the measurement indicated by the measuring tape or ruler. Be as precise as possible, recording the measurement in inches or millimeters.
By accurately measuring the flapper diameter, you can select a replacement that perfectly fits your toilet’s flushing system. Installing a flapper with the correct diameter will ensure a proper seal and prevent any water leakage or inefficient flushing.
Remember to jot down the measurement and keep it handy when shopping for a replacement flapper. It is a good idea to double-check the measurement to ensure accuracy and avoid any mistakes in the purchasing process.
Now that you have measured the flapper’s diameter, proceed to the next step to measure the flapper chain length.
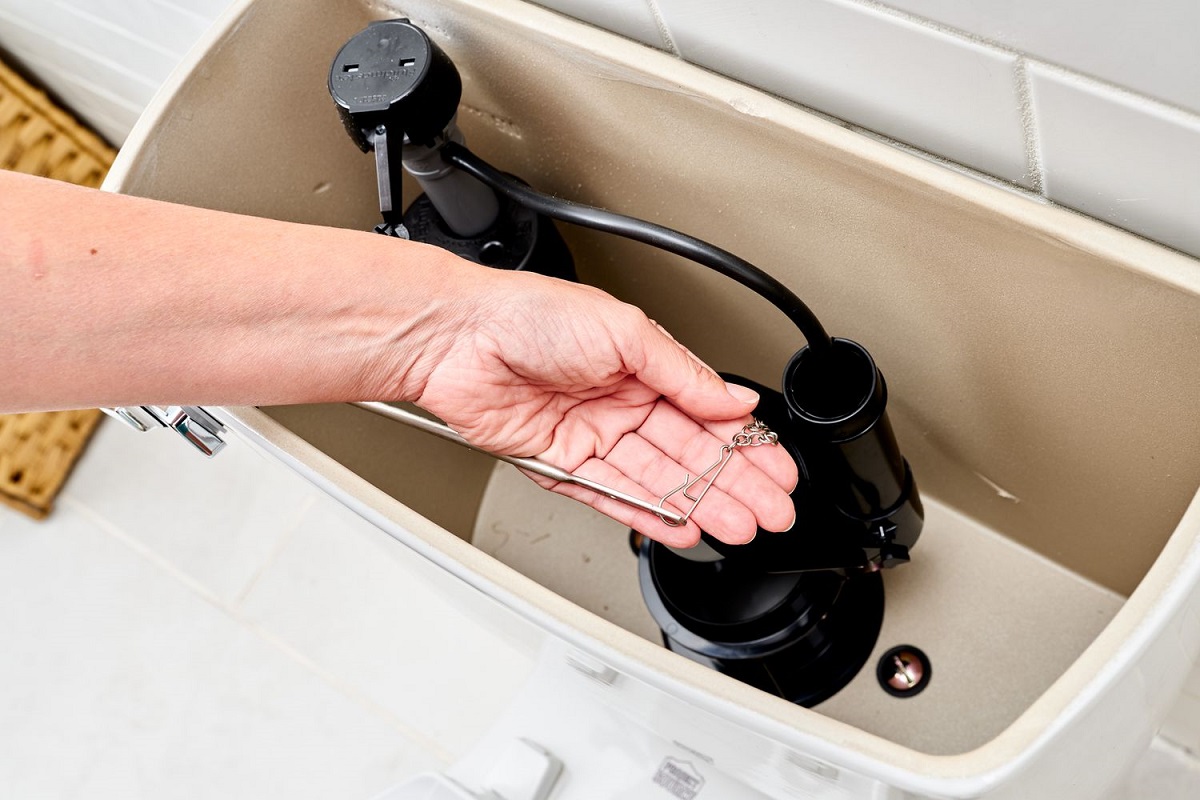
Step 5: Measure the toilet flapper chain length
Measuring the length of the toilet flapper chain is important to ensure that it is properly connected and functions correctly. Follow these steps to measure the flapper chain length accurately:
- Locate the flapper chain: Identify the chain that connects the flapper to the flush handle. It is usually made of metal or plastic and hangs down inside the toilet tank.
- Straighten the chain: Make sure the chain is free from any twists or tangles and is hanging straight down from the flapper.
- Measure the chain length: Use a measuring tape or ruler to measure the length of the chain from the top of the flapper to the connection point on the flush handle. Be sure to pull the chain taut while taking the measurement.
- Record the measurement: Note down the measurement in inches or centimeters. This will help you find a replacement flapper that has a chain of the appropriate length.
Measuring the flapper chain length ensures that the chain is long enough to operate the flapper smoothly. If the chain is too short, it can prevent the flapper from fully closing, leading to water leaks. On the other hand, if the chain is too long, it can get tangled or caught, affecting the proper functioning of the flush mechanism.
By accurately measuring the flapper chain length, you can ensure that the replacement flapper you choose has a chain of the right size, leading to optimal performance and efficient flushing of your toilet.
With the flapper chain length measured, you’re ready to move on to the next step of reinstalling the toilet tank lid.
Read more: How To Keep Fence Posts From Rotting
Step 6: Reinstall the toilet tank lid
Now that you have measured the toilet flapper and chain, it’s time to reinstall the toilet tank lid. Follow these steps to securely put the lid back in place:
- Position the lid correctly: Align the lid with the tank, ensuring that it sits properly and covers the opening completely. Take note of any notches or grooves on the tank where the lid should fit.
- Lower the lid onto the tank: Carefully lower the lid onto the tank, making sure it sits evenly and snugly. Avoid applying excessive force or putting pressure on any fragile parts of the lid.
- Secure the lid: If the lid has screws, clips, or tabs, fasten them back into their respective positions. Use a screwdriver if necessary to tighten any screws securely. For models with tabs or clips, push or snap them into place until you hear a click.
- Double-check the alignment: Once the lid is secured, ensure that it is properly aligned with the tank and sits flush. Adjust it if needed to achieve a balanced and symmetrical appearance.
Reinstalling the toilet tank lid is an important step as it not only provides a finished look but also helps to protect the inner components of the tank. It ensures that the flapper and other parts remain in their correct positions and function optimally.
Take a moment to inspect the lid and tank for any signs of damage or cracks. If you notice any issues, it may be necessary to replace the lid to ensure the longevity and proper functioning of your toilet.
With the lid securely back in place, you’re ready for the final step of turning on the water supply to your toilet.
Step 7: Turn on the water supply
With the toilet tank lid properly reinstalled, it’s time to turn on the water supply and test your newly measured flapper. Follow these steps to restore the water flow:
- Locate the shut-off valve: Refer back to the shut-off valve that you turned off in the first step. It is usually located near the base of the toilet or on the wall behind the toilet.
- Turn on the water supply: Rotate the shut-off valve counterclockwise to open it and allow water to flow into the toilet tank.
- Monitor the tank filling: Keep an eye on the tank as it fills with water. Listen for any unusual sounds or observe any leaks that may occur during the filling process. If you notice any leaks, immediately shut off the water supply and double-check the installation of the flapper and tank components.
- Check the functionality: Once the tank has filled, test the toilet’s flushing mechanism. Gently press the flush handle to ensure that the flapper lifts and allows water to flow into the toilet bowl. Release the handle and verify that the flapper closes completely, stopping the flow of water.
- Observe for leaks: Take a moment to inspect the toilet base and surrounding areas for any signs of water leaks. It’s crucial to ensure that the flapper and other components are properly installed and do not allow water to escape when not in use.
By turning on the water supply and testing the functionality of the flapper, you can ensure that the measurement and installation process was successful. Proper water flow and a watertight seal are essential for the efficient operation of your toilet.
If any issues persist, such as water leaks or improper flushing, it may be necessary to reassess the measurement and installation of the flapper or consult a professional plumber for further assistance.
Congratulations! You have now completed the process of measuring a toilet flapper and restoring your toilet’s functionality. With the correct measurements in hand, you can confidently select and install a replacement flapper, ensuring the smooth operation of your toilet for years to come.
Conclusion
Measuring a toilet flapper is a simple yet important task that can help address various issues with your toilet’s functionality. By accurately measuring the flapper’s diameter and chain length, you can ensure a proper fit and optimal performance, ultimately preventing water leaks, inefficient flushing, and excessive water bills.
In this comprehensive guide, we’ve outlined the step-by-step process to measure a toilet flapper effectively. From turning off the water supply to reinstalling the toilet tank lid, each step plays a crucial role in ensuring a successful measurement and replacement process.
Remember to gather the necessary tools and materials before you start, such as a measuring tape, paper, pen, flashlight, gloves, and a replacement flapper if needed. Take care to follow safety guidelines and handle the toilet tank lid with caution to avoid any accidents or damage.
Once you’ve measured the flapper’s diameter and chain length accurately, you’ll be ready to find the perfect replacement flapper that matches your toilet’s specifications. Installing the right flapper will restore your toilet’s functionality, reduce water waste, and save you from unnecessary repairs or replacements in the future.
If you encounter any challenges during the measurement process or if your toilet continues to exhibit issues even after replacing the flapper, it may be best to consult a professional plumber for further assistance and guidance.
By taking the time to measure your toilet flapper correctly, you are investing in the long-term efficiency and performance of your toilet. So go ahead, follow the steps outlined in this guide, and enjoy a properly functioning toilet that saves you water, money, and unnecessary headaches.
Now that you've mastered measuring a toilet flapper, why stop there? Dive deeper into maintaining your bathroom's efficiency with our detailed guides. If you're tackling common commode issues, check out our latest insights on toilet repair, perfectly suited for 2024. For those considering an upgrade, explore our guide on selecting the best toilet flapper replacements, ensuring you find the perfect match for your needs. Both articles are packed with practical advice to keep your toilet in top shape!
Frequently Asked Questions about How To Measure A Toilet Flapper
Was this page helpful?
At Storables.com, we guarantee accurate and reliable information. Our content, validated by Expert Board Contributors, is crafted following stringent Editorial Policies. We're committed to providing you with well-researched, expert-backed insights for all your informational needs.


0 thoughts on “How To Measure A Toilet Flapper”