Articles
How To Change A Toilet Flapper
Modified: October 18, 2024
Learn how to change a toilet flapper with this informative article. Find step-by-step instructions and helpful tips to fix your toilet efficiently.
(Many of the links in this article redirect to a specific reviewed product. Your purchase of these products through affiliate links helps to generate commission for Storables.com, at no extra cost. Learn more)
Introduction
Changing a toilet flapper is a simple yet essential task that every homeowner should know how to do. The flapper is a small rubber or silicone valve that controls water flow from the tank to the bowl when you flush the toilet. Over time, flappers can become worn or damaged, leading to leaks, constant running water, and increased water bills. By replacing the flapper, you can quickly and easily fix these issues and restore your toilet to its proper functioning.
In this article, we will guide you through the step-by-step process of changing a toilet flapper. We will explain the tools and materials you will need, and provide detailed instructions to ensure a successful and efficient replacement. Whether you are a DIY enthusiast or simply looking to save some money on plumbing repairs, this article is for you.
Before we dive into the steps, it’s important to understand how the toilet flapper works and why it may need to be replaced. The flapper is located at the bottom of the toilet tank, connected to the flush valve. When you press the flush lever, it is the flapper that lifts and allows water to flow from the tank into the bowl, creating the flush. Once the flushing is complete, the flapper closes, preventing any more water from entering the bowl.
Over time, the flapper can deteriorate due to the exposure to water and chemicals in the tank. This deterioration can result in a variety of issues, such as leaks, weak flushes, or a toilet that constantly runs. By inspecting the flapper and replacing it if necessary, you can maintain the proper functioning of your toilet and prevent further problems down the line.
Now that you understand the importance of the toilet flapper and why it needs to be replaced, let’s move on to the next section, where we will discuss the necessary tools and materials for this project.
Key Takeaways:
- Save money and prevent water waste by learning to change a toilet flapper. Follow the step-by-step guide to ensure a properly functioning toilet and efficient flushing.
- Regularly inspect and clean the flapper seat to maintain optimal performance and prevent leaks, weak flushes, and running toilets. Master this DIY skill for a more efficient bathroom experience.
Read more: How To Change Toilet Paper Roll
Understanding the Toilet Flapper
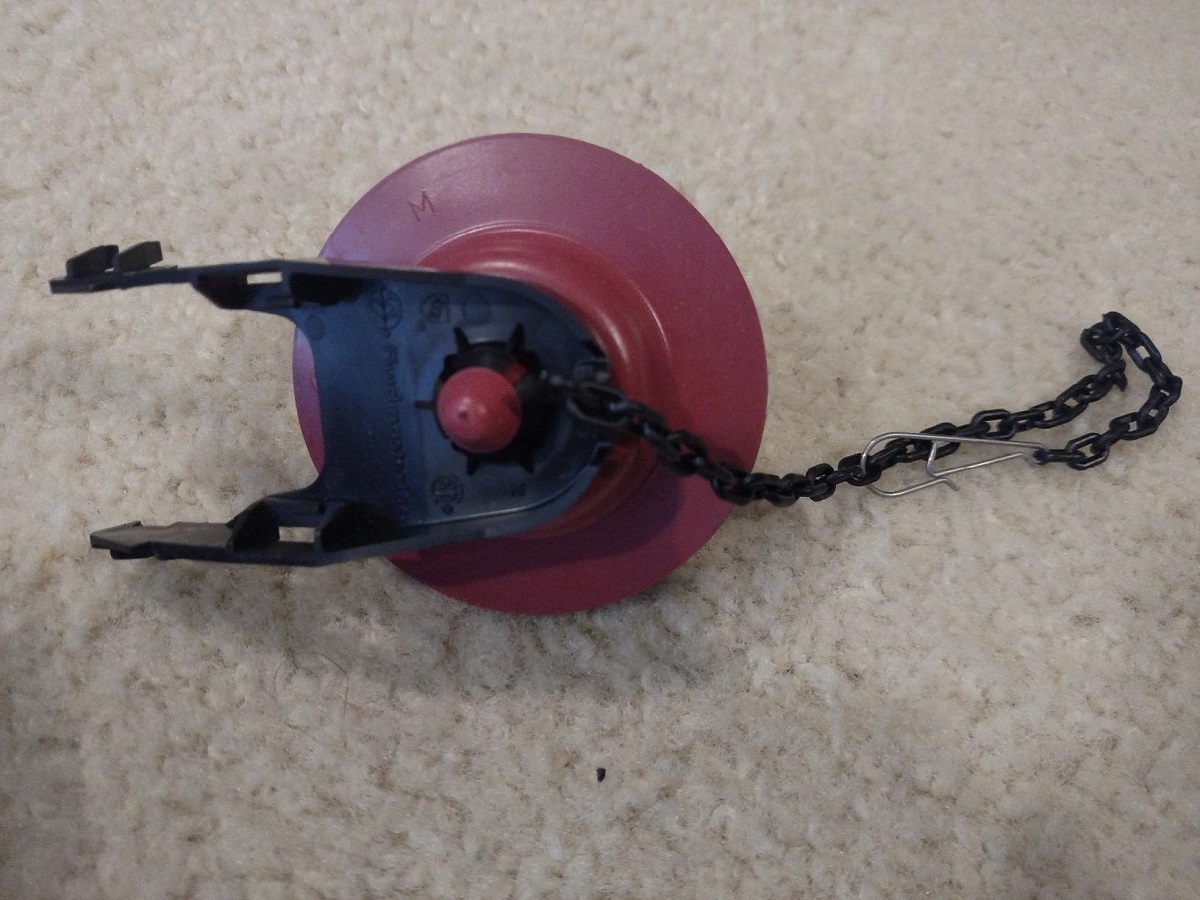
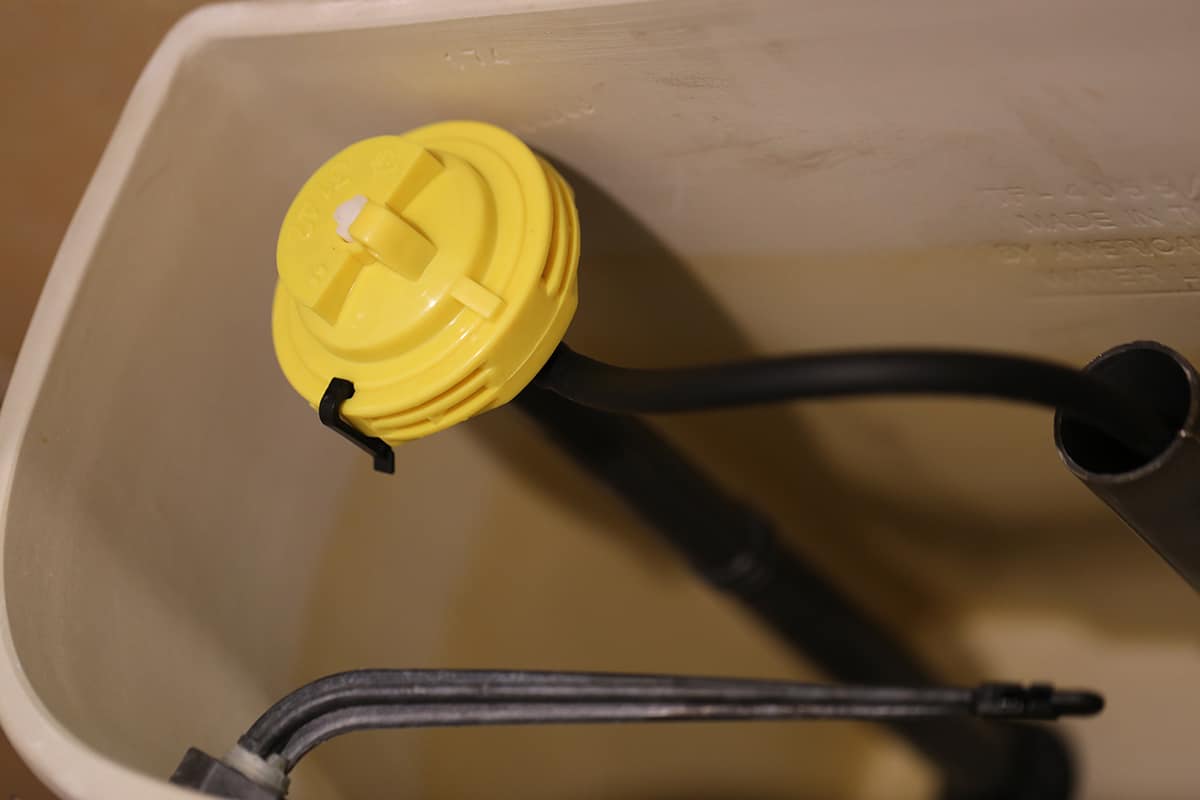
Before you begin replacing a toilet flapper, it’s essential to have a clear understanding of what it is and how it works. The flapper is a small valve located at the bottom of the toilet tank. It’s typically made of rubber or silicone and is connected to the flush valve. Its main function is to control the flow of water from the tank into the bowl when you flush the toilet.
When you press the flush lever, it lifts the flapper, allowing water to flow from the tank and into the bowl. This creates the necessary pressure to remove waste from the bowl. Once the flushing action is complete and you release the flush lever, the flapper closes, sealing off the opening and preventing any further water from entering the bowl.
There are several common issues that can occur with the toilet flapper, indicating that it may need to be replaced:
- Leaking: If you notice water continually running into the toilet bowl when the tank is full, it can indicate a problem with the flapper. A worn or damaged flapper may have difficulty creating a proper seal, leading to water leakage.
- Weak Flush: If your toilet is not flushing with enough power, it could be due to a flapper that is not lifting fully or closing properly. This reduced water flow can result in an inefficient flush.
- Running Toilet: If your toilet tank constantly refills, it could be a sign that the flapper is not sealing correctly after flushing. This continuous running water can waste a significant amount of water and increase your water bill.
- Worn or Damaged Flapper: With time and regular usage, the flapper can deteriorate, becoming brittle or torn. This can compromise its ability to create a watertight seal, resulting in various issues as mentioned above.
Now that you have a thorough understanding of what a toilet flapper is and the potential problems it can cause, let’s move on to the next section, where we will outline the tools and materials you will need to replace a flapper.
Tools and Materials Needed
Before you begin replacing a toilet flapper, it’s important to gather the necessary tools and materials. Here is a list of items you will need for this project:
- Adjustable Wrench: This tool will be used to disconnect the water supply line from the bottom of the toilet tank.
- Bucket or Towel: It’s always a good idea to have a bucket or towel handy to catch any water that may spill during the process.
- New Toilet Flapper: Make sure to choose a flapper that is compatible with your toilet model. Flappers come in various sizes and styles, so consult your toilet’s manual or consult a plumbing professional if you’re unsure.
- Flapper Chain: In some cases, you may need to replace the chain that connects the flush lever to the flapper. Check the condition of your current chain and replace it if necessary.
- Flapper Seat Cleaner: Over time, mineral deposits and debris can accumulate on the flapper seat, affecting the flapper’s ability to create a tight seal. A flapper seat cleaner or vinegar can be used to clean the seat and ensure optimal performance.
- Rag or Sponge: You will need a rag or sponge to clean and dry the flapper seat before installing the new flapper.
- Flashlight (optional): If the lighting in your bathroom is insufficient, a flashlight can come in handy to help you see and work in the tank.
Once you have gathered all the necessary tools and materials, you are ready to move on to the next section, where we will walk you through the step-by-step process of replacing the toilet flapper.
Step 1: Shut Off the Water Supply
Before you begin replacing the toilet flapper, it’s important to shut off the water supply to the toilet. This will prevent any water from flowing into the tank as you work on the flapper. Here’s how to shut off the water supply:
- Locate the water shut-off valve: The shut-off valve is usually located on the wall behind or near the toilet. It is a small valve with a round handle or lever.
- Turn off the water supply: Turn the handle or lever clockwise (to the right) to shut off the water supply. Keep in mind that older valves may require a few extra turns to fully shut off.
- Flush the toilet: After shutting off the water supply, flush the toilet to drain any water remaining in the tank. Hold down the flush lever until the tank is completely empty.
By shutting off the water supply and flushing the toilet, you ensure that the tank is empty and that no water will flow into the tank while you work on the flapper. This step is essential for your safety and to avoid any potential water damage during the replacement process.
Once you have shut off the water supply and emptied the tank, you can proceed to the next step: draining the tank. This step will prepare the tank for the removal of the old flapper and the installation of the new one.
Step 2: Drain the Tank
With the water supply shut off and the toilet flushed, it’s time to drain the tank. This step is crucial as it ensures that there is no water remaining in the tank, making it easier to remove the old flapper and install the new one. Follow these steps to drain the tank:
- Place a bucket or towel near the toilet: Position a bucket or lay a towel on the floor around the base of the toilet. This will catch any water that may spill during the draining process.
- Locate the tank’s flush valve: Lift the toilet tank lid and look for the flush valve, typically located at the center of the tank. The flush valve has a small overflow tube attached to it.
- Open the tank’s flapper: Locate the flapper in the tank. It is the rubber or silicone valve attached to the flush valve. Lift the flapper or prop it open to allow water to flow out of the tank and into the bowl.
- Hold down the flush lever: Press and hold down the flush lever to initiate the flushing action. This will drain the water from the tank through the open flapper and into the bowl. Hold down the lever until the tank is completely empty.
During this step, it’s common for excess water to splash or spill. Hence, the bucket or towel is there to catch any water and prevent it from damaging your floor or surrounding area. Take your time to ensure that the tank is completely drained before moving on to the next step.
Now that the tank is empty, you’re ready to remove the old flapper in the next step. But before you do, ensure that you have all the necessary tools, materials, and a clear workspace to work comfortably and efficiently.
Read more: How Often Should You Change Toilet Seat
Step 3: Remove the Old Flapper
Now that the tank is drained, it’s time to remove the old flapper. The flapper is attached to the flush valve, and its removal will pave the way for installing the new flapper. Follow these steps to remove the old flapper:
- Inspect the flapper: Take a moment to examine the old flapper and its components. Observe how it is connected to the flush valve, the chain length, and any additional attachments such as hooks or clips.
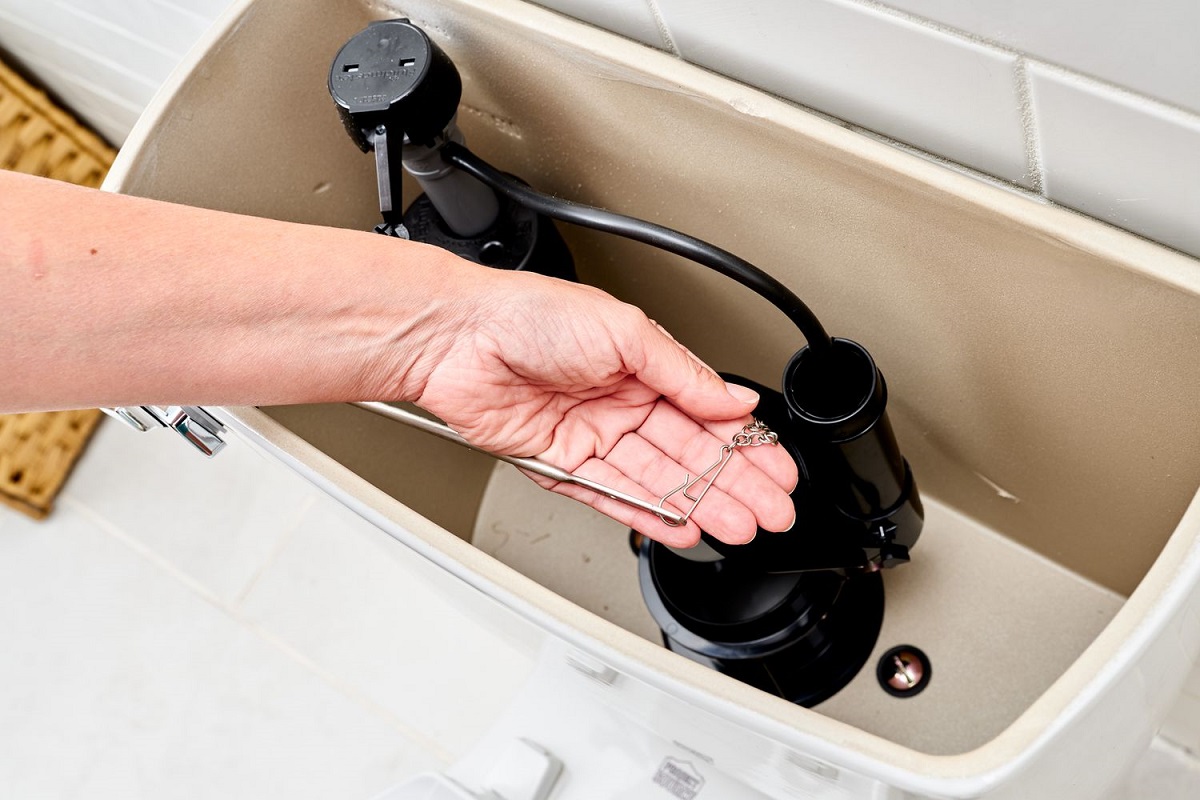
- Disconnect the flapper chain: Locate the chain that connects the flush lever to the flapper. Unhook or disconnect the chain from the flush lever. Keep track of the chain length and position for later reconnection.
- Detach the flapper from the flush valve: The flapper is typically attached to the flush valve with either tabs, hooks, or clips. Gently release the flapper from these attachments to detach it from the flush valve. Be careful not to damage or break any parts during this process.
- Remove the old flapper: Once the flapper is detached from the flush valve, simply lift it out of the tank and set it aside. Inspect the flapper for any signs of damage, wear, or buildup that may have contributed to its malfunctioning.
Removing the old flapper might require a bit of finesse and patience, especially if it has been in place for a long time. Take your time and be gentle to avoid any potential damage or complications. If there are any additional attachments, such as hooks or clips, make sure to note their positioning for the installation of the new flapper.
Now that the old flapper has been removed, you’re one step closer to a properly functioning toilet. In the next step, we’ll focus on cleaning the flapper seat, ensuring optimal performance for the new flapper.
When changing a toilet flapper, be sure to turn off the water supply to the toilet before starting. This will prevent any water from flowing while you work on the flapper.
Step 4: Clean the Flapper Seat
Once the old flapper has been removed, it’s important to clean the flapper seat before installing the new flapper. The flapper seat is the area where the flapper seals against the flush valve. Over time, mineral deposits, debris, and other build-up can accumulate on the flapper seat, affecting the flapper’s ability to create a watertight seal. Follow these steps to clean the flapper seat:
- Inspect the flapper seat: Take a close look at the area where the old flapper was seated against the flush valve. Look for any signs of buildup, such as mineral deposits or debris.
- Prepare the cleaning solution: Depending on the level of build-up, you can use a flapper seat cleaner or a simple solution of vinegar and water. Dilute the vinegar with water in a small container, aiming for a 50/50 mixture.
- Apply the cleaning solution: Dip a rag or sponge into the cleaning solution and apply it to the flapper seat. Gently scrub the seat, focusing on removing any deposits or debris. Be thorough but avoid using excessive force that could damage the surface.
- Rinse the flapper seat: Once you have cleaned the flapper seat, rinse it with clean water to remove any remaining cleaning solution or loosened debris.
- Dry the flapper seat: Use a clean, dry rag or sponge to dry the flapper seat completely. Ensuring a dry surface will help the new flapper create a tight seal against the flush valve.
Cleaning the flapper seat is crucial in ensuring a proper seal and optimal performance for the new flapper. By removing any buildup or debris, you can prevent leaks and maintain the efficiency of your toilet. Take your time during this step to ensure a thorough cleaning of the flapper seat.
With the flapper seat cleaned, you’re ready to move on to the next step, where we will guide you through the process of installing the new flapper.
Step 5: Install the New Flapper
With the flapper seat cleaned, it’s time to install the new flapper. Follow these steps to ensure a proper installation:
- Inspect the new flapper: Before installing the new flapper, take a moment to examine it. Ensure that it is the correct size and style for your toilet model. Check for any additional attachments, such as hooks or clips, that need to be connected.
- Position the new flapper: Place the new flapper over the opening of the flush valve. Ensure that it is centered properly and aligned with the flapper seat.
- Attach the new flapper: Depending on the design of the new flapper, secure it to the flush valve using the appropriate method. This may involve hooking it onto the tabs, latching it with clips, or connecting it with hooks. Follow the manufacturer’s instructions for proper attachment.
- Connect the flapper chain: With the new flapper in place, reconnect the flapper chain to the flush lever. Ensure that there is a slight amount of slack in the chain, allowing the flapper to lift and close fully without pulling on the chain.
- Adjust the flapper chain length (if necessary): If the chain is too long, it can prevent the flapper from closing properly. If it’s too short, it may prevent the flapper from lifting fully. Adjust the chain length as needed to ensure smooth operation.
Properly installing the new flapper is crucial in achieving a watertight seal and restoring the functionality of your toilet. Take the time to align it correctly and securely attach it to the flush valve. Additionally, ensure that the flapper chain is properly connected with the right amount of slack for smooth operation.
With the new flapper installed, you’re almost done! In the next step, we’ll guide you through turning on the water supply and testing the flapper to ensure it’s working as expected.
Step 6: Turn On the Water Supply
After successfully installing the new flapper, it’s time to turn on the water supply to the toilet. Follow these steps to restore the water flow:
- Locate the water shut-off valve: Recall the location of the water shut-off valve, which you previously turned off during Step 1. The valve is typically located on the wall behind or near the toilet.
- Turn on the water supply: Turn the water shut-off valve counterclockwise (to the left) to turn it back on. You may need to turn the valve several times until it is fully open. Ensure the valve is completely open to allow the water to flow freely.
As you turn on the water supply, pay attention to any signs of leaks around the shut-off valve or water connections. If any leaks are detected, you may need to tighten the connections or replace any faulty parts.
Now that the water supply is turned on, water will begin refilling the toilet tank. It’s important to monitor the tank as it fills to check for any potential issues, such as leaks or irregularities in water flow. If everything appears to be functioning correctly, you’re ready to move on to the final step: testing the flapper.
Note: If you notice any leaks or issues with the water supply after turning it on, immediately shut off the water supply and assess the problem before proceeding further.
Step 7: Test the Flapper
After turning on the water supply, it’s essential to test the newly installed flapper to ensure that it is functioning properly. Here’s how you can test the flapper:
- Allow the tank to fill: Let the tank fill up with water until it reaches the proper level. You may hear the sound of running water as the tank is refilling.
- Observe the flapper’s seal: Once the tank is filled, carefully observe the flapper to ensure that it is sealing tightly against the flapper seat. There should be no visible gaps or leaks around the edges of the flapper.
- Flush the toilet: Press the flush lever and observe the flapper’s movement. It should lift easily and fully when the lever is pressed down, allowing the water to flow into the bowl for a complete flush. When you release the lever, the flapper should return to its closed position, sealing off the flush valve and stopping the flow of water.
- Check for any issues: As you flush the toilet, pay attention to any signs of problems. Ensure that the water drains properly from the bowl and the tank refills without any delays or leaks. Listen for any unusual sounds, such as continuous running water, which could indicate a malfunctioning flapper.
If you notice any issues during the testing process, such as a flapper that doesn’t seal properly, a weak flush, or constant water running, you may need to readjust the flapper or double-check the installation. Revisit the previous steps to ensure that everything is correctly in place.
By testing the flapper, you can ensure that it is functioning as intended, allowing for efficient flushing and water conservation. Address any issues promptly to prevent water waste or further damage to the toilet’s components.
Congratulations! You have successfully replaced the toilet flapper and tested its functionality. You can now enjoy a properly functioning toilet with no leaks or running water. Remember to periodically inspect the flapper and other toilet components for any signs of wear or damage to prevent future issues.
Thank you for following this step-by-step guide. We hope it has been helpful in resolving any flapper-related problems you may have encountered. Happy flushing!
Conclusion
In conclusion, knowing how to change a toilet flapper is a valuable skill for any homeowner. A malfunctioning flapper can lead to water leaks, constant running water, and increased water bills. By following the step-by-step process outlined in this article, you can successfully replace the flapper and restore the proper functioning of your toilet.
Throughout the process, it’s important to understand the importance of the toilet flapper and how it works. The flapper controls the water flow from the tank to the bowl when you flush, and over time, it can become worn or damaged. Regular inspection and replacing the flapper as needed can prevent various issues and ensure efficient flushing.
To successfully change a toilet flapper, you need to gather the necessary tools and materials, shut off the water supply, drain the tank, remove the old flapper, clean the flapper seat, install the new flapper, turn on the water supply, and test the functionality of the flapper.
By carefully following these steps, you can avoid leaks, weak flushes, and running toilets, ultimately saving water and reducing your water bills. It’s important to always take the necessary safety precautions, such as shutting off the water supply and working in a well-lit area.
Remember to periodically inspect and clean the flapper seat, as well as other components of the toilet, to ensure their proper functioning. If you encounter any issues or have concerns about the process, consulting a plumbing professional can provide additional guidance and expertise.
We hope that this comprehensive guide has been helpful in your journey to change a toilet flapper. By mastering this skill, you can tackle common toilet maintenance tasks independently, saving both time and money. Enjoy the benefits of a properly functioning toilet and a more efficient bathroom experience!
Frequently Asked Questions about How To Change A Toilet Flapper
Was this page helpful?
At Storables.com, we guarantee accurate and reliable information. Our content, validated by Expert Board Contributors, is crafted following stringent Editorial Policies. We're committed to providing you with well-researched, expert-backed insights for all your informational needs.


0 thoughts on “How To Change A Toilet Flapper”