Articles
How To Paint A Floor
Modified: January 5, 2024
Learn the step-by-step process of painting a floor in this comprehensive article. Discover expert tips and techniques for a flawless finish.
(Many of the links in this article redirect to a specific reviewed product. Your purchase of these products through affiliate links helps to generate commission for Storables.com, at no extra cost. Learn more)
Introduction
Welcome to our guide on how to paint a floor! Whether you want to transform the look of your home or simply give new life to a tired floor, painting is a cost-effective and versatile solution. With the right tools and proper technique, you can achieve stunning results that will make a lasting impact on your space.
Painting a floor is not only a creative way to enhance the aesthetics of a room, but it can also offer practical benefits. A fresh coat of paint can create a protective barrier, making the floor more resistant to wear and tear. Additionally, it allows you to personalize the style and color scheme of your space, complementing other design elements and creating a cohesive look.
Before you dive into this rewarding project, it’s important to familiarize yourself with the necessary steps and gather all the required supplies. Taking the time to properly prepare and execute each stage will ensure a smooth application and long-lasting results.
In this comprehensive guide, we’ll walk you through the step-by-step process of how to paint a floor. From gathering supplies to cleaning and priming, to finally applying the paint and adding the finishing touches, we’ve got you covered.
So, if you’re ready to embark on a fun and creative journey, let’s get started! By the end of this guide, you’ll have all the knowledge and confidence you need to transform your floor into a stunning focal point that will make your space truly shine.
Key Takeaways:
- Transform your space with a stunning, cost-effective floor painting project. From preparation to application, achieve a professional finish and enjoy the creative journey.
- Personalize your home and protect your floor with the right tools and techniques. Follow step-by-step guidance for a durable, beautiful painted floor.
Read more: How To Paint Checkerboard Floor
Step 1: Gather the Supplies
Before you can begin the process of painting your floor, it’s crucial to gather all the necessary supplies. Having everything you need on hand will ensure a smooth and efficient painting experience. Here’s a list of the essential supplies you’ll need:
- Paint: Choose a high-quality floor paint that is specifically designed for the type of floor you are painting. Consider factors such as durability, flexibility, and resistance to stains and scratches. Also, select the desired color that complements your overall design scheme.
- Primer: Depending on the condition of your floor and the type of paint you choose, you may need a primer. A primer helps the paint adhere better to the surface and provides a more even finish.
- Paint Roller: Opt for a roller with a medium to long nap, depending on the texture of your floor. A longer nap is suitable for uneven or textured surfaces, while a medium nap works well for smooth surfaces.
- Paintbrush: A paintbrush is necessary for cutting in around the edges and corners of the floor. Choose a brush that is appropriate for the size and detail of your floor.
- Paint Tray: A shallow paint tray or roller pan will make it easier to load the roller with paint and ensure even distribution.
- Painter’s Tape: Use painter’s tape to protect baseboards, walls, and any areas adjacent to the floor that you don’t want to be painted. Ensure that it adheres securely and remove it promptly after painting to avoid any damage to the underlying surfaces.
- Sanding Equipment: If your floor has imperfections or previous layers of paint, you may need to sand it to create a smooth surface for painting. Invest in sandpaper or a sander to achieve the desired result.
- Cleaners: Before painting, you’ll need appropriate cleaners to ensure the floor is free of dust, dirt, grease, and any other debris. Choose a cleaner that is suitable for your floor material.
- Protective Gear: It’s important to protect yourself during the painting process. Wear safety glasses, a mask, and gloves to shield yourself from any potential chemicals or fumes.
- Dust Sheets or Drop Cloths: Cover the surrounding area with dust sheets or drop cloths to protect it from any accidental spills or splatters. This will save you from unnecessary cleanup later on.
Once you have gathered all these supplies, you’ll be well-prepared to move on to the next steps and start the floor painting process. Remember, having everything at your fingertips will make the entire process more efficient and enjoyable.
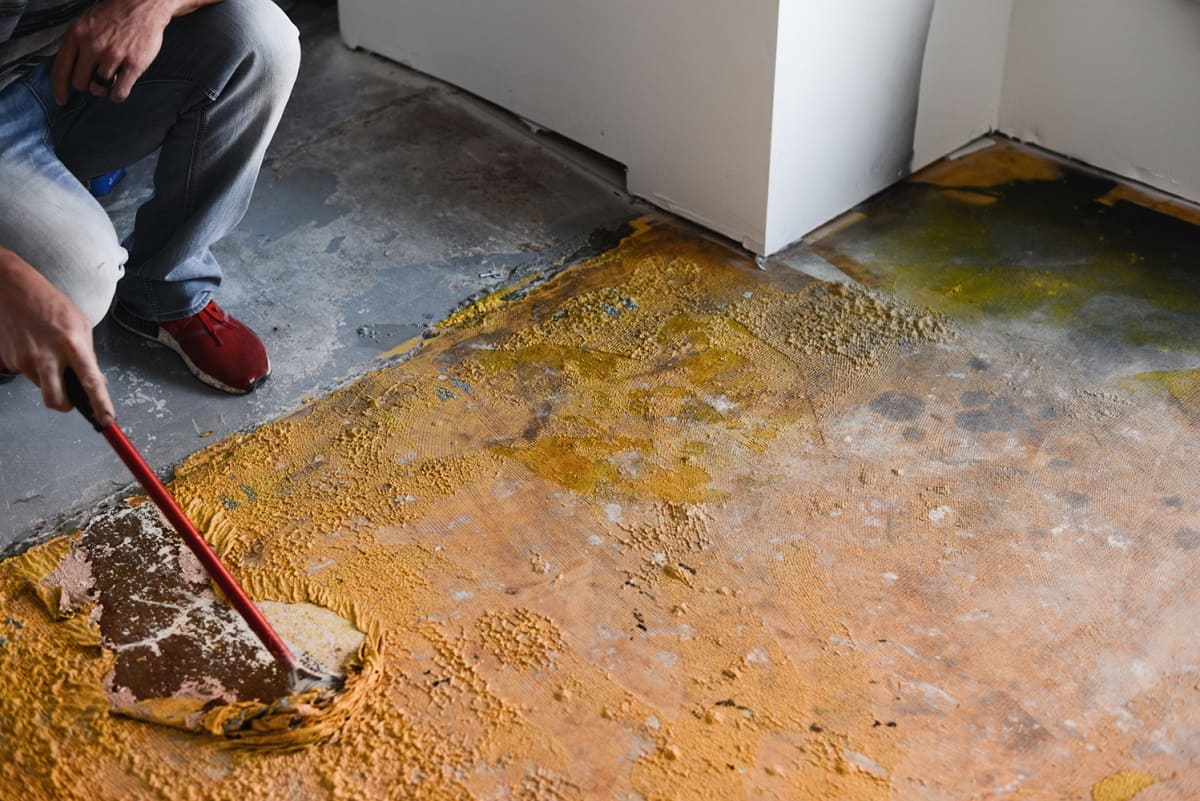
Step 2: Prepare the Floor
Preparing the floor is a crucial step in the painting process. Proper preparation ensures better adhesion of the paint and helps to achieve a smooth, long-lasting finish. Follow these steps to prepare your floor:
- Remove Furniture and Decor: Start by clearing the floor of any furniture, rugs, or decor items. This will allow you to work freely and avoid any accidental paint splatters or damage to your belongings.
- Repair Imperfections: Inspect the floor for any cracks, holes, or damaged areas. Use appropriate floor filler or putty to repair these imperfections. Follow the manufacturer’s instructions and allow the filler to dry completely before proceeding.
- Scrape Off Old Paint: If there is any old paint on the floor that is chipped or peeling, it’s important to remove it. Use a scraper or sander to gently scrape away the old paint. Be careful not to dig into the floor or create excessive dust.
- Smooth the Surface: After removing the old paint, sand the surface of the floor to create a smooth and even texture. This step is particularly important if there are rough or uneven areas. Use sandpaper or a sander to achieve the desired result.
- Clean the Floor: Thoroughly clean the floor to remove any dust, dirt, or debris. Use a vacuum cleaner or broom to eliminate loose particles, followed by a mop and appropriate floor cleaner to ensure a clean and grease-free surface. Allow the floor to dry completely before moving on to the next step.
- Mask Off Baseboards and Walls: To protect your baseboards, walls, and any adjacent surfaces, use painter’s tape to create a clean edge. Apply the tape along the edges of the floor, ensuring it adheres securely.
- Cover Light Switches and Outlets: If you have light switches or electrical outlets near the floor, it’s important to protect them from paint drips or splatters. Cover them with painter’s tape or plastic sheeting to avoid any damage.
By following these preparation steps, you’ll create a smooth and clean canvas for your floor painting project. Taking the time to properly prepare the floor will result in a more professional-looking finish and ensure the longevity of your painted floor.
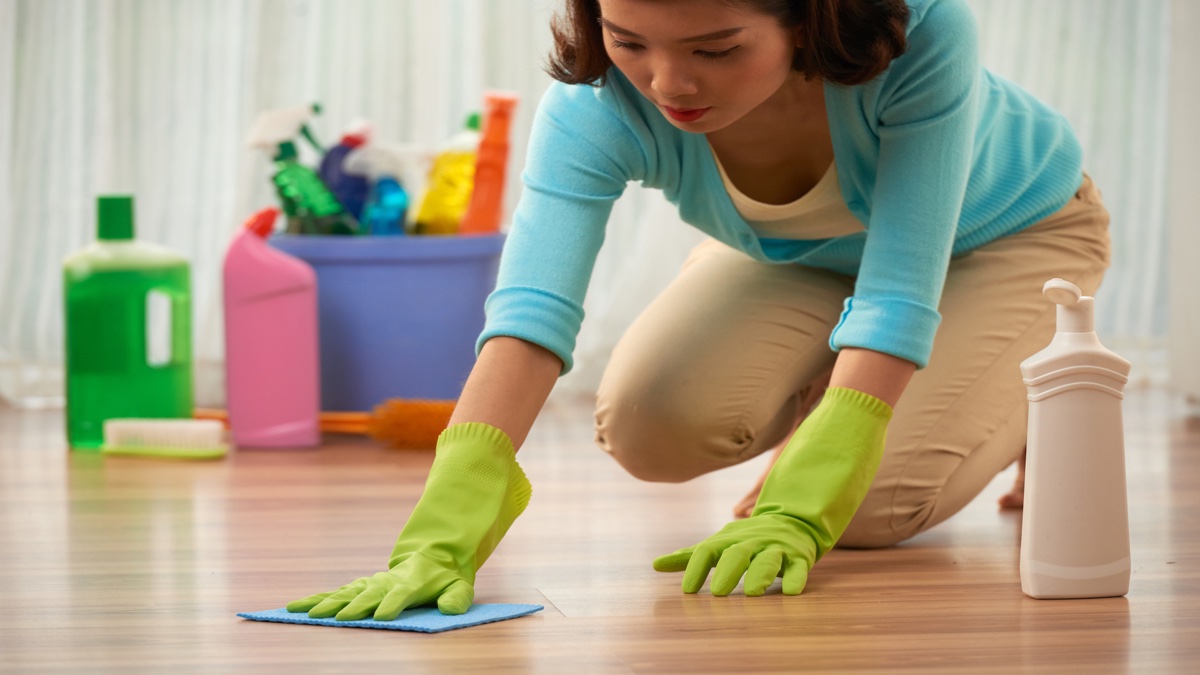
Step 3: Clean the Floor
A clean surface is essential for successful paint adhesion and a smooth finish. Before you start painting, it’s important to thoroughly clean the floor to remove any dirt, grease, or debris. Follow these steps to ensure your floor is properly cleaned:
- Sweep or Vacuum: Begin by sweeping or vacuuming the floor to eliminate loose dirt, dust, and debris. This will prevent them from getting trapped under the paint and affecting the finish.
- Remove Stubborn Stains: If there are any stubborn stains on the floor, use appropriate cleaning solutions to remove them. For greasy or oily stains, use a degreaser. Stubborn dirt or grime can be tackled with a heavy-duty cleaner or a mixture of warm water and mild detergent. Use a scrub brush or sponge to agitate the stains and rinse with clean water.
- Address Mold or Mildew: If you notice any signs of mold or mildew on your floor, it’s crucial to address this issue before painting. Clean the affected areas with a mold and mildew cleaner or a bleach solution according to the manufacturer’s instructions. Ensure that the floor is completely dry before proceeding.
- Wash the Floor: Once you have treated any stains or mold, it’s time to wash the entire floor. Use a suitable floor cleaner that is specifically designed for your floor type. Dilute it according to the instructions and mop the floor, working in small sections. Rinse the mop frequently in clean water to avoid spreading dirt around.
- Dry the Floor: After mopping, allow the floor to air dry completely. It’s essential to ensure that there is no residual moisture on the surface as it can affect paint adhesion. You can speed up the drying process by using fans or opening windows and doors for air circulation.
- Inspect for Any Remaining Debris: Take a closer look at the floor and inspect for any remaining debris or dust. Remove them using a lint-free cloth or a tack cloth. The goal is to have a clean and smooth surface before proceeding to the next step.
By thoroughly cleaning your floor, you’ll create an optimal surface for paint adhesion and achieve a professional-looking finish. Taking the time to clean the floor will ensure that the paint adheres evenly and remains durable over time.
Step 4: Sand the Floor (optional)
Sanding the floor is an optional step that can be beneficial, depending on the condition of the surface and the desired outcome. Sanding helps to smooth out imperfections, remove old finishes, and create a better surface for paint adhesion. Here’s how you can sand your floor:
- Assess the Floor: Start by assessing the condition of your floor. If there are rough areas, previous layers of paint that are chipped or peeling, or any other imperfections, sanding can help to improve the surface.
- Choose the Right Sandpaper: Select the appropriate sandpaper grit based on the condition of your floor. For light sanding, a finer grit (120-150) will suffice. For more intensive sanding, choose a coarser grit (80-100). It’s recommended to start with a coarser grit and progress to finer grit sandpaper for a smoother finish.
- Sand in the Direction of the Grain: Using a handheld sanding block or a floor sander, sand the floor in the direction of the grain. This will help to minimize any visible scratches and create a uniform surface. Apply even pressure and keep the sander moving to avoid creating uneven spots.
- Be Mindful of the Dust: Sanding can generate a significant amount of dust, so it’s important to take precautions. Wear a dust mask, safety goggles, and protective clothing to minimize exposure. Consider using an orbital sander with a built-in dust collection system to reduce the amount of dust produced.
- Clean the Floor: After sanding, thoroughly clean the floor to remove any dust or debris. Use a vacuum cleaner or a broom followed by a damp cloth to ensure a clean surface. It’s important to remove all traces of dust before moving on to the next step.
Although sanding is optional, it can greatly improve the overall finish of your painted floor, especially if your floor has imperfections or previous layers of paint. It provides a smoother surface for the paint to adhere to, resulting in a more professional-looking and durable finish.
Keep in mind that sanding may not be necessary for all floors. If your floor is in good condition and has a smooth surface, you can skip this step and proceed to the next step of priming the floor.
Read more: How To Paint A Porch Floor
Step 5: Prime the Floor
Priming the floor is a crucial step in the painting process as it helps to create a stable and even surface for the paint to adhere to. Priming also enhances the durability and longevity of the painted floor. Follow these steps to properly prime your floor:
- Select the Right Primer: Choose a primer that is specifically designed for your floor type and the type of paint you will be using. Consider factors such as the material of your floor (wood, concrete, etc.) and whether you are painting over a stained or sealed surface.
- Prepare the Primer: Follow the manufacturer’s instructions to prepare the primer. This may involve stirring the primer thoroughly or diluting it with a specific ratio of water or other solvent. Mix the primer well to ensure that it is smooth and consistent.
- Cut In: Use a paintbrush to cut in around the edges and corners of the floor. Apply the primer to these areas, ensuring full coverage and a clean line where the floor meets the walls or baseboards.
- Roll the Primer: Pour the primer into a paint tray or roller pan. Use a roller with a medium to long nap to apply the primer to the main areas of the floor. Start in a corner and work your way towards an exit, applying the primer in smooth, overlapping strokes. Ensure that the primer is spread evenly and covers the entire floor surface.
- Allow the Primer to Dry: Check the drying time specified by the primer manufacturer and allow it to dry completely. Depending on the type of primer, it may take anywhere from a few hours to overnight. Ensure that the floor is completely dry before proceeding to the next step.
- Inspect for Complete Coverage: Once the primer is dry, inspect the floor for complete coverage. Look for any areas that may need additional primer application. If necessary, touch up these areas with a brush or roller, ensuring uniform coverage across the entire floor.
Primed floors provide a solid foundation for the paint and help to prevent issues such as uneven color, poor adhesion, and premature wear. Taking the time to properly prime your floor will result in a more professional-looking and long-lasting finish.
Note that not all floors may require priming, especially if you are using a paint and primer combination or a self-priming floor paint. Check the product instructions to determine if priming is necessary for your specific paint and floor type.
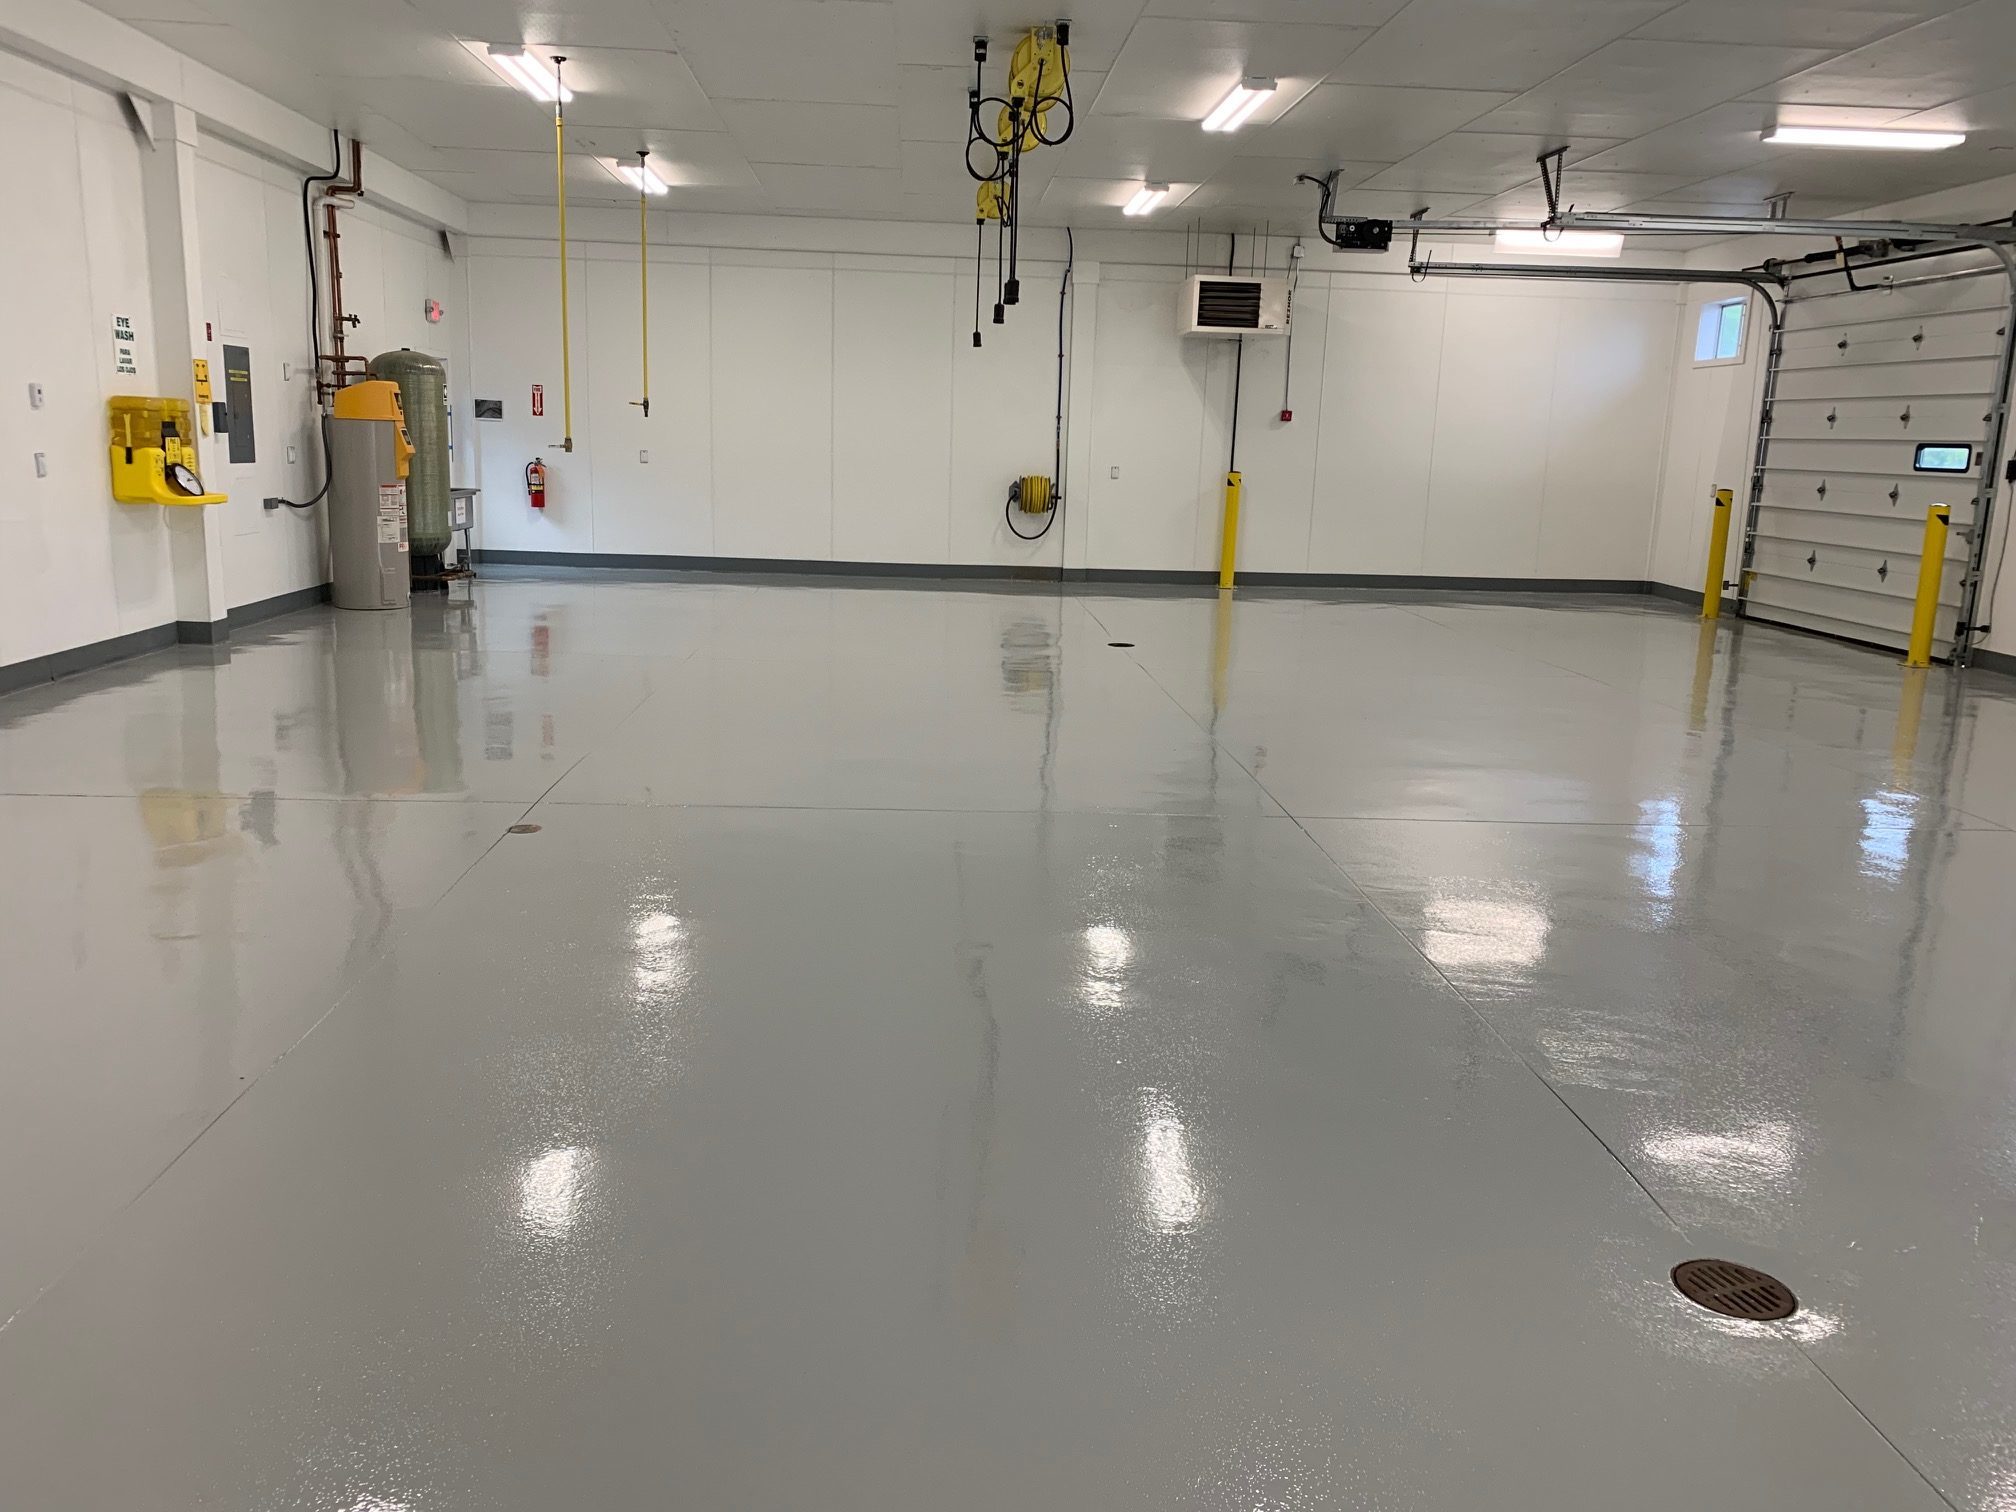
When painting a floor, make sure to thoroughly clean and sand the surface before applying any paint. This will help the paint adhere better and result in a smoother finish.
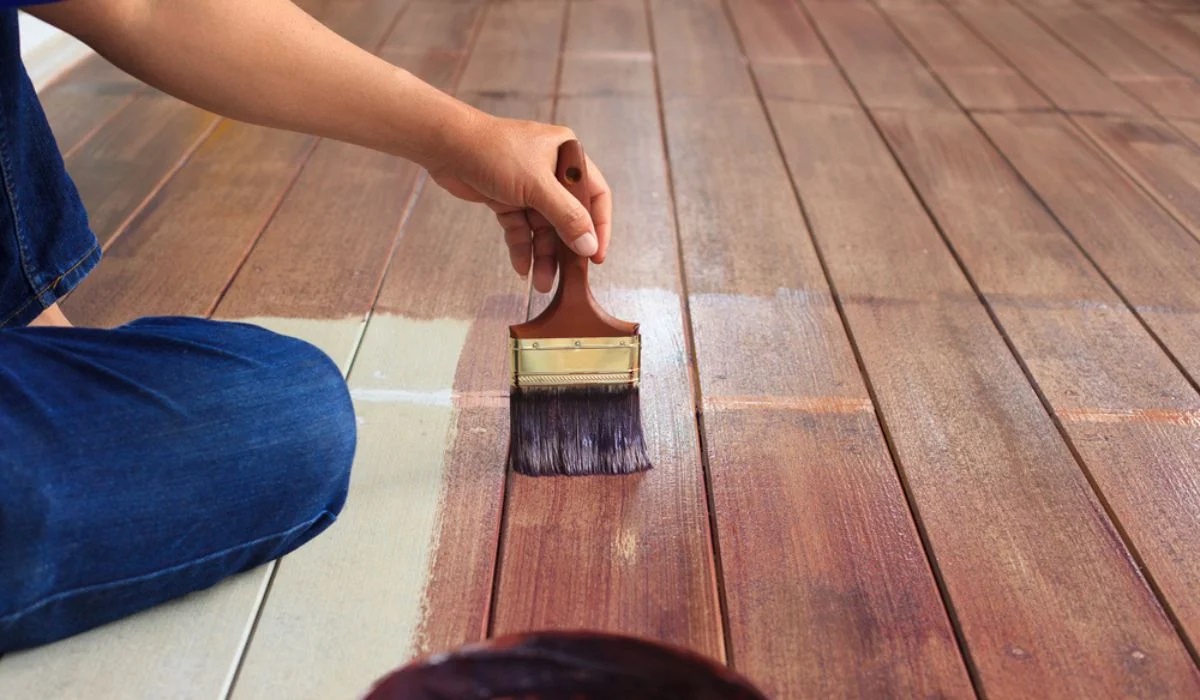
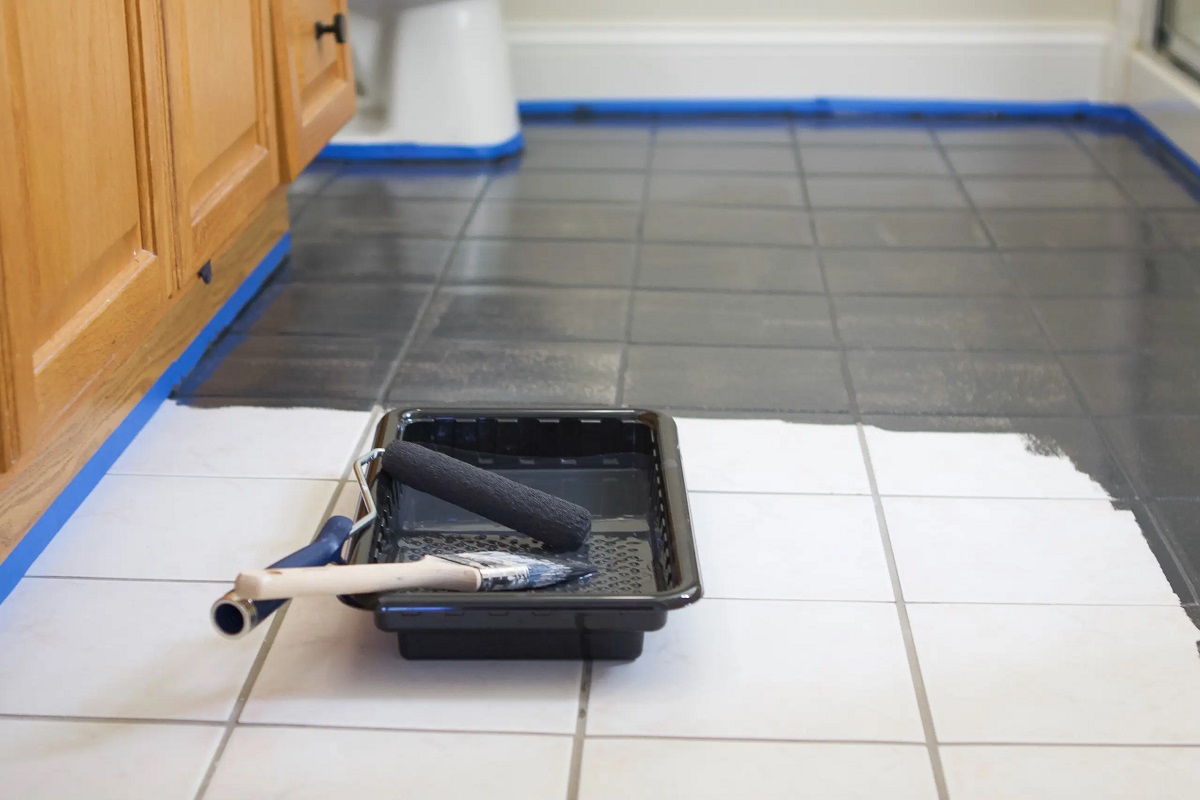
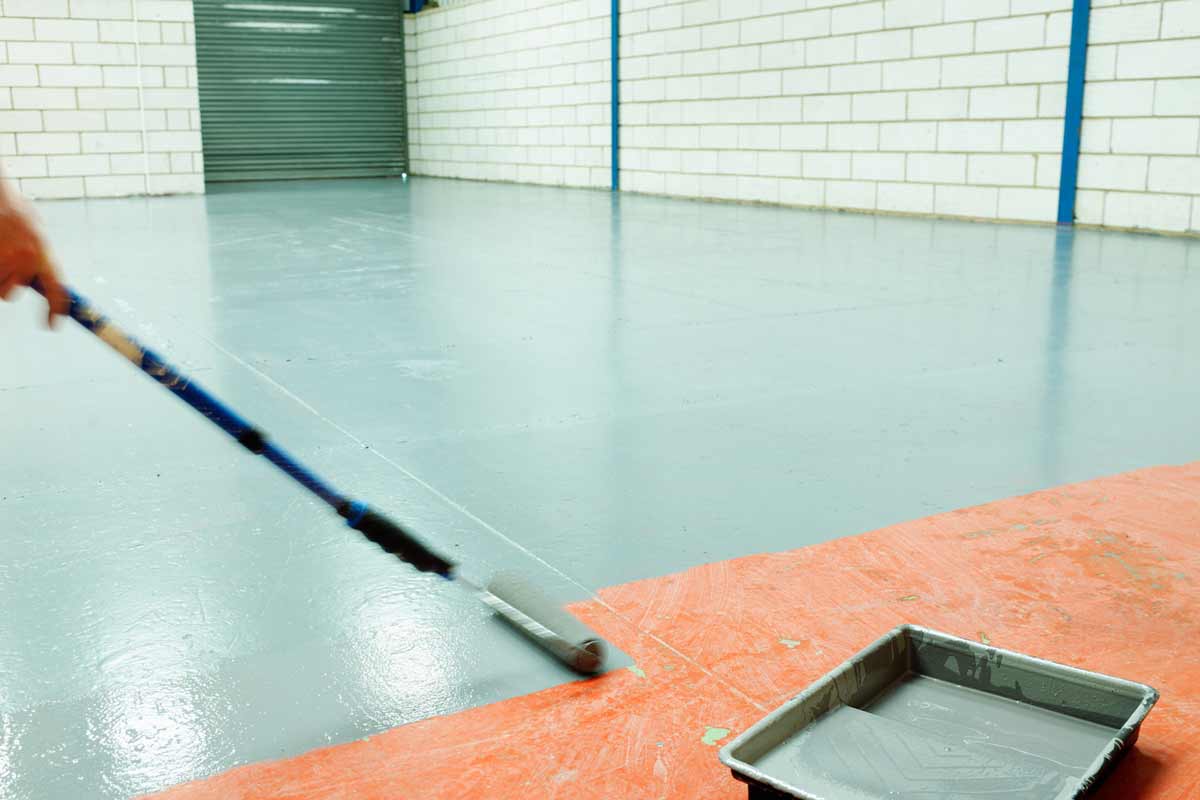
Step 6: Start Painting
Now that you have properly prepared and primed your floor, it’s time to start painting! Follow these steps to achieve a smooth and flawless finish:
- Choose the Right Paint: Select a high-quality floor paint that is suitable for your floor type and desired finish. Consider factors such as durability, ease of cleaning, and compatibility with the primer you have used. Ensure that the paint color complements your overall design scheme.
- Stir the Paint: Before you begin painting, thoroughly stir the paint to ensure it is well-mixed. This will help to distribute any settled pigments and create a consistent color throughout.
- Cut In: Use a paintbrush to cut in around the edges and corners of the floor. Apply the paint with smooth and even strokes, ensuring full coverage and clean lines where the floor meets the walls or baseboards. Take your time to achieve a precise and neat result.
- Roll the Paint: Pour the paint into a paint tray or roller pan. Use a roller with a medium to long nap for the main areas of the floor. Start in a corner and work your way towards an exit, applying the paint in smooth and overlapping strokes. Maintain a wet edge to avoid visible lines or marks.
- Apply Thin Coats: It’s better to apply multiple thin coats of paint rather than one thick coat. This ensures better adhesion and reduces the risk of paint pooling or creating a heavy finish. Allow each coat to dry completely before applying the next.
- Follow the Paint Drying Time: Check the paint can for the recommended drying time between coats. This may vary depending on the brand and type of paint you are using. Be patient and give the paint ample time to dry before proceeding with additional coats.
- Work in Sections: If you are painting a large floor area, consider working in smaller sections to maintain control and achieve an even finish. Apply the paint in manageable portions and blend the edges between sections for a seamless look.
- Watch for Drips and Imperfections: As you paint, keep an eye out for any drips, sags, or imperfections. Quickly remove any excess paint with a brush or roller to avoid a buildup of paint that can lead to uneven texture or visible marks.
Remember to take your time and work methodically to ensure a professional-quality finish. Proper technique and attention to detail will result in a beautiful painted floor that enhances the overall look of your space.
Once you have finished painting the entire floor, step back and admire your work. Allow the paint to dry completely before moving on to the next step of applying additional coats if needed.
Step 7: Apply Additional Coats (if needed)
After the initial coat of paint has dried, it’s time to assess whether additional coats are necessary. Depending on the desired color intensity and the coverage achieved with the first coat, you may need to apply one or more additional coats. Follow these steps for applying additional coats:
- Inspect the Paint Coverage: Take a close look at the painted floor to evaluate the coverage and color intensity achieved with the first coat. If the desired result has been achieved, and there are no visible patches or uneven areas, you may not need to apply another coat. However, if the color appears too light or uneven, or if the floor still shows through, an additional coat may be required.
- Prepare the Paint: Stir the paint thoroughly to ensure it is well-mixed and consistent in color. If necessary, strain the paint to remove any particles or lumps that may have formed during storage.
- Apply Additional Coats: Using the same technique as before, cut in around the edges and corners of the floor with a paintbrush. Then, roll on the additional coats of paint using a roller. Apply thin and even coats, overlapping the edges slightly to blend the paint seamlessly. Allow each coat to dry fully before applying the next.
- Assess the Result: After each additional coat, step back and assess the overall coverage and color intensity. Continue with additional coats until the desired result is achieved. Remember to follow the recommended drying time specified by the paint manufacturer.
- Clean Up: Once you have finished applying the final coat of paint, clean your paintbrushes and rollers according to the instructions provided by the paint manufacturer. Dispose of any leftover paint or empty paint cans responsibly, following local recycling or disposal guidelines.
Applying additional coats of paint, if needed, will ensure a more opaque and even finish. It is essential to carefully inspect the painted floor after each coat to determine if another coat is necessary. Taking the extra time and effort to apply additional coats will result in a professional-looking and long-lasting painted floor.
Once the final coat has dried, allow the floor to fully cure before moving furniture back into the space or placing heavy objects on the painted surface. This will help to prevent any potential damage and ensure the longevity of your beautifully painted floor.
Step 8: Let the Paint Dry
Allowing the paint to dry thoroughly is a crucial step in the floor painting process. Proper drying time ensures that the paint fully adheres to the surface, resulting in a durable and long-lasting finish. Follow these guidelines to ensure your painted floor dries properly:
- Check the Drying Time: The drying time will vary depending on the type of paint you used and the environmental conditions. Check the paint can or manufacturer’s instructions for the recommended drying time. It’s important to be patient and allow the paint sufficient time to dry before moving on to the next step.
- Avoid Heavy Traffic: While the paint is drying, it’s essential to avoid heavy foot traffic or placing heavy objects on the painted floor. This can cause damage and compromise the finish. Restrict access to the painted area if possible, and place signs or tape to remind people to be cautious around the area.
- Provide Adequate Ventilation: Ensure proper ventilation in the space where the floor is being painted. Opening windows and using fans can help to facilitate air circulation and speed up the drying process.
- Be Mindful of Humidity: High humidity levels can prolong the drying time of the paint. If the air is humid, consider using a dehumidifier to reduce moisture in the room and assist in drying the painted floor.
- Observe Touch Dry vs. Cure Time: Touch dry time refers to when the paint feels dry to the touch but is not fully cured. Cure time refers to the time it takes for the paint to fully harden and reach its maximum durability. It’s important to differentiate between the two and allow the paint to cure fully before subjecting it to regular use or heavy cleaning.
- Monitor for Smudges or Marks: While the paint is drying, be cautious of accidentally smudging or marking the surface. Avoid dragging furniture or objects across the floor until the paint has cured completely.
- Follow Additional Instructions: Keep in mind that different types of paint may have specific instructions for drying and curing. Check the paint can or manufacturer’s guidelines for any additional instructions or tips to ensure proper drying.
Properly allowing the paint to dry will ensure a beautiful and durable finish. It’s important to follow the recommended drying time and take measures to protect the painted floor during this crucial stage. Once the paint has fully dried and cured, you can proceed to the next step of applying a sealant if desired.
Read more: How To Paint A Basement Cement Floor
Step 9: Apply a Sealant (optional)
Applying a sealant to your painted floor is an optional step, but it can provide added protection and enhance the longevity of the finish. A sealant creates a protective barrier that helps to prevent scratches, stains, and wear on the painted surface. Follow these steps to apply a sealant to your painted floor:
- Choose the Right Sealant: Select a sealant that is compatible with your floor type and paint. Consider factors such as the level of durability, sheen, and compatibility with the paint you used. Read the product instructions and recommendations for the specific sealant you have chosen.
- Prepare the Floor: Before applying the sealant, ensure that the painted floor is fully dry and cured. Thoroughly clean the floor to remove any dust or debris using a mild cleaner and water. Allow the surface to dry completely before proceeding.
- Apply the Sealant: Follow the manufacturer’s instructions to apply the sealant evenly on the floor. Use a high-quality paintbrush or a paint roller with a fine nap for smooth application. Apply the sealant in thin coats, working in small sections to ensure complete coverage.
- Allow the Sealant to Dry: Consult the instructions provided by the sealant manufacturer for drying time. It is important to allow the sealant to dry fully before using the floor or placing any items on the surface. Ensure proper ventilation to speed up the drying process.
- Apply Additional Coats (if necessary): Depending on the instructions and the level of protection desired, you may need to apply multiple coats of sealant. Ensure that each coat is dry before applying the next. Sand lightly between coats if recommended by the manufacturer for better adhesion.
- Clean Up: Clean your brushes or rollers immediately after applying the sealant using the appropriate solvent or water as specified by the manufacturer. Dispose of any leftover sealant or empty containers responsibly.
Applying a sealant can help to maintain the appearance of your painted floor and extend its lifespan. The sealant creates a protective layer that guards against daily wear and tear, making it easier to clean and maintain the floor over time.
Remember that not all painted floors require a sealant. Some high-quality paints are designed to be durable and resistant on their own. Consider the level of foot traffic and use in the area where the painted floor is located to determine if a sealant is necessary for added protection.
Step 10: Clean Up
After completing your floor painting project, it’s important to properly clean up and tidy the area. Follow these steps to ensure a thorough and efficient clean-up process:
- Dispose of Waste Materials: Start by disposing of any waste materials such as empty paint cans, used paintbrushes or rollers, and masking tape. Follow local guidelines for proper disposal or recycling of these items.
- Store Remaining Paint: If you have any remaining paint, ensure the lids are tightly sealed to prevent drying or spilling. Label the paint containers with the color and date for future reference. Store the paint in a cool, dry place away from extreme temperatures.
- Remove Painter’s Tape: Carefully remove the painter’s tape from the baseboards and other surfaces. Remove the tape slowly and at a sharp angle to avoid peeling off any fresh paint. Dispose of the tape responsibly.
- Clean Brushes and Rollers: Thoroughly clean your paintbrushes and rollers using the appropriate solvent or water, according to the paint manufacturer’s instructions. Remove excess paint, rinse thoroughly, and allow them to dry completely before storing.
- Remove Drop Cloths or Dust Sheets: If you used drop cloths or dust sheets to protect the surrounding area, carefully remove and fold them up. Shake off any debris or dust outside before storing them for future use or disposal.
- Inspect and Clean the Floor: Once the clean-up is complete, take the time to inspect and clean the painted floor. Look for any smudges, drips, or marks that may have been missed during the painting process. Use a damp cloth or sponge to gently clean these areas.
- Avoid Heavy Use: To allow the paint to fully cure and harden, avoid heavy use of the painted floor for at least a few days. This will help prevent any accidental damage and ensure the longevity of the finish.
Proper cleaning and tidying up after a floor painting project will leave your space looking pristine and ready to enjoy. Taking the time to clean up ensures a clean and organized environment while maintaining the integrity of the freshly painted floor.
Now that you have completed the clean-up process, step back and admire your beautifully painted floor. It’s time to enjoy the transformation and appreciate the hard work you put into creating a stunning focal point in your space.
Conclusion
Congratulations on completing the journey of painting your floor! By following the step-by-step guide provided in this article, you have gained the knowledge and skills necessary to achieve a professional-looking and long-lasting finish.
Painting a floor is a rewarding project that allows you to express your creativity and transform the look of your space. Whether you’re aiming to revitalize worn-out flooring or add a personal touch to a room, the process of painting a floor offers numerous benefits. It not only enhances the aesthetics of your space but also creates a protective barrier that helps to resist daily wear and tear.
Throughout the process, it’s important to gather the necessary supplies, prepare the floor, clean it thoroughly, and apply the appropriate primer. Taking the time to properly paint the floor, applying multiple thin coats and allowing sufficient drying time between each coat, ensures a smooth and even finish.
Depending on your preference and the floor’s requirements, you may choose to sand the surface for a smoother result and apply a sealant for added protection. Following these optional steps can further enhance the durability and longevity of your painted floor.
Remember to be patient and attentive to detail throughout the entire painting process. Proper preparation, application, and clean-up ensure a successful outcome and a floor that you can enjoy for years to come.
Now that you have completed painting your floor, it’s time to take a step back and appreciate the transformation you have accomplished. Relax and revel in the satisfaction of creating a beautiful, personalized space that reflects your unique style and vision.
Enjoy your newly painted floor and the renewed ambiance it brings to your home. Happy painting!
Frequently Asked Questions about How To Paint A Floor
Was this page helpful?
At Storables.com, we guarantee accurate and reliable information. Our content, validated by Expert Board Contributors, is crafted following stringent Editorial Policies. We're committed to providing you with well-researched, expert-backed insights for all your informational needs.


0 thoughts on “How To Paint A Floor”