Articles
How To Paint A Basement Cement Floor
Modified: October 21, 2024
Learn how to paint your basement cement floor with our informative articles. Transform your space with our step-by-step guide and expert tips.
(Many of the links in this article redirect to a specific reviewed product. Your purchase of these products through affiliate links helps to generate commission for Storables.com, at no extra cost. Learn more)
Introduction
Welcome to this comprehensive guide on how to paint a basement cement floor. If you have a basement that has bare cement flooring, painting it can not only improve its appearance but also provide added protection. Whether you want to create a clean and polished look, add some color to the space, or simply safeguard the floor from stains and damage, painting can be a cost-effective and relatively easy solution.
Before diving into the painting process, let’s discuss the materials you’ll need to successfully complete this project.
Key Takeaways:
- Transform your basement with a fresh, durable look by painting the cement floor. Follow the step-by-step guide for proper preparation, application, and optional protective sealant to achieve a stunning and long-lasting finish.
- Enhance the aesthetics and functionality of your basement with a painted cement floor. From repairing damages to choosing the right paint, this comprehensive guide ensures a successful transformation with added protection.
Materials Needed
Before you begin painting your basement cement floor, gather the following materials:
- Paint roller
- Paint tray
- Paintbrush
- Concrete primer
- Concrete paint
- Protective clothing (gloves, goggles, mask)
- Cleaner or degreaser
- Scrub brush or broom
- Patching compound (if needed)
- Sanding block or sandpaper
- Painter’s tape
- Dry cloth
- Sealant (optional)
Having these materials ready will help ensure a smooth and efficient painting process.
Step 1: Prepare the Basement Floor
The first step in painting a basement cement floor is proper preparation. This is crucial for achieving a durable and long-lasting paint finish. Follow these steps to prepare your basement floor:
- Clear the area: Remove any furniture, rugs, or other items from the floor. Sweep or vacuum up any dust or debris to ensure a clean work area.
- Check for moisture: Basements can be prone to moisture issues. Before painting, check for any signs of dampness or water leakage. If you notice any problems, address them before proceeding with the painting process.
- Repair cracks and holes: Inspect the floor for any cracks or holes. Use a patching compound to fill in these imperfections. Follow the manufacturer’s instructions on how to apply and cure the compound.
- Smooth rough areas: If there are any rough or uneven spots on the floor, you may need to use a sander or sandpaper to smoothen them out. This will help create a more even surface for painting.
- Clean the floor: Use a cleaner or degreaser specific to cement surfaces to thoroughly clean the floor. Follow the instructions provided with the cleaner and make sure to remove any dirt, oil, or grease. This step is essential for ensuring proper paint adhesion.
Once you have completed these preparatory steps, you’ll be ready to move on to the next stage: cleaning the floor surface.
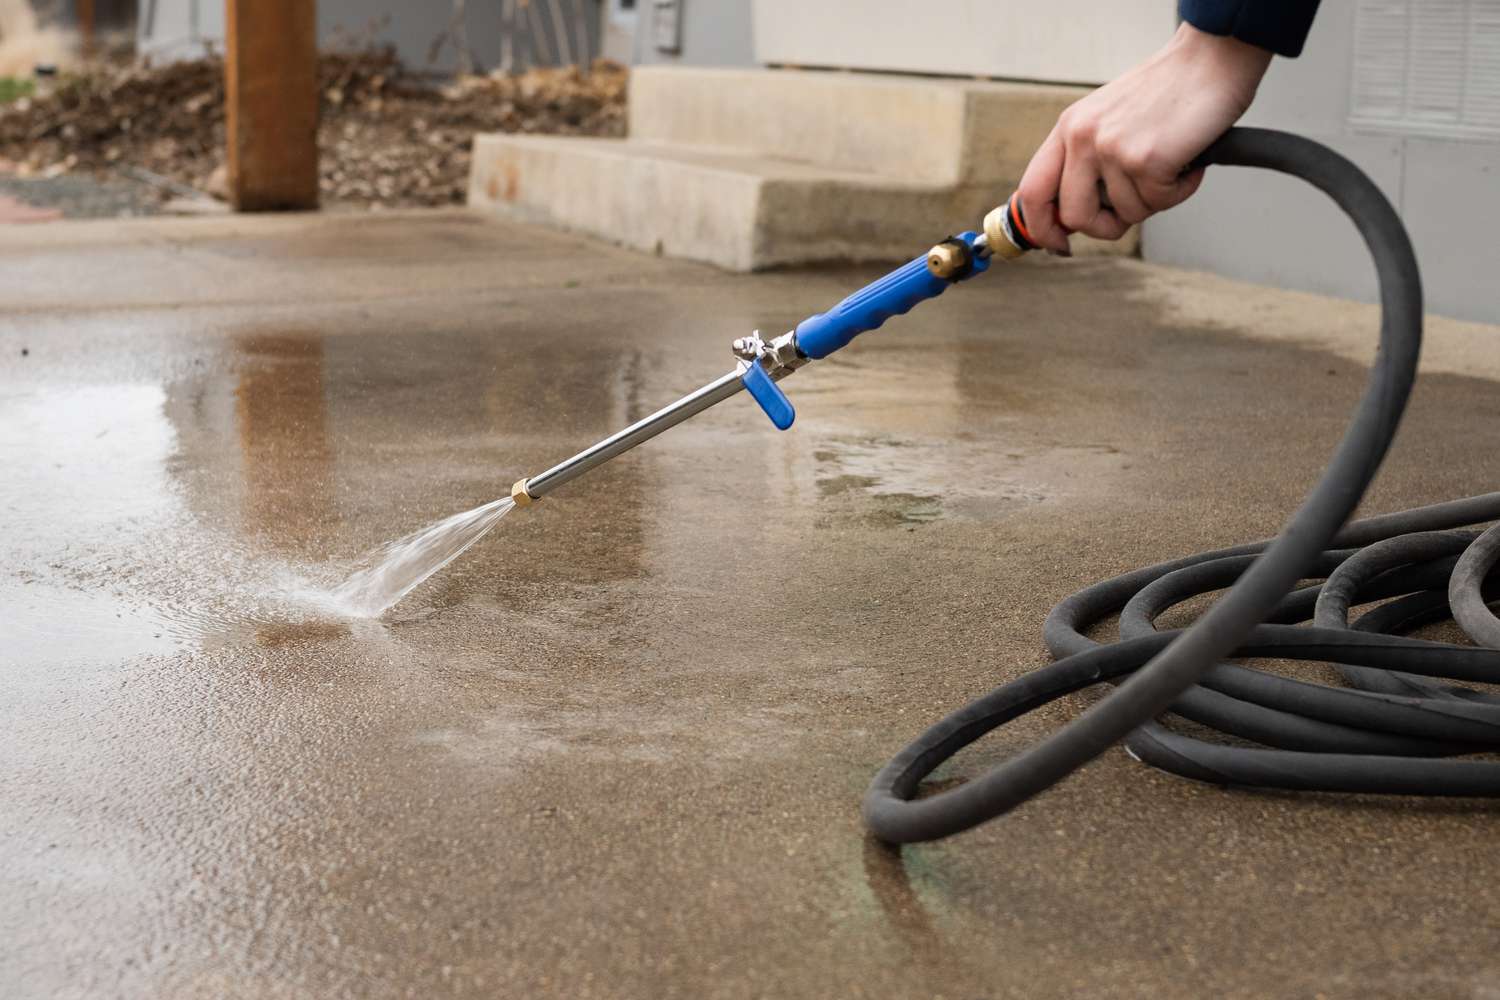
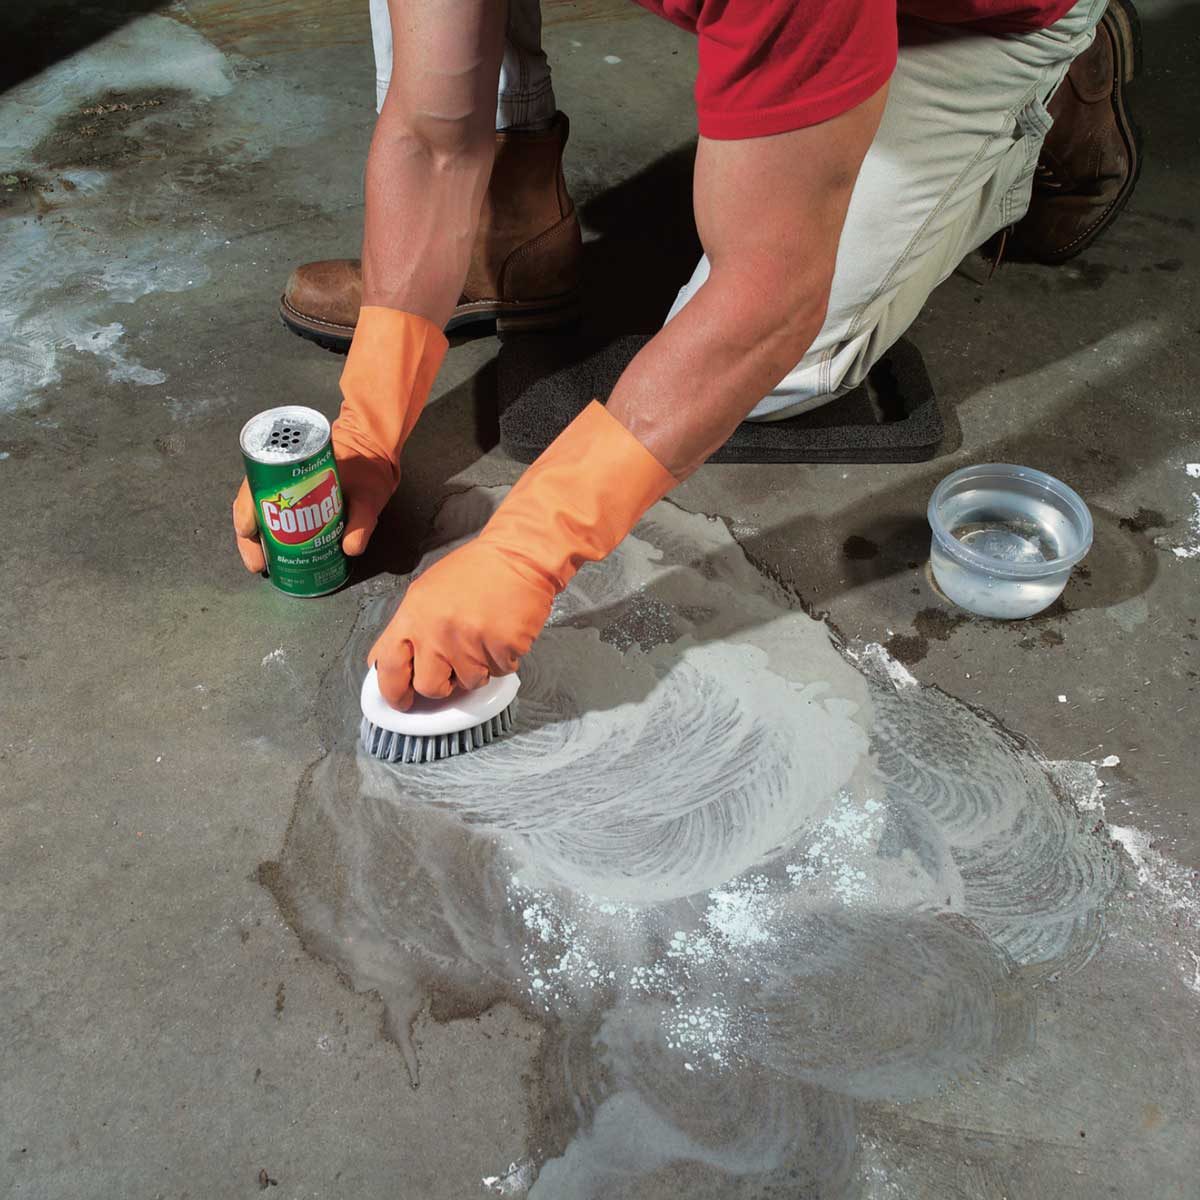
Step 2: Clean the Floor Surface
After preparing the basement floor, it’s time to thoroughly clean the surface. Cleaning is essential to remove any remaining dirt, dust, or contaminants that could interfere with the paint adhesion. Follow these steps to clean the floor surface:
- Sweep or vacuum: Start by sweeping or vacuuming the floor to remove loose dirt and debris. Use a broom or vacuum cleaner with a brush attachment to ensure thorough cleaning.
- Use a cleaner or degreaser: Select a cleaner or degreaser specifically designed for cement surfaces. Dilute the cleaner as instructed on the packaging, and apply it to the floor.
- Scrub the floor: Use a scrub brush or a stiff-bristled broom to scrub the floor surface. Work in small sections to ensure thorough coverage and focus on any especially dirty or stained areas.
- Rinse the floor: Once you have scrubbed the entire floor, rinse it thoroughly with clean water. This will remove any residue from the cleaner or degreaser.
- Dry the floor: Allow the floor to dry completely before moving on to the next step. You can speed up the drying process by using fans or dehumidifiers.
By cleaning the floor surface, you create an optimal environment for the paint to adhere, ensuring a smooth and long-lasting finish. Now that the floor is clean and dry, you can proceed to the next step: repairing any damaged areas.
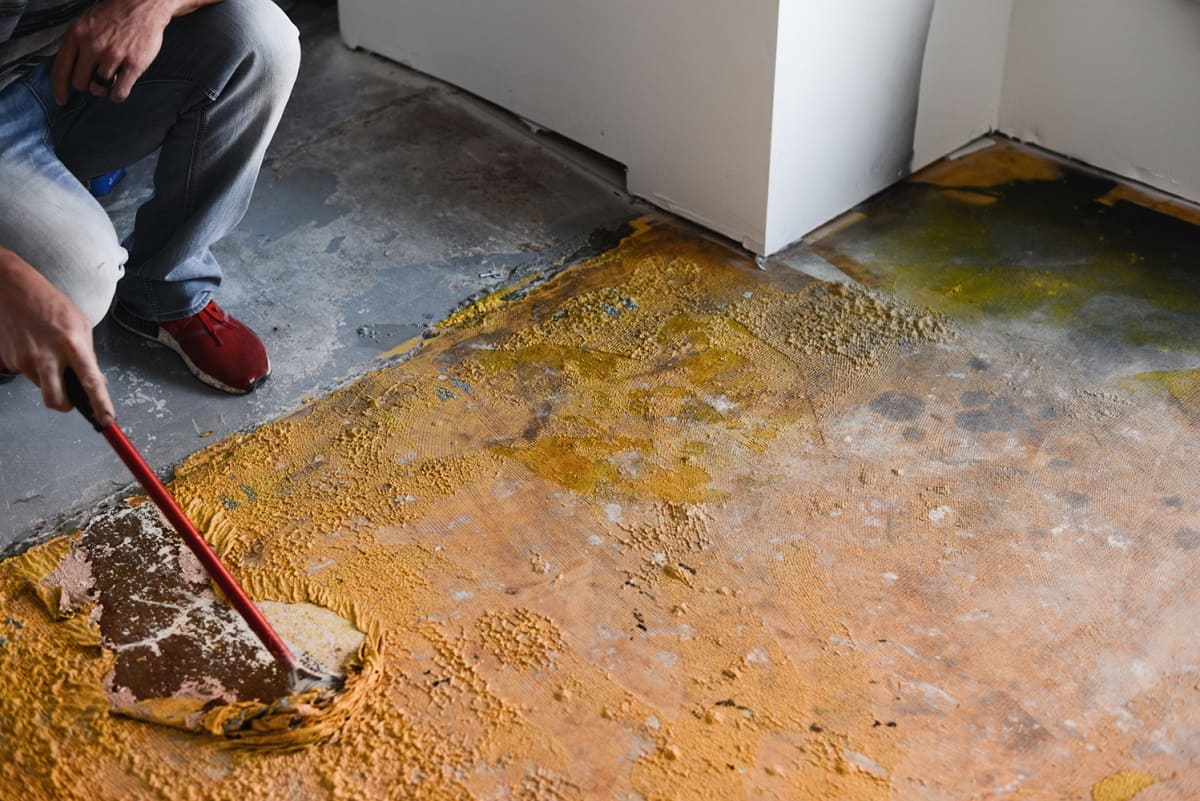
Step 3: Repair Any Damaged Areas
Before proceeding with painting your basement cement floor, it’s important to address any damaged areas that may be present. Repairing these areas will ensure a smooth and even surface for the paint application. Follow these steps to repair any damaged areas:
- Inspect for cracks and holes: Carefully examine the floor for any cracks, pits, or holes. These can occur due to the natural settling of the foundation or from wear and tear over time.
- Prepare the damaged areas: Use a chisel or a scraper to remove any loose debris or crumbling material from the cracks or holes. This will create a clean and solid base for the patching compound.
- Apply the patching compound: Mix the patching compound according to the manufacturer’s instructions. Using a putty knife or trowel, fill in the cracks or holes with the compound. Smooth it out and level it with the surrounding floor surface.
- Allow the compound to dry: Follow the recommended drying time provided with the patching compound. It’s essential to allow sufficient drying time to ensure the patch is fully cured and hardened.
- Sand the repaired areas: Once the patching compound is dry, use a sanding block or sandpaper to smooth out the repaired areas. This will help blend them with the rest of the floor surface.
Repairing any damaged areas will prevent them from becoming more pronounced after painting. It will also contribute to the overall appearance and durability of the painted basement floor. With the damaged areas repaired, you can now move on to the next step: applying a concrete primer.
Read more: How To Polish A Cement Floor
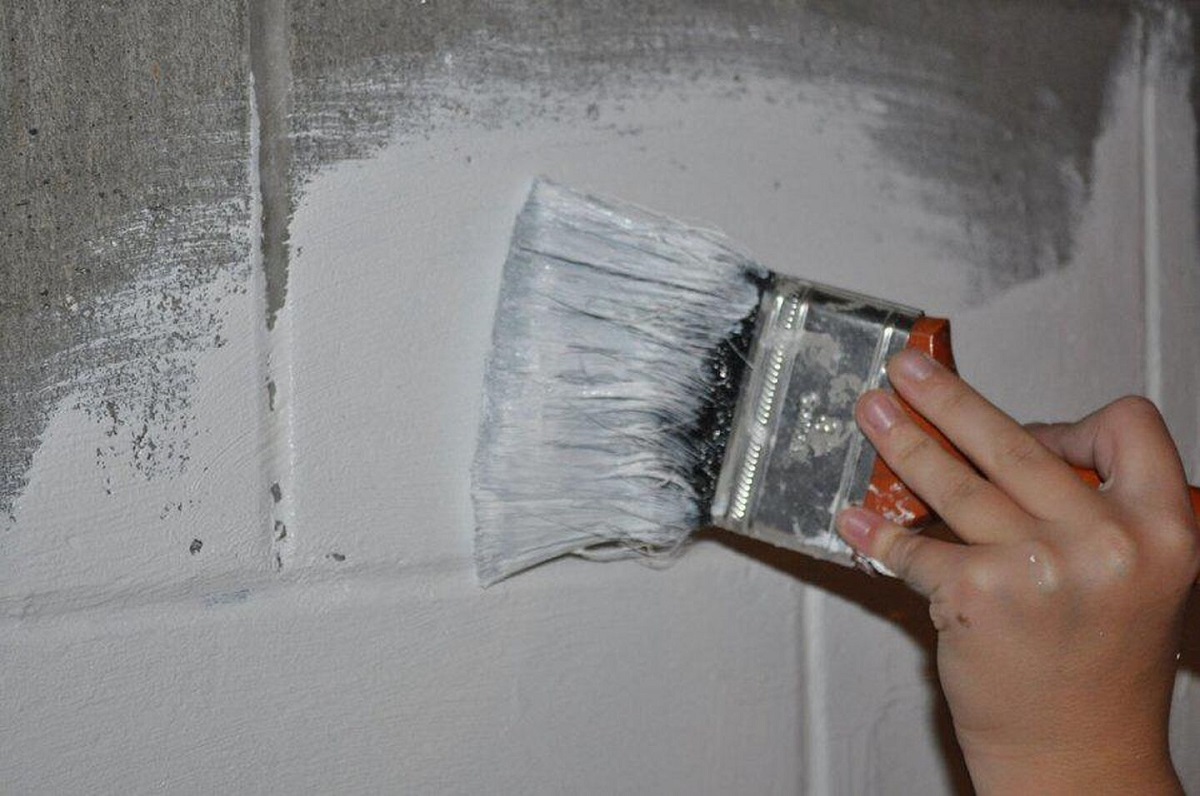
Step 4: Apply a Concrete Primer
Before painting your basement cement floor, it’s important to apply a concrete primer. The primer serves as a base coat that helps the paint adhere to the floor surface, improves durability, and prevents peeling or chipping. Follow these steps to apply a concrete primer:
- Select the right primer: Choose a primer specifically designed for concrete surfaces. There are various types available, including epoxy, acrylic, or latex-based primers. Read the product labels and choose a primer that is suitable for your project.
- Prepare the primer: Follow the manufacturer’s instructions for preparing the primer. Many primers require stirring or shaking before use. Make sure to mix the primer thoroughly to ensure even coverage.
- Apply the primer: Start by cutting in the edges of the floor with a paintbrush. Apply the primer along the walls, corners, and any other areas where a roller might not reach. Use a paint roller to cover the rest of the floor surface with the primer, working in small sections.
- Spread the primer evenly: Roll the primer onto the floor in smooth, overlapping strokes. Be sure to distribute it evenly to create a consistent base coat. Take care not to apply the primer too thickly, as it can lead to a longer drying time or a tacky surface.
- Allow the primer to dry: Follow the manufacturer’s instructions for drying time. Typically, primers need several hours to dry before applying the paint. Ensure the area is well-ventilated during the drying process.
By applying a concrete primer, you create a stable and adhesive surface for the paint. This step enhances the longevity and appearance of the painted basement floor. Once the primer has fully dried, you can move on to the next step: choosing the right paint for your project.
Before painting a basement cement floor, make sure to thoroughly clean and etch the surface to ensure proper adhesion of the paint. Use a concrete cleaner and follow the manufacturer’s instructions for etching.
Step 5: Choose the Right Paint
When it comes to painting your basement cement floor, selecting the right type of paint is crucial. You’ll want to choose a paint that is not only durable and long-lasting but also suitable for concrete surfaces. Follow these guidelines to choose the right paint for your project:
- Opt for concrete floor paint: Look for paint specifically formulated for concrete floors. These paints are designed to withstand heavy foot traffic, resist stains, and adhere well to the surface.
- Consider your needs: Determine the finish and color you desire for your basement floor. Concrete floor paints are available in a range of finishes, such as matte, satin, or glossy. Choose a color that complements your basement decor and personal preference.
- Read the product labels: Pay close attention to the product labels and manufacturer’s instructions. Look for paints that mention their suitability for concrete floors, as well as any specific application instructions or requirements.
- Consider additional features: Some concrete floor paints offer additional features like mold and mildew resistance, quick drying time, or low VOC (volatile organic compound) content. Consider these features based on your specific needs and preferences.
- Calculate the amount of paint needed: Measure the square footage of your basement floor to determine how much paint you’ll need. Refer to the manufacturer’s recommendations for coverage per gallon to make sure you purchase the right quantity.
By selecting the right paint for your basement floor, you’ll ensure excellent adhesion, durability, and aesthetic appeal. Once you have chosen the paint, you’re ready to move on to the exciting part: applying the paint to your basement floor.
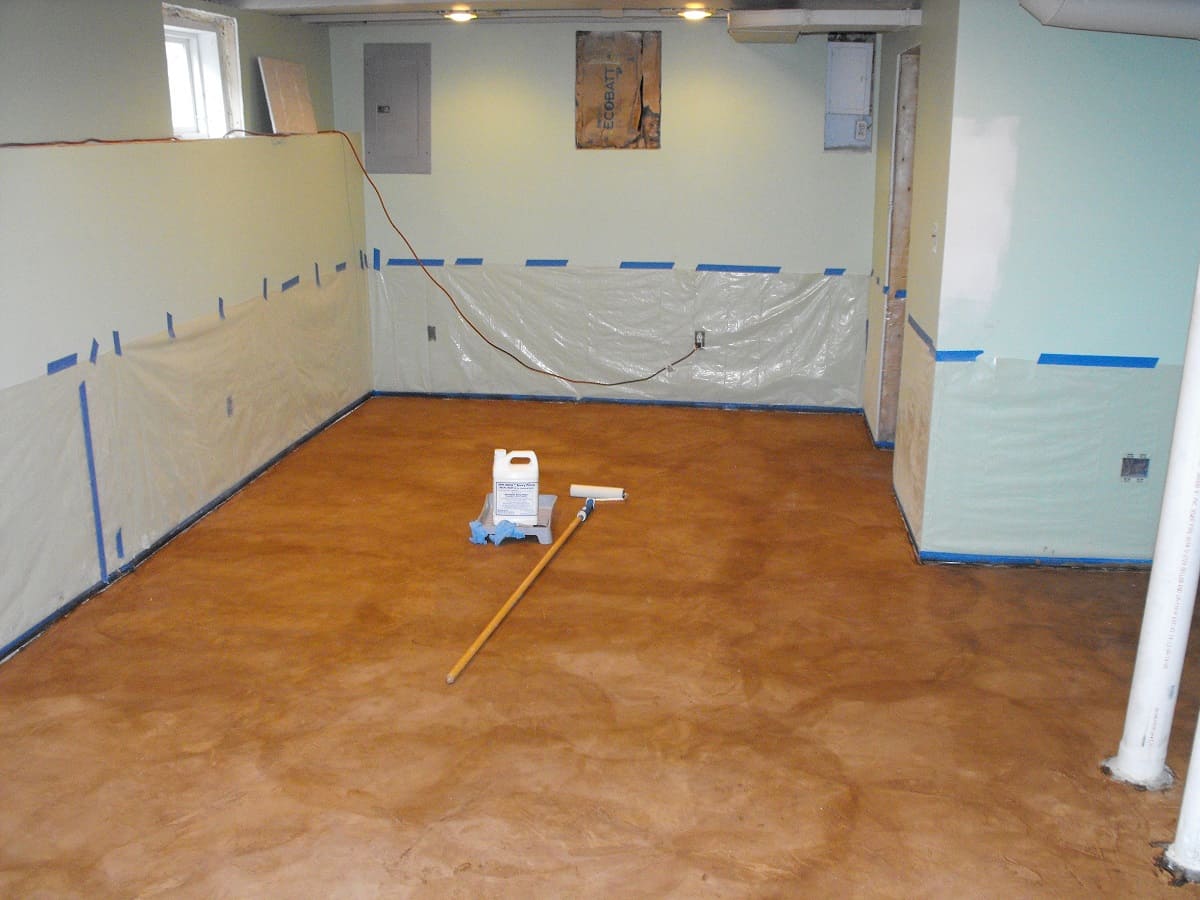
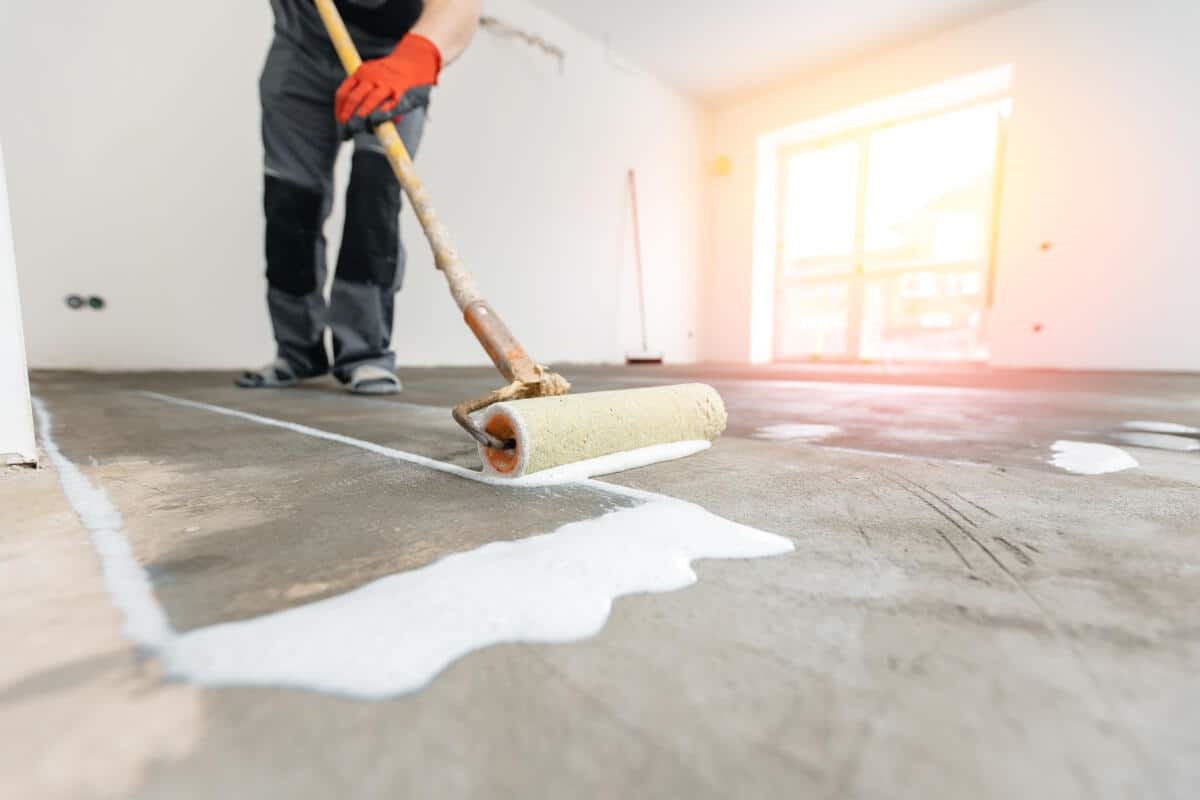
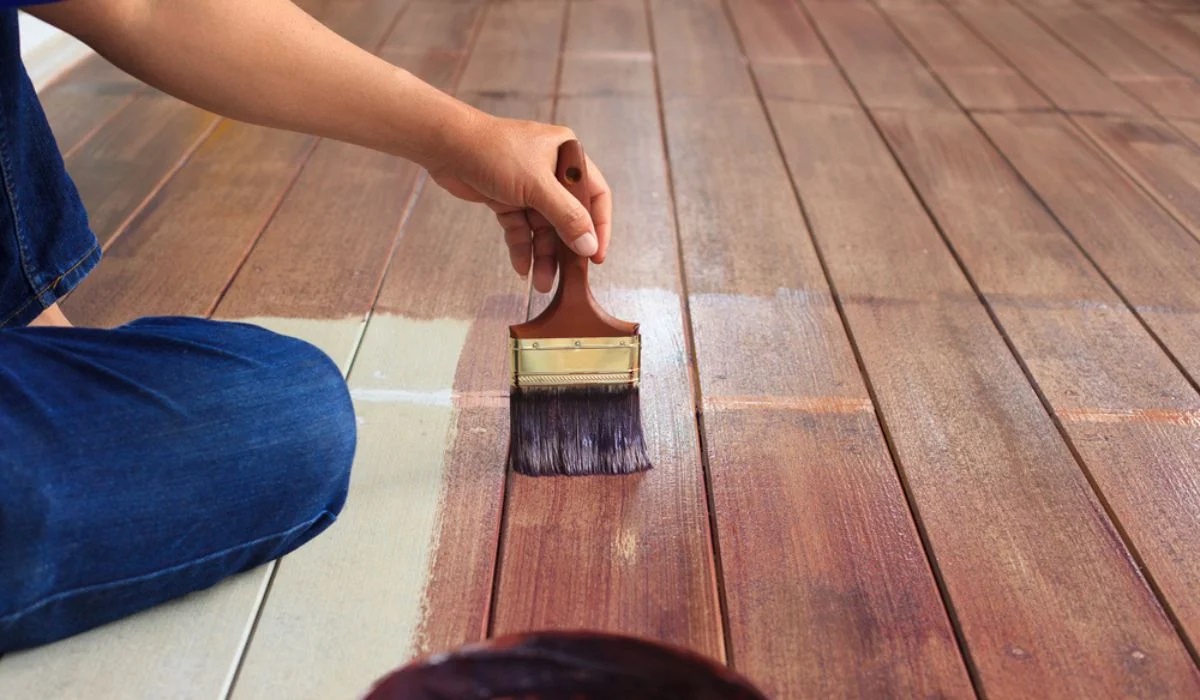
Step 6: Apply the Paint
Applying the paint to your basement cement floor is the next step in transforming the space. Follow these steps to ensure a smooth and successful painting process:
- Prepare the paint: Stir the paint well using a paint stick. This will help to mix any settled pigment and ensure an even color. If necessary, pour the paint into a paint tray for easy access.
- Cut in the edges: Start by cutting in the edges of the floor using a paintbrush. Apply the paint along the walls, corners, and around any obstacles that a roller may not reach. This will create clean lines and ensure even coverage.
- Roll the paint: Using a paint roller, work in small sections to apply the paint to the floor. Begin in a corner and roll in a “W” or “M” pattern to distribute the paint evenly. Apply firm and even pressure to avoid streaks or pooling.
- Maintain a wet edge: To avoid visible seams or lines, make sure to maintain a wet edge while rolling. This means overlapping each new section with the previously painted area while it is still wet. This will create a seamless and uniform finish.
- Work systematically: Divide the floor into manageable sections and work across the room in a systematic manner. This will prevent accidentally stepping on wet paint or causing smudges. Take breaks as needed, ensuring that each painted section is completely dry before moving on.
- Check for coverage: As you paint, periodically check for coverage and any missed spots. It is better to catch them earlier on and touch them up while the paint is still wet. If needed, apply an additional coat of paint to achieve the desired color and opacity.
Remember to follow the paint manufacturer’s instructions regarding drying time and ventilation. Properly applying the paint will create a beautiful and durable finish for your basement floor.
Once you have completed the paint application, you can decide whether or not to proceed with an optional step: applying a second coat.
Step 7: Apply a Second Coat (Optional)
Applying a second coat of paint to your basement cement floor is an optional step, but it can further enhance the appearance and durability of the painted surface. Follow these steps if you choose to apply a second coat:
- Allow the first coat to dry: Before applying the second coat, ensure that the first coat is completely dry. Refer to the paint manufacturer’s instructions for the recommended drying time. Typically, it can take several hours to overnight for the paint to dry.
- Prepare the second coat: Just like with the first coat, stir the paint well to ensure proper mixing. Check the consistency and color of the paint to ensure it matches the first coat. If necessary, pour the paint into a clean paint tray.
- Apply the second coat: Follow the same techniques as you did for the first coat. Start by cutting in the edges using a paintbrush, and then use a roller to cover the rest of the floor. Apply the paint in thin and even layers, maintaining a wet edge and overlapping each stroke.
- Check for even coverage: As you apply the second coat, check for any areas that may require additional coverage. Look for any missed spots or areas where the first coat may be showing through. Touch up these areas with the second coat for a consistent finish.
- Allow the paint to dry: Once you have applied the second coat, allow it to dry completely. Again, refer to the manufacturer’s instructions for the recommended drying time. Proper drying ensures the longevity and effectiveness of the painted basement floor.
Applying a second coat of paint adds an extra layer of protection and enhances the overall aesthetics of your basement floor. If desired, proceed with this optional step to achieve the best results. Once the paint is fully dried and cured, you can move on to the next step: allowing the paint to cure.
Read more: How To Cover Cement Walls In Basement
Step 8: Allow the Paint to Cure
After applying the paint to your basement cement floor, it is essential to allow it sufficient time to cure. Curing is the process in which the paint fully hardens, increases in durability, and reaches its maximum strength. Follow these steps to ensure proper paint curing:
- Refer to the manufacturer’s instructions: Different types of paint may have varying curing times. Read the manufacturer’s instructions on the paint can or packaging to determine the recommended curing period.
- Maintain proper ventilation: During the curing process, it is important to maintain good ventilation in the basement. Open windows or use fans to allow fresh air circulation. Adequate airflow helps to speed up the curing process and minimize potential odor buildup.
- Avoid heavy foot traffic: While the paint is curing, avoid walking on the floor or placing heavy furniture or objects on it. Even if the paint feels dry to the touch, it may still require more time to fully cure. Follow the manufacturer’s guidelines for the recommended curing duration.
- Be cautious with cleaning: It is best to wait until the paint is fully cured before cleaning the floor. This includes avoiding any wet mopping or vigorous scrubbing. Gentle sweeping or dry mopping is sufficient to remove any loose debris during the curing period.
- Consider additional curing time: Depending on the specific paint and environmental conditions, you may want to allow additional time for the paint to fully cure beyond the recommended duration. This ensures maximum durability and longevity of the painted basement floor.
Allowing the paint to cure properly ensures optimal performance and longevity of the painted surface. Once the paint has completely cured, you can choose to add an optional protective sealant for increased durability.
Step 9: Add a Protective Sealant (Optional)
Adding a protective sealant to your painted basement cement floor is an optional step, but it can provide an added layer of durability and protection against stains, moisture, and general wear and tear. Follow these steps if you choose to apply a protective sealant:
- Choose the right sealant: Look for a sealant specifically designed for use on painted concrete floors. There are various types available, such as acrylic, polyurethane, or epoxy sealants. Consider factors like gloss level, ease of application, and compatibility with your paint.
- Prepare the floor surface: Ensure that the painted floor is clean and free of any dust or debris. If necessary, use a broom or vacuum cleaner to remove any loose particles. Ensure the floor is completely dry before applying the sealant.
- Apply the sealant: Follow the manufacturer’s instructions for the specific sealant you’ve chosen. Typically, you’ll need a paint roller or brush to apply the sealant evenly onto the floor surface. Work in small sections, starting from one end of the room and moving towards the exit.
- Spread the sealant evenly: Use long, even strokes to spread the sealant across the floor. Pay attention to any areas that may require extra coverage, such as high-traffic areas or spots prone to spills. Ensure that the sealant is spread evenly to avoid streaks or blotches.
- Allow proper drying time: Give the sealant sufficient time to dry and cure completely. Refer to the manufacturer’s instructions for the recommended drying time. During this period, avoid walking on the floor or placing any furniture or objects on it to prevent smudging or damage to the sealant.
- Consider additional coats: Depending on the sealant’s instructions, you may need to apply additional coats for optimal protection. Allow each coat to dry before applying the next one, following the manufacturer’s recommended curing time.
Applying a protective sealant can help prolong the life of your painted basement floor and make it easier to clean and maintain. However, keep in mind that sealants may require periodic reapplication over time to maintain their effectiveness. With the sealant applied, your basement floor is now complete and ready to enjoy.
Conclusion
Congratulations on successfully painting your basement cement floor! By following the steps outlined in this guide, you have transformed your basement into a more aesthetically pleasing and durable space. Painting the floor not only enhances its appearance but also provides protection against stains, moisture, and general wear and tear.
Throughout this process, you have learned how to properly prepare the floor, clean the surface, repair any damages, apply a concrete primer, choose the right paint, and apply it with precision. You also had the option to apply a second coat of paint for added durability and could consider adding a protective sealant for even more protection.
Remember, proper preparation and careful execution are key to achieving the best results. Take your time, follow the manufacturer’s instructions for each product used, and allow sufficient drying and curing time between steps.
With your newly painted basement floor, you can now enjoy a fresh and clean space for various activities. Whether you plan to use it as a recreational area, storage space, or even as an additional living space, the painted floor will provide an attractive and functional foundation.
Keep in mind that regular maintenance and cleaning will help preserve the longevity and appearance of your painted floor. Avoid using harsh chemicals or abrasive cleaners that could damage the paint, and sweep or dry mop regularly to remove any dirt or debris.
We hope this guide has been helpful in your basement floor painting journey. Enjoy your newly transformed space and the satisfaction of a job well done!
Frequently Asked Questions about How To Paint A Basement Cement Floor
Was this page helpful?
At Storables.com, we guarantee accurate and reliable information. Our content, validated by Expert Board Contributors, is crafted following stringent Editorial Policies. We're committed to providing you with well-researched, expert-backed insights for all your informational needs.


0 thoughts on “How To Paint A Basement Cement Floor”