Articles
How To Remove Mold From Interior Walls
Modified: January 9, 2024
Learn effective strategies and techniques for removing mold from interior walls with our informative articles. Say goodbye to mold and hello to a clean and healthy living environment.
(Many of the links in this article redirect to a specific reviewed product. Your purchase of these products through affiliate links helps to generate commission for Storables.com, at no extra cost. Learn more)
Introduction
We all strive to create a safe and healthy environment in our homes, but sometimes, unforeseen issues can arise. One such problem that many homeowners face is the presence of mold on their interior walls. Mold not only damages the structure of our homes but also poses risks to our health. In this article, we will explore what mold is, the potential health risks associated with it, and most importantly, how to effectively remove mold from interior walls.
Key Takeaways:
- Prioritize prevention: Regularly inspect and maintain your home to prevent moisture buildup and address any signs of mold promptly. Proper ventilation and controlling indoor humidity levels are key in preventing future mold growth.
- Seek professional help when needed: For extensive or hidden mold growth, recurring problems, or complex environments, professional mold remediation specialists can provide expertise and resources for effective and safe mold removal.
Read more: How To Remove Mold From Attic
What is mold?
Mold is a type of fungus that thrives in damp and humid environments. It reproduces by producing tiny spores that can float through the air and settle on surfaces, including walls. There are many different types of mold, but the most common ones found indoors are black mold (Stachybotrys chartarum), green mold (Aspergillus), and white mold (Penicillium).
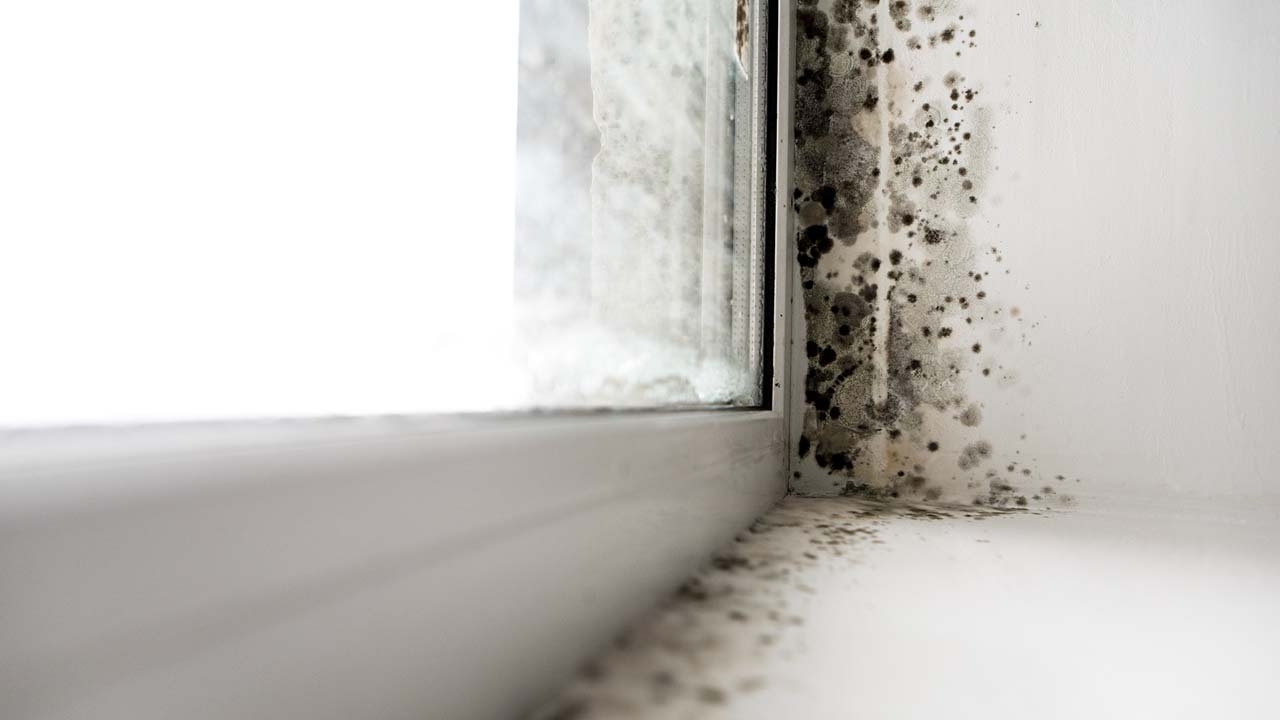
Mold growth on interior walls is usually a result of excessive moisture, which can be caused by various factors such as water leaks, high humidity levels, condensation, or inadequate ventilation. Once mold finds a suitable environment with enough moisture and organic matter to feed on, it can quickly spread and colonize the area.
Health risks associated with mold
While many people may think of mold as just an unsightly annoyance, it poses significant health risks, especially for individuals with allergies, respiratory conditions, or weakened immune systems. Prolonged exposure to mold spores can cause a range of health issues, including allergic reactions, asthma attacks, respiratory infections, and even severe lung conditions.
Common symptoms of mold exposure can include coughing, sneezing, wheezing, itchy or watery eyes, skin rashes, nasal congestion, and respiratory difficulties. If you or your family members experience any of these symptoms in your home, it is crucial to investigate and address the presence of mold promptly.
Importance of removing mold from interior walls
Removing mold from interior walls is not only essential for preserving the aesthetics of your home; it is also crucial for safeguarding the health and well-being of your family. Mold colonies can release spores into the air, which can then spread to other areas of your home, potentially causing further contamination.
Furthermore, mold can weaken the structure of your walls and compromise their integrity over time. If left untreated, it can lead to costly repairs and renovations to restore your home’s structural integrity. By addressing the mold growth early and effectively, you can prevent further damage and ensure a safe living environment for you and your loved ones.
Key Takeaways:
- Prioritize prevention: Regularly inspect and maintain your home to prevent moisture buildup and address any signs of mold promptly. Proper ventilation and controlling indoor humidity levels are key in preventing future mold growth.
- Seek professional help when needed: For extensive or hidden mold growth, recurring problems, or complex environments, professional mold remediation specialists can provide expertise and resources for effective and safe mold removal.
Read more: How To Remove Mold From Attic
What is mold?
Mold is a type of fungus that plays a crucial role in the natural environment. It serves as nature’s decomposer, breaking down organic matter such as dead plants and trees. While mold plays a beneficial role outdoors, it becomes problematic when it starts growing inside our homes.
Mold reproduces through the release of microscopic spores that are invisible to the naked eye. These spores are present in the air, both indoors and outdoors. When they land on a damp surface, they can start to grow and form colonies. One of the most common places for mold growth is on interior walls.
There are various types of mold, and they can come in different colors such as black, green, brown, or white. However, the color of the mold does not determine its toxicity or danger to health. Black mold, also known as Stachybotrys chartarum, is often associated with health risks, but it’s important to note that any type of mold can have adverse effects if not addressed promptly.
When mold grows on interior walls, it usually appears as a fuzzy or powdery substance. It can spread rapidly if the conditions are favorable, such as high humidity, poor ventilation, or water leakage. Mold often thrives in areas with excessive moisture, such as bathrooms, kitchens, basements, or areas affected by water damage.
To effectively remove mold from interior walls, it’s essential to understand its growth pattern and the factors that contribute to its development. Mold requires three main elements to thrive: moisture, organic matter as a food source, and a suitable temperature. Once these conditions are met, mold spores can quickly germinate and spread throughout the affected area.
It’s important to note that mold growth on interior walls is not always visible. Mold can grow behind wallpaper, under carpets, or within wall cavities, making it harder to detect. If you notice a musty odor or experience unexplained health symptoms, it’s essential to thoroughly inspect your home for hidden mold.
Regular maintenance and prompt action in addressing moisture issues can help prevent mold growth on interior walls. By keeping your home dry and well-ventilated, you can create an environment that is less conducive to mold growth.
In the next sections, we will explore the health risks associated with mold, the importance of removing it from interior walls, and provide a step-by-step guide on how to effectively remove mold to create a healthier living space.
Health risks associated with mold
Mold growth in our homes can pose significant health risks, especially for individuals who are sensitive or allergic to mold spores. Prolonged exposure to mold can lead to a variety of health issues, ranging from mild irritations to severe respiratory problems.
Here are some of the health risks associated with mold:
Allergic reactions:
Many people are allergic to mold spores. When they come into contact with mold, they may experience symptoms such as sneezing, runny or stuffy nose, itchy or watery eyes, and skin rashes. These allergic reactions can be bothersome and affect daily life if exposed to mold on a regular basis.
Asthma exacerbation:
If you have asthma, exposure to mold can trigger or worsen asthma symptoms. It can lead to coughing, wheezing, chest tightness, and difficulty breathing. People with asthma should take extra precautions to minimize their exposure to mold to prevent asthma attacks.
Respiratory infections:
Prolonged exposure to mold spores can weaken the immune system and make individuals more susceptible to respiratory infections. Common respiratory infections linked to mold exposure include bronchitis, pneumonia, and sinus infections.
Read more: How To Remove Mold From Showerhead
Mycotoxin exposure:
Some molds produce mycotoxins, which are toxic substances that can have detrimental effects on human health. Stachybotrys chartarum, commonly known as black mold, is a type of mold that has been associated with mycotoxin production. Mycotoxins can potentially cause neurological symptoms, such as headaches, dizziness, difficulty concentrating, and memory problems.
Hypersensitivity pneumonitis:
Hypersensitivity pneumonitis, also known as “allergic alveolitis,” is a rare lung disease that can occur in individuals who have a heightened sensitivity to mold spores. It causes inflammation and damage to the lung tissue, leading to symptoms such as cough, shortness of breath, fatigue, and weight loss.
Immune system suppression:
Prolonged exposure to mold can suppress the immune system, making individuals more susceptible to infections and illnesses. This is particularly concerning for individuals with weak immune systems, such as the elderly, young children, and those with underlying health conditions.
Toxic mold syndrome:
There is an ongoing debate about the existence of toxic mold syndrome, which refers to a condition where individuals experience a variety of symptoms after exposure to mold. Symptoms can range from fatigue, headaches, and muscle aches to digestive issues and cognitive difficulties. While the exact cause and diagnosis of toxic mold syndrome remain controversial, it’s clear that mold exposure can have wide-ranging effects on health.
It’s important to note that the severity of symptoms can vary greatly depending on an individual’s sensitivity, the type and amount of mold present, and the duration of exposure. If you or your family members experience any unexplained health symptoms or suspect mold growth in your home, it is essential to take action to address the issue and minimize the health risks associated with mold.
Importance of removing mold from interior walls
Removing mold from interior walls is not just about restoring the aesthetics of your home; it is crucial for protecting the health and well-being of your family. Here are several reasons why removing mold is of utmost importance:
Health risks:
Mold can have a detrimental impact on health, especially for individuals with allergies, respiratory conditions, or weakened immune systems. Prolonged exposure to mold spores can trigger allergic reactions, worsen asthma symptoms, and even lead to respiratory infections. By removing mold from interior walls, you can create a healthier environment and reduce the risk of health complications.
Preventing further spread:
Mold is known for its ability to spread rapidly. When mold growth is left unchecked on interior walls, it can release spores into the air that can contaminate other areas of your home. These spores can settle on furniture, carpets, or other surfaces, leading to ongoing mold growth and further health risks. Removing mold from interior walls helps to prevent the spread of mold to other areas of your home and minimizes the need for extensive remediation in the future.
Structural damage:
Aside from the health implications, mold growth on interior walls can also compromise the structural integrity of your home. Mold can weaken the material it grows on, leading to decay, deterioration, and damage. If mold is left untreated for an extended period, it can result in costly repairs and renovations to restore the affected walls. By removing mold from interior walls early on, you can prevent further structural damage and avoid substantial financial implications.
Read more: How To Remove Mold From Ice Maker
Eliminating odors:
Mold growth on interior walls often goes hand in hand with a musty and unpleasant odor. Even if the mold is not visible, the odor can linger, making your home feel damp and uninviting. By removing the mold and addressing the underlying cause, you can eliminate the unpleasant odors and create a more pleasant living environment for you and your family.
Enhancing indoor air quality:
Mold spores can significantly affect the quality of the air you breathe indoors. By removing mold from interior walls, you can improve the indoor air quality and provide a healthier living space for your family. Clean indoor air is especially crucial for individuals with respiratory conditions or allergies, as it can reduce triggers and improve their overall well-being.
Peace of mind:
Living in a home infested with mold can be stressful and worrying. Constantly being exposed to mold and its potential health risks can take a toll on your mental well-being. By taking the necessary steps to remove mold from interior walls, you can have peace of mind knowing that you have created a safer and healthier living environment for yourself and your loved ones.
Overall, removing mold from interior walls is not just about the visual appearance of your home; it is about prioritizing the health and safety of your family. By taking proactive measures to address mold growth, you can prevent further health complications, protect your home’s structure, and create a clean and comfortable living space.
Common causes of mold growth on interior walls
Mold is often found growing on interior walls, and understanding the common causes of mold growth can help you effectively address the problem. Here are some of the main factors that contribute to mold growth on interior walls:
Read more: How To Remove Mold From Plywood In Attic
Excessive moisture:
Excess moisture is the primary cause of mold growth. When there is persistent moisture in your home, whether from leaks, condensation, or high humidity levels, it creates an ideal environment for mold to thrive. Moisture can seep into the walls and provide the necessary conditions for mold spores to germinate and grow into colonies.
Water leaks:
Leaking pipes, roof leaks, or any other source of water leakage can lead to mold growth on interior walls. Even small, unnoticed leaks can result in hidden mold growth within the walls. It’s crucial to regularly inspect your home for any signs of water damage, such as stains, dampness, or a musty odor, and address any leaks immediately to prevent mold growth.
Poor ventilation:
Inadequate ventilation can trap moisture and contribute to mold growth on interior walls. When there is not enough airflow, moisture cannot properly evaporate, creating a damp environment that is conducive to mold growth. Areas like bathrooms, kitchens, and basements, which tend to be more humid, are particularly susceptible to mold growth if they lack proper ventilation.
High humidity:
High humidity levels can create a favorable environment for mold growth. Areas with poor ventilation or excessive moisture buildup, such as basements or areas with limited natural airflow, can have higher humidity levels, making them susceptible to mold growth. Using dehumidifiers or ensuring proper ventilation can help control humidity levels and prevent mold growth.
Read more: How To Remove Mold From Furniture Fabric
Lack of insulation:
Inadequate insulation in exterior walls can result in condensation, which can lead to mold growth. When warm, moist air comes into contact with cooler surfaces, such as poorly insulated walls, condensation forms, providing the moisture needed for mold to thrive. Properly insulating walls can help prevent condensation and reduce the risk of mold growth.
Poor housekeeping habits:
Inadequate cleaning practices and failure to address spills or water damage promptly can contribute to mold growth on interior walls. Dirt, dust, and organic matter can provide nutrients for mold to feed on, while spills or water accidents that are not cleaned up promptly can lead to moisture buildup. Regular cleaning and prompt attention to any moisture-related issues can help prevent mold growth.
Previous water damage:
If your home has experienced water damage in the past, whether from flooding, leaks, or plumbing issues, it increases the likelihood of mold growth on interior walls. Water damage that was not adequately dried or remediated can create a lingering moisture problem that becomes a breeding ground for mold. It’s crucial to thoroughly address and properly dry any areas affected by water damage to prevent mold growth.
Identifying the underlying causes of mold growth on interior walls is essential for effective mold removal and prevention. By addressing these causes and implementing necessary measures, you can create an environment that is less prone to mold growth and ensure a healthier living space.
Preparation for mold removal
Before embarking on the process of removing mold from interior walls, it’s important to make proper preparations. Here are some steps to take to ensure the safest and most efficient mold removal process:
Read more: How To Remove Mold From Toilet Seat
Gathering necessary supplies:
Collect the needed supplies for mold removal, including protective gear such as gloves, goggles, and a mask, as well as cleaning solutions, brushes, and disposable materials for cleanup.
Taking safety precautions:
Mold can release spores that can be harmful when inhaled or come into contact with the skin. Wear protective gear to minimize exposure and ensure proper ventilation by opening windows and using fans during the removal process.
Identifying the extent of the mold problem:
Carefully inspect the affected area to determine the scope of the mold growth. Assessing the size and severity of the infestation will help you plan the best course of action and determine if professional assistance is needed.
Developing a removal plan:
Based on the assessment of the mold growth, develop a step-by-step plan for removing the mold. Consider factors such as the type of surface affected, the extent of the growth, and the appropriate cleaning products or methods to use.
Once you have made all the necessary preparations, you are ready to follow a comprehensive step-by-step guide for removing mold from interior walls, which we will cover in the next section.
Read more: How To Remove Mold From Popcorn Ceiling
Gathering necessary supplies
Before starting the mold removal process, it’s important to gather all the necessary supplies. Having the right tools and cleaning solutions will help you effectively remove the mold and minimize the risk of spreading spores. Here are some essential supplies to gather:
Protective gear:
First and foremost, ensure that you have the appropriate protective gear to safeguard yourself during the mold removal process. This includes wearing disposable gloves, safety goggles to protect your eyes, and a mask or respirator to prevent inhaling mold spores. These items will help minimize direct contact with the mold and reduce the risk of respiratory irritation.
Cleaning solutions:
There are several effective cleaning solutions that you can use to remove mold from interior walls. A common option is a mixture of bleach and water, with a ratio of one part bleach to ten parts water. Alternatively, you can use commercial mold cleaning products that are specifically formulated for mold removal. Make sure to follow the manufacturer’s instructions when using these products.
Brushes and scrubbers:
Soft-bristle brushes, such as a nylon brush or a toothbrush, are helpful for scrubbing away mold from interior walls. For stubborn mold growth, you may need a stiffer brush or a scrub pad. These tools will allow you to effectively remove the mold from the surfaces without causing damage to the walls.
Read more: How To Remove Mold From Carpet In A Car
Disposable cloths or towels:
Having disposable cloths or paper towels is essential for cleaning the mold-infested surfaces. These can be discarded after use to prevent cross-contamination and further spread of mold spores. Avoid using cloth towels or sponges that can absorb and hold mold spores, as this can lead to unintentional spreading of the mold during cleanup.
Trash bags:
Plastic trash bags are necessary for disposing of contaminated materials and any mold-infested items that cannot be salvaged. Double-bagging the materials can provide an extra layer of protection against mold spores and prevent them from spreading to other areas of your home.
Plastic sheets or tarps:
If you’re concerned about containing the mold spores during the removal process, you can use plastic sheets or tarps to create a containment area. This can be helpful, especially if you’re dealing with a large mold-infested area. By isolating the work area, you can prevent the spread of mold spores to other parts of your home.
Ventilation equipment:
Proper ventilation is crucial during the mold removal process. Open windows and use fans or dehumidifiers to increase airflow and aid in drying out the affected area. Good ventilation will help reduce the moisture content and prevent the growth of mold spores.
By gathering these necessary supplies, you will be well-prepared to commence the mold removal process efficiently and safely. Having the right tools and protective gear will enable you to tackle the task effectively while minimizing exposure to mold spores.
Read more: How To Remove Mold From Lunch Box
Taking safety precautions
When it comes to removing mold from interior walls, it’s essential to prioritize your safety. Mold can release tiny spores into the air, which can cause respiratory irritation or allergic reactions. Therefore, taking appropriate safety precautions is crucial. Here are some important steps to follow:
Wear protective gear:
Prior to starting the mold removal process, ensure that you are wearing the necessary protective gear. Disposable gloves are essential to prevent direct contact with mold and potential skin irritation. Safety goggles or glasses will protect your eyes from any airborne spores or cleaning solutions. Additionally, wearing a mask or respirator will help filter out airborne particles and prevent you from inhaling mold spores.
Provide proper ventilation:
Before you begin removing mold, it’s important to ensure that the area is properly ventilated. Open windows to allow fresh air to circulate and improve the overall air quality. Use fans or dehumidifiers to increase airflow and aid in drying out the affected area. Ventilation will help minimize the concentration of mold spores in the air and reduce the risk of inhalation.
Contain the work area:
If possible, consider containing the mold-infested area to prevent spores from spreading to other parts of your home. You can use plastic sheets or tarps to create a barrier around the work area. This will help confine the mold and minimize the risk of cross-contamination. Make sure to seal off any vents or air ducts to prevent the mold spores from spreading through the ventilation system.
Avoid direct contact:
When removing mold, avoid direct contact with it as much as possible. Do not touch or disturb the mold growth without proper protection. This will help prevent the release of additional spores into the air. Use brushes or scrubbers to physically remove the mold without agitating it too much. Be cautious not to spread the mold spores to unaffected areas of the walls or other surfaces.
Take breaks and rest:
Mold removal can be physically demanding, especially if you are working in a confined or uncomfortable space. It’s important to take periodic breaks to rest and rehydrate. This will help prevent fatigue and ensure that you can maintain focus throughout the process. Additionally, consider taking breaks in well-ventilated areas to minimize prolonged exposure to mold spores.
Properly dispose of contaminated materials:
After removing mold-infested materials, such as disposable gloves, cleaning cloths, or debris, it’s important to handle their disposal properly. Place them in sealed plastic bags to prevent any further contamination. Double-bagging is recommended to reduce the risk of mold spores escaping. Dispose of the bags in an appropriate manner, following your local regulations for handling and disposing of mold-contaminated waste.
By following these safety precautions, you can minimize your exposure to mold spores during the removal process. Prioritizing your health and safety is crucial to ensure a successful mold removal while protecting yourself from any potential risks associated with mold exposure.
Identifying the extent of the mold problem
Before starting the mold removal process, it’s important to assess the extent of the mold growth. Identifying the size and severity of the infestation will help guide your actions and determine the appropriate course of action. Here are some steps to help you identify the extent of the mold problem:
Read more: How To Remove Mold From Crawl Space Joists
Visual inspection:
Begin by visually inspecting the affected area. Look for visible signs of mold growth, such as black or green patches, discoloration, or fuzzy textures on the walls. Pay attention to areas with moisture issues, previous water damage, or places that are prone to poor ventilation. Inspect not only the surface of the walls but also check behind furniture, wallpaper, or any other objects that could hide mold growth.
Musty odor:
Mold often produces a distinctive musty smell. If you notice a persistent, unpleasant odor in certain areas of your home, it could be an indication of hidden mold growth. Follow your nose to detect any areas with a strong musty odor, as this can help pinpoint the locations where mold might be present.
Mold testing:
If the mold growth is extensive or if you suspect hidden mold, you may consider mold testing. There are professional mold testing kits available or you can hire a certified mold inspector to perform an assessment. Mold testing can help identify the specific type of mold present and determine the spore concentration in the air. This information can be useful in determining the severity of the infestation and guiding the proper removal process.
Professional assessment:
In some cases, it may be best to seek the expertise of a professional mold remediation specialist. They have the knowledge, experience, and specialized equipment to detect and assess the extent of the mold problem accurately. A professional assessment can provide a comprehensive evaluation of the mold growth, including any hidden mold or potential sources of moisture that may contribute to the problem.
Read more: How To Remove Pink Mold From A Toilet Brush
Documenting the mold growth:
As you inspect and identify the extent of the mold problem, it’s important to document your findings. Take photos or videos of the affected areas to provide a visual record of the mold growth. This documentation can be helpful for insurance purposes or if you need to consult with a mold remediation professional.
Mold growth spread:
Finally, assess whether the mold growth is localized or if it has spread to other areas of your home. Check nearby rooms, adjacent walls, and surfaces to determine if the mold has migrated beyond the initial source. This will help you understand the scope of the problem and determine the necessary steps for containment and removal.
By carefully assessing the extent of the mold problem, you can develop an effective plan for removal and take the appropriate actions to address the mold growth. Whether through visual inspection, odor detection, testing, or professional assessment, understanding the severity and spread of the mold infestation will guide you towards a successful remediation process.
Developing a removal plan
Once you have identified the extent of the mold problem, it’s important to develop a removal plan. Having a well-thought-out plan will help ensure a systematic and effective approach to removing mold from interior walls. Here are the steps to develop a removal plan:
Assess the severity of the mold growth based on your findings. Determine whether the mold growth is minor, moderate, or extensive. This evaluation will help you prioritize your resources, determine the level of precautions needed, and decide if professional assistance is required.
Based on the severity of the mold growth, establish the appropriate safety precautions. Ensure that you have the necessary protective gear, such as gloves, goggles, and a mask or respirator, to minimize exposure to mold spores. Additionally, create a plan for proper ventilation during the removal process, opening windows or using fans to increase airflow and remove airborne spores.
Read more: How To Remove Mold In A Bathtub
Set a timeline for the mold removal process. Mold should be addressed promptly to prevent further spread and minimize health risks. Consider the size of the affected area, the available time you have for the project, and any potential limitations that may impact the process. Having a timeline will help you stay organized and ensure timely completion of the removal process.
Read more: How To Remove Mold In A Bathtub
Based on the scope of the mold growth and the specific requirements of your removal plan, gather the necessary tools and supplies. These can include protective gear, cleaning solutions, brushes or scrubbers, disposable cloths or towels, trash bags, and plastic sheets or tarps if containment is necessary.
Determine the most suitable cleaning method for your specific situation. Depending on the surface and the severity of the mold growth, different cleaning methods may be needed. Common methods include using a bleach solution, commercial mold cleaning products, or natural remedies like vinegar or hydrogen peroxide. Research and choose the method that best fits your needs.
Step-by-step guide for removing mold from interior walls
Once you have developed your removal plan, it’s time to move on to the step-by-step process of removing mold from interior walls. Here is a guide to help you through the process:
Step 1: Prepare the area:
Before you begin the removal process, prepare the area by clearing any furniture or objects that may obstruct your access to the mold-infested walls. Cover the floor with plastic sheets or tarps to catch any debris or drips during the cleaning process.
Step 2: Protect yourself:
Put on your protective gear, including gloves, goggles, and a mask or respirator, to ensure your safety during the mold removal process. Make sure the room is properly ventilated by opening windows or using fans to improve airflow.
Step 3: Remove visible mold:
Start by physically removing any visible mold growth from the walls using a soft-bristle brush or scrubber. Gently scrub the mold-infested areas to loosen and remove the mold. Be cautious not to agitate the mold too much, as it can release additional spores into the air.
Step 4: Clean the affected area:
After removing the visible mold, clean the affected area using an appropriate cleaning solution. Apply the solution to the mold-infested surfaces and scrub thoroughly to remove any remaining mold particles. Ensure that you cover all the mold-affected areas, including corners and hard-to-reach spots.
Step 5: Dry and monitor:
Once the cleaning process is complete, allow the walls to dry completely. Use fans or dehumidifiers to speed up the drying process. Monitor the area for any signs of mold return or moisture issues over the next few days or weeks to ensure that the mold problem does not reoccur.
Step 6: Dispose of materials:
Dispose of any contaminated materials, including gloves, cloths, or debris, in sealed plastic bags. Double-bag the materials to prevent any potential spread of mold spores and dispose of them following your local regulations for mold-contaminated waste.
Step 7: Prevent future mold growth:
To prevent future mold growth, address any underlying moisture issues. Repair any leaks or water damage promptly, improve ventilation in the affected area, and maintain proper humidity levels in your home. Regularly inspect your home for any signs of water intrusion and take preventive measures to minimize the risk of mold growth.
By following this step-by-step guide and implementing your removal plan, you can effectively remove mold from interior walls, create a healthier living space, and prevent the reoccurrence of mold growth.
Step 1: Protecting yourself
When it comes to removing mold from interior walls, it is crucial to prioritize your safety and take the necessary precautions to protect yourself from potential health risks. Mold can release spores into the air that can cause respiratory irritation or allergic reactions. Here are the steps to protect yourself during the mold removal process:
1. Wear protective gear:
Before you begin the mold removal process, ensure that you have the appropriate protective gear. This includes wearing disposable gloves to prevent direct contact with mold and potential skin irritation. Safety goggles or glasses will protect your eyes from any airborne spores or cleaning solutions. Wearing a mask or respirator is essential to filter out airborne particles, preventing inhalation of mold spores. Choose a mask that is specifically designed for mold removal and fits securely to provide adequate protection.
2. Choose the right clothing:
Wear old, long-sleeved clothing and long pants that cover your skin to minimize direct contact with mold. Choose clothing items that you don’t mind discarding afterward, as they may become contaminated during the removal process. This precaution helps prevent mold spores from adhering to your clothes and spreading to other areas of your home.
3. Create proper ventilation:
Ensure that you have good ventilation in the area where you’ll be removing mold. Open windows and use fans or dehumidifiers to increase airflow and volume exchange with the outside environment. Proper ventilation helps prevent the build-up of mold spores in the air and reduces the risk of inhaling them.
4. Limit access to the work area:
If possible, restrict access to the work area to minimize the exposure of household members or pets to mold spores. Close the doors leading to the affected area and cover any air vents or ducts with plastic to prevent the spread of spores through the ventilation system. This precaution helps contain the mold and reduces the risk of spreading it to other parts of your home.
5. Take breaks and rest:
Mold removal can be physically demanding, especially if you’re working in a confined or uncomfortable space. Take regular breaks to rest and rehydrate. This will help prevent fatigue and ensure that you can maintain focus throughout the removal process. Consider taking breaks in a well-ventilated area to minimize prolonged exposure to mold spores.
6. Wash hands and change clothes:
After completing the mold removal process, make sure to wash your hands thoroughly with soap and warm water. This will help remove any mold spores that may have come into contact with your skin. It is also recommended to change your clothes and launder them separately to prevent cross-contamination with any remaining mold spores.
Remember, mold removal can be hazardous if proper precautions are not taken. By following these steps and protecting yourself during the removal process, you can minimize the risks associated with mold exposure and ensure a safer environment for both you and your family.
Step 2: Removing any visible mold growth
Once you have taken the necessary precautions to protect yourself, it’s time to remove any visible mold growth from the interior walls. This step involves physically getting rid of the mold and preparing the surfaces for further cleaning. Follow these steps to effectively remove visible mold:
1. Prepare the area:
Start by preparing the work area. Clear any furniture, decorations, or other items near the mold-infested walls, keeping them at a safe distance to prevent accidental contamination. Lay down plastic sheets or tarps to protect the floor from debris and contain the removed mold.
2. Wear protective gear:
Put on your protective gear, including gloves, goggles, and a mask or respirator, before you start removing the mold. This will protect you from direct contact with mold spores and minimize inhalation.
3. Set up a containment area (if necessary):
If you are dealing with extensive mold growth or want to prevent the spread of spores to other areas, consider setting up a containment area with plastic sheets or tarps. This will isolate the work area and help contain any released spores during removal.
4. Use a soft brush or scrubbing tool:
Gently scrub the mold-infested areas using a soft-bristle brush or scrubbing tool, such as a nylon brush or toothbrush. Avoid using stiff brushes that may damage the wall surface. Apply gentle pressure to dislodge and remove the mold from the walls.
5. Work from top to bottom:
Start at the top of the mold-affected area and work downwards. This helps prevent any dislodged mold spores from falling onto already cleaned surfaces. Take your time and focus on one small section at a time to ensure thorough removal.
6. Dispose of mold debris:
As you remove the mold, place the debris directly into a plastic bag. Double-bag the waste to prevent any potential spores from escaping. Seal the bags tightly to contain the mold-infested materials before disposing of them in accordance with local regulations for mold-contaminated waste.
7. Clean surrounding areas:
After removing the visible mold, clean the surrounding areas to ensure that any residual spores or mold particles are eliminated. Use a damp cloth or sponge with a mild detergent to wipe down the adjacent walls, ceilings, and floors. Thoroughly rinse and wring out the cloth or sponge to prevent spreading the mold further.
8. Dispose of cleaning materials:
Dispose of the cleaning materials, such as gloves or cloths, in sealed plastic bags along with the mold debris. This prevents cross-contamination and potential spread of spores. Remember to practice proper hand hygiene by washing your hands with soap and warm water after disposing of the materials.
By following these steps, you can effectively remove visible mold growth from the interior walls. It’s important to be thorough in your removal to minimize the risk of regrowth and ensure a cleaner and healthier living environment.
Step 3: Cleaning the affected area
After removing the visible mold, it’s essential to thoroughly clean the affected area to eliminate any remaining mold spores and prevent regrowth. Cleaning the area properly will help ensure a healthier living space. Follow these steps to effectively clean the mold-affected area:
1. Prepare the cleaning solution:
Prepare a cleaning solution suitable for removing mold. A common option is a mixture of bleach and water, with a ratio of one part bleach to ten parts water. If you prefer a natural alternative, you can use a mixture of vinegar and water. Commercial mold cleaning products are also available and can be used according to the manufacturer’s instructions.
2. Test the cleaning solution:
Before applying the cleaning solution to the entire area, perform a patch test on a small, inconspicuous area of the wall. This will ensure that the solution does not cause any adverse reactions or damage to the surface. Wait for a few minutes and monitor for any signs of discoloration or damage before proceeding.
3. Apply the cleaning solution:
Using a sponge or cloth, apply the cleaning solution to the mold-affected areas of the interior walls. Ensure that the solution covers all visible mold spots and any adjacent areas where spores may have spread. Let the solution sit on the surfaces for about 15 minutes to effectively kill the mold and reduce the chance of regrowth.
4. Scrub the surfaces:
After allowing the cleaning solution to sit, gently scrub the mold-affected surfaces using a soft-bristle brush or sponge. Use circular motions and apply light pressure to remove any remaining mold particles. Pay special attention to crevices, corners, and other hard-to-reach areas where mold may have settled.
5. Rinse with clean water:
After scrubbing the surfaces, rinse them thoroughly with clean water. Use a damp cloth or sponge to remove any excess cleaning solution and residual mold particles. Rinse and wring out the cloth or sponge regularly to prevent spreading the mold.
6. Dry the area:
Allow the cleaned area to dry completely. Use fans, dehumidifiers, or open windows to promote air circulation and speed up the drying process. Ensuring the area is properly dried helps prevent moisture buildup and reduces the likelihood of regrowth.
7. Dispose of cleaning materials:
Dispose of any cleaning materials, such as cloths or sponges, used during the cleaning process. Place them in sealed plastic bags and discard them according to local regulations for mold-contaminated waste. Additionally, practice proper hand hygiene by washing your hands thoroughly with soap and warm water after handling the cleaning materials.
By following these steps, you can effectively clean the mold-affected area, eliminating any remaining mold spores and minimizing the risk of regrowth. Regular cleaning and maintenance of the area in the future will help prevent mold from returning and create a healthier living environment.
Step 4: Preventing mold regrowth
After effectively removing mold from interior walls, it’s crucial to take preventive measures to minimize the risk of regrowth. Preventing mold regrowth is essential for maintaining a healthy and mold-free living environment. Follow these steps to help prevent mold from returning:
1. Address moisture issues:
Identify and address any sources of moisture that contributed to the mold growth. Check for leaks, plumbing issues, or areas with excessive condensation. Repair any leaks promptly and improve ventilation in moisture-prone areas, such as bathrooms or kitchens. By reducing moisture levels, you can create an environment less favorable for mold growth.
2. Improve ventilation:
Proper ventilation is critical in preventing mold growth. Ensure that all areas of your home are adequately ventilated, allowing for the circulation of fresh air. Use exhaust fans or open windows when cooking, showering, or doing activities that generate moisture. Good airflow helps to dry out damp areas and prevent the buildup of excess humidity that can support mold growth.
3. Reduce humidity levels:
Mold thrives in high humidity environments. In areas where humidity is consistently high, consider using dehumidifiers to remove excess moisture from the air. Aim to maintain indoor humidity levels below 60% or between 30-50% if possible. Monitoring humidity levels and taking appropriate measures to reduce them will create an environment that is less conducive to mold growth.
4. Regularly clean and maintain:
Regularly clean and maintain your home to prevent the buildup of dirt, dust, and organic materials that can provide nutrients for mold growth. Vacuum carpets, wipe surfaces, and clean bathrooms and kitchens on a routine basis. Regular maintenance reduces the likelihood of mold finding a suitable environment to grow.
5. Monitor problem areas:
Keep an eye on areas that have previously experienced mold growth or areas prone to moisture-related issues. Regularly inspect these areas, such as basements, bathrooms, or areas with plumbing connections, for any signs of moisture buildup or mold regrowth. Early detection allows for prompt intervention and prevents the mold problem from spreading.
6. Consider mold-resistant products:
When renovating or selecting materials for your home, consider using mold-resistant products. Mold-resistant drywall, paints, and coatings are available that can help inhibit the growth of mold. These products have additives or special coatings that discourage mold growth, providing an added layer of protection.
7. Maintain proper indoor temperature:
Maintain a consistent indoor temperature throughout your home. Fluctuations in temperature can lead to condensation on walls or other surfaces, providing a moist environment for mold to thrive. Use a programmable thermostat to regulate the temperature and avoid extreme fluctuations.
8. Monitor indoor humidity:
Regularly monitor indoor humidity levels using a hygrometer. This will help you keep track of the moisture content in your home and take appropriate action if humidity levels rise. If the humidity levels consistently exceed recommended ranges, adjust your ventilation and dehumidification strategies accordingly.
By following these preventive measures, you can significantly reduce the risk of mold regrowth and maintain a mold-free living environment. Consistency in preventive maintenance is key in keeping your home dry, well-ventilated, and inhospitable to mold growth.
Step 5: Properly disposing of mold-contaminated materials
Proper disposal of mold-contaminated materials is crucial to prevent the spread of mold spores and minimize the risk of further contamination. When removing mold from interior walls, follow these steps to ensure the safe and appropriate disposal of materials:
1. Use sealed bags:
Place any mold-contaminated materials, such as gloves, cloths, or debris, into sealed plastic bags immediately after removal. Double-bagging the materials adds an extra layer of protection against potential spore release.
2. Seal the bags tightly:
Ensure that the plastic bags are tightly sealed to prevent any potential escape of mold spores during disposal. This will help contain the contaminants and prevent them from spreading to other areas of your home or during transport.
3. Follow local regulations:
Familiarize yourself with the local regulations and guidelines for the disposal of mold-contaminated waste. Different areas may have specific rules in place for handling and disposing of materials that are affected by mold.
4. Dispose of in designated areas:
Dispose of the sealed bags containing mold-contaminated materials in designated areas as designated by local authorities. This may include municipal waste collection points or recycling centers that can handle this type of waste disposal. Follow the local guidelines to ensure proper disposal.
5. Practice proper hand hygiene:
After handling mold-contaminated materials, it’s important to practice proper hand hygiene. Wash your hands thoroughly with soap and warm water. This will help remove any potential mold spores or residue that may have come into contact with your skin.
Ensuring the proper disposal of mold-contaminated materials is essential for preventing the spread of mold spores and maintaining a clean and healthy environment. Adhering to local regulations for waste disposal and practicing good hygiene will contribute to an effective and safe mold removal process.
Additional tips for effective mold removal
In addition to the step-by-step guide provided, here are some additional tips to enhance the effectiveness of your mold removal efforts:
1. Seek professional help when needed:
If the mold growth is extensive, or if you have concerns about your ability to safely remove the mold, it is recommended to seek professional assistance. Professional mold remediation specialists have the expertise, equipment, and experience to handle complex mold removal projects effectively.
2. Use natural remedies to remove mold:
In addition to commercial cleaning products, you can also use natural remedies to remove mold. Vinegar, hydrogen peroxide, and tea tree oil are natural substances known for their mold-fighting properties. Dilute these solutions with water and apply them to the affected areas for effective mold removal.
3. Prioritize prevention:
Prevention is key in combating mold growth. Regularly inspect your home for any signs of water leaks, moisture buildup, or areas prone to condensation. Address any issues promptly to prevent the conditions that promote mold growth.
4. Monitor indoor humidity levels:
Keep track of indoor humidity using a hygrometer to ensure that levels stay within the recommended range (below 60% or 30-50% if possible). Monitor areas of your home where humidity tends to be higher, such as bathrooms or basements, and take appropriate measures to control humidity levels.
5. Improve ventilation:
Promote proper air circulation and ventilation throughout your home. Open windows, use exhaust fans, and consider installing a whole-house ventilation system to ensure fresh air flow and reduce moisture buildup.
6. Regularly maintain and clean:
Regularly clean and maintain your home to prevent the buildup of dirt, dust, and organic matter that can provide nutrients for mold growth. Regular maintenance will help minimize the risk of mold growth and ensure a healthier living environment.
By incorporating these additional tips into your mold removal process, you can enhance the effectiveness of your efforts and reduce the likelihood of mold regrowth in your home.
Using natural remedies to remove mold
In addition to commercial cleaning products, there are natural remedies that can be effective in removing mold. These natural alternatives are environmentally friendly and often more affordable. Here are some natural remedies you can use to remove mold from interior walls:
Vinegar:
Vinegar is a potent natural cleaner that can help remove mold and inhibit its growth. It has antimicrobial properties that can kill mold spores and prevent regrowth. To use vinegar, simply pour undiluted white vinegar into a spray bottle and spray it onto the mold-infested areas. Let it sit for a few hours, then scrub the surface with a brush or sponge and rinse with water. Note that vinegar has a strong smell that will dissipate as it dries.
Hydrogen peroxide:
Hydrogen peroxide is another effective natural remedy for mold removal. It has antifungal, antibacterial, and antiviral properties. To use hydrogen peroxide, pour 3% concentration hydrogen peroxide into a spray bottle and spray it directly onto the moldy surface. Allow it to sit for 10-15 minutes before scrubbing with a brush or sponge and rinsing with water. Hydrogen peroxide can also be mixed with vinegar or baking soda for enhanced cleaning power.
Tea tree oil:
Tea tree oil is a natural essential oil known for its antifungal and antiseptic properties. It can effectively kill mold spores and help prevent their growth. Mix around 10 drops of tea tree oil with a cup of water in a spray bottle and shake well. Spray the mixture onto the moldy areas and let it sit for a few hours. Scrub the surface with a brush or sponge, then wipe clean with a damp cloth. Tea tree oil has a strong scent, but it will dissipate over time. Ensure proper ventilation during and after its application.
Grapefruit seed extract:
Grapefruit seed extract is a natural antimicrobial agent that can be used to remove mold from interior walls. Mix around 20 drops of grapefruit seed extract with two cups of water in a spray bottle. Shake well and spray onto the moldy surfaces. Allow it to sit for a few minutes, then scrub the area with a brush or sponge. Rinse with water and wipe clean. Grapefruit seed extract does not have a strong scent, making it a good option for those sensitive to strong odors.
Baking soda:
Baking soda is a versatile and affordable natural cleaner that can help remove mold and absorb moisture. Create a paste by mixing baking soda with water and apply it to the moldy areas. Let it sit for a few minutes, then scrub with a brush or sponge. Baking soda also helps eliminate musty odors caused by mold. Rinse the area with water and wipe clean. Baking soda is non-toxic and safe to use around children and pets.
When using natural remedies to remove mold, it’s important to remember that they may be less effective on porous surfaces or severe mold infestations. It’s always a good idea to test these remedies on a small, inconspicuous area before applying them to larger surfaces. If the mold growth is extensive or persistent, it’s recommended to consult with a professional mold remediation specialist to ensure thorough and effective mold removal.
Seeking professional help when needed
While many cases of mold growth on interior walls can be addressed through DIY methods, there are situations where seeking professional help is necessary. Professional mold remediation specialists have the expertise, experience, and specialized equipment to handle complex mold problems effectively. Here are some instances when it’s advisable to seek professional assistance:
Extensive mold growth:
If the mold growth covers a large area or has spread to multiple rooms, it may be best to enlist the help of professionals. Dealing with extensive mold growth can be challenging and time-consuming, and professionals have the resources to address the issue more efficiently. They can assess the extent of the problem, develop a comprehensive remediation plan, and employ techniques to safely remove the mold without risking further contamination or damage to your home.
Hidden mold:
If you suspect hidden mold behind walls, ceilings, or other hard-to-reach areas, it’s best to consult with professionals. They have the expertise and tools, such as thermal imaging cameras or moisture meters, to detect hidden mold. Professionals can conduct thorough inspections, identify the source of moisture, and safely remove the mold without causing unnecessary damage to your property.
Health concerns:
If you or your family members have allergies, respiratory conditions, or weakened immune systems, it’s prudent to seek professional help with mold removal. Professionals take necessary precautions to ensure the safety of both their clients and themselves. They use proper containment measures, adequate personal protective equipment (PPE), and follow industry best practices to minimize exposure to mold spores and prevent cross-contamination.
Recurring mold problems:
If you have experienced recurring mold problems despite your best efforts to remove and prevent mold growth, it’s advisable to involve professionals. Recurring mold issues may indicate underlying problems, such as persistent moisture sources or hidden mold colonies. Professionals can help identify the root cause of the mold problem and implement effective strategies to address it, reducing the likelihood of future mold regrowth.
Complex or sensitive environments:
In buildings with complex structures or valuable contents, such as historical properties or sensitive equipment, seeking professional assistance is essential. Professionals have the knowledge and experience to handle challenging situations while minimizing potential damage and disruption. They use specialized techniques and equipment to safely remove mold and restore the affected areas without compromising the integrity of the structure or valuable possessions.
When selecting a professional mold remediation company, ensure they are certified, licensed, and experienced in handling mold removal. Request references, check online reviews, and inquire about warranties or guarantees for their services. Obtaining multiple quotes and comparing services will help you make an informed decision about the best professional assistance for your mold removal needs.
Remember, professional assistance can save you time, effort, and frustration in dealing with complex mold problems. Their expertise and resources ensure that mold is effectively removed, the underlying issues are addressed, and your home is restored to a clean and healthy condition.
Preventing future mold growth
Preventing future mold growth is essential for maintaining a safe and healthy living environment. By implementing preventive measures, you can reduce the risk of mold regrowth and minimize the need for extensive mold removal in the future. Here are some key steps to prevent future mold growth:
Address moisture issues:
Identify and address any sources of moisture that contribute to mold growth. Fix water leaks promptly, repair any plumbing issues, and ensure proper drainage around your home’s foundation. Keep an eye out for condensation on windows or pipes and take measures to reduce excess moisture in your home.
Improve ventilation:
Proper ventilation is crucial in preventing mold growth. Ensure that all areas of your home, especially high-moisture areas like bathrooms and kitchens, have adequate ventilation. Use exhaust fans or open windows to improve airflow and reduce humidity levels. Consider installing whole-house ventilation systems if necessary.
Control indoor humidity:
Monitor and control indoor humidity levels to keep them within the recommended range. Use dehumidifiers in areas with high humidity, especially basements or crawl spaces. Regularly empty and clean the dehumidifier to prevent mold growth inside. Keep indoor humidity levels below 60% or ideally between 30-50% to discourage mold growth.
Inspect and maintain:
Regularly inspect your home for any signs of water damage, leaks, or mold growth. Pay attention to areas that are prone to moisture, such as bathrooms, laundry rooms, and basements. Perform regular maintenance tasks like cleaning gutters, fixing roof leaks, and sealing cracks or gaps to prevent water intrusion.
Proper insulation:
Ensure that your home is properly insulated to prevent condensation and moisture buildup. Well-insulated walls, windows, and roofs can help regulate indoor temperature and humidity, reducing the conditions favorable for mold growth.
Keep surfaces clean and dry:
Regularly clean surfaces in your home to prevent the buildup of dust, dirt, and organic matter that can provide nutrients for mold growth. Quickly address any spills or water accidents to keep surfaces dry and prevent moisture from seeping into walls, carpets, or other porous materials.
Utilize mold-resistant products:
Consider using mold-resistant materials in high-risk areas, such as bathrooms or kitchens. Mold-resistant drywall, paint, and other building materials have additives or coatings that inhibit mold growth. These products can help provide an extra layer of protection against mold in vulnerable areas.
Monitor and respond to signs of mold:
Be vigilant for signs of mold growth, such as musty odors, discoloration, or respiratory symptoms. If you notice any signs of mold, address the issue promptly to prevent it from spreading and causing further damage.
Conclusion
Mold growth on interior walls can have detrimental effects on your home and health. By understanding the causes of mold growth and implementing preventive measures, you can significantly reduce the risk of mold regrowth. Regular maintenance, thorough cleaning, and addressing moisture issues promptly will help create an environment that is inhospitable to mold.
If you do encounter mold growth, following the proper steps for removal and seeking professional help when necessary can ensure effective remediation. By taking these preventive steps and promptly addressing mold issues, you can maintain a clean, healthy, and mold-free living space for you and your family.
Frequently Asked Questions about How To Remove Mold From Interior Walls
Was this page helpful?
At Storables.com, we guarantee accurate and reliable information. Our content, validated by Expert Board Contributors, is crafted following stringent Editorial Policies. We're committed to providing you with well-researched, expert-backed insights for all your informational needs.
0 thoughts on “How To Remove Mold From Interior Walls”