Articles
How To Remove Ring Doorbell Battery
Modified: August 28, 2024
Learn how to remove the battery from your Ring Doorbell with these informative articles. Ensure smooth operation of your home security system.
(Many of the links in this article redirect to a specific reviewed product. Your purchase of these products through affiliate links helps to generate commission for Storables.com, at no extra cost. Learn more)
Introduction
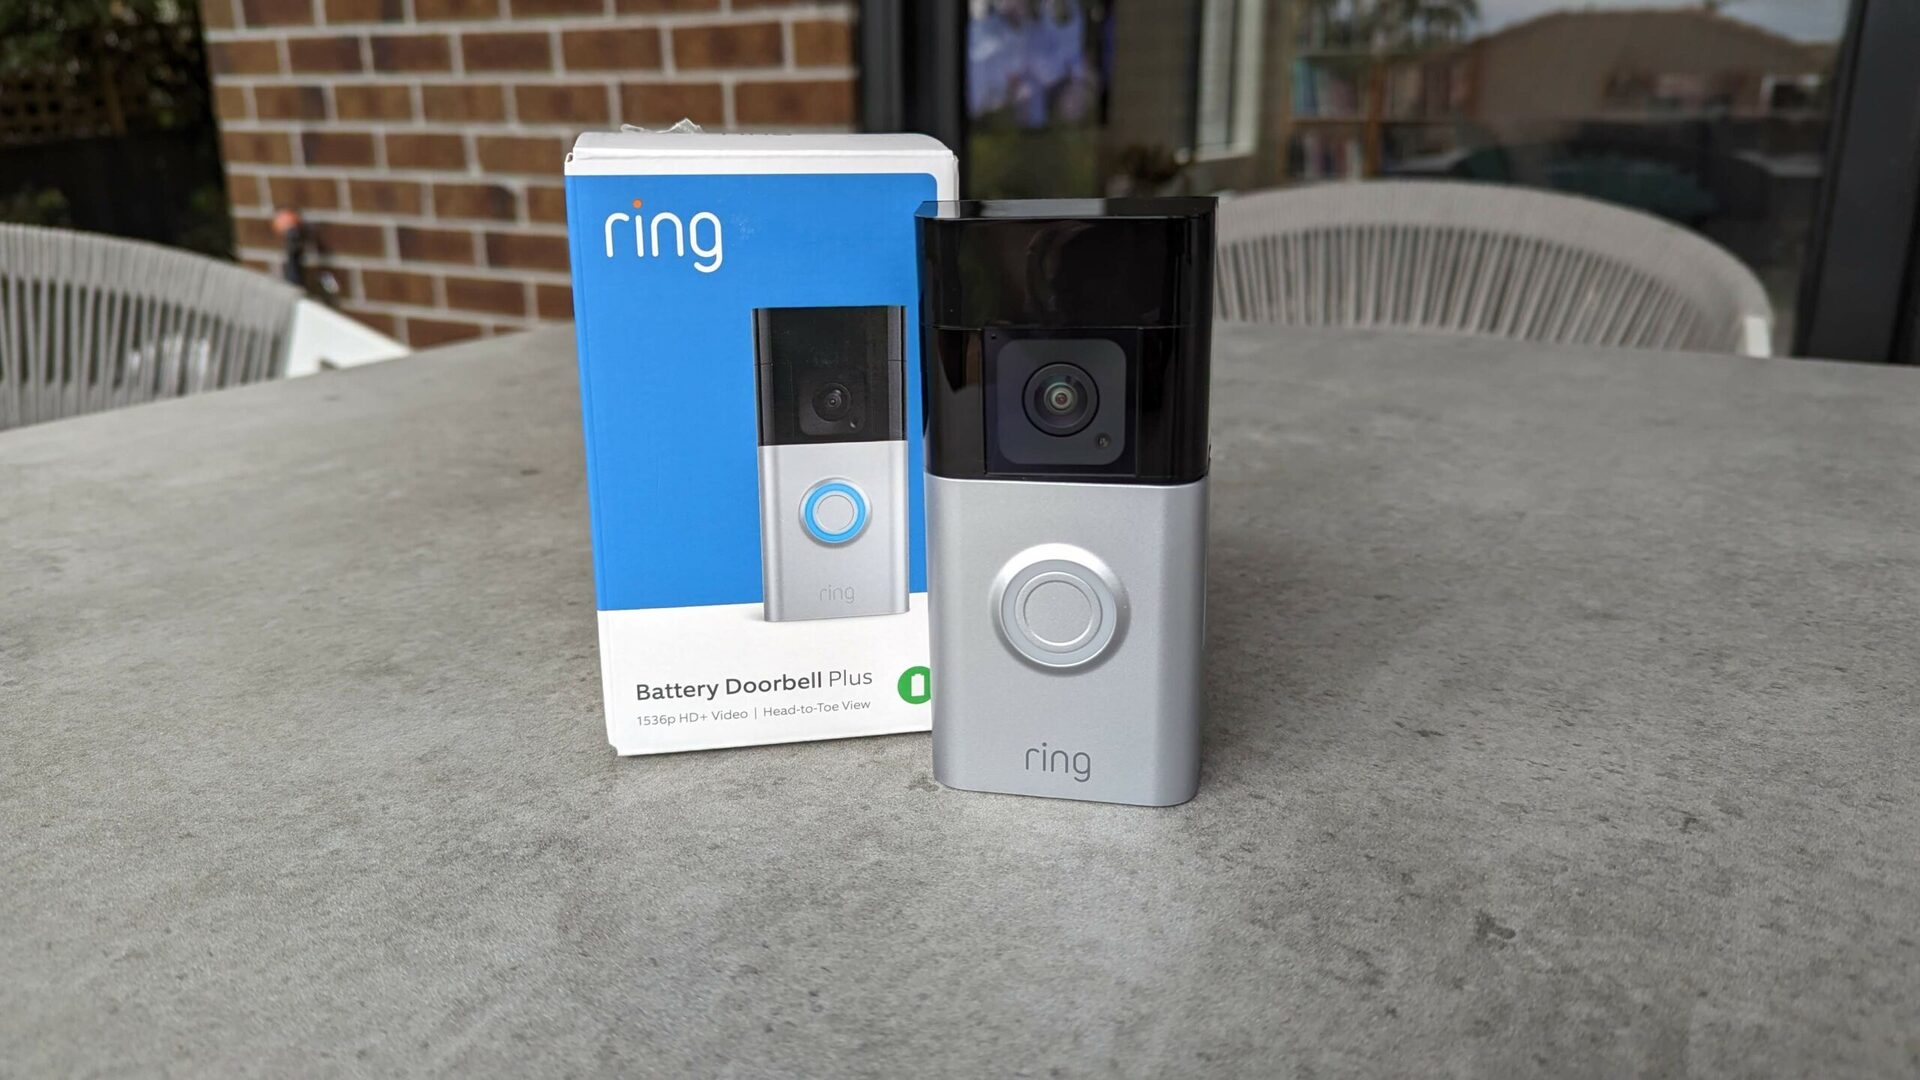
Welcome to the ultimate guide on how to remove the battery from your Ring doorbell! Having a Ring doorbell can provide security and convenience, but eventually, you’ll need to replace the battery. Whether it’s due to a low battery notification or simply wanting to upgrade to a new one, the process of removing the battery is relatively simple.
In this article, we’ll walk you through each step of the process, ensuring that you have the necessary tools and knowledge to successfully remove the battery from your Ring doorbell. By following these steps, you’ll be able to maintain the functionality and effectiveness of your doorbell system.
Before we dive into the process, it’s important to note that the steps may vary slightly depending on the specific Ring doorbell model you have. Refer to the manufacturer’s instructions or user manual for your specific model to ensure you follow the correct procedure. With that said, let’s get started!
Key Takeaways:
- Easily remove and replace your Ring doorbell battery by following simple steps and gathering the necessary tools. Ensure a smooth and safe process for maintaining your doorbell’s functionality and effectiveness.
- Test your Ring doorbell after battery removal to ensure proper functionality. Reinstall or replace the battery as needed, and monitor battery level for future maintenance. Enjoy continued security and convenience with your Ring doorbell.
Read more: How To Remove The Faceplate On Ring Doorbell
Step 1: Gather the necessary tools
Before you begin the battery removal process, it’s essential to gather the necessary tools. Having the right tools on hand will make the process much smoother and ensure that you can complete the task without any complications.
Here are the tools you’ll need:
- A small screwdriver or a Ring doorbell removal tool: Depending on your doorbell model, you may need a Phillips or flathead screwdriver. Alternatively, some Ring doorbells come with a specialized removal tool that makes the process even easier.
- Replacement battery (if applicable): If you’re planning on replacing the battery with a new one, make sure you have the correct battery for your Ring doorbell model. Refer to the manufacturer’s instructions or website to find the appropriate battery type.
- A clean, soft cloth: This will come in handy for wiping any dust or debris that may have accumulated around the battery compartment or doorbell housing.
Having all these tools ready will save you time and ensure a hassle-free battery removal process. Once you’ve gathered the necessary tools, you’re ready to move on to the next step.
Step 2: Prepare for battery removal
Before you dive into removing the battery from your Ring doorbell, it’s crucial to take a few precautions and prepare the area to ensure a safe and efficient process.
Here’s what you need to do to prepare for battery removal:
- Switch off the power: First and foremost, it’s important to turn off the power to your Ring doorbell. This step is crucial to prevent any electrical shock or damage during the battery removal process. Locate the power source and switch it off before proceeding.
- Clear the area: Ensure that the area around your doorbell is clear and free from any obstacles. This will give you ample space to work and prevent any accidents or damage to your doorbell or personal belongings.
- Secure a stable surface: Find a stable surface to place your tools and the removed battery during the process. This will help prevent any accidental drops or damage to the battery or doorbell.
By taking these preparatory steps, you’ll be setting yourself up for a smooth and safe battery removal process. Once you’ve ensured that everything is in order, it’s time to move on to the next step: locating and accessing the battery compartment.
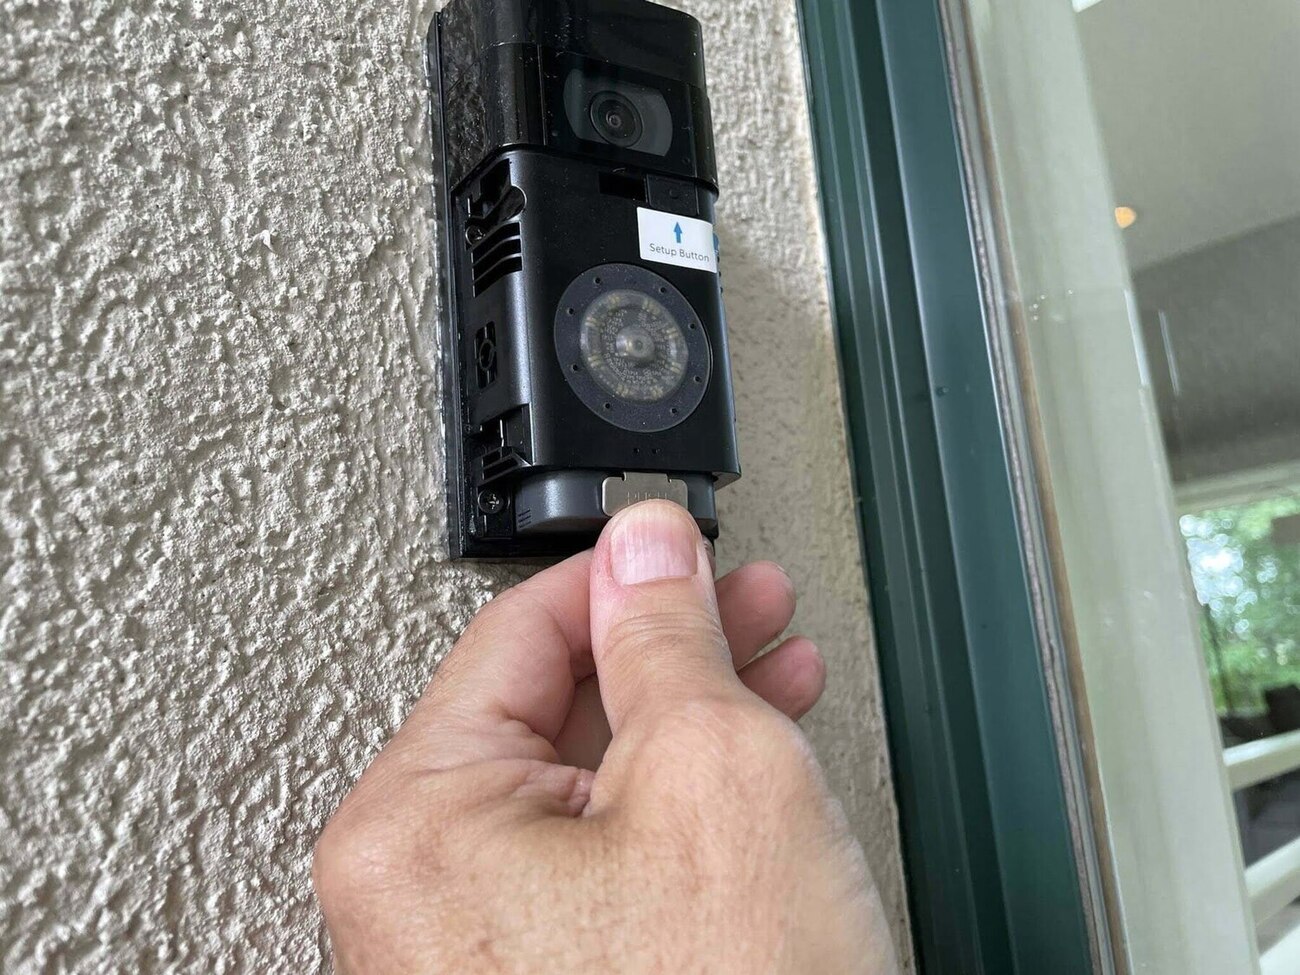
Step 3: Locate and access the battery compartment
Locating and accessing the battery compartment is the next crucial step in removing the battery from your Ring doorbell. Different Ring doorbell models may have varying methods of accessing the battery compartment, so it’s important to follow the specific instructions for your model.
Here are the general steps to locate and access the battery compartment:
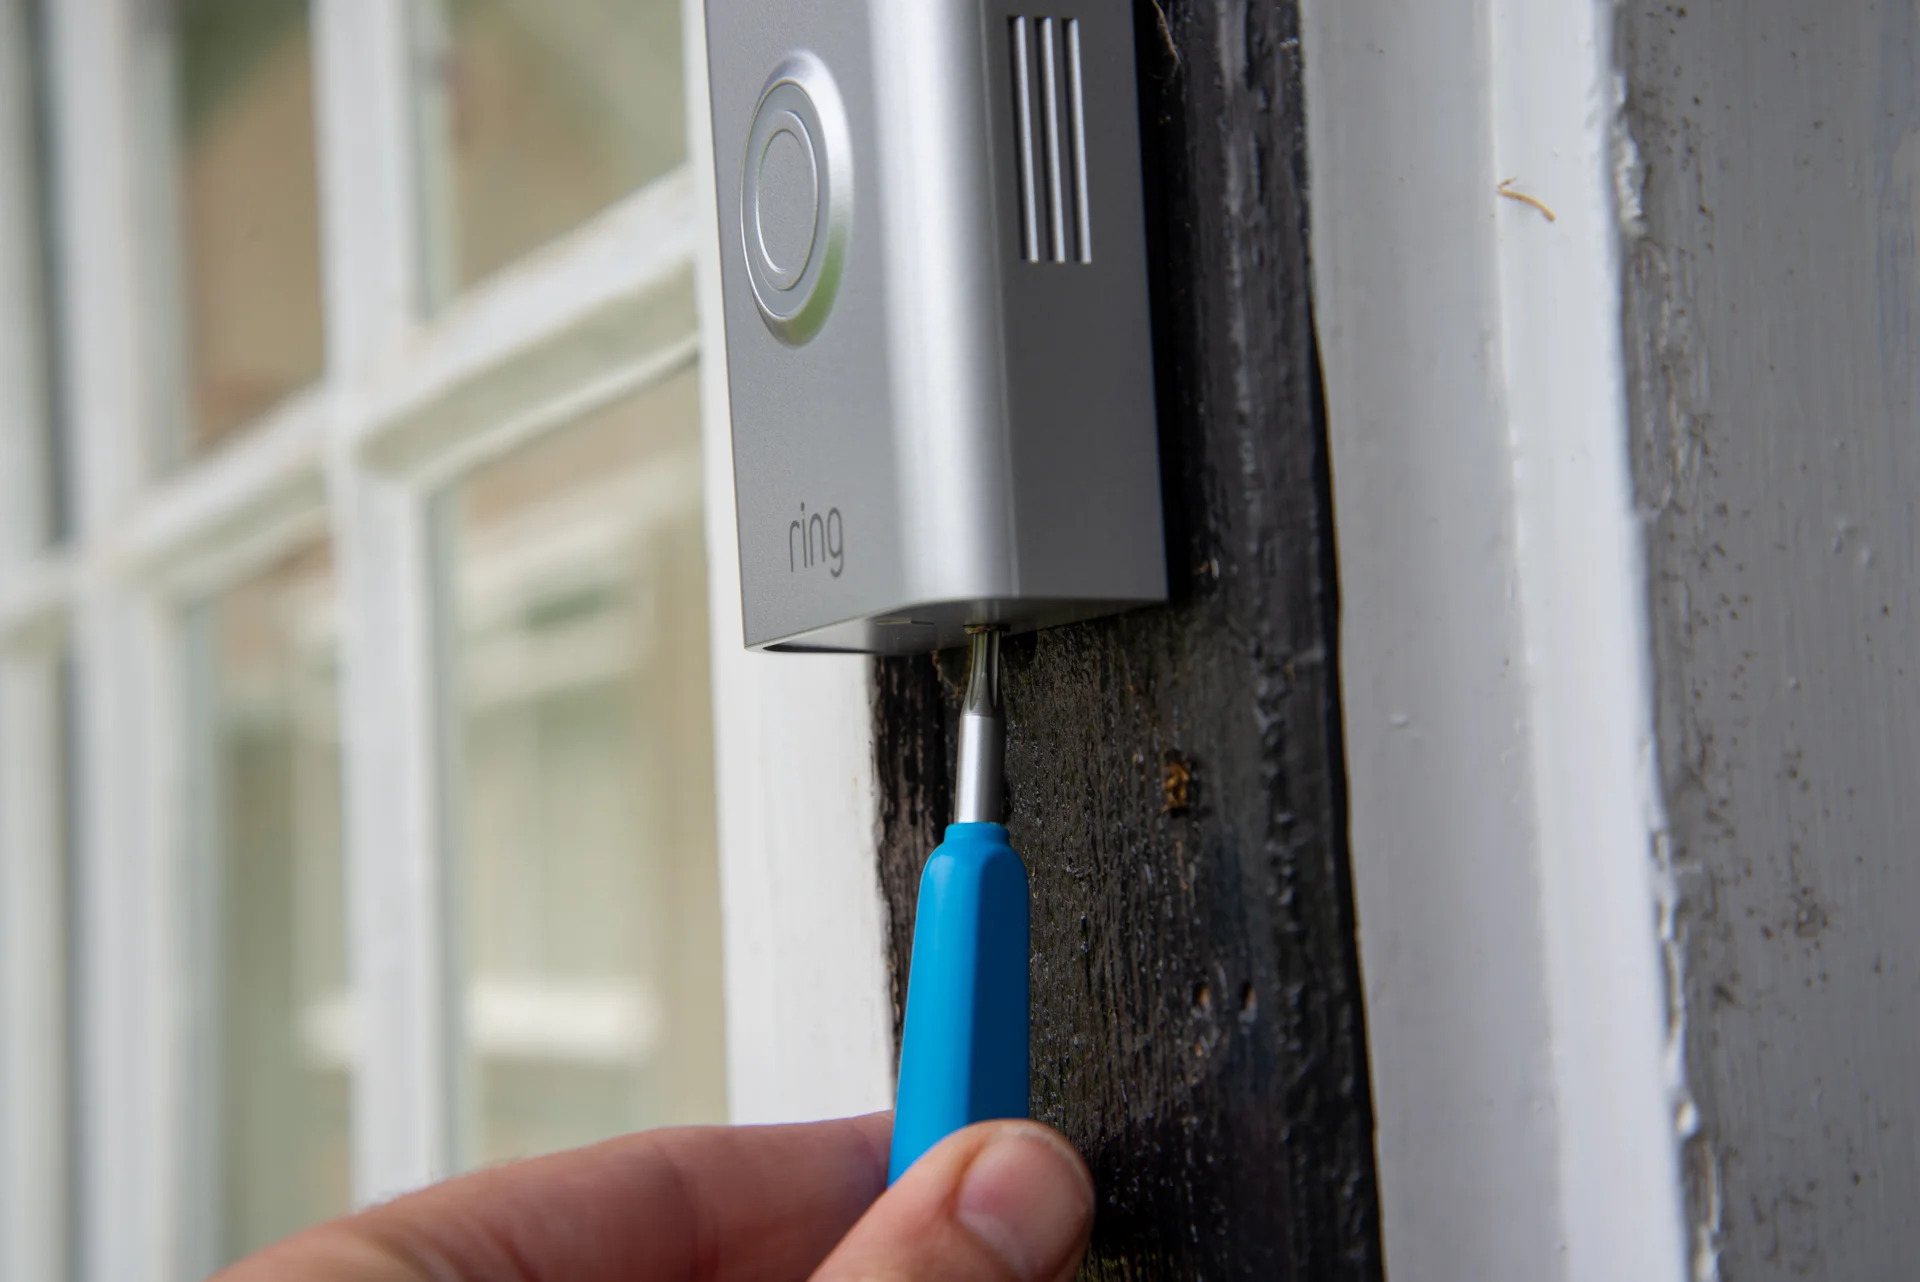
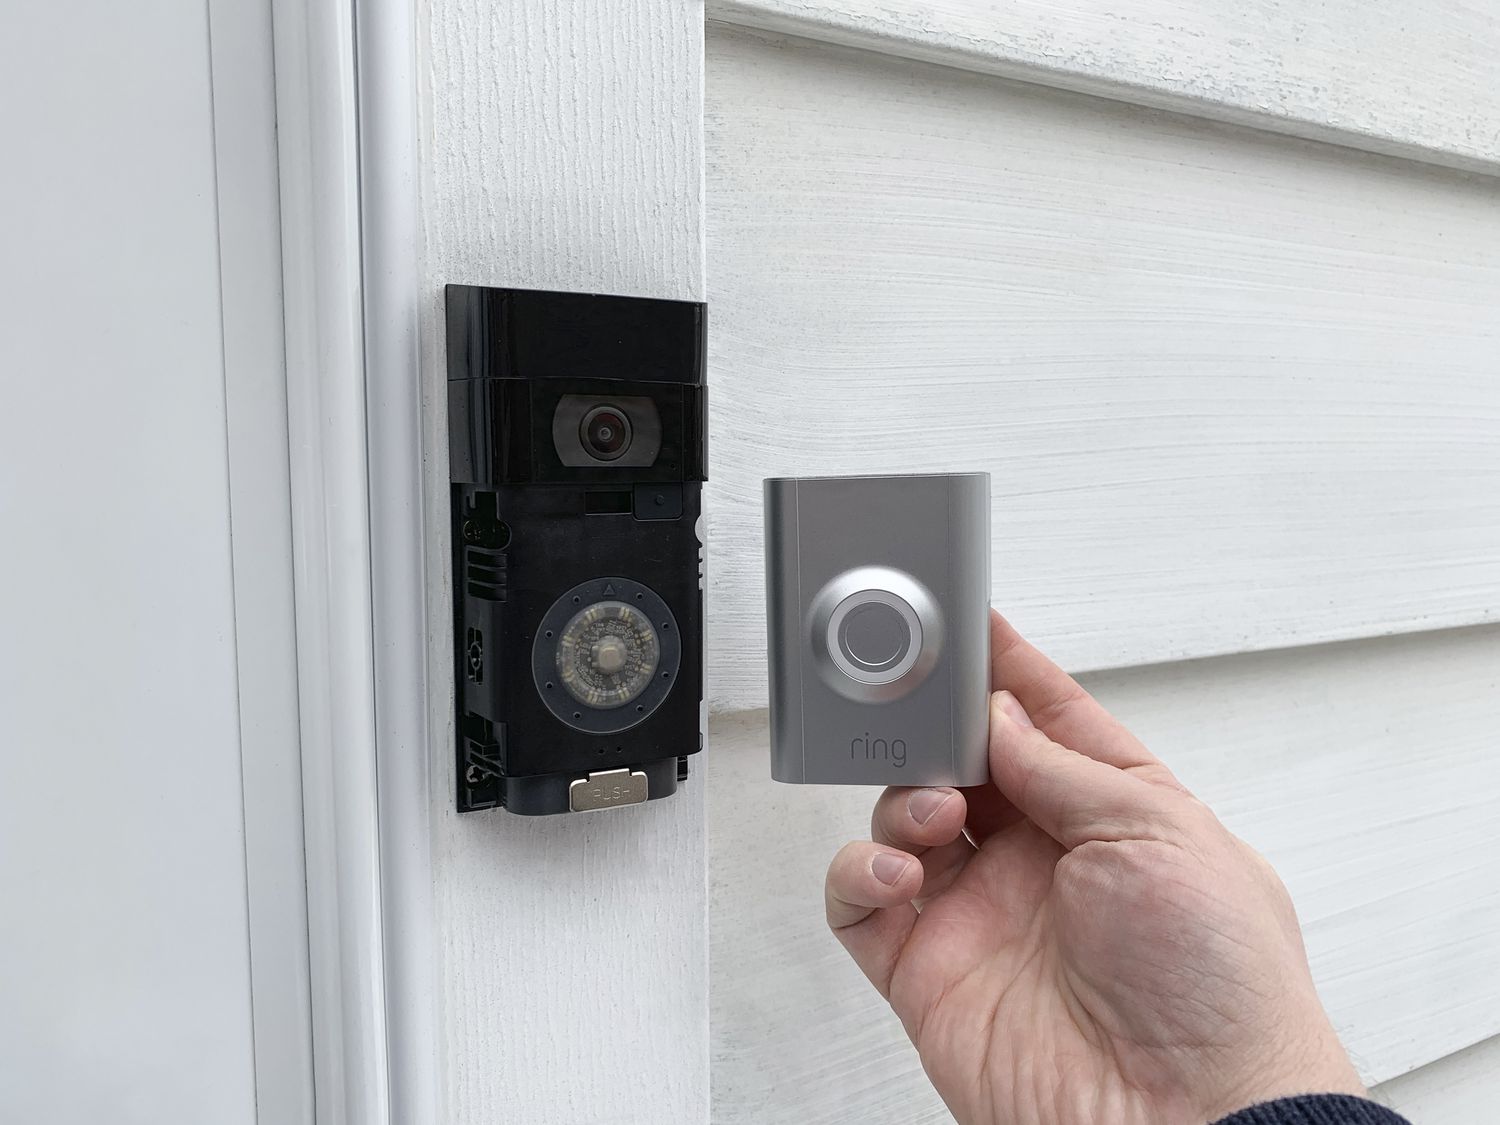
- Remove the faceplate or cover: Start by removing the faceplate or cover of your Ring doorbell. This can usually be done by gently prying it off with your fingers or using a screwdriver, depending on the design of your doorbell model. Be careful not to exert too much force to avoid any damage.
- Locate the battery compartment: Once the faceplate or cover is removed, you should be able to locate the battery compartment. Different doorbell models may have the battery compartment in different locations, so refer to the manufacturer’s instructions or user manual for your specific model if you’re unsure.
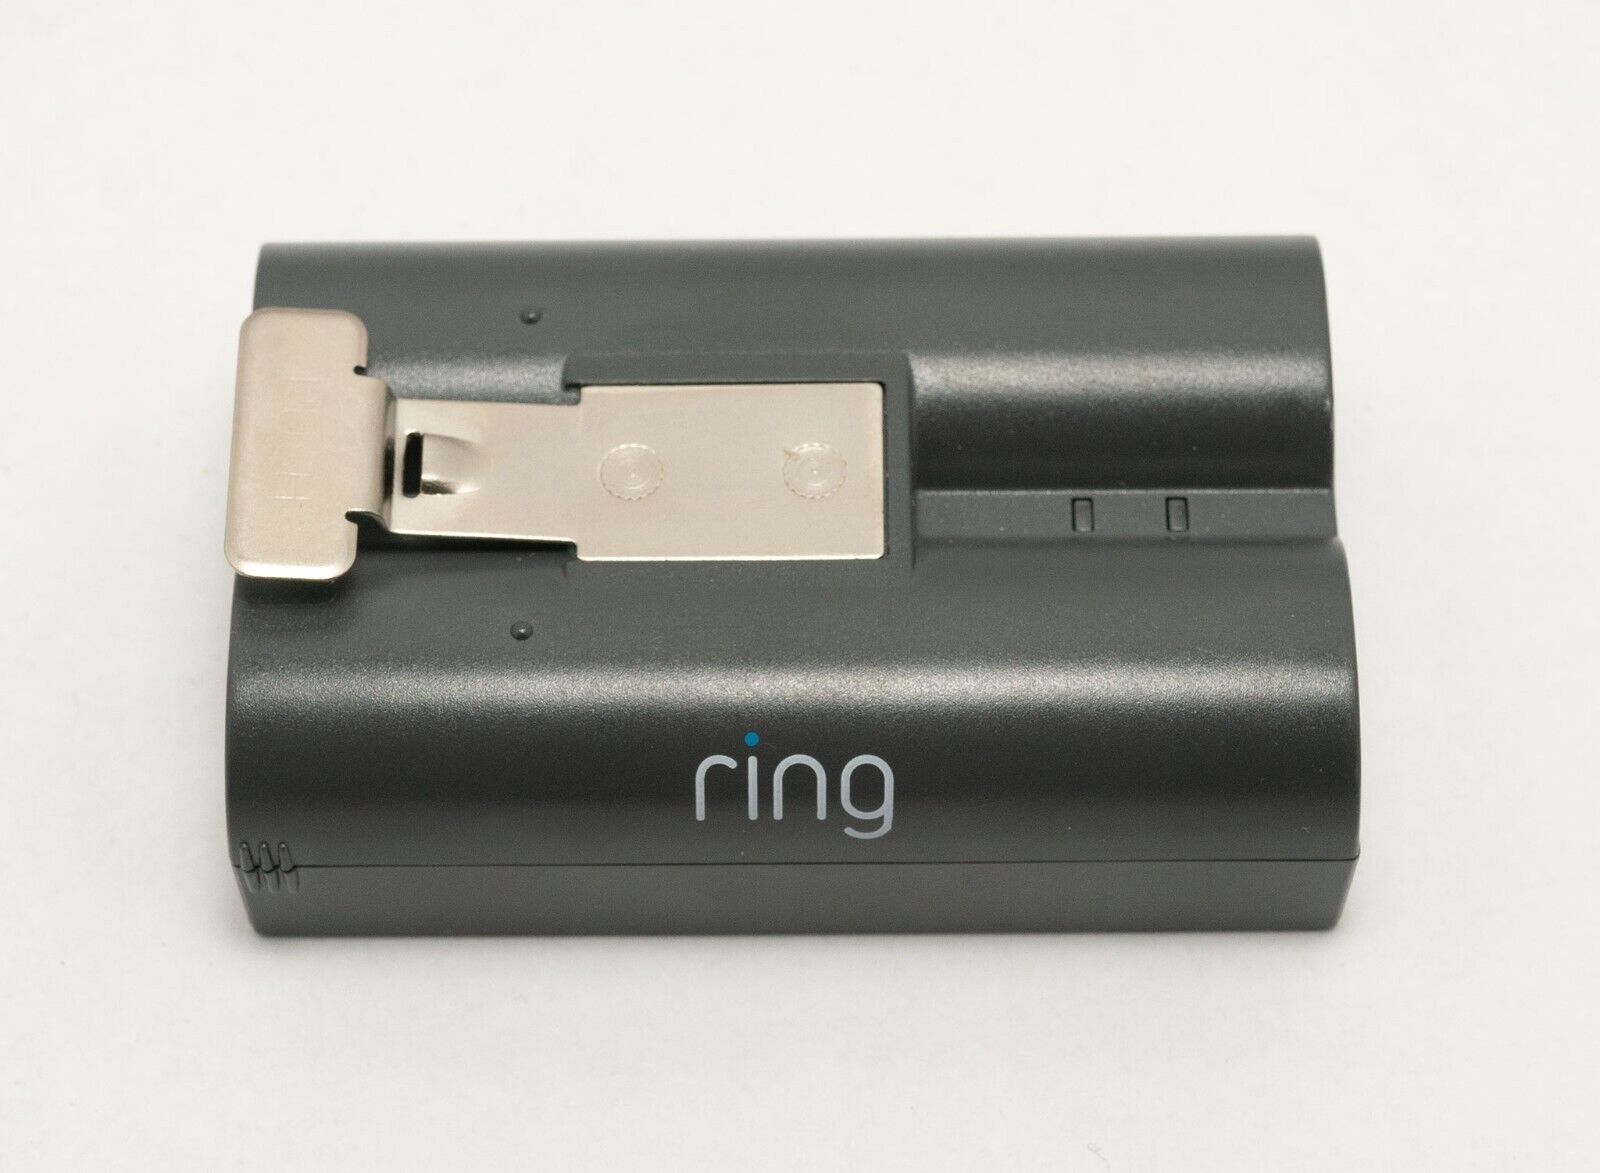
- Identify the battery: Take note of the battery’s position and how it is secured within the compartment. This will help you understand the next steps involved in removing the battery.
It’s worth mentioning that some Ring doorbell models may have a removable battery pack, while others may have a built-in battery that requires disconnection. Refer to the manufacturer’s instructions for your specific model to determine the exact method of accessing and removing the battery.
Once you’ve located and accessed the battery compartment, you’re ready to move on to the next step: removing the battery itself.
To remove the battery from a Ring doorbell, first, unscrew the security screws at the bottom of the device. Then, gently pull the faceplate off to access the battery. Disconnect the battery and replace it with a fully charged one.
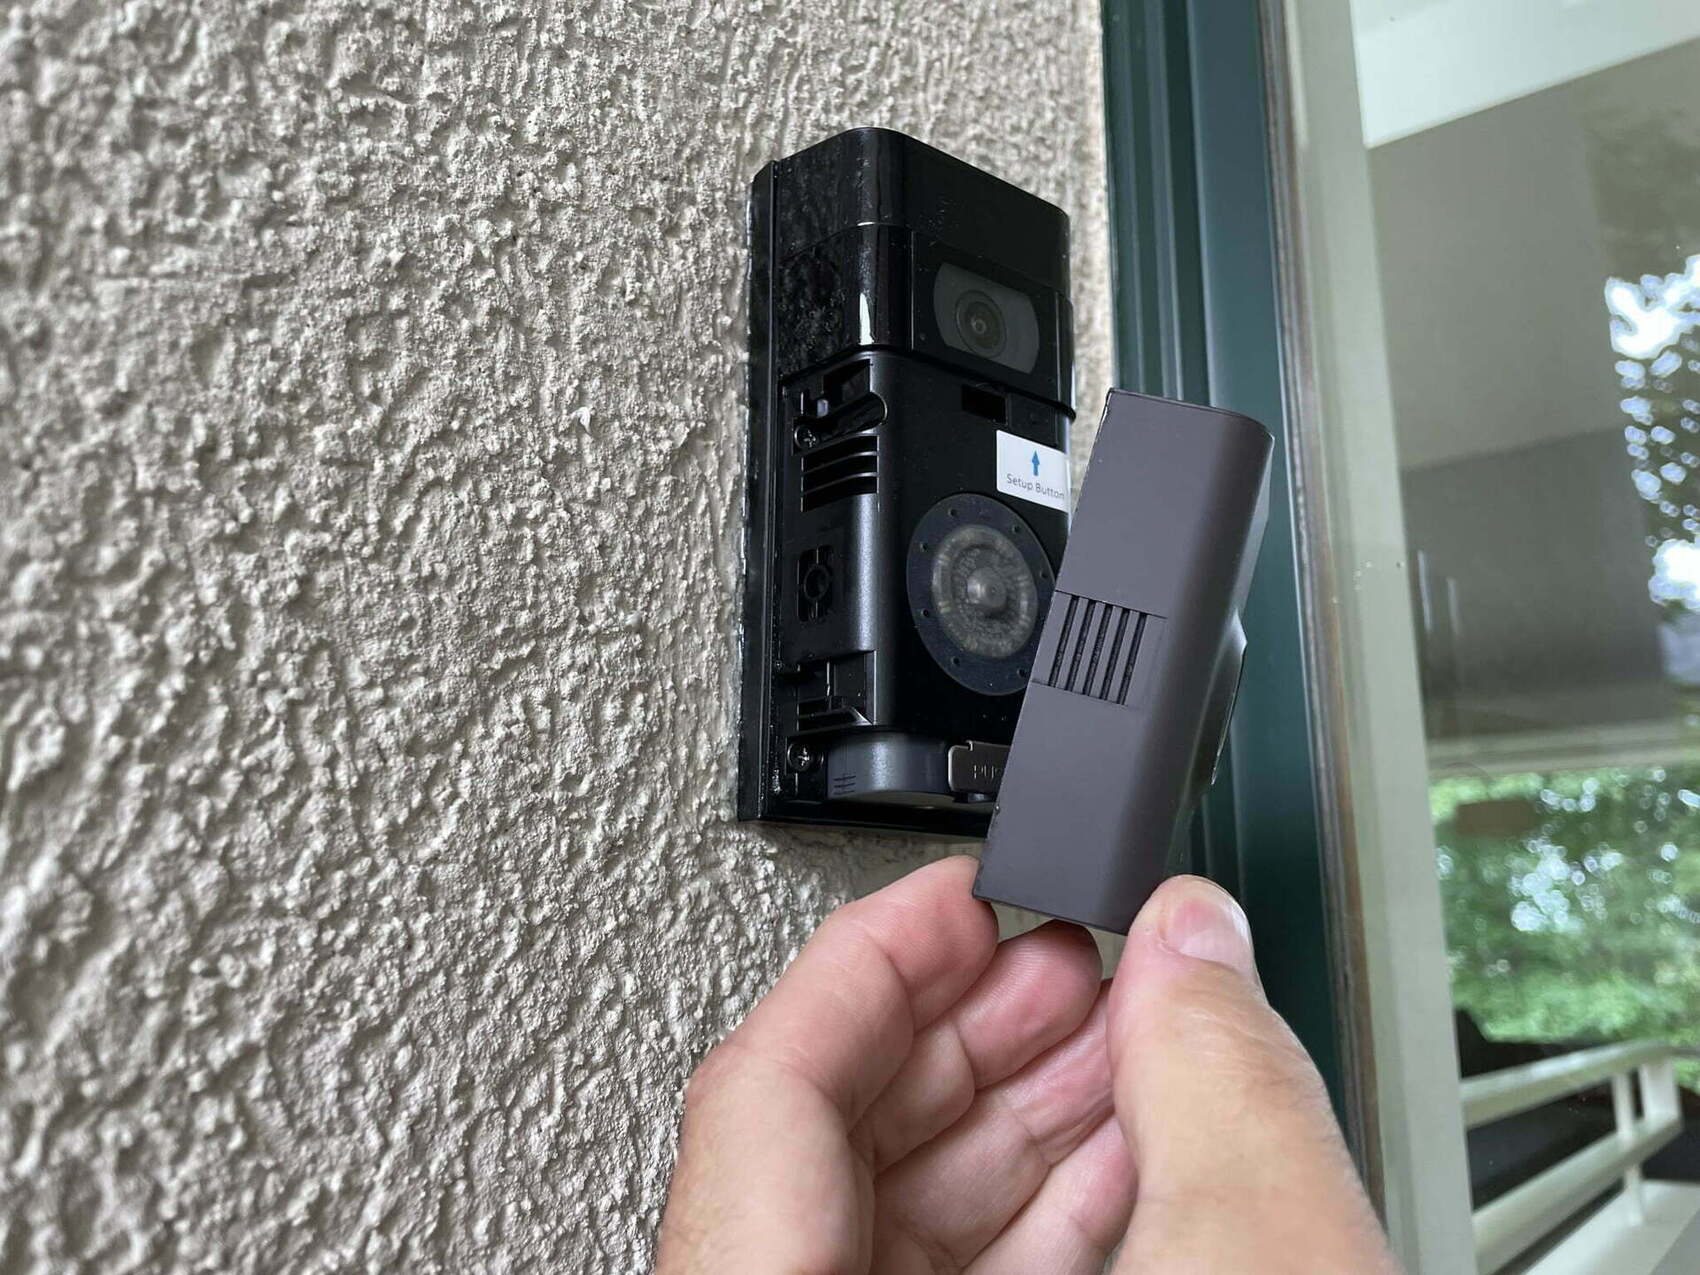
Step 4: Remove the battery
Now that you’ve located the battery compartment, it’s time to remove the battery from your Ring doorbell. The process may vary depending on your specific doorbell model, so refer to the manufacturer’s instructions or user manual for detailed guidance. However, here are some general steps to help you remove the battery:
- Disconnect any power source: Before removing the battery, ensure that any power source, such as a backup battery or power cable, is disconnected to avoid any electrical hazards.
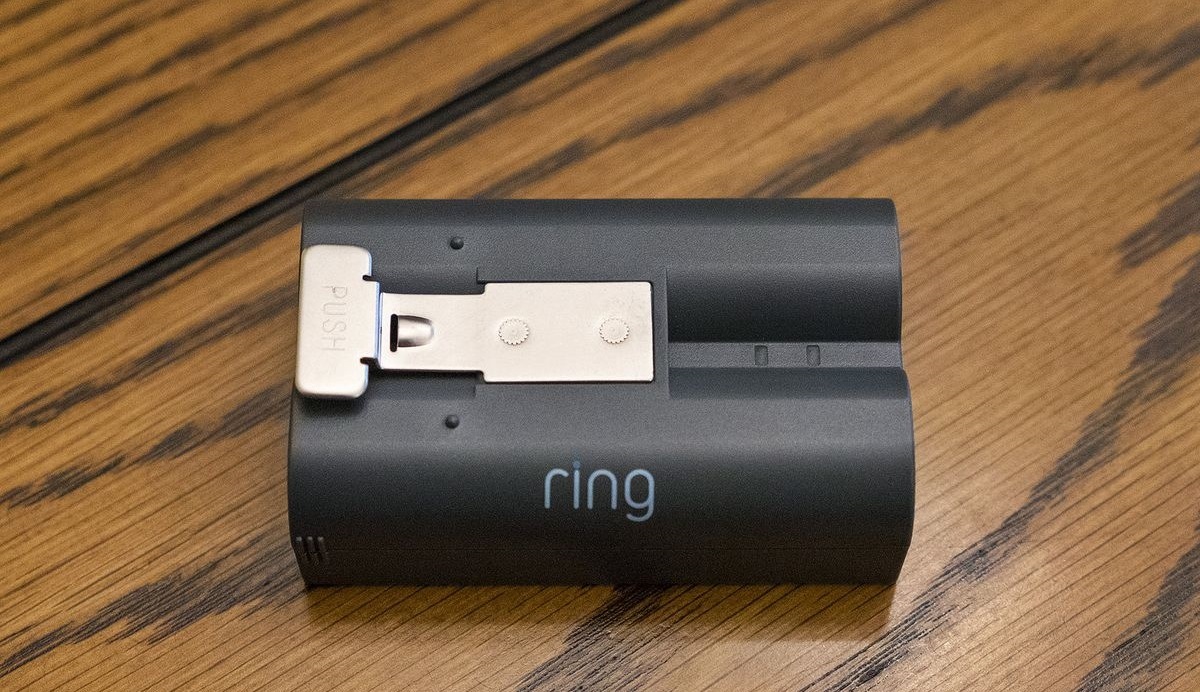
- Release or unfasten the battery: Depending on your doorbell model, there may be different mechanisms in place to secure the battery. Some models have a latch or release button that you need to press to disengage the battery, while others may have screws or connectors that need to be loosened or detached.
- Gently remove the battery: Once the battery is released or unfastened, gently lift it out from the compartment. Be careful not to damage any connectors or wires during this process. If the battery feels stuck, double-check if there are any additional fasteners securing it.
Take your time to ensure that the battery is safely and properly removed. If you encounter any difficulties or are unsure about any steps, consult the manufacturer’s instructions or reach out to customer support for assistance.
Remember to handle the battery with care and avoid any excessive force that might damage it or the doorbell. By following these steps, you’ll be able to successfully remove the battery from your Ring doorbell.
Now that the battery is out, it’s time to move on to the next step: reinstallation or replacement of the battery.
Read more: How To Change The Battery In A Ring Doorbell
Step 5: Reinstall or replace the battery
After removing the battery from your Ring doorbell, you have the option to either reinstall the same battery or replace it with a new one. The decision depends on the condition of the battery and your specific needs.
Here are the steps to reinstall or replace the battery:
- Inspect the battery: Take a moment to examine the condition of the removed battery. If it appears damaged, swollen, or does not hold a charge effectively, it’s best to replace it with a new battery.
- Clean the battery compartment: Use a clean, soft cloth to wipe any dust, dirt, or debris from the battery compartment. This will help maintain a good connection and ensure optimal performance.
- Reinstall the battery (if applicable): If you’re reinstalling the same battery, carefully place it back into the battery compartment, making sure it is aligned correctly and fully inserted. Follow any specific instructions provided by the manufacturer.
- Replace the battery (if needed): If you’ve decided to replace the battery, insert the new battery into the compartment. Ensure that it is compatible with your Ring doorbell model and properly aligned before securing it according to the manufacturer’s instructions.
- Secure the battery: If your doorbell model requires it, reattach any screws, connectors, or latches to secure the battery in place. Make sure everything is tightly fastened but be cautious not to overtighten to avoid damaging the components.
Whether you’re reinstalling or replacing the battery, it’s important to follow the manufacturer’s guidelines to ensure proper installation. This will help maintain the functionality and performance of your Ring doorbell.
With the battery reinstalled or replaced, we’re almost done. There’s one final step to complete: testing the doorbell to ensure everything is functioning correctly.
Step 6: Test the doorbell
After going through the process of removing and reinstalling or replacing the battery, it’s crucial to test your Ring doorbell to ensure it is functioning properly. Testing the doorbell will give you the confidence that everything is in working order and that your battery replacement or reinstallation was successful.
Follow these steps to test your doorbell:
- Restore power: If you had switched off the power during the battery removal process, turn it back on now.
- Reattach the faceplate: If you removed the faceplate or cover earlier, securely reattach it to the doorbell. Ensure it is aligned correctly and snaps or locks into place.
- Press the doorbell button: Test the doorbell by pressing the doorbell button as you normally would. If you hear a ring or chime sound from the doorbell or receive a notification on your connected device, it indicates that the doorbell is working correctly.
- Check the video and audio feed: In addition to the doorbell ring, ensure that the video and audio feed from the doorbell to your connected device or Ring app is functioning properly. Test the live video stream and see if you can hear and communicate through the two-way audio feature.
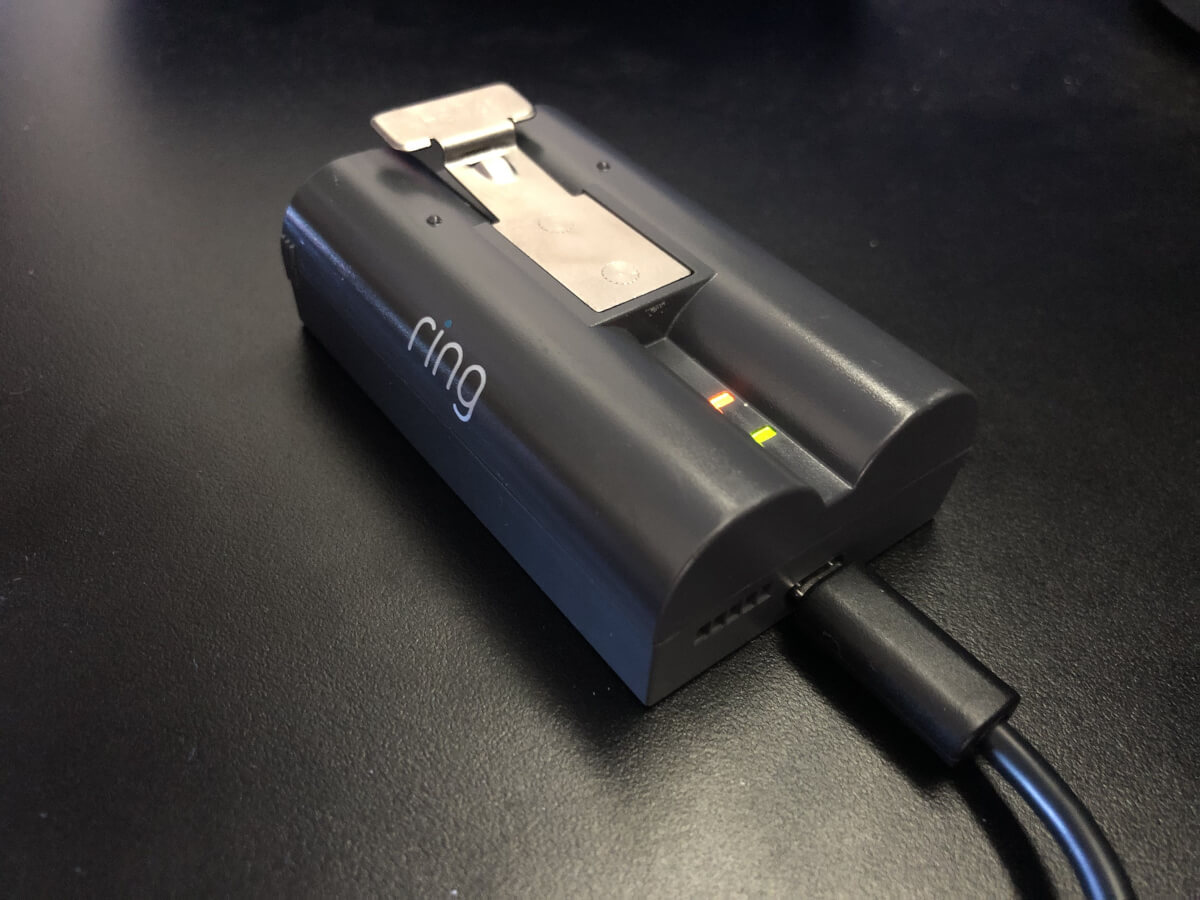
- Monitor battery level (if applicable): If you replaced the battery with a new one, monitor the battery level in the Ring app or dashboard. This will help you keep track of the battery’s performance and know when it needs to be recharged or replaced in the future.
If you encounter any issues during the testing process or if the doorbell is not functioning as expected, consult the manufacturer’s troubleshooting guides or contact their customer support for assistance. They will be able to provide guidance and help you resolve any issues.
Congratulations! You have successfully removed, reinstalled, or replaced the battery in your Ring doorbell and tested its functionality. Your doorbell is now ready to provide security and convenience to your home.
Conclusion
Removing the battery from your Ring doorbell may seem like a daunting task, but by following the simple steps outlined in this guide, you can easily and safely complete the process. Whether you’re replacing an old battery or simply removing it for maintenance purposes, having the knowledge and tools necessary for the job is essential.
Throughout this guide, we have covered the key steps to remove the battery from your Ring doorbell. From gathering the necessary tools to preparing for battery removal, locating and accessing the battery compartment, removing the battery itself, and finally reinstalling or replacing it, each step has been outlined to ensure a smooth and successful process.
It’s important to remember that while the steps provided in this guide are general in nature, there may be slight variations depending on your specific Ring doorbell model. Refer to the manufacturer’s instructions or user manual for your particular model to ensure you follow the correct procedure.
By taking the time to properly remove and replace the battery in your Ring doorbell, you can ensure that your doorbell system remains functional and effective. Regular battery maintenance is necessary to prevent any interruptions in the functioning of your doorbell and to keep it operating at its best.
We hope that this guide has been helpful in providing you with the necessary knowledge and guidance to remove the battery from your Ring doorbell. By following these steps and exercising caution throughout the process, you can easily complete this task and continue to enjoy the security and convenience that your Ring doorbell provides.
Remember, if you ever encounter any difficulties or have any concerns, consult the manufacturer’s instructions or reach out to their customer support for assistance. They will be able to provide further guidance and help you with any specific issues related to your Ring doorbell model.
Thank you for reading, and we wish you success in removing the battery from your Ring doorbell!
Frequently Asked Questions about How To Remove Ring Doorbell Battery
Was this page helpful?
At Storables.com, we guarantee accurate and reliable information. Our content, validated by Expert Board Contributors, is crafted following stringent Editorial Policies. We're committed to providing you with well-researched, expert-backed insights for all your informational needs.


0 thoughts on “How To Remove Ring Doorbell Battery”