
Articles
How To Remove Ring Doorbell From Wall
Modified: October 18, 2024
Learn how to remove your Ring Doorbell from the wall with these step-by-step articles. Easily uninstall and relocate your device for maximum convenience.
(Many of the links in this article redirect to a specific reviewed product. Your purchase of these products through affiliate links helps to generate commission for Storables.com, at no extra cost. Learn more)
Introduction
If you’ve decided to remove your Ring Doorbell from the wall, whether it’s for maintenance, relocation, or any other reason, it’s essential to know the proper steps to avoid any damage or complications. Removing the Ring Doorbell from the wall may seem like a daunting task, but with the right tools and guidance, you can accomplish it easily.
In this article, we will guide you through the step-by-step process of safely removing your Ring Doorbell from the wall. We will cover everything from powering off the device to patching the wall after removing it. So, let’s dive in and begin the process of removing your Ring Doorbell!
Before we start, make sure you gather all the necessary tools and materials. This will ensure a smooth removal process and prevent any unnecessary delays. Here’s a list of items you’ll need:
Key Takeaways:
- Safely and effectively remove your Ring Doorbell from the wall by following step-by-step instructions, ensuring a smooth process for maintenance, relocation, or any other reason.
- Prioritize safety, gather necessary tools, and consider optional steps like filling holes and patching the wall for a seamless finish after removing your Ring Doorbell.
Read more: How To Remove Cover From Ring Doorbell
Tools and Materials Needed
- Flathead screwdriver
- Philips screwdriver
- Wire strippers (if necessary)
- Masking tape
- Putty knife (optional)
- Spackle or wall filler (optional)
- Sanding block (optional)
- Paint and paintbrush (optional)
Key Takeaways:
- Safely and effectively remove your Ring Doorbell from the wall by following step-by-step instructions, ensuring a smooth process for maintenance, relocation, or any other reason.
- Prioritize safety, gather necessary tools, and consider optional steps like filling holes and patching the wall for a seamless finish after removing your Ring Doorbell.
Read more: How To Remove Cover From Ring Doorbell
Tools and Materials Needed
Before you begin removing your Ring Doorbell from the wall, gather all the necessary tools and materials. Having everything on hand will make the process smoother and more efficient. Here’s a list of what you’ll need:
1. Flathead screwdriver: This tool will be used to remove the faceplate and any screws holding the Ring Doorbell in place.
2. Philips screwdriver: You may encounter screws that require a Philips screwdriver, so it’s essential to have one on hand.
3. Wire strippers (if necessary): Depending on your setup, you may need wire strippers to disconnect the wiring from the Ring Doorbell.
4. Masking tape: This will come in handy for labeling and securing any loose wires while you work.
5. Putty knife (optional): If you plan to fill the holes left behind by the removal of the Ring Doorbell, a putty knife will help in the process.
6. Spackle or wall filler (optional): If you want to fill the holes and create a seamless appearance on the wall, spackle or wall filler will be necessary.
7. Sanding block (optional): To smooth out the patched areas on the wall, a sanding block will be useful.
8. Paint and paintbrush (optional): If you decide to paint the patched areas, make sure to have matching paint and a paintbrush on hand.
By having these tools and materials prepared, you’ll be well-equipped to remove your Ring Doorbell from the wall with ease and efficiency. Let’s move on to the step-by-step process of removing the Ring Doorbell!
Step 1: Power off the Ring Doorbell
Before you start removing the Ring Doorbell from the wall, it’s crucial to power it off to ensure your safety. Follow these steps to turn off the Ring Doorbell:
- Locate the power source: Depending on your setup, the Ring Doorbell may be connected to the existing doorbell wiring or powered by a battery. If it’s connected to the doorbell wiring, locate the breaker switch or fuse that controls the power to the doorbell.
- Turn off the power: Once you’ve located the correct breaker switch or fuse, flip it to the “off” position to cut off the power supply to the Ring Doorbell. This step is crucial to prevent any electrical accidents or damage during the removal process.
- Verify power is off: Use a voltage tester or multimeter to double-check that there is no power running to the Ring Doorbell. This step provides an extra layer of safety and ensures that you can proceed with the removal process without any risks.
Make sure to carefully follow these steps to ensure that the Ring Doorbell is completely powered off before moving on to the next steps. This minimizes the risk of electrical shock and allows for a smooth and safe removal process.
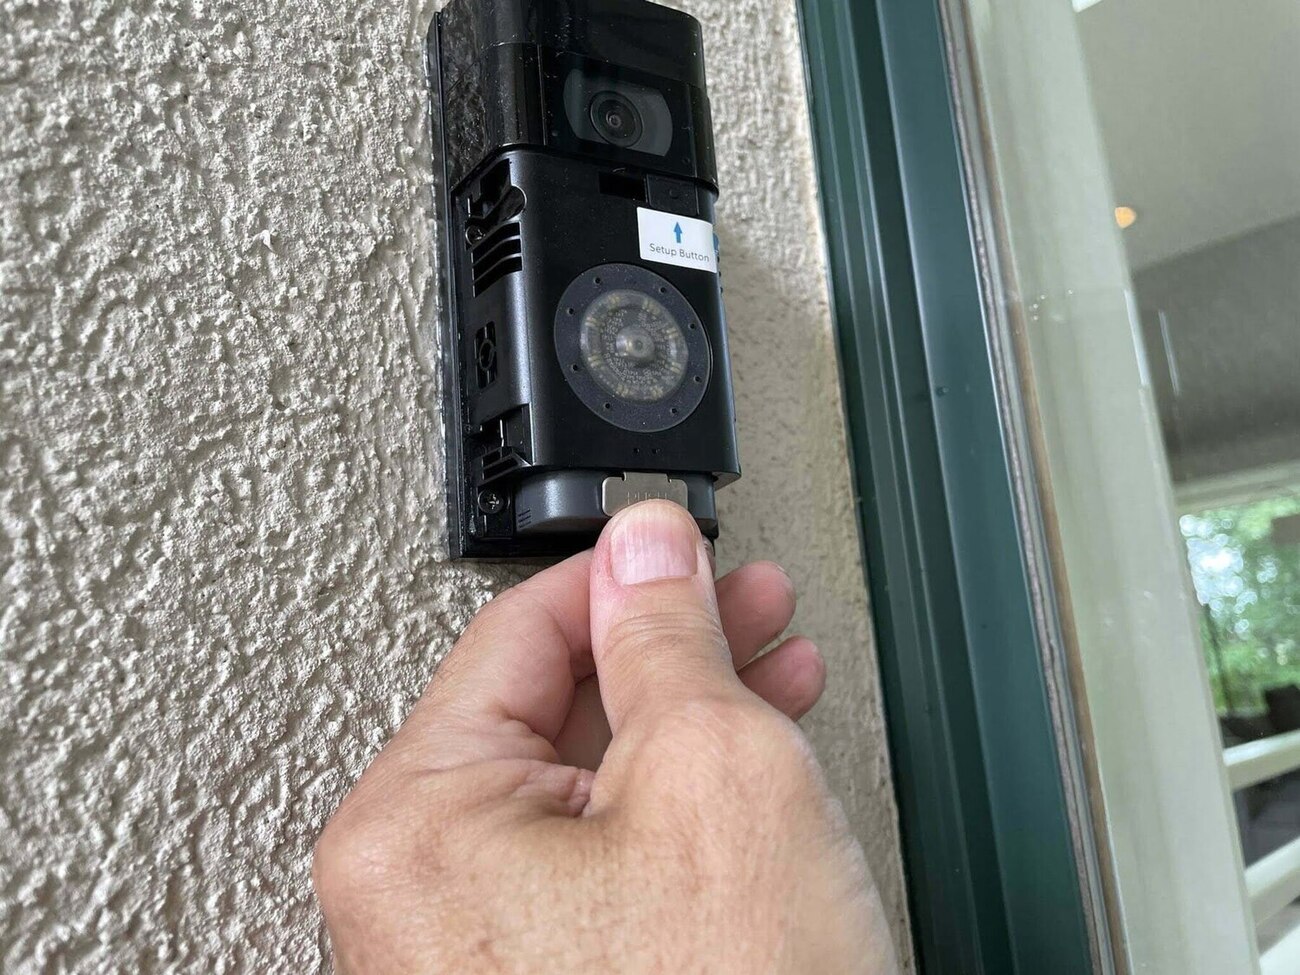
Step 2: Remove the faceplate
Once you have ensured that the power to the Ring Doorbell is off, you can proceed to remove the faceplate. Follow these steps to remove the faceplate:
- Locate the faceplate: The faceplate is the front cover of the Ring Doorbell. It is usually held in place by small clips or screws.
- Use a flathead screwdriver: If your faceplate has clips, carefully insert the flathead screwdriver between the faceplate and the mounting bracket. Gently pry the faceplate away from the bracket, starting from one corner and working your way around. Be cautious not to apply too much force to avoid damaging the faceplate or the bracket.
- Unscrew the faceplate: If your faceplate is secured with screws, use a Philips screwdriver to remove them. Set the screws aside in a safe place for reassembly later.
- Remove the faceplate: With the clips released or screws removed, the faceplate should come off easily. Slowly and carefully pull the faceplate away from the mounting bracket, paying attention to any wires that may be attached.
- Inspect the wiring: Once the faceplate is removed, take a closer look at the wiring to ensure there are no signs of damage or fraying. If you notice any issues, consider contacting a professional electrician for help.
By following these steps, you will successfully remove the faceplate of your Ring Doorbell. Proceed to the next step to disconnect the wiring securely.
Read more: How To Remove The Faceplate On Ring Doorbell
Step 3: Disconnect the wiring
After removing the faceplate, the next step is to disconnect the wiring of your Ring Doorbell. Properly disconnecting the wires ensures a safe removal process. Follow these steps to disconnect the wiring:
- Identify the wiring: Take a close look at the wiring that is connected to the back of the Ring Doorbell. It is usually color-coded with labels such as “Front”, “Power”, “Transformer”, and “Chime”.
- Label the wires: To help with reinstallation later, use masking tape and a pen to label each wire according to its function. This will make it easier for you to reconnect the wires correctly when reinstalling the Ring Doorbell.
- Loosen the terminal screws: Using a screwdriver, carefully loosen the terminal screws that hold each wire in place. Turn the screws counterclockwise to release the wires. Take note of any washers or spacers that might be attached to the terminals as well.
- Disconnect the wires: Now that the terminal screws are loose, gently pull each wire out of its respective terminal. Be cautious not to tug too forcefully to avoid damaging the wires or the Ring Doorbell.
- Secure the wires: After disconnecting the wires, use masking tape to secure them individually. This will prevent the wires from accidentally falling back into the wall during the removal process.
By carefully following these steps, you will disconnect the wiring of your Ring Doorbell in a safe and organized manner. With the wiring disconnected, you can now proceed to remove the mounting bracket in the next step.
Before removing your Ring doorbell from the wall, make sure to turn off the power supply to avoid any electrical hazards. Then, use a screwdriver to remove the mounting screws and gently lift the doorbell off the wall.
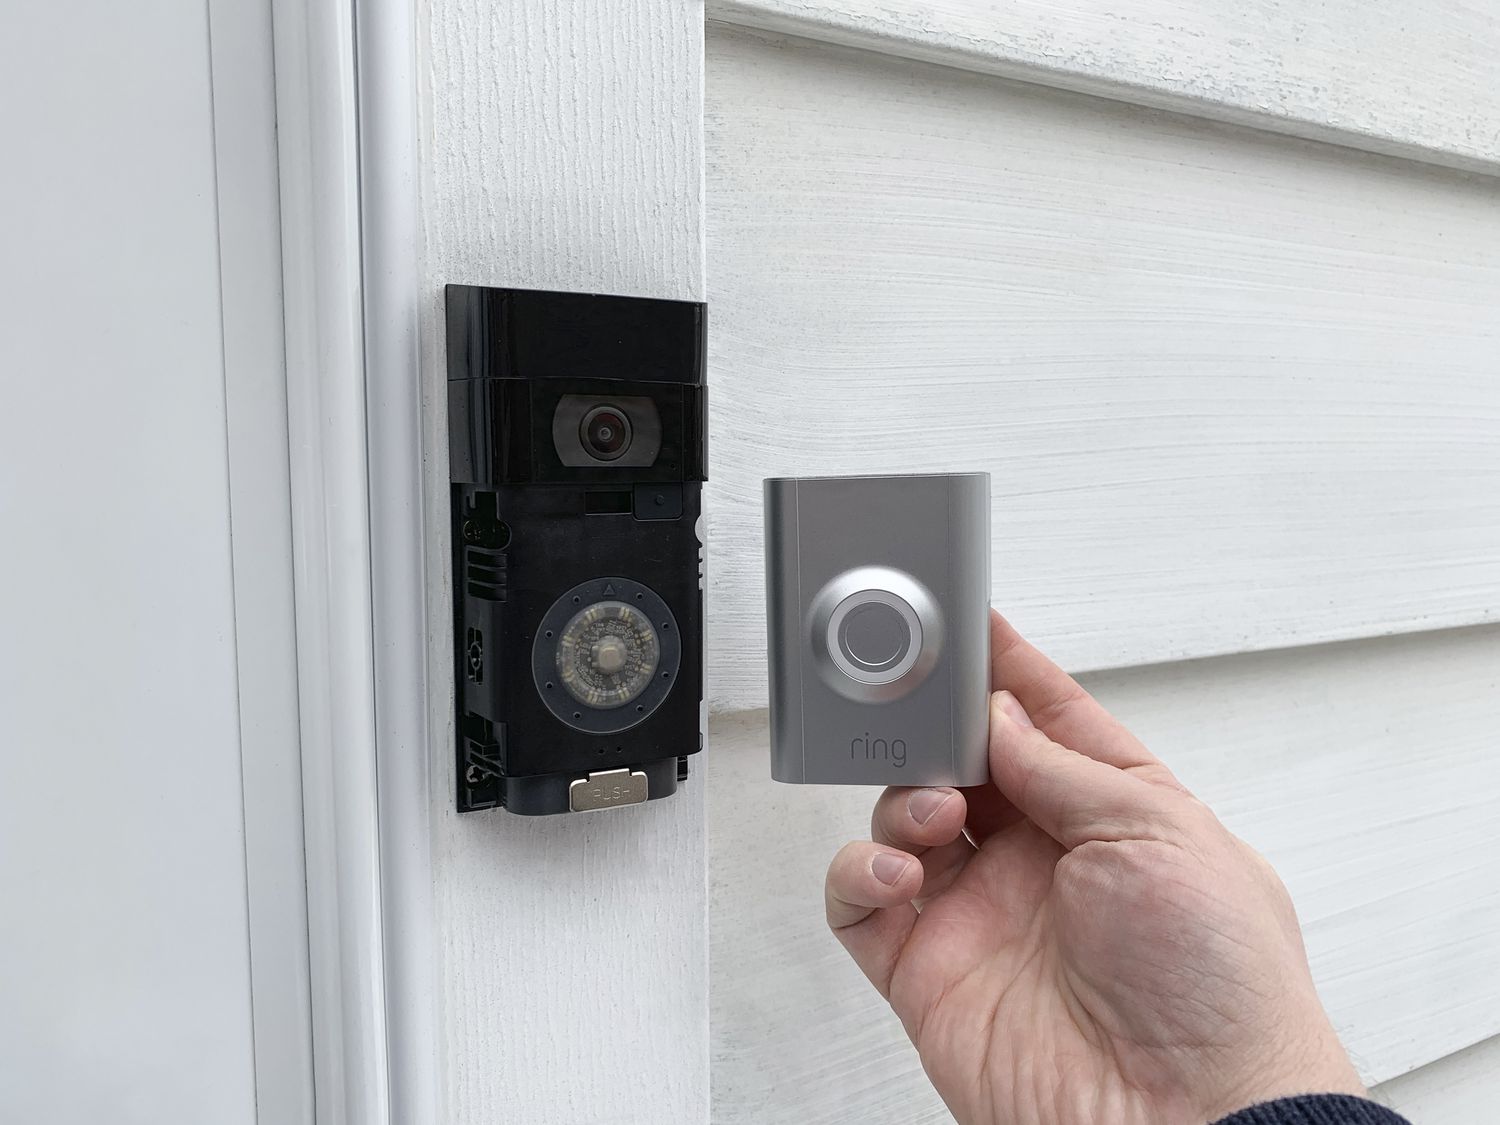
Step 4: Unscrew the mounting bracket
With the wiring disconnected, the next step in removing your Ring Doorbell from the wall is to unscrew the mounting bracket. The mounting bracket is what secures the Ring Doorbell to the wall. Follow these steps to successfully remove the mounting bracket:
- Locate the mounting screws: The mounting screws are usually located on the bottom of the Ring Doorbell or on the sides, depending on the model.
- Use the appropriate screwdriver: Depending on the type of screws used, you’ll need either a flathead or a Philips screwdriver to unscrew them. Select the appropriate screwdriver and position it securely on the screw.
- Turn the screws counterclockwise: Rotate the screwdriver counterclockwise to loosen and remove the screws. Depending on the model, there may be one or multiple screws holding the mounting bracket in place.
- Remove the mounting bracket: Once the screws are removed, gently pull the mounting bracket away from the wall. Be careful not to apply excessive force to avoid damaging the wall or any surrounding areas.
- Inspect the wall: Take a moment to inspect the wall for any damage or imperfections that may require patching or repair. This step will allow you to address any wall-related issues before moving on.
By following these steps, you will successfully unscrew and remove the mounting bracket of your Ring Doorbell. The next steps will guide you through optional processes to fill the holes and patch the wall if desired.
Step 5: Fill the holes (optional)
If you want to restore the wall to its original appearance or prepare it for a new installation, you may choose to fill the holes left behind by the mounting bracket. This step is optional but recommended for a seamless finish. Follow these steps to fill the holes:
- Prepare the wall filler or spackle: Gather your chosen wall filler or spackle and a putty knife. Ensure that the wall filler is suitable for the type of wall you have (e.g., drywall, plaster).
- Clean the holes: Use a small brush or cloth to remove any debris or loose material from the holes left by the mounting bracket. This will ensure proper adhesion for the wall filler.
- Apply the wall filler: Take a small amount of wall filler or spackle on the putty knife and apply it directly into the holes. Use the putty knife to smooth the filler, ensuring it is flush with the surface of the wall.
- Let the filler dry: Allow the wall filler to dry according to the manufacturer’s instructions. This may take several hours or overnight, depending on the product used.
- Sand the filled areas: Once the filler is dry, use a sanding block or sandpaper to smooth the filled areas. Gently sand in a circular motion until the patched holes are level with the surrounding wall surface.
- Wipe away dust: After sanding, wipe away any dust or debris with a clean cloth or brush. This will ensure a clean surface for further finishing if desired.
By following these steps, you can successfully fill the holes left behind by the mounting bracket. This optional step will help achieve a visually appealing result, creating a seamless finish on your wall.
Step 6: Patch the wall (optional)
If you want to take the extra step in restoring the wall to its original condition after removing the Ring Doorbell, patching the wall is a great option. This will provide a smooth and seamless surface for painting or future installations. Follow these steps to patch the wall:
- Gather the necessary materials: Before you begin, ensure that you have spackle or wall patching compound, a putty knife, sandpaper, and a clean cloth or brush.
- Clean the area: Use a clean cloth or brush to remove any debris or loose material from the area that needs to be patched. This will ensure proper adhesion of the patching compound.
- Apply the patching compound: Take a small amount of spackle or wall patching compound on the putty knife. Apply it to the damaged or patched areas, spreading it evenly to create a smooth surface.
- Smooth the surface: Use the putty knife to smooth the patching compound, ensuring it blends seamlessly with the surrounding wall. Be patient and take your time to achieve a professional finish.
- Let it dry: Allow the patching compound to dry completely according to the manufacturer’s instructions. This may take a few hours or overnight, depending on the product used.
- Sand the patched area: Once the patching compound is dry, use sandpaper to gently sand the patched area. This will help to level the surface and create a seamless blend with the rest of the wall.
- Remove dust and clean: After sanding, wipe away any dust or debris using a clean cloth or brush. This will ensure a clean surface, ready for painting or leaving it as is.
By following these steps, you can successfully patch the wall and achieve a smooth, professional-looking finish. This optional step is recommended if you want to restore the wall to its original condition or prepare it for future wall installations or paint jobs.
Read more: How Do You Remove A Ring Doorbell
Step 7: Final Steps and Cleanup
As you near the end of the process of removing your Ring Doorbell from the wall, there are a few final steps to take to ensure a clean and tidy finish. Follow these steps to complete the process:
- Inspect the doorbell components: Before finalizing the removal process, double-check that you have safely removed the faceplate, disconnected the wiring, and unscrewed the mounting bracket. Ensure that all components are accounted for and set them aside in a safe place for future use or reinstallation.
- Clean the doorbell and faceplate: Take a clean cloth or gentle cleaner and wipe down the doorbell and faceplate to remove any dust, fingerprints, or dirt that may have accumulated during the removal process. This will help keep your Ring Doorbell in good condition and ready for future use.
- Dispose of any packaging materials: If there are any packaging materials or debris left from the removal process, dispose of them in an appropriate manner. Recycling or proper disposal helps keep the environment clean and clutter-free.
- Store tools and materials: Gather all the tools and materials used during the removal process and store them in a designated place for future reference. This will help you stay organized and ensure that you have everything readily available when needed.
- Perform a final clean-up: Take a moment to clean the surrounding area where the Ring Doorbell was installed. Wipe down the wall, remove any dust or debris, and ensure that the area looks neat and tidy.
- Review the installation manual: If you plan on reinstalling the Ring Doorbell or installing a new device in the future, it’s a good idea to review the installation manual or guidelines. Familiarize yourself with the steps and requirements to ensure a successful installation next time.
By following these final steps, you can complete the process of removing your Ring Doorbell from the wall with ease and efficiency. It’s important to take the time to clean up properly and store the necessary tools and materials for future use. With the removal process complete, you can now decide whether to install a new Ring Doorbell or proceed with any further repairs or modifications.
Conclusion
In this article, we have walked you through the step-by-step process of removing your Ring Doorbell from the wall. By following these instructions, you can safely and effectively remove your Ring Doorbell for maintenance, relocation, or any other reason. Here’s a quick summary of the steps:
- Power off the Ring Doorbell to ensure safety.
- Remove the faceplate, whether through clips or screws.
- Disconnect the wiring from the back of the Ring Doorbell.
- Unscrew the mounting bracket carefully.
- Fill the holes left behind by the mounting bracket with spackle or wall filler (optional).
- Patch the wall if necessary to restore its original condition (optional).
- Complete the process by performing final steps and cleaning up the area.
By following these steps and taking the time to properly remove your Ring Doorbell from the wall, you can ensure a smooth and hassle-free process. Remember to gather the necessary tools and materials beforehand and always prioritize safety throughout the removal process.
Whether you are removing your Ring Doorbell temporarily or permanently, it’s essential to handle it with care and follow the proper steps. By doing so, you can not only maintain the functionality and condition of your Ring Doorbell but also keep your wall in pristine condition.
If you plan to reinstall the Ring Doorbell or install a new device in the future, make sure to consult the appropriate installation manual or guidelines for accurate and up-to-date instructions. This will help you navigate the installation process with confidence.
Now that you have successfully removed your Ring Doorbell, you can proceed with any necessary repairs or modifications to the wall and enjoy a clean and unobstructed space. Whether you’re repositioning the device or simply taking a break from its use, knowing how to remove your Ring Doorbell properly is a valuable skill for any homeowner.
Remember, if you encounter any difficulties or have questions during the removal process, it’s always advisable to seek professional assistance. By following the instructions provided in this article and exercising caution, you can successfully remove your Ring Doorbell from the wall and achieve the desired result.
Now that you've mastered removing your Ring Doorbell, why not secure your home even further? Check out our detailed guide on home protection, where we discuss all you need to know about home security. Additionally, keeping your house in top shape requires regular upkeep. Don't miss our essential tips on home maintenance, ensuring your living space remains in prime condition year-round.
Frequently Asked Questions about How To Remove Ring Doorbell From Wall
Was this page helpful?
At Storables.com, we guarantee accurate and reliable information. Our content, validated by Expert Board Contributors, is crafted following stringent Editorial Policies. We're committed to providing you with well-researched, expert-backed insights for all your informational needs.


0 thoughts on “How To Remove Ring Doorbell From Wall”