Articles
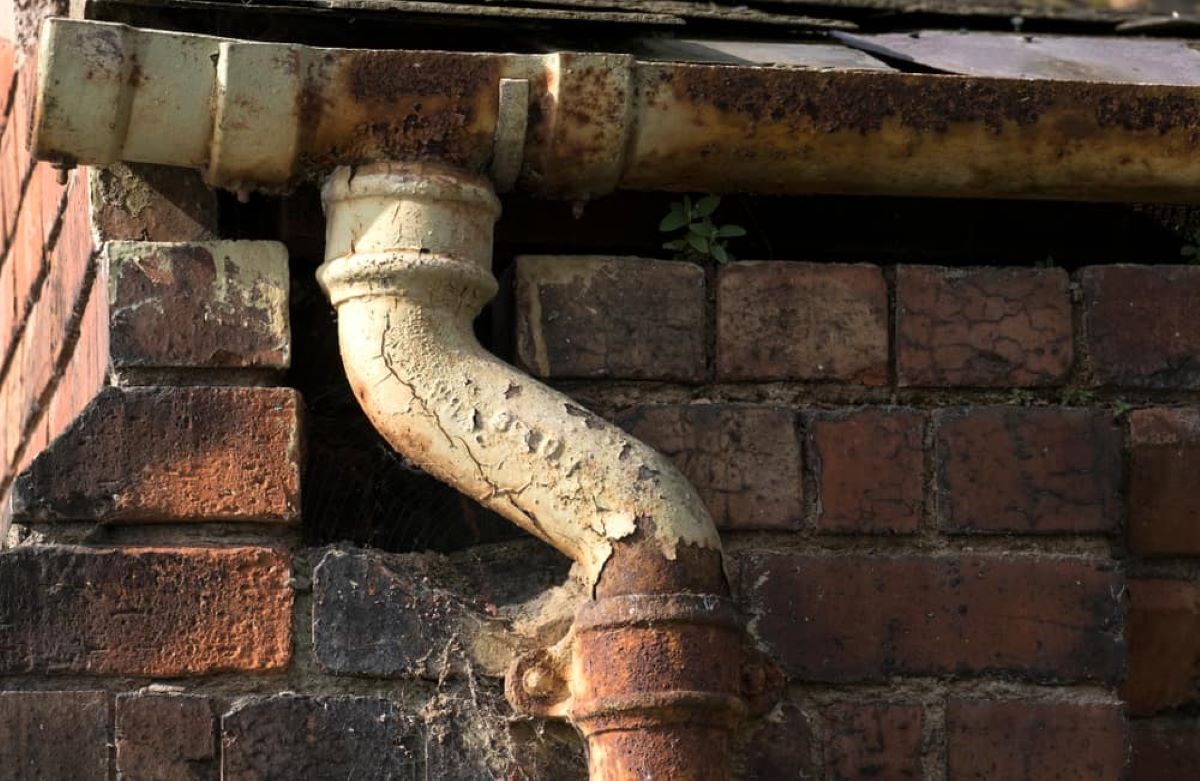
How To Repair A Cast Iron Pipe
Modified: December 7, 2023
Learn effective techniques and methods for repairing cast iron pipes with our informative articles. Get expert tips and guidance to fix your pipes in no time.
(Many of the links in this article redirect to a specific reviewed product. Your purchase of these products through affiliate links helps to generate commission for Storables.com, at no extra cost. Learn more)
Introduction
Having a damaged cast iron pipe in your plumbing system can be a real headache. Whether it’s a crack, a leak, or a complete break, repairing a cast iron pipe is essential to prevent further damage and ensure the proper functioning of your plumbing system. While it may seem like a daunting task, with the right tools and techniques, you can successfully repair a cast iron pipe yourself.
In this article, we will guide you through the step-by-step process of repairing a cast iron pipe. From assessing the damage to connecting the new pipe, we will provide you with all the necessary information and expert tips to make the repair process as smooth as possible.
Before we dive into the details, it’s important to note that safety should always be your top priority. Make sure to wear protective gear, such as gloves and goggles, and work in a well-ventilated area.
Now, let’s get started with the first step: assessing the damage.
Key Takeaways:
- Repairing a cast iron pipe requires assessing the damage, gathering necessary tools, preparing the work area, cutting out the damaged section, connecting the new pipe, and testing for leaks. Safety and precision are crucial throughout the process.
- Regular maintenance and inspections are essential for preventing future pipe damage. While DIY repairs are possible, consulting a professional plumber for extensive damage or lack of confidence is always a wise decision.
Read more: How To Use A Cast Iron Waffle Iron
Step 1: Assess the Damage
The first step in repairing a cast iron pipe is to assess the extent of the damage. Carefully inspect the pipe to determine if it’s a minor crack, a leak, or a complete break. This will help you determine the best approach for the repair.
Start by visually examining the pipe for any visible signs of damage, such as cracks, holes, or corrosion. Pay close attention to areas where the pipe is exposed, such as under sinks or in crawl spaces. Additionally, check if there are any signs of water leakage, such as dampness or mold growth.
In some cases, the damage may not be visible from the outside. In such situations, you can use a flashlight to inspect the interior of the pipe for any signs of corrosion or blockages. Look for flaking or rust-colored residue inside the pipe, as these are indicators of corrosion.
If the damage is limited to a small crack or leak, you may be able to fix it with a simple patch. However, if the pipe is extensively damaged or has a complete break, you may need to replace a section or the entire pipe.
Once you have assessed the damage, take measurements of the affected area. This will help you determine the length of the new pipe or patch needed for the repair.
Remember, if you are unsure about the extent of the damage or the appropriate repair method, it’s always best to consult a professional plumber.
With the damage assessed, you are now ready to move on to the next step: gathering the necessary tools.
Step 2: Gather the Necessary Tools
Before you begin the repair process, it’s important to gather all the necessary tools and materials. Having everything on hand will ensure a smooth and efficient repair.
Here are the essential tools you will need:
- Protective gear: Safety should always come first. Make sure to wear gloves, safety goggles, and a face mask to protect yourself from any potential hazards.
- Measuring tape: You will need a measuring tape to accurately measure the damaged area and determine the length of the new pipe or patch.
- Hacksaw or reciprocating saw: A hacksaw or reciprocating saw will be needed to cut out the damaged section of the pipe.
- Pipe cutter: If you prefer a cleaner and more precise cut, you can use a pipe cutter instead of a hacksaw.
- Adjustable wrench: An adjustable wrench will be used to loosen and tighten pipe fittings.
- Pipe wrench: A pipe wrench is essential for gripping and turning pipes, especially if they are old and corroded.
- Pipe cutter: If you prefer a cleaner and more precise cut, you can use a pipe cutter instead of a hacksaw.
- Pipe cutter: If you prefer a cleaner and more precise cut, you can use a pipe cutter instead of a hacksaw.
- Plumbers’ tape: Also known as Teflon tape, plumbers’ tape is used to create a watertight seal between threaded pipe fittings.
- Pipe primer and solvent cement: These are necessary for joining and sealing the new pipe or patch to the existing plumbing system.
Make sure to have all these tools readily available before you start the repair process. It’s also a good idea to have a bucket or container nearby to catch any water or debris that may come out during the repair.
With the necessary tools gathered, you are now ready to move on to the next step: preparing the work area.
Step 3: Prepare the Work Area
Preparing the work area is crucial to ensure a safe and efficient repair process. By taking the time to properly prepare, you can minimize the risk of accidents and make the repair process more manageable.
Here are the steps to prepare the work area:
- Turn off the water supply: Before you start any repair work, it’s essential to shut off the water supply to the damaged pipe. Locate the main water shut-off valve and turn it clockwise to close it. This will prevent any water flow while you work on the pipe.
- Drain the pipe: After shutting off the water supply, you will need to drain any remaining water from the pipe. Open the faucets connected to the damaged pipe and let the water flow until it stops completely. You can also open a valve or drain cap if one is available to release any trapped water.
- Remove any obstacles: Clear the area around the damaged pipe of any obstructions that may hinder your repair work. Remove items such as boxes, tools, or debris to create ample space for you to work comfortably.
- Protect surrounding surfaces: Depending on the location of the damaged pipe, you may need to protect surrounding surfaces from potential damage or spills. Use waterproof sheeting or towels to cover nearby walls, floors, or furniture to prevent any accidental damage.
- Ensure proper ventilation: Since you may be working with solvents and adhesives, it’s essential to have proper ventilation in the work area. Open windows or use fans to circulate fresh air and prevent the build-up of fumes or strong odors.
By following these steps and properly preparing the work area, you can create a safe and organized space to carry out the repair. With the work area ready, it’s time to move on to the next step: cutting out the damaged section of the pipe.
Step 4: Cut out the Damaged Section
Now that you have prepared the work area, it’s time to cut out the damaged section of the cast iron pipe. This step is crucial to remove the compromised portion and create space for the new pipe or patch.
Follow these steps to cut out the damaged section:
- Mark the cutting points: Use a pencil or marker to mark the section of the cast iron pipe that needs to be removed. Ensure that your marks are clear and visible.
- Secure the pipe: Use a pipe vise or adjustable pliers to securely hold the pipe in place. This will prevent it from moving or vibrating during the cutting process.
- Make the cut: With a hacksaw or reciprocating saw, carefully cut along the marked lines. Apply steady pressure and use smooth, controlled motions to ensure a clean and precise cut. Alternatively, you can use a pipe cutter for a more precise cut.
- Remove the cut section: Once the cut is complete, set aside the removed section of the pipe. Clear any excess debris or shavings from the work area to maintain cleanliness.
It’s important to note that cutting cast iron can be challenging and time-consuming, especially if you’re dealing with older or more corroded pipes. Take your time, and if necessary, use a lubricant like cutting oil to make the cutting process smoother. Additionally, ensure that you are wearing appropriate safety gear throughout this step.
With the damaged section removed, you are now ready to move on to the next step: removing the old pipe.
Read more: How To Season A Cast Iron Kettle
Step 5: Remove the Old Pipe
With the damaged section cut out, it’s time to remove the old pipe from the plumbing system. Removing the old pipe ensures a clean and smooth surface for connecting the new pipe or patch.
Follow these steps to remove the old pipe:
- Inspect the fittings: Check the fittings connected to the old pipe for any signs of damage or corrosion. If they are in good condition, you can reuse them. However, if they are worn out or corroded, it’s best to replace them with new fittings.
- Loosen the fittings: Use an adjustable wrench or pipe wrench to loosen and remove any nuts or bolts securing the fittings to the old pipe. Turn in a counterclockwise direction to loosen them. If the fittings are stubborn, you can use penetrating oil to help loosen them.
- Remove the fittings: Once the nuts or bolts are loosened, carefully remove the fittings from the old pipe. Set aside any reusable fittings and discard any damaged or corroded ones.
- Clean the surrounding area: After removing the fittings, clean the area around the pipe using a wire brush or sandpaper. Remove any rust, debris, or old adhesive to ensure a clean and smooth surface.
- Inspect the remaining pipe: Take a moment to inspect the remaining pipe for any signs of damage or corrosion. If necessary, clean or sand down any rough or corroded areas to ensure a proper seal when connecting the new pipe.
Removing the old pipe can sometimes be challenging, especially if it has been in place for a long time. Be patient and take care not to damage any surrounding pipes or fittings.
With the old pipe removed, you are now ready to move on to the next step: measuring and cutting the new pipe.
When repairing a cast iron pipe, make sure to thoroughly clean the area around the damaged section before applying any repair materials. This will ensure a strong and lasting bond.
Step 6: Measure and Cut the New Pipe
With the old pipe removed, it’s time to measure and cut the new pipe to the appropriate length. Accurate measurements and precise cuts are essential to ensure a proper fit and a successful repair.
Follow these steps to measure and cut the new pipe:
- Measure the length: Use a measuring tape to measure the distance between the two ends where the new pipe will be connected. Ensure your measurements are precise to avoid any gaps or overlapping.
- Mark the cutting point: Once you have determined the correct length, use a pencil or marker to mark the cutting point on the new pipe. Double-check your measurements before you make the cut.
- Cut the new pipe: Using a hacksaw or pipe cutter, carefully cut along the marked line. Apply even pressure and use smooth, controlled movements to achieve a clean and straight cut.
- Inspect the cut ends: After cutting the new pipe, inspect the cut ends for any sharp edges or burrs. Use a file or sandpaper to smooth out any rough edges and ensure a proper fit.
It’s essential to use the correct cutting tool and technique to achieve a clean and precise cut. Take your time and ensure that the new pipe is cut to the exact length needed for the repair.
With the new pipe cut and prepared, you are now ready to move on to the next step: applying primer and cement.
Step 7: Apply Primer and Cement
Applying primer and cement is a crucial step in connecting the new pipe to the existing plumbing system. The primer and cement create a strong bond and ensure a watertight seal, providing long-lasting durability to your repair.
Follow these steps to apply primer and cement:
- Clean the pipe ends: Before applying primer and cement, ensure that the pipe ends are clean and free from any debris or moisture. Use a clean cloth or rag to wipe away any dirt or residue.
- Apply the primer: Using a brush or applicator, apply a liberal coat of primer to the outside of the pipe end and the inside of the fitting. Make sure to cover the entire surface evenly and allow the primer to dry as per the manufacturer’s instructions.
- Apply the cement: Once the primer is dry, apply a thin, even layer of cement to the primed surfaces. Use a brush or applicator to apply the cement, ensuring that the entire surface is covered.
- Connect the new pipe: Immediately after applying the cement, insert the new pipe into the fitting, making sure it aligns properly. Give it a slight twisting motion to ensure a complete and secure connection.
- Hold in place: Hold the connected pipe and fitting together firmly for about 30 seconds to allow the cement to set. This will create a strong bond and prevent any leaks.
It’s important to note that the process of applying primer and cement should be done swiftly, as the cement sets quickly. Follow the manufacturer’s instructions for drying and curing times to ensure a proper bond.
With the new pipe connected and the primer and cement applied, you are now ready to move on to the next step: testing for leaks.
Step 8: Connect the New Pipe
With the new pipe in place and the primer and cement applied, it’s time to connect the new pipe to the existing plumbing system. This step involves securing the fittings and ensuring a tight and leak-free connection.
Follow these steps to connect the new pipe:
- Align the fittings: Make sure the fittings on the new pipe align properly with the existing plumbing system. Ensure that the pipes are in the correct position and that the fittings are tightly secured.
- Tighten the fittings: Use an adjustable wrench or pipe wrench to tighten the nuts or bolts on the fittings. Turn them in a clockwise direction until they are snug but be careful not to overtighten, as it may damage the fittings or cause leaks.
- Check for alignment: Double-check the alignment of the new pipe to ensure it is straight and properly connected. Make any necessary adjustments to the fittings or pipe positioning to achieve a secure and aligned connection.
- Test for leaks: Once the fittings are tightened and aligned, it’s important to test for leaks. Turn on the water supply and inspect the newly connected area for any signs of leakage. Look for drips, puddles, or any water seepage around the fittings.
If you notice any leaks, immediately turn off the water supply and make adjustments to the fittings as needed. Apply additional primer and cement to reinforce the connection if necessary. It’s crucial to ensure a watertight seal and prevent any potential water damage.
With the new pipe connected and the connections secure, you are now ready to move on to the final step: testing for leaks.
Read more: How To Clean A Cast Iron Fireplace
Step 9: Test for Leaks
Testing for leaks is the final step in the repair process of a cast iron pipe. It’s essential to thoroughly check the connections and ensure that there are no water leaks before considering the job complete.
Follow these steps to test for leaks:
- Turn on the water supply: Gradually turn on the water supply to the repaired section of the plumbing system. Start with a slow and gentle flow to allow time for any potential leaks to become visible.
- Inspect the connections: Carefully observe the newly repaired area, focusing on the fittings and joints. Look for any signs of water leakage, such as drips, puddles, or water stains.
- Check the surrounding area: In addition to inspecting the connections, also check the surrounding area for any signs of water leakage. Pay attention to nearby walls, floors, or ceilings, as water may travel and cause damage in unexpected locations.
- Monitor for leaks: After turning on the water supply, monitor the repaired area for a few minutes. Watch closely for any changes or further signs of leakage. If there are no visible leaks, proceed to observing for a longer duration.
- Observe for an extended period: For a more thorough test, leave the water supply on and observe the repaired area for an extended period, such as 30 minutes. This will provide ample time to detect any hidden or slow leaks.
If you notice any leaks during the testing process, it’s crucial to address them immediately. Turn off the water supply and assess the cause of the leak. It may require tightening the fittings, reapplying primer and cement, or seeking professional assistance if necessary.
Once you have confirmed that there are no leaks and the repair is successful, you can consider the cast iron pipe repair complete. Clean up the work area, dispose of any debris properly, and restore the water supply to the rest of the plumbing system.
Remember, regular maintenance and inspections of your plumbing system can help prevent future pipe damage and the need for repairs. By being proactive, you can avoid potential issues and ensure the longevity of your cast iron pipes.
Congratulations! You have successfully repaired a cast iron pipe and saved yourself from potential plumbing headaches.
—————————————–
By following these step-by-step instructions and utilizing the necessary tools and materials, you can effectively repair a cast iron pipe. However, if you are not confident in your DIY skills or if the damage is extensive, it’s always best to consult a professional plumber who will ensure that the repair is done correctly and efficiently.
Remember, safety should always be a priority when working on any plumbing project. Wear appropriate protective gear, work in a well-ventilated area, and exercise caution while using tools and working with pipes.
With proper repairs and maintenance, your cast iron pipe will continue to serve you well for years to come.
—————————————–
Please note that the information provided in this article is for educational purposes only. The article does not substitute professional advice.
Conclusion
Repairing a cast iron pipe may seem like a daunting task, but with the right knowledge and tools, you can successfully tackle this project. By following the step-by-step guide outlined in this article, you can assess the damage, gather the necessary tools, prepare the work area, cut out the damaged section, remove the old pipe, measure and cut the new pipe, apply primer and cement, connect the new pipe, and test for leaks.
Throughout the repair process, it’s important to prioritize safety and take necessary precautions. Wear personal protective equipment, work in a well-ventilated area, and consult a professional plumber if needed.
By repairing a cast iron pipe, you can prevent further damage and ensure the proper functioning of your plumbing system. Regular maintenance and inspections are key to identifying and addressing issues before they escalate into more significant problems.
Remember, if you are uncertain about undertaking the repair yourself or if the damage is extensive, it is always wise to consult a professional plumber who can provide expert guidance and assistance.
With the right approach, tools, and techniques, you can successfully repair a cast iron pipe and enjoy a reliable plumbing system for years to come.
—————————————–
Disclaimer: The information provided in this article is for informational purposes only and does not constitute professional advice. The author and publisher disclaim any liability for any damages, losses, or risks that may arise from the implementation of the procedures and techniques presented in this article. It is always recommended to consult with a professional plumber for accurate guidance and assistance.
Frequently Asked Questions about How To Repair A Cast Iron Pipe
Was this page helpful?
At Storables.com, we guarantee accurate and reliable information. Our content, validated by Expert Board Contributors, is crafted following stringent Editorial Policies. We're committed to providing you with well-researched, expert-backed insights for all your informational needs.


0 thoughts on “How To Repair A Cast Iron Pipe”