Articles
How To Reset A Toilet
Modified: October 19, 2024
Learn how to reset a toilet with this informative article. Discover step-by-step instructions and helpful tips to solve your toilet problems.
(Many of the links in this article redirect to a specific reviewed product. Your purchase of these products through affiliate links helps to generate commission for Storables.com, at no extra cost. Learn more)
Introduction
When it comes to home maintenance, some household tasks can seem intimidating, but with a little know-how, you can tackle them with confidence. One of those tasks is resetting a toilet. Whether you’re dealing with a wobbly toilet or a leaking wax seal, knowing how to reset a toilet can save you time and money by avoiding the need for a plumber.
In this article, we’ll guide you through the steps to reset a toilet correctly. We’ll cover everything from shutting off the water supply to reconnecting it once the toilet is back in place. So, grab your tools and let’s get started!
Before we dive into the nitty-gritty, it’s essential to gather all the necessary tools and materials. Having everything at hand will make the process smoother and more efficient.
Key Takeaways:
- Don’t be intimidated by resetting a toilet! With the right tools and know-how, you can tackle this DIY project, save money, and enjoy a properly functioning bathroom fixture.
- After resetting the toilet, test for leaks, stability, unusual sounds, and proper water fill to ensure it’s working correctly. Confidence in DIY skills can save time and money.
Read more: How To Reset A Printer
Gather Necessary Tools and Materials
Before you begin resetting the toilet, gather the following tools and materials:
- Adjustable wrench
- Sponge or towels
- Bucket or container
- Plunger
- New wax ring
- Cloths or rags
- Protective gloves
- Pliers (if needed)
Make sure you have all these items readily available. It’s essential to have a plunger on hand in case you encounter any issues with drainage during the process.
Now that you’re prepared with the necessary supplies, it’s time to shut off the water supply.
Shut off the Water Supply
Before you start working on resetting the toilet, you need to shut off the water supply. This will prevent any water flow and ensure that you can safely disconnect the toilet without any mess.
To shut off the water supply, locate the shut-off valve behind the toilet. It is usually located on the wall or floor near the base of the toilet. Turn the valve clockwise until it is fully closed. This will stop the water flow to the toilet tank and bowl.
Once the water supply is shut off, flush the toilet to drain any water remaining in the tank and bowl. This will make it easier to remove the toilet without any spills.
Make sure to have a bucket or container nearby to catch any residual water that may remain in the tank or bowl during the flushing process. You can also use a sponge or towels to soak up any water that may have escaped.
With the water supply shut off and the toilet drained, you’re ready to move on to the next step: draining the toilet.
Drain the Toilet
Now that the water supply is shut off and the toilet is flushed, the next step is to drain the remaining water from the tank and bowl. This will make it easier to remove the toilet without any spillage.
Start by using a plunger to help remove any water in the bowl. Place the plunger over the drain hole and give it a few firm plunges until the water is mostly gone. Be careful not to splash any water around while doing this.
Next, use a sponge or towels to soak up any water that may be left in the bowl or tank. Wring out the sponge or towels into a bucket or container to collect the water. This will prevent any spills or leaks when you remove the toilet.
If necessary, you can also use a wet-dry vacuum to remove any remaining water from the tank and bowl. Simply insert the vacuum hose into the tank and bowl and suction out the water until it’s dry.
Once all the water is removed, you can move on to the next step, which is removing the toilet from its position.
Remove the Toilet
Now that the toilet is drained, it’s time to remove it from its position. This step requires some physical effort, so be prepared to exert a bit of muscle power.
Start by locating the bolts at the base of the toilet that secure it to the floor. There are usually two bolts, one on each side. Use an adjustable wrench or pliers to loosen and remove the nuts that hold the bolts in place.
Once the nuts are removed, gently rock the toilet back and forth to break the seal between the toilet and the wax ring. Lift the toilet straight up to detach it from the flange. Be cautious not to tip the toilet or put excessive strain on the water supply line.
With the toilet removed, place it on a protective surface, such as old cloths or rags, to avoid damaging the floor or the toilet itself. Inspect the wax ring, which is a circular rubber or wax seal located on the flange. If the wax ring is damaged or worn out, it’s recommended to replace it with a new one before reinstalling the toilet.
It’s also a good idea to inspect the flange, which is the round opening in the floor where the toilet sits. Make sure it’s clean and free of any debris or old wax residue. If there are any issues with the flange, it may need to be repaired or replaced.
Now that the toilet is removed and the flange is inspected, it’s time to move on to the next step: cleaning and preparing the flange for the reset.
When resetting a toilet, be sure to use a new wax ring to create a proper seal between the toilet and the floor. This will prevent any leaks or odors from escaping.
Read more: How To Reset A Washer
Inspect and Clean the Flange
After removing the toilet, it’s important to inspect and clean the flange. The flange is the round opening in the floor where the toilet sits and is secured.
Start by visually inspecting the flange for any damage or wear. Look for cracks, chips, or any signs of instability. If you notice any issues, it’s important to address them before proceeding with the toilet reset.
Next, use a cloth or rag to clean the flange of any debris or old wax residue. This will ensure a clean and smooth surface for the new wax ring to adhere to. Be thorough in your cleaning, paying special attention to the area around the flange. A clean flange will provide a solid foundation for the reset.
If the flange is damaged, it may need to be repaired or replaced. Consult a professional plumber for guidance on the best course of action. It’s important to have a secure and stable flange to ensure a proper toilet reset.
Once the flange is inspected and cleaned, it’s time to move on to the next step: resetting the toilet.
Reset the Toilet
Now that the flange is inspected and cleaned, it’s time to reset the toilet back in its original position. Follow these steps to ensure a proper and secure reset:
- Position the new wax ring: Place the new wax ring on the flange, aligning it with the bolt holes. The wax ring creates a watertight seal between the toilet and the flange.
- Align the toilet: Carefully lower the toilet bowl onto the wax ring, making sure to align the bolt holes on the base of the toilet with the bolts on the flange. Gently press down to compress the wax ring and create a tight seal.
- Secure the toilet: Place the washers and nuts back onto the bolts and tighten them with an adjustable wrench or pliers. Be careful not to overtighten, as this can crack the toilet base. Alternate tightening each side to ensure an even and secure fit.
- Check the level: Use a torpedo level to ensure the toilet is level from side to side and front to back. Adjust the position if necessary by gently rocking the toilet or adding shims under the base to achieve a level installation.
- Tighten the bolts: Once the toilet is level, tighten the nuts on the bolts until they are firmly secured. Again, be careful not to overtighten, as this can cause damage.
With the toilet successfully reset, it’s time to move on to the next step: reconnecting the water supply.
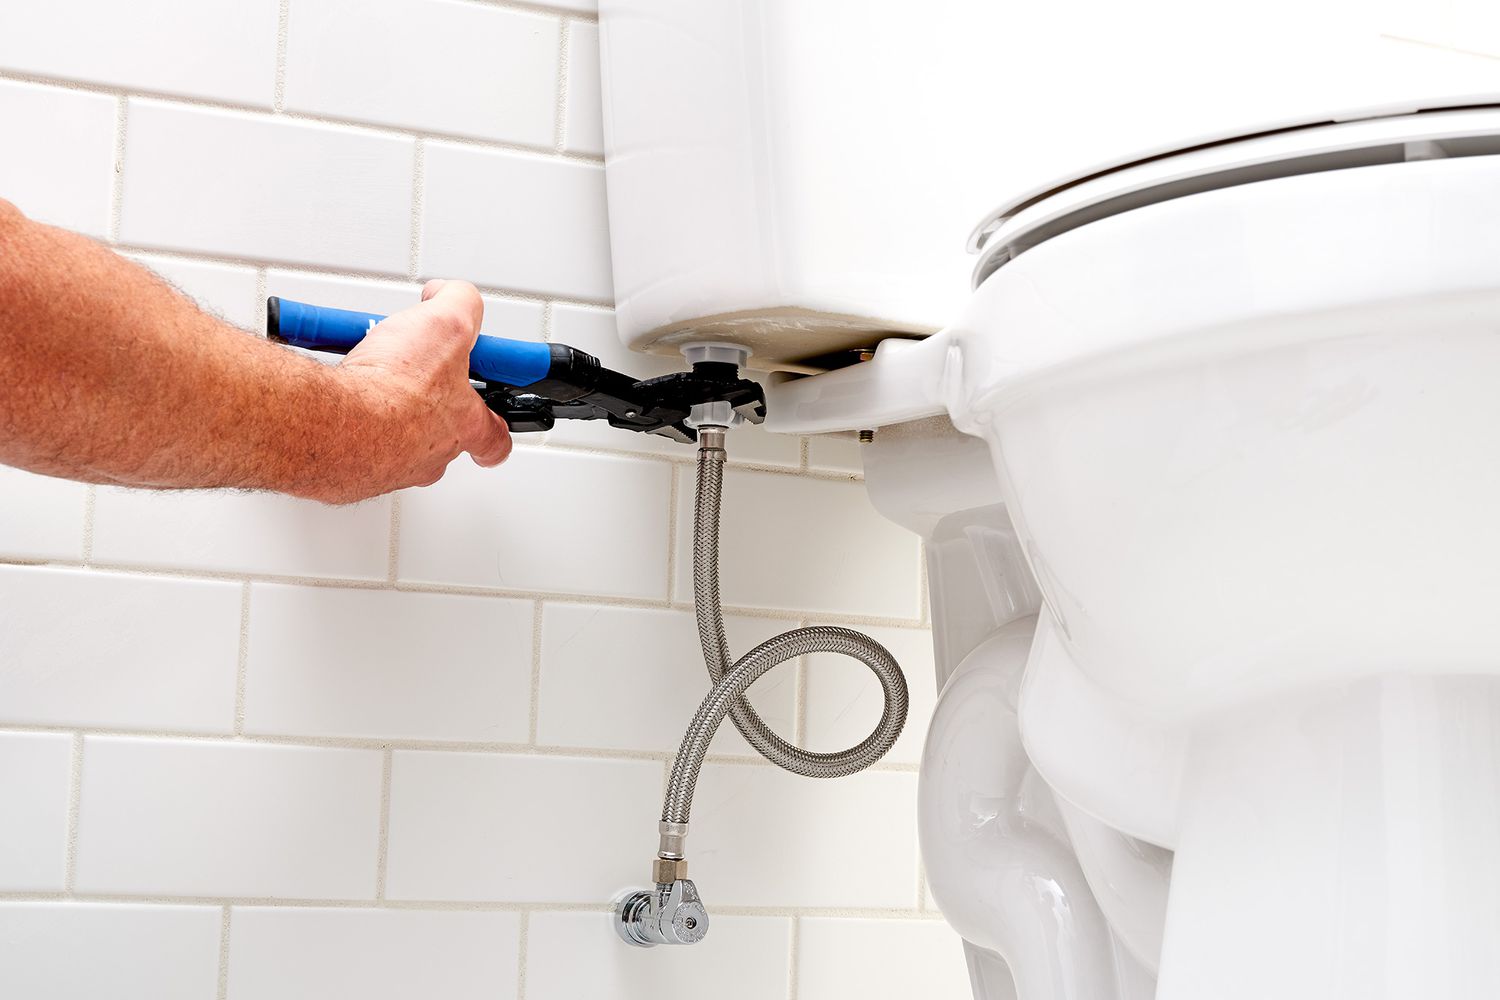
Reconnect the Water Supply
With the toilet securely reset, it’s time to reconnect the water supply. Follow these steps to complete this important final stage:
- Locate the water supply valve: Look for the shut-off valve that you closed earlier to shut off the water supply to the toilet. It is usually located near the base of the toilet or on the wall.
- Open the shut-off valve: Turn the shut-off valve counterclockwise to open it and allow water to flow into the toilet tank.
- Check for leaks: Once the water supply is turned on, carefully inspect all the connections for any signs of leaks. Watch for water drips or pooling around the base of the toilet or at the water supply valve. If you notice any leaks, tighten the connections or replace any faulty parts as needed.
- Fill the tank: Allow the toilet tank to fill with water. This may take a few minutes. Keep an eye on the water level inside the tank and make sure it reaches the appropriate fill line without overflowing.
- Test the flush: Once the tank is filled, give the toilet a test flush to ensure it is working properly. Pay attention to whether the water drains properly and if there are any issues with flushing. If there are any problems, double-check the connections and adjust as necessary.
With the water supply reconnected and the toilet functioning correctly, you’ve successfully completed the process of resetting the toilet.
Before concluding, it’s essential to clean up any remaining debris, wipe down the toilet, and dispose of any old materials properly.
Test the Toilet
Now that the toilet is reset and the water supply is reconnected, it’s time to test its functionality. Follow these steps to ensure that everything is working correctly:
- Check for leaks: After reconnecting the water supply, closely inspect all the connections for any signs of leaks. Look for water drips or pooling around the base of the toilet or at the water supply valve. If you notice any leaks, tighten the connections or replace any faulty parts as needed.
- Flush the toilet: Give the toilet a test flush to check if it is working properly. Observe the water flow and whether it drains properly without any blockages or unusual noises. If there are any issues, make the necessary adjustments or seek professional assistance.
- Inspect for stability: Sit on the toilet and check for stability. Make sure it doesn’t wobble or move excessively. If it does, check that the bolts securing it to the floor are properly tightened. If necessary, use a wrench or pliers to ensure a secure fit.
- Listen for any unusual sounds: While the toilet is flushing, listen for any unusual sounds such as gurgling or hissing. These could be signs of an underlying issue, such as a clogged vent or a problem with the water flow. Address any concerns promptly to avoid further complications.
- Ensure proper water fill: After flushing, make sure the tank refills to the appropriate level. Check that the water stops flowing once it reaches the fill line. Adjust the float or water level if necessary to achieve the desired water level.
By carefully testing the toilet, you can ensure that it is fully functional and ready for regular use.
Congratulations! You have successfully reset and tested your toilet. Now it’s time to enjoy a properly functioning bathroom fixture.
If you encounter any persistent issues or are unsure about any step in the process, it’s always best to consult a professional plumber for assistance.
Read more: How To Reset A Dishwasher
Conclusion
Resetting a toilet may seem like a daunting task, but with the right knowledge and tools, it can be a manageable DIY project. By following the steps outlined in this article, you can successfully reset your toilet and avoid the need for a plumber.
We began by gathering the necessary tools and materials, including an adjustable wrench, sponge or towels, bucket or container, plunger, new wax ring, cloths or rags, protective gloves, and pliers if needed. Having these items readily available will make the process smoother and more efficient.
We then walked through the steps to shut off the water supply, drain the toilet, remove the toilet from its position, inspect and clean the flange, reset the toilet back into place, reconnect the water supply, and finally, test the toilet for functionality.
Throughout the process, we emphasized the importance of inspecting for leaks, checking for stability, listening for unusual sounds, and ensuring proper water fill. These tests will ensure that your toilet is working properly and ready for regular use.
Remember, if you encounter any persistent issues or are unsure about any step in the process, it’s always best to consult a professional plumber. They have the expertise and experience to handle more complicated situations and can provide valuable guidance.
By having the confidence and knowledge to reset a toilet, you can save time and money in avoiding the need for professional assistance. So, don’t be afraid to tackle this home maintenance task on your own.
With the toilet reset successfully, you can now enjoy a properly functioning bathroom fixture. Take pride in your DIY skills and rest easy knowing that you’ve accomplished a significant home repair task.
Thank you for following along with our guide on how to reset a toilet. We wish you success in all your future DIY projects!
Frequently Asked Questions about How To Reset A Toilet
Was this page helpful?
At Storables.com, we guarantee accurate and reliable information. Our content, validated by Expert Board Contributors, is crafted following stringent Editorial Policies. We're committed to providing you with well-researched, expert-backed insights for all your informational needs.


0 thoughts on “How To Reset A Toilet”