Articles
How To Store Buttons
Modified: August 27, 2024
Discover the best way to store buttons in our informative articles. Keep your collection organized and protected with our expert tips and advice.
(Many of the links in this article redirect to a specific reviewed product. Your purchase of these products through affiliate links helps to generate commission for Storables.com, at no extra cost. Learn more)
Introduction
Welcome to the world of button storage! If you’re an avid collector, a sewing enthusiast, or just someone who has accumulated a large collection of buttons over time, finding a reliable and organized way to store them is essential. No matter the size or variety of your button collection, having a systematic storage method will save you time and frustration when you need to find the perfect button for your next project.
In this article, we will explore various techniques and ideas for storing buttons effectively. From sorting by color and size to creative storage solutions, we aim to provide you with practical tips and inspiration to keep your buttons in order.
So, gather your button collection and let’s dive into the wonderful world of button storage!
Key Takeaways:
- Organize your button collection by color, size, material, and design to create an efficient and visually appealing storage system. Utilize containers, labels, and creative displays to keep your buttons organized and easily accessible.
- Explore unique button storage ideas such as mason jar wall displays, vintage suitcase organizers, and button art to add a touch of creativity and style to your crafting or sewing space. Personalize these ideas to suit your preferences and available space.
Read more: How To Store Button Mushrooms
Materials Needed
Before we embark on our button storage journey, let’s gather the materials you’ll need to ensure a successful organization system. Here are some essential items:
- Button Collection: Of course, you’ll need a collection of buttons to store. Take inventory of your buttons to determine the quantity and variety you have.
- Sorting Trays or Containers: Invest in sorting trays or containers to facilitate the process of organizing your buttons. These can be small plastic trays, compartmentalized boxes, or even repurposed storage containers.
- Labels or Markers: Having labels or markers on hand will help you label different sections of your storage containers, making it easier to locate specific buttons later on.
- Ziploc Bags: Ziploc bags are a great option for storing buttons of different sizes and designs. They keep buttons secure while allowing you to easily see what’s inside.
- Button Cards or Sheets: If you have vintage or valuable buttons, consider using button cards or sheets to protect them from damage. These are typically made of acid-free paper or plastic and have individual slots for each button.
Once you have gathered these materials, you’re ready to start organizing your button collection! Let’s move on to sorting our buttons for efficient storage.
Sorting Buttons
Sorting your buttons is the first step towards creating an organized storage system. By categorizing your buttons, you’ll be able to locate specific ones quickly and easily. Here are a few ways you can sort your buttons:
- Color: Sorting buttons by color is a popular method as it allows for easy visual identification. You can have separate containers or compartments for different colors, or use color-coded labels to indicate the color group of each button.
- Size: If you have buttons of varying sizes, sorting them by size will make it easier to find the right button for your needs. Arrange them in separate sections based on size, or use different-sized storage containers.
- Material: Another sorting option is to group buttons based on their material. This includes plastic, metal, wood, or even fabric-covered buttons. This approach can be helpful especially if you have specialized projects that require specific materials.
- Design or Style: Categorizing buttons by design or style is ideal if you have a diverse collection. You can group them based on patterns, shapes, or themes, making it easier to find buttons that match specific projects.
When sorting your buttons, take the time to examine each button and consider its unique characteristics. This will help you determine the most appropriate category for each button. For instance, if you have a multicolored button with floral patterns, you can categorize it under “multicolor” and “floral”.
Remember, there’s no right or wrong way to sort your buttons. Choose a method that works best for your collection and personal preferences. Let’s move on to exploring different storage options based on the categories we’ve created.
Containers for Button Storage
Now that we have sorted our buttons into different categories, it’s time to find suitable containers for storing them. The right container will help keep your buttons organized, secure, and easily accessible. Here are a few options to consider:
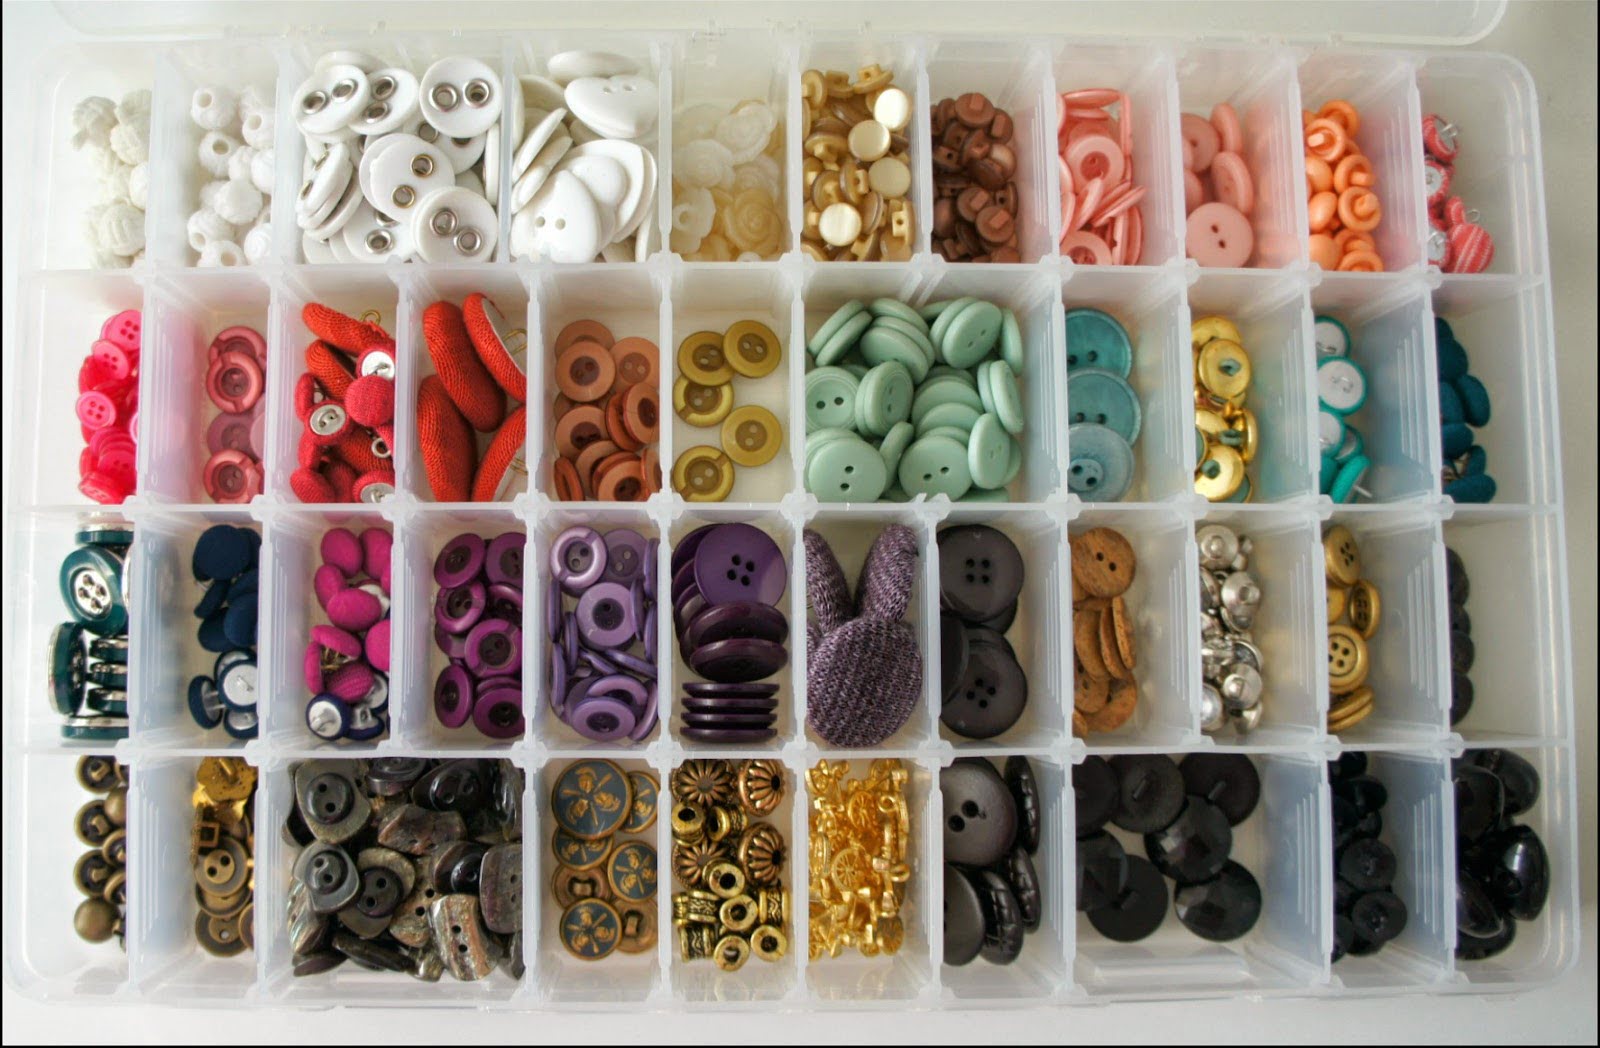
- Compartmentalized Boxes: Compartmentalized boxes or trays are an excellent choice for storing buttons. These boxes have multiple sections or compartments, allowing you to separate and organize your buttons by category. Look for boxes with adjustable dividers, so you can customize the size of each compartment to accommodate different button sizes.
- Plastic Containers: Transparent plastic containers with snap-on lids are a popular choice for button storage. These containers come in various sizes and are stackable, which makes them space-efficient. You can easily see the contents of each container, making it convenient to locate specific buttons.
- Drawer Organizers: If you have a spare drawer, consider using drawer organizers to store your buttons. Look for organizers with different-sized compartments to accommodate buttons of various sizes. Label each section to easily find the buttons you need.
- Mini Mason Jars or Bottles: If you prefer a more aesthetically pleasing storage solution, mini mason jars or small clear bottles can be a great choice. They provide a charming display while keeping your buttons organized. You can arrange them on a shelf or in a decorative box for easy access.
- Accordion Files: Accordion files, typically used for documents, can also be repurposed for button storage. Label each section of the file with different button categories and place the buttons inside. This option is ideal for flat buttons or vintage buttons that need extra protection.
Ultimately, the choice of container depends on the size and quantity of your button collection, as well as your personal preference. It’s worth noting that using a combination of containers may be the most efficient way to store your buttons. For example, using compartmentalized boxes for sorting by color or size, and smaller containers such as mini jars for more specialized button categories.
Now that we have our buttons sorted and containers ready, let’s explore how to store them based on the different sorting methods we discussed.
Storing Buttons by Color
When sorting buttons by color, it’s important to have a storage system that allows for easy identification and access to each color group. Here are some tips for storing buttons by color:
- Color-Coded Containers: Use storage containers or trays that are specifically designated for each color group. You can allocate a separate container for red buttons, another for blue buttons, and so on. This method makes it simple to locate the desired color quickly.
- Color-Labelled Compartments: If you prefer using compartmentalized boxes or trays, use color-coded labels on each section to indicate the color group of the buttons inside. You can use colored stickers or adhesive labels with the corresponding color written on them.
- Rainbow Order: Arrange your buttons in a rainbow order within each container or compartment. Start with red, followed by orange, yellow, green, blue, indigo, and violet. This visually appealing arrangement not only makes it easy to find specific colors but also adds a delightful touch to your button storage.
- Clear Containers: Transparent containers are particularly useful for storing buttons by color. They allow you to see the color of the buttons without the need for labels or opening each container. Choose containers with divided compartments or individual jars to keep each color separate.
- Color-Blocked Display: If you have a large button collection and want to showcase your colorful buttons, consider creating a color-blocked display. Use a pegboard or corkboard and attach strings or pins to hang your buttons in color groups. This method not only keeps your buttons organized but also serves as a visually appealing decoration for your craft room.
Remember to label each container or section clearly so you can easily find and return buttons to their designated places. With a well-organized storage system based on color, you’ll be able to locate the perfect button to complement your next project effortlessly.
Now let’s explore how to store buttons based on their size.
Store buttons in a small container with compartments to keep them organized and prevent them from getting lost. You can also use a small ziplock bag or a pill organizer to store them neatly.
Read more: How To Store Button Cell Batteries
Storing Buttons by Size
Saving time and effort in finding the right-sized button for your project becomes more manageable when you have a reliable system for storing buttons by size. Here are some tips for organizing your buttons based on their size:
- Divided Compartments: Use compartmentalized boxes or trays with different-sized sections to store buttons of various sizes. Sort your buttons into small, medium, and large categories or create more specific size ranges. Having designated sections for each size will make it easy to locate the right button quickly.
- Size-Labeled Bags: If you prefer using ziplock bags, label each bag with the corresponding button size. Arrange them in a box or container, either stacked or standing vertically, so you can easily see and access the buttons by size.
- Graduated Containers: Consider using containers with graduated sizes, such as nesting boxes or jars with different heights. Arrange the buttons with the largest in the bottom container, followed by progressively smaller ones in each subsequent container. This method not only saves space but also provides an organized visual representation of your button sizes.
- Hinged Storage Boxes: Hinged storage boxes with adjustable dividers are an excellent option for storing buttons by size. Adjust the dividers to create compartments that fit each button size, ensuring they are neatly separated and easy to access. Label each section to maintain organization.
- Size-Specific Drawers or Shelves: If you have enough space, you can dedicate specific drawers or shelves for each button size. Label them accordingly to make it effortless to find buttons of the desired size. This method works well if you have a large button collection with a wide range of sizes.
As with any storage system, consistency is key. Make sure to return buttons to their designated sections after each use to maintain organization. With buttons stored by size, you’ll be able to quickly find the perfect button for your project, regardless of its dimensions.
Now let’s explore how to store buttons based on their design or style.
Storing Buttons by Design
If you have a diverse collection of buttons with various designs or styles, organizing them based on their unique characteristics is crucial. Here are some ideas for storing buttons by design:
- Divided Storage Boxes: Use compartmentalized boxes with adjustable dividers to create separate sections for different button designs. You can have sections for floral buttons, geometric buttons, novelty buttons, and more. This method allows you to easily locate buttons with specific designs.
- Labelled Drawers: If you have enough storage space, dedicate different drawers or sections of a drawer for each design category. Label each drawer or section accordingly so you know where to find buttons of specific designs or styles.
- Organizational Trays: Invest in organizational trays with separate compartments for each design or style category. This allows you to arrange your buttons neatly while keeping them easily accessible. Label each compartment to avoid confusion.
- Clear Display Cases: Consider using transparent display cases specially designed for buttons. With these cases, you can create a visually pleasing display of buttons by design. Arrange them in rows or groups based on their unique patterns, shapes, or themes.
- Shadow Box Frames: For showcasing your most precious or vintage buttons, consider using shadow box frames. You can arrange the buttons within the frame, ensuring they stay protected while adding a decorative touch to your space.
When storing buttons by design, it’s important to consider the uniqueness and individuality of each button. Take your time to arrange them in a way that highlights their distinct designs and allows for easy access when needed.
Now that we’ve explored different ways to store buttons based on their design, let’s get creative with some unique button storage ideas!
Creative Button Storage Ideas
If you’re looking to add a touch of creativity to your button storage, here are some unique ideas to inspire you:
- Mason Jar Wall Display: Attach mason jar lids to a wooden board, then screw the jars onto the lids. Arrange your buttons in the jars, creating a colorful and eye-catching button display on your wall.
- Vintage Suitcase Organizer: Repurpose a vintage suitcase by adding compartments, such as small boxes or dividers, to create storage sections. Place your buttons inside these sections and close the suitcase for a stylish and portable storage solution.
- Button Bouquet: Use an old glass vase or jar and fill it with buttons of different colors and sizes. Arrange them in a way that resembles a beautiful bouquet. This not only serves as storage but also makes for a delightful decorative piece.
- Button Tic-Tac Containers: Empty tic-tac containers, with their small compartments, are perfect for storing buttons. Use different containers for various button sizes or colors and label them accordingly.
- Button Art: Transform your button collection into a piece of art by gluing them onto a canvas or wooden board in a creative pattern or design. Display it on the wall while simultaneously keeping your buttons organized and easily accessible.
- Button Jewelry Organizer: If you have buttons that are suitable for jewelry making, use a jewelry organizer with small compartments to store them. Hang the organizer on the wall or place it on a countertop, making it convenient to find the perfect button for your next accessory project.
These creative storage ideas not only offer unique ways to organize your button collection but also add a touch of style and charm to your crafting or sewing space. Feel free to adapt and personalize these ideas to suit your preferences and available space.
Now that we’ve explored various button storage methods, it’s time to wrap up our article.
Conclusion
Congratulations! You are now well-equipped to embark on your button storage journey. By implementing the tips and ideas shared in this article, you can organize and store your button collection in a way that is efficient, visually appealing, and accessible.
Remember, the key to effective button storage is to sort your buttons based on categories that make sense for your unique collection. Whether you choose to sort them by color, size, design, or a combination of these factors, having a systematic approach will save you time and frustration when searching for the perfect button for your next project.
Utilizing suitable containers, such as compartmentalized boxes, clear jars, or creative displays, will help keep your buttons organized, protected, and easily accessible. Additionally, labeling each container or section will ensure you can quickly locate buttons within your collection.
If you’re feeling adventurous, don’t hesitate to explore creative and unique button storage ideas that add a personal touch to your crafting or sewing space. Whether it’s a mason jar wall display, vintage suitcase organizer, or button art, these creative solutions can combine functionality and aesthetics.
Lastly, maintaining consistency in your button storage system is essential. Take the time to return buttons to their designated places after each use, ensuring your collection remains organized and accessible in the long run.
With your well-organized button storage system in place, you can now approach your future projects with ease and inspiration. Enjoy the satisfaction of effortlessly finding the perfect button and let your creativity flourish!
Happy button organizing!
Frequently Asked Questions about How To Store Buttons
Was this page helpful?
At Storables.com, we guarantee accurate and reliable information. Our content, validated by Expert Board Contributors, is crafted following stringent Editorial Policies. We're committed to providing you with well-researched, expert-backed insights for all your informational needs.


0 thoughts on “How To Store Buttons”