Articles
How To Store Dahlias For Winter
Modified: February 23, 2024
Learn how to properly store dahlias for winter in this helpful articles. Find out the best techniques to ensure your dahlias survive the cold temperatures and bloom beautifully next season.
(Many of the links in this article redirect to a specific reviewed product. Your purchase of these products through affiliate links helps to generate commission for Storables.com, at no extra cost. Learn more)
Introduction
Welcome to the world of dahlias! These beautiful and vibrant flowers are a favorite among gardeners for their stunning blooms and array of colors. However, as the winter season approaches, it’s important to prepare your dahlias for storage to ensure their survival and future bloom.
Storing dahlias for winter is a crucial step in preserving these delicate flowers from the harsh conditions that can damage or kill them. By following the right techniques and using the proper storage methods, you can enjoy the beauty of dahlias year after year.
In this article, we will guide you through the process of storing dahlias for winter, from choosing the right time to dig them up to preparing them for storage and eventually replanting them in the spring. So let’s dive in and learn how to keep your dahlias safe and sound during the colder months!
Key Takeaways:
- Preserve the beauty of dahlias year after year by storing them for winter. Choose the right time, prepare the tubers, and select suitable storage containers to ensure their survival and future bloom.
- Replanting dahlias in spring is a rewarding experience. Follow the steps to bring these captivating flowers back to life, providing care and support for a flourishing dahlia garden.
Read more: How To Store Dahlia Bulbs For The Winter
Choosing the Right Time to Store Dahlias
Timing is crucial when it comes to storing dahlias for winter. It’s essential to dig up your dahlias before the first frost hits, as frost can damage the tubers and make them susceptible to rot. The ideal time to store dahlias is after the first frost, but before the soil becomes frozen.
Pay attention to the weather forecast in your area and keep an eye out for the first frost. Once you know the frost is on its way, it’s time to prepare for the dahlia excavation. This timing ensures that your dahlias have enough time to cure before being stored for winter.
Keep in mind that if you live in a region with mild winters, where the ground rarely freezes, you may not need to dig up your dahlias at all. In such cases, you can opt to leave them in the ground, but it’s still a good idea to protect the plants with a layer of mulch to insulate and shield them from the cold.
In colder regions, where the ground freezes deeply, it’s essential to dig up the tubers and store them indoors for the winter. This approach protects the dahlias from freezing and ensures their survival for the next growing season.
By choosing the right time to store dahlias, you set the stage for a successful storage and thriving garden in the upcoming year.
Preparing Dahlias for Storage
Before you store your dahlias for winter, it’s important to prepare them properly to ensure their long-term health and vitality. Proper preparation will help prevent diseases and decay, allowing your dahlias to thrive when they are replanted in the spring.
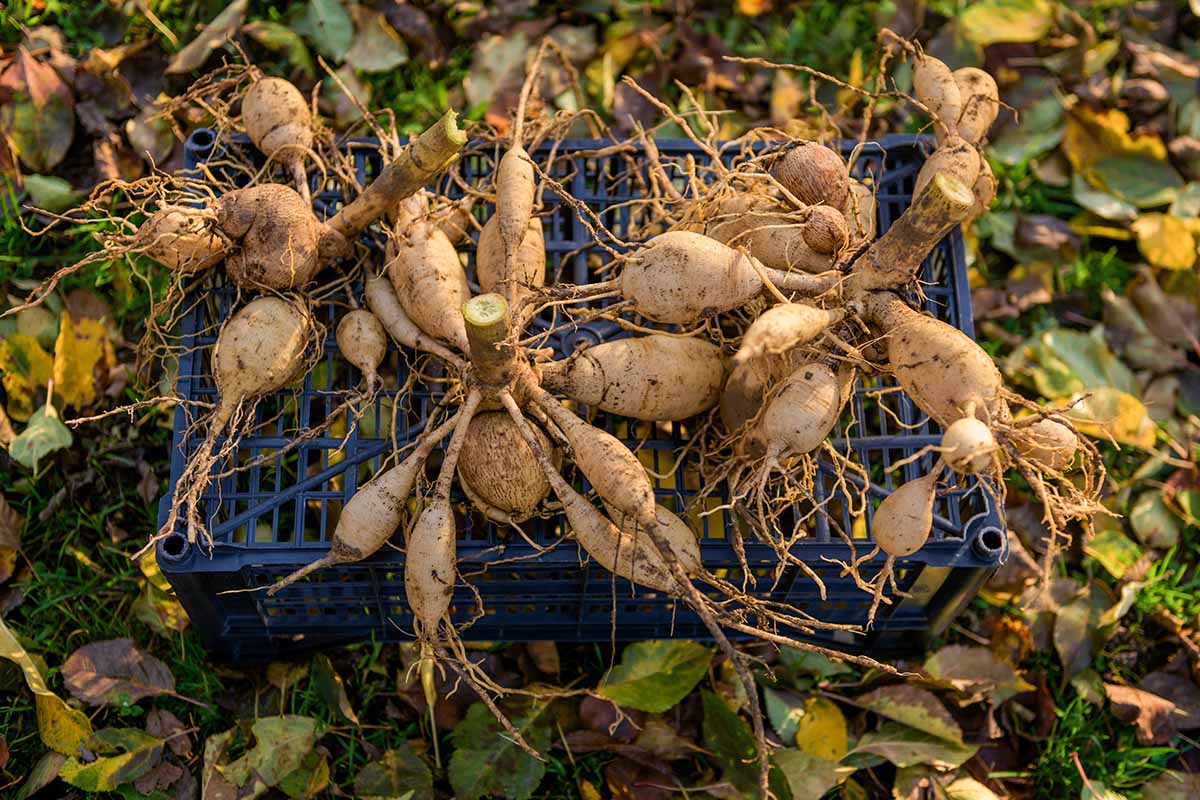
The first step in preparing dahlias for storage is to carefully dig them up from the ground. Use a garden fork or shovel to gently loosen the soil around the plants, being careful not to damage the tubers. Lift the clumps of dahlias out of the ground, making sure to keep the tubers intact.
Once you have dug up the dahlias, shake off any excess soil and remove any loose foliage or stems. It’s important to clean the tubers thoroughly to prevent the spread of diseases or pests. Rinse the tubers with water or gently brush off the soil using a soft brush.
After cleaning, it’s time to trim the tubers. Remove any damaged or dead parts, as well as any thin or weak growth. Trimming helps promote healthy growth and prevents the spread of diseases. Use clean and sharp gardening shears to make clean cuts.
Next, allow the tubers to dry for a few days in a well-ventilated area. This process, known as curing, helps toughen the skin of the tubers and reduces the risk of rotting during storage. Ensure that the tubers are not exposed to direct sunlight or extreme temperatures during this time.
During the curing process, inspect the tubers for any signs of diseases or pests. Discard any tubers that show signs of rot, mold, or damage. It’s better to be safe than sorry when it comes to storing healthy tubers.
Once the tubers are dry and cured, they are ready to be stored. In the next sections, we will explore various storage methods and discuss the best options for keeping your dahlias safe during the winter months. So let’s continue our journey to successful dahlia storage!
Digging Up Dahlias
When it comes to storing dahlias for winter, digging them up correctly is a crucial step. By following the proper technique, you can ensure the tubers remain undamaged and ready for storage.
Before digging up your dahlias, make sure to water the plants thoroughly a day or two before. Moist soil is easier to work with and reduces the risk of breaking the tubers.
Start by carefully loosening the soil around the dahlia plants using a garden fork or shovel. Insert the tool 6 to 8 inches away from the plants and gently lift the soil, taking care not to damage the tubers. Work your way around the plant in a circle to loosen the entire clump.
Once the soil is loosened, use your hands or a garden fork to lift the clump out of the ground. Be gentle and avoid pulling on the stems or foliage, as they are fragile and can break easily.
Once the clump is lifted, gently shake off any excess soil to remove the loose particles. However, it’s important NOT to wash or rinse the tubers at this stage, as water can promote rotting during the storage process.
After shaking excess soil, it’s time to separate the clump into individual tubers. Carefully remove the tubers from the clump, ensuring that each tuber has an intact crown (the area where the stem attaches).
Inspect each tuber for any signs of damage, disease, or pests. Discard any tubers that show signs of rot, mold, or other issues. It’s important to only store healthy and viable tubers for successful replanting in the spring.
Once the tubers are separated and inspected, set them aside in a cool, dry place to cure for a few days. Curing allows the tubers to develop a protective layer and reduces the risk of rotting during storage.
Now that you’ve successfully dug up your dahlias, it’s time to move on to the next step: preparing the tubers for storage. We will cover this in detail in the upcoming section, so keep reading to learn more!
Cleaning and Trimming Dahlias
After digging up your dahlias, it’s important to clean and trim them before storing for the winter. This process helps prevent the spread of diseases and ensures the tubers remain healthy during the dormant period.
The first step in cleaning dahlias is to gently remove any excess soil clinging to the tubers. You can do this by lightly brushing off the soil using a soft brush or your hands. Avoid washing the tubers with water, as excessive moisture can lead to rotting during storage.
As you clean the tubers, inspect them for any signs of damage, disease, or pests. Remove any damaged or rotting parts, as well as any discolored or mushy areas. A clean and healthy tuber is crucial for a successful storage period.
Once the tubers are clean, it’s time to trim them to promote healthy growth in the next growing season. Start by removing any dead or dried out foliage or stems. Cut them back close to the tuber using clean and sharp gardening shears.
Next, examine the tubers for thin or weak growth. If you notice any small or spindly tubers, it’s best to remove them. These weak tubers are unlikely to produce healthy plants and can drain energy from the larger, more robust ones.
When making cuts, ensure that you make clean and smooth cuts without leaving any jagged edges or rough surfaces. This helps prevent the entry of diseases and pests into the tubers.
After trimming, allow the tubers to dry and cure for a few days. This drying period helps toughen the skin of the tubers and reduces the risk of rotting during storage.
During the drying process, store the tubers in a well-ventilated area away from direct sunlight and extreme temperatures. Make sure there is enough airflow around the tubers to prevent the build-up of moisture.
By cleaning and trimming your dahlias before storage, you create the best conditions for their long-term health and successful growth in future seasons. Now that the tubers are clean and trimmed, let’s move on to the next step: curing the dahlias for storage.
Read more: How To Store Dahlia Tubers
Curing Dahlias
After cleaning and trimming your dahlias, the next step in preparing them for winter storage is the curing process. Curing involves allowing the tubers to dry and develop a protective layer, which helps prevent rotting and extends their storage life.
Once you’ve cleaned and trimmed your dahlias, set them aside in a cool and well-ventilated area to cure. Ideally, a temperature range of 60-70°F (15-21°C) works best for this process. Avoid exposing the tubers to direct sunlight or extreme temperatures, as this can cause damage.
During the curing period, it’s important to periodically check on the tubers. Inspect them for any signs of rotting, mold, or pests. If you notice any issues, remove the affected tubers immediately to prevent further damage.
The curing process generally takes around 1-2 weeks, but this can vary depending on the size and moisture content of the tubers. You’ll know the tubers are properly cured when the skin is dry, firm, and slightly wrinkled.
It’s important to note that during the curing process, the tubers may continue to lose moisture. To prevent excessive drying, you can lightly mist the tubers with water or store them in a container with a layer of slightly damp peat moss or vermiculite.
Once the tubers are fully cured, it’s time to move on to the next step: selecting storage containers. Proper storage containers are essential for maintaining the tubers’ quality and protecting them from external elements. We’ll explore different storage container options in the following sections, so keep reading!
Selecting Storage Containers
Choosing the right storage containers for your dahlias is crucial to ensure their protection and longevity during the winter months. The ideal containers should provide insulation, protection from moisture, and enough space for the tubers to breathe.
When it comes to selecting storage containers, there are several options available. Let’s explore some of the most commonly used containers for dahlia storage:
- Plastic Crates or Bins: Plastic crates or bins with lids are a popular choice for storing dahlias. These containers offer good insulation and protection from moisture. Make sure the containers have ventilation holes or lids that can be partially opened to allow for airflow.
- Metal or Cardboard Boxes: Metal or cardboard boxes can also be used for dahlia storage. Line the boxes with newspaper or perforated plastic bags to help regulate moisture levels. Avoid using boxes that have been previously used for storing chemicals or potentially harmful substances.
- Plastic Ziplock Bags: For smaller quantities of tubers, plastic ziplock bags can be a convenient option. Place the tubers in the bags, squeeze out excess air, and seal them tightly. Avoid overpacking the bags to prevent damage to the tubers.
- Burlap or Mesh Bags: Burlap or mesh bags are breathable options for storing dahlias. These bags allow for better airflow and help prevent the buildup of moisture. However, it’s important to store these bags inside a secondary container to protect the tubers from exposure to light and potential damage.
Regardless of the container you choose, make sure it is clean and free from any contaminants that could harm the tubers. Label the containers with the dahlia variety or any other pertinent information to easily identify them when it’s time to replant.
It’s also worth considering the size of the containers. Ideally, each tuber should have enough space around it to prevent overcrowding and minimize the risk of tubers rubbing against each other and causing damage.
Now that you have selected the appropriate containers, it’s time to move on to the next step: choosing a suitable storage medium. We’ll explore different storage mediums for dahlias in the following sections, so keep reading to learn more!
After the first frost, carefully dig up dahlia tubers, remove excess soil, and let them air dry for a few days. Store them in a cool, dry place in peat moss or vermiculite to prevent rot. Check on them periodically to ensure they are not drying out or becoming too moist.
Storing Dahlias in Peat Moss
Storing dahlias in peat moss is a popular method that provides insulation, moisture control, and protection for the tubers during the winter months. Peat moss helps maintain a stable environment, preventing the tubers from drying out or becoming too damp.
To store dahlias in peat moss, follow these steps:
- Prepare your dahlias for storage by cleaning, trimming, and curing them as outlined earlier.
- Select a clean and dry storage container that is large enough to accommodate your tubers. Plastic crates or bins with lids work well for this purpose.
- Place a layer of slightly damp peat moss at the bottom of the container. The peat moss should be moist but not soaking wet.
- Arrange the cured tubers on top of the peat moss, making sure they are not touching each other.
- Cover the tubers completely with more damp peat moss, ensuring that they are entirely surrounded and insulated.
- Close the lid of the container securely to maintain a stable environment and to prevent excessive moisture loss or entry of external elements.
- Store the container in a cool, dark, and well-ventilated area, such as a basement or garage. Make sure the storage location maintains a temperature of around 45-55°F (7-13°C).
Periodically check on the stored dahlias during the winter to ensure they are in good condition. Be on the lookout for any signs of mold, rot, or pest infestations. If you notice any issues, remove the affected tubers immediately to prevent them from spreading to the others.
Storing dahlias in peat moss provides an excellent environment for the tubers to remain dormant and protected until they are ready to be replanted in the spring. Now that you know how to store dahlias in peat moss, let’s explore other storage options in the upcoming sections!
Storing Dahlias in Vermiculite
Storing dahlias in vermiculite is another effective method that provides insulation, moisture control, and protection for the tubers during the winter months. Vermiculite helps maintain a stable environment, allowing the tubers to stay in optimal condition until it’s time for them to be replanted.
To store dahlias in vermiculite, follow these steps:
- Prepare your dahlias for storage by cleaning, trimming, and curing them as mentioned earlier.
- Select a clean and dry storage container that is large enough to hold your tubers. Plastic crates or bins with lids are suitable options.
- Place a layer of dry vermiculite at the bottom of the container. The vermiculite acts as an insulating layer and helps regulate moisture.
- Arrange the cured tubers on top of the vermiculite, ensuring that they are not touching or overlapping each other.
- Cover the tubers completely with more vermiculite, making sure they are fully surrounded and insulated.
- Close the lid of the container tightly to create a sealed environment and prevent moisture loss or exposure to external elements.
- Store the container in a cool, dark, and well-ventilated area, maintaining a temperature of around 45-55°F (7-13°C).
Throughout the winter, periodically check the stored dahlias to ensure they are in good condition. Watch for signs of mold, rot, or any pest activity. If you come across any issues, promptly remove the affected tubers to prevent further damage to the rest.
Storing dahlias in vermiculite provides an excellent environment for the tubers to remain dormant and protected. When it’s time to replant in the spring, carefully remove the tubers from the vermiculite, making sure to brush off any excess before planting.
Now that you know how to store dahlias in vermiculite, let’s explore other storage options in the upcoming sections!
Read more: How To Store Ferns For The Winter
Storing Dahlias in Sawdust
Storing dahlias in sawdust is another effective method to protect the tubers during the winter months. Sawdust provides insulation, moisture control, and prevents the tubers from drying out or becoming too damp.
To store dahlias in sawdust, follow these steps:
- Prepare your dahlias for storage by cleaning, trimming, and curing them as mentioned earlier.
- Choose a clean and dry storage container that is large enough to accommodate your tubers. Plastic crates or bins with lids are suitable options.
- Place a layer of dry sawdust at the bottom of the container. The sawdust provides insulation and helps regulate moisture levels.
- Arrange the cured tubers on top of the sawdust, making sure they are not touching or overlapping each other.
- Fill the container with more sawdust, ensuring that the tubers are fully covered and insulated.
- Secure the lid of the container tightly to maintain a stable environment and prevent moisture loss or the entry of external elements.
- Store the container in a cool, dark, and well-ventilated area, maintaining a temperature around 45-55°F (7-13°C).
During the winter months, periodically check on the stored dahlias to ensure they are in good condition. Look out for any signs of mold, rot, or pest activity. If any issues arise, promptly remove the affected tubers to prevent them from spreading to others.
Storing dahlias in sawdust creates an ideal environment for the tubers to remain dormant and protected. When it’s time to replant in the spring, gently remove the tubers from the sawdust and shake off any excess before planting them.
Now that you know how to store dahlias in sawdust, let’s explore another storage option in the next section!
Storing Dahlias in Paper Bags
Storing dahlias in paper bags is a simple and cost-effective method that provides insulation and protection for the tubers during the winter months. Paper bags allow for airflow while also preventing excessive moisture buildup, keeping the tubers in optimal condition.
To store dahlias in paper bags, follow these steps:
- Prepare your dahlias for storage by cleaning, trimming, and curing them as outlined earlier.
- Select clean and dry paper bags that are large enough to hold your tubers. Lunch-sized or grocery-sized paper bags work well for this purpose.
- Place a few tubers in each paper bag, making sure they are not touching or overlapping each other.
- Label each bag with the dahlia variety or any other relevant information to easily identify them when it’s time to replant.
- Roll down the top of the bag to seal it, leaving some room for airflow.
- Store the paper bags in a cool, dark, and well-ventilated area, such as a basement or garage. Maintain a temperature of around 45-55°F (7-13°C) to ensure the tubers remain dormant.
Throughout the winter, periodically check on the stored dahlias to ensure they are in good condition. Look for any signs of mold, rot, or pest activity. If any issues arise, promptly remove the affected tubers to prevent further damage.
Storing dahlias in paper bags is a convenient method that allows for easy identification and retrieval of tubers when it’s time to replant in the spring. Once the gardening season begins, carefully remove the tubers from the bags, ensuring to handle them gently and avoiding any damage, and proceed with replanting.
Now that you know how to store dahlias in paper bags, you have another option to consider for the winter storage of your treasured tubers!
Checking on Stored Dahlias
While your dahlias are in winter storage, it’s important to periodically check on them to ensure they remain in good condition. Regular inspections will help you identify any issues such as mold, rot, or pest infestations early on and take necessary actions to prevent further damage.
Here are some steps to follow when checking on your stored dahlias:
- Choose a time every few weeks throughout the winter to inspect your stored dahlias. It’s best to do this during daylight hours when you have good visibility.
- Take each of the storage containers one by one and carefully open them. Check for any signs of mold, rot, or moisture accumulation. Pay close attention to the smell, as a foul odor may indicate rotting.
- Examine each tuber individually, looking for any soft or discolored spots. If you come across any damaged or rotting tubers, remove them from the storage immediately to prevent the spread of disease.
- If you notice any mold growth on the tubers, gently brush it off using a soft brush or cloth. Be careful not to damage the healthy parts of the tubers while doing so.
- Inspect the storage containers themselves for any signs of pests, such as mice or insects. If you find any evidence of infestation, take measures to resolve the issue and ensure the tubers are protected.
- If necessary, adjust the storage environment to prevent any issues. For example, if you notice excessive dryness, you can lightly mist the tubers or add a small amount of moisture to the storage medium.
Regularly checking on stored dahlias allows you to catch any problems early and take appropriate action. By promptly addressing any issues, you maximize the chances of preserving healthy tubers for the upcoming growing season.
Now that you know how to check on stored dahlias, let’s move on to the final section: replanting dahlias in spring.
Replanting Dahlias in Spring
After a long winter of hibernation, it’s finally time to bring your dahlias out of storage and replant them in the spring. Replanting dahlias is an exciting process that allows you to witness the vibrant blooms once again. Here’s a step-by-step guide to help you successfully replant your dahlias:
- Choose the right time: Wait until the danger of frost has passed and the soil temperature reaches around 60°F (15°C) before replanting your dahlias. This typically occurs in late spring.
- Prepare the planting area: Select a location in your garden that receives full sun throughout the day. Dahlias thrive in well-draining soil, so make sure the soil is loose and fertile.
- Prepare the tubers: Before planting, inspect each tuber for any signs of damage or rot. Remove any damaged parts and let the tubers dry briefly to allow their cut surfaces to callus, which helps prevent diseases.
- Dig the planting holes: Dig holes that are at least 6-8 inches deep and wide enough to comfortably accommodate the tubers. Space the holes 1-2 feet apart to allow for proper airflow and growth.
- Plant the tubers: Place each tuber horizontally in the hole, with the eyes facing up. Cover the tuber with soil, ensuring that you leave about 2 inches of the neck exposed above the soil surface.
- Water and mulch: After planting, water the tubers thoroughly to promote proper hydration. Apply a layer of mulch around the plants to help conserve moisture and suppress weed growth.
- Provide support: As your dahlia plants grow, they may require support to prevent them from falling over. Install stakes or cages around the plants at the time of planting or soon after to offer necessary support.
- Water and care: Throughout the growing season, water your dahlias regularly, keeping the soil consistently moist but not waterlogged. Fertilize the plants every few weeks with a balanced fertilizer to promote healthy growth and abundant blooms.
- Monitor and protect: Regularly monitor your dahlia plants for signs of pests or diseases. Treat any issues promptly to minimize damage and ensure the well-being of your plants.
- Enjoy the blooms: With proper care and attention, your dahlias will reward you with stunning blooms and vibrant colors throughout the summer and fall. Take time to appreciate and enjoy the beauty they bring to your garden.
Replanting dahlias in the spring is a rewarding experience that allows you to witness the beauty of these captivating flowers once again. By following these steps and providing the necessary care, you’ll be able to enjoy a flourishing dahlia garden for the entire growing season.
Now that you know how to replant your dahlias, it’s time to get your gardening gloves on and bring those beautiful blooms back to life!
Read more: How To Store Winter Shoes
Conclusion
Storing dahlias for winter is essential to protect these delicate and beautiful flowers from the harsh conditions that can damage or kill them. By following the right techniques and using the proper storage methods, you can ensure the survival and future bloom of your dahlias year after year.
Choosing the right time to store dahlias, preparing them for storage, and selecting the right storage containers are important steps in the process. Whether you choose to store your dahlias in peat moss, vermiculite, sawdust, or paper bags, each method provides insulation and protection for the tubers during the dormant period.
Regular checks on your stored dahlias during the winter will help you spot and address any issues promptly, such as mold, rot, or pest infestations. By taking necessary measures, you can preserve healthy tubers for the upcoming growing season.
When spring arrives, it’s time to replant your dahlias and watch them bloom once again. Properly preparing the planting area, treating the tubers carefully, and providing appropriate care and support throughout the growing season will ensure the health and vibrancy of your dahlias.
Now that you have a comprehensive understanding of how to store dahlias for winter and replant them in spring, you’re well-equipped to enjoy the enduring beauty of these enchanting flowers year after year. So get ready to nurture your dahlias and witness their stunning blooms grace your garden once again!
Frequently Asked Questions about How To Store Dahlias For Winter
Was this page helpful?
At Storables.com, we guarantee accurate and reliable information. Our content, validated by Expert Board Contributors, is crafted following stringent Editorial Policies. We're committed to providing you with well-researched, expert-backed insights for all your informational needs.


0 thoughts on “How To Store Dahlias For Winter”