Articles
How To Store Ethereum Offline
Modified: October 20, 2024
Learn the best practices for storing Ethereum offline and safeguarding your assets. Get expert articles and tips on secure storage methods.
(Many of the links in this article redirect to a specific reviewed product. Your purchase of these products through affiliate links helps to generate commission for Storables.com, at no extra cost. Learn more)
Introduction
Welcome to the world of Ethereum, the groundbreaking blockchain platform that has revolutionized the world of decentralized finance and smart contracts. As the popularity of Ethereum continues to soar, so does the need to prioritize security and protect your digital assets from online threats. One effective way to achieve this is by storing your Ethereum offline.
Offline storage, also known as cold storage, refers to the practice of keeping your cryptocurrency wallets and private keys offline, away from the internet. By doing so, you minimize the risk of your funds being compromised by hackers or malicious software.
In this comprehensive guide, we will explore the benefits of offline storage for Ethereum and take you through the process of setting up and using an offline Ethereum wallet. Whether you’re a seasoned Ethereum investor or just starting your cryptocurrency journey, this article will equip you with the knowledge and tools to safeguard your Ethereum investments.
Key Takeaways:
- Storing Ethereum offline provides enhanced security, privacy, and control over digital assets, protecting against online threats and offering peace of mind for investors.
- Implementing best practices, such as securing wallet backups, using dedicated offline devices, and staying informed about security measures, is crucial for safeguarding Ethereum investments.
Read more: How To Store Ethereum On Usb
Benefits of Offline Storage
Offline storage offers a myriad of advantages when it comes to securing your Ethereum. Let’s delve into some key benefits:
- Protection Against Online Threats: Storing your Ethereum offline ensures that your private keys and wallet information are not vulnerable to online attacks, such as phishing, malware, or hacking attempts. It significantly reduces the risk of unauthorized access to your funds.
- Eliminates the Risk of Online Wallet Compromises: Online wallets are susceptible to security breaches, as they rely on internet connectivity and third-party services. By keeping your Ethereum offline, you eliminate the risk of unauthorized access to your wallet due to vulnerabilities in digital platforms.
- Protection Against Malware and Keyloggers: Malicious software can compromise your online security and capture sensitive information, including your private keys. Offline storage prevents malware and keyloggers from intercepting your keystrokes and gaining access to your Ethereum.
- Added Layer of Privacy: Offline storage enhances privacy by minimizing your online footprint. It helps prevent the tracking of your transactions and wallet activity, as your wallet information is not connected to the internet.
- Protection From Exchange Hacks: Keeping your Ethereum offline ensures that your funds remain secure even if a cryptocurrency exchange suffers a security breach. By having control of your private keys, you are not reliant on the security practices of third-party platforms.
- Peace of Mind: Storing your Ethereum offline provides peace of mind, knowing that your hard-earned digital assets are safeguarded from online threats. It allows you to have better control over your funds and minimizes the risk of losing them due to unforeseen circumstances.
By leveraging offline storage, you can enjoy enhanced security, privacy, and control over your Ethereum investments. In the next sections, we will dive into the different types of Ethereum wallets that support offline storage and guide you through the process of setting up and using them.
Types of Ethereum Wallets
There are several types of Ethereum wallets available, each offering different levels of security and convenience. When it comes to storing Ethereum offline, the following wallet options are recommended:
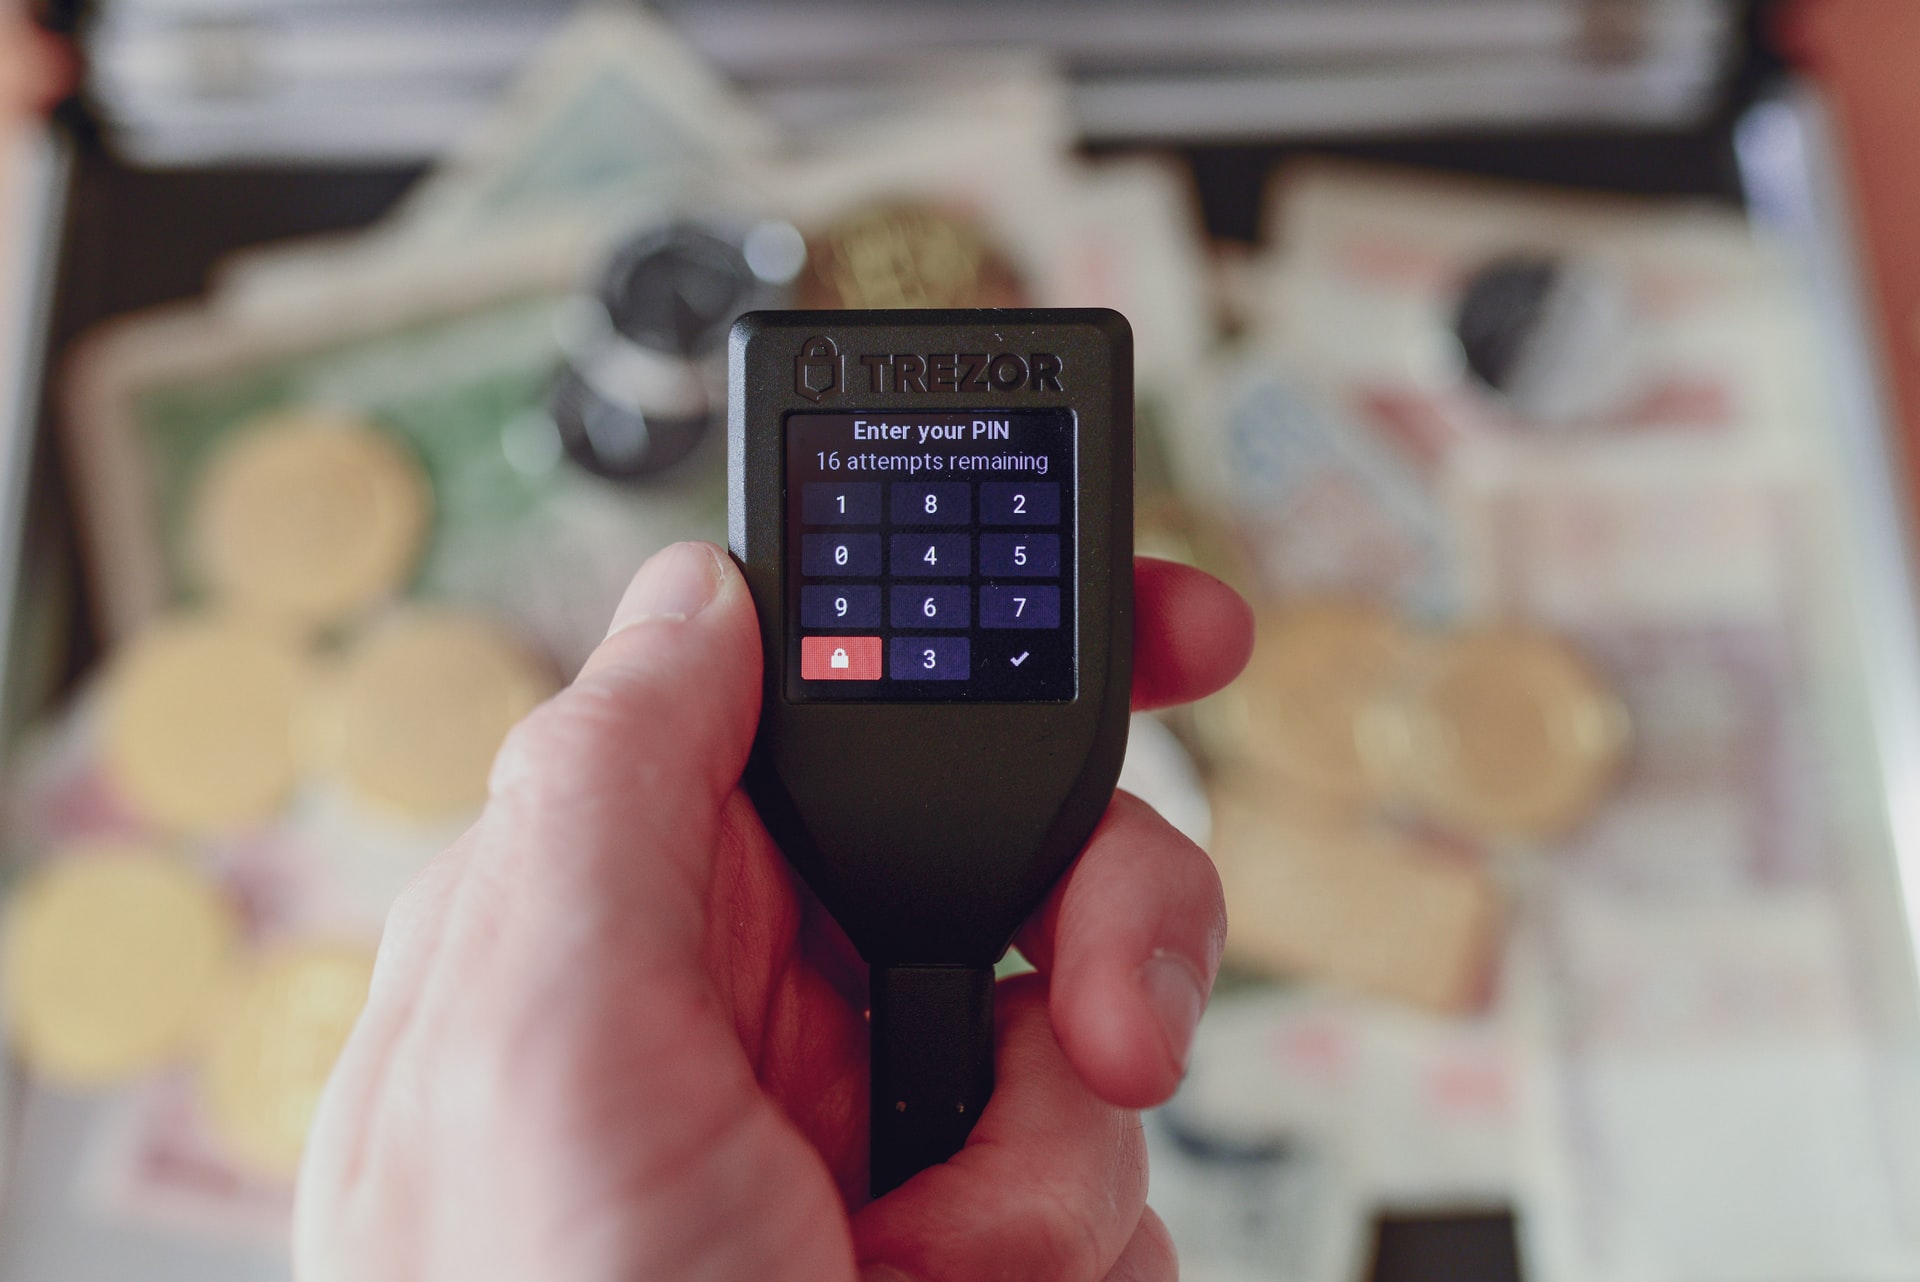
- Hardware Wallets: Hardware wallets are physical devices designed specifically for cryptocurrency storage. They offer the highest level of security for offline storage. These wallets store your private keys offline, making it virtually impossible for hackers to gain access to your funds. Popular options include Ledger Nano S, Trezor, and KeepKey.
- Paper Wallets: Paper wallets provide a low-tech and offline method of storing Ethereum. They consist of a printed copy of your wallet’s public and private keys. Paper wallets are stored offline, typically as a physical printout or written down on paper. While paper wallets can be a secure option, they require careful handling to avoid loss, damage, or unauthorized access.
- Offline Software Wallets: Offline software wallets are wallets installed on an air-gapped computer, disconnected from the internet. These wallets generate and store your private keys offline, ensuring enhanced security. Popular options include MyEtherWallet (MEW) and Electrum.
When choosing an offline Ethereum wallet, it is crucial to consider factors such as security features, ease of use, and compatibility with your device. Hardware wallets are generally recommended for long-term storage due to their robust security features, while paper wallets and offline software wallets provide viable options for those seeking a more budget-friendly solution.
In the next section, we will walk you through the step-by-step process of setting up an offline Ethereum wallet using a hardware wallet as an example.
Setting Up an Offline Ethereum Wallet
To set up an offline Ethereum wallet, follow these steps:
- Installing the Required Software: If you’re using a hardware wallet, ensure that you have the necessary software installed on your computer or mobile device. Visit the manufacturer’s website and download the official wallet app or browser extension.
- Generating a New Wallet Address: Connect your hardware wallet to your computer or mobile device. Follow the instructions provided by the wallet manufacturer to create a new wallet address. This process typically involves setting a PIN and passphrase for added security.
- Creating and Saving the Wallet Backup: As part of the wallet setup process, you will be prompted to create a wallet backup. This backup is crucial and serves as a failsafe in case your hardware wallet is lost or damaged. Follow the instructions provided by the wallet manufacturer to generate and securely store the backup, which may be in the form of a recovery phrase or a backup file.
- Importing the Wallet to an Offline Device: To ensure offline storage, transfer the wallet backup to an air-gapped computer or an offline device. This can be a separate computer that has never been connected to the internet or a computer with its Wi-Fi and network disconnected. Use a secure method such as a USB drive to move the backup file or write down the recovery phrase on paper for a paper wallet.
- Sending and Receiving Ethereum Offline: To send Ethereum from your offline wallet, connect the hardware wallet to an online device with the wallet software installed. Follow the instructions provided by the wallet manufacturer to initiate a transaction. Once the transaction is completed, disconnect the hardware wallet from the online device and return it to the offline environment.
It’s important to note that the specific steps and process may vary depending on the type of offline wallet you are using. Always follow the instructions provided by the wallet manufacturer to ensure proper setup and secure storage of your Ethereum.
In the next section, we will discuss best practices to consider when utilizing offline storage for Ethereum.
Installing the Required Software
Before you can set up an offline Ethereum wallet, you need to install the necessary software on your computer or mobile device. The required software will vary depending on the type of wallet you choose, such as a hardware wallet or an offline software wallet. Here is a general overview of the installation process:
- Research and Choose a Wallet: Determine which type of wallet suits your needs best. If you opt for a hardware wallet, visit the manufacturer’s website and choose the model that you prefer. For offline software wallets, research and select a trusted wallet provider.
- Check System Requirements: Before downloading the software, ensure that your computer or mobile device meets the system requirements. This information is usually provided on the wallet manufacturer’s website.
- Download the Wallet Software: Visit the official website of the wallet manufacturer and navigate to the download section. Choose the appropriate version for your operating system (Windows, Mac, Linux) or mobile platform (iOS, Android).
- Follow the Installation Instructions: Once the software is downloaded, follow the installation instructions provided by the wallet manufacturer. This typically involves running the installer file and agreeing to the terms and conditions.
- Set Up the Wallet: After the software is installed, launch the wallet application. Depending on the type of wallet, you may need to create a new wallet or import an existing one. Follow the on-screen instructions to complete the setup process, including setting a secure password or PIN.
- Connect Your Hardware Wallet (If Applicable): If you are using a hardware wallet, connect it to your computer or mobile device using the provided USB cable. Make sure the wallet is properly powered on and follow any additional instructions provided by the manufacturer.
It’s important to ensure you download the wallet software from the official source to avoid any potential for malware or scams. Always double-check the website URL and verify the authenticity before downloading any software.
Once the required software is installed, you can proceed with generating a new wallet address or importing an existing one, as described in the next section.
Read more: How To Store Bitcoin Offline
Generating a New Wallet Address
Generating a new wallet address is a crucial step in setting up an offline Ethereum wallet. Whether you’re using a hardware wallet or an offline software wallet, the process is generally straightforward. Follow these steps to generate a new wallet address:
- Connect Your Hardware Wallet (If Applicable): If you’re using a hardware wallet, connect it to your computer or mobile device using the provided USB cable. Ensure that the wallet is properly powered on.
- Launch the Wallet Application: Open the wallet application on your device. If you’re using a hardware wallet, the application should automatically detect and connect to the device. For offline software wallets, ensure that the application is running smoothly on your air-gapped device.
- Create a New Wallet: In the wallet application, look for an option to create a new wallet. This is typically found in the settings or account section. Click on the “Create New Wallet” or similar button to commence the process.
- Set a Secure Password or PIN: As part of the new wallet creation, you will be prompted to set a secure password or PIN. Choose a strong and unique password that is difficult to guess. If using a hardware wallet, set the PIN according to the manufacturer’s guidelines. This password or PIN will be required to access your wallet and perform transactions.
- Follow the On-Screen Instructions: The wallet application will guide you through the process of generating a new wallet address. This usually involves randomizing and generating a new set of private and public keys. These keys are the cryptographic foundation of your wallet and enable you to send and receive Ethereum.
- Confirm and Save the Wallet Address: Once the wallet address is generated, review the details carefully to ensure accuracy. It is advisable to double-check the characters or use a QR code scanner to verify the address. Save the wallet address in a secure location, such as a password-protected document or a physical copy stored in a safe place.
Remember to never share your private keys or wallet address with anyone. These are sensitive pieces of information that grant access to your Ethereum funds. By following these steps, you will have successfully generated a new wallet address for your offline Ethereum wallet.
In the next section, we will discuss the importance of creating and saving a wallet backup.
Consider using a hardware wallet, such as Ledger or Trezor, to store your Ethereum offline. These devices keep your private keys offline, providing an extra layer of security against online threats.
Creating and Saving the Wallet Backup
Creating a backup of your Ethereum wallet is an essential step in securing your funds. In the event of a lost or damaged wallet, a backup ensures that you can recover your wallet and access your Ethereum. Here’s how to create and save a wallet backup for your offline Ethereum wallet:
- Follow Wallet Manufacturer’s Instructions: Depending on the type of wallet you’re using, follow the instructions provided by the manufacturer on how to create a wallet backup. This may involve generating a recovery phrase or backing up a wallet file.
- Recovery Phrase: If your wallet uses a recovery phrase (also known as a seed phrase or mnemonic phrase), the wallet application will generate a set of words (usually between 12 to 24). Write down each word in the exact order presented by the application. Make sure to write legibly and keep the backup in a safe and secure place, away from prying eyes or potential hazards.
- Wallet File: In some cases, the wallet software may generate a wallet file that contains the necessary private key information. This file should be saved securely on an external storage device, such as a USB drive or an encrypted cloud storage service. Ensure the file is encrypted and password-protected to enhance security.
- Multiple Copies: It’s recommended to create multiple copies of your wallet backup and store them in separate locations. This serves as a safeguard against unforeseen events, such as fire, theft, or damage to a single backup. Keep in mind, however, that each copy of the backup should be stored securely to prevent unauthorized access.
- Test the Backup: After creating the wallet backup, it’s crucial to test the recovery process. Follow the wallet manufacturer’s guidelines on how to restore your wallet using the backup. By doing so, you can ensure that the backup is functional and that you can successfully access your Ethereum funds if needed.
Remember, your wallet backup is as important as the wallet itself. Losing access to your backup could mean permanently losing your Ethereum funds. Take the necessary precautions to store your backup securely and treat it with the same level of care as you would with physical cash or valuable possessions.
In the next section, we will discuss how to import your wallet to an offline device for enhanced security.
Importing the Wallet to an Offline Device
Importing your Ethereum wallet to an offline device is a crucial step in achieving enhanced security for your digital assets. By transferring your wallet to an air-gapped computer or an offline device, you minimize the risk of online threats and unauthorized access. Here’s how to import your wallet to an offline device:
- Prepare Your Offline Device: Ensure that your offline device is set up and ready for use. This can be an air-gapped computer that has never been connected to the internet or a device with all Wi-Fi and network connections disabled. Keeping your offline device secure is vital to maintain the integrity of your wallet.
- Access the Wallet Backup: Locate the wallet backup you created in the previous steps. If you used a recovery phrase, have it readily available. If it’s a wallet file, transfer it to a secure storage medium, such as a USB drive.
- Install Wallet Software on the Offline Device: On your offline device, install the wallet software associated with your wallet type. Follow the installation instructions provided by the wallet manufacturer. Ensure that the software is obtained from a trusted source.
- Import the Wallet: Launch the wallet software on your offline device and look for the option to import or restore a wallet. Depending on the software, this may be labeled as “Import Wallet” or “Restore Wallet.” Follow the on-screen instructions and select the appropriate method based on your backup type (recovery phrase or wallet file).
- Enter the Backup Details: Provide the necessary backup details as prompted by the wallet software. If using a recovery phrase, enter the words in the correct sequence. If importing a wallet file, browse and select the file from the secure storage medium.
- Complete the Import Process: Follow the remaining steps outlined by the wallet software to complete the import process. This may involve setting a new password or PIN for your wallet on the offline device. Ensure you choose strong and secure credentials.
- Ensure no Online Connectivity: Double-check that your offline device remains disconnected from the internet throughout the wallet import process. This ensures the isolation and security of your wallet.
By importing your wallet to an offline device, you maintain full control and privacy over your Ethereum funds. It is important to keep your offline device secure, physically and digitally, to prevent any potential breaches.
In the next section, we will discuss how to send and receive Ethereum while using your offline wallet.
Sending and Receiving Ethereum Offline
Utilizing an offline Ethereum wallet doesn’t mean you can’t send or receive Ethereum transactions. While offline, you can prepare and sign transactions on your offline device, then transfer them to an online device to broadcast the transaction to the Ethereum network. Here’s how you can send and receive Ethereum offline:
- Prepare the Offline Transaction: On your offline device, open your wallet software and navigate to the transaction section. Select the option to send Ethereum and fill in the required transaction details, such as the recipient’s Ethereum address and the amount to be sent. Review the transaction details to ensure accuracy.
- Sign the Transaction: Once the transaction details are entered, the wallet software will generate a raw unsigned transaction. Follow the instructions provided by the software to sign the transaction using your private key. This process ensures that only you, as the wallet holder, can authorize the transaction.
- Transfer the Signed Transaction: Now, you need to transfer the signed transaction from your offline device to an online device for broadcasting. This can be done by using a USB drive or any other secure method to transfer the file or transaction data. Ensure that the file or data is securely transferred without being tampered with.
- Broadcast the Transaction: On your online device, navigate to an online Ethereum wallet or a compatible Ethereum client. Import the signed transaction data or file that you transferred from your offline device. Follow the instructions provided by the wallet or client to broadcast the transaction to the Ethereum network.
- Confirm the Transaction: Once the transaction is broadcasted, it will be included in the Ethereum network’s blockchain and eventually confirmed by miners. You can track the progress of your transaction using an Ethereum blockchain explorer or the wallet software.
- Receive Ethereum Offline: To receive Ethereum while using an offline wallet, you can simply provide your Ethereum address to the sender. Your Ethereum address is an identifier unique to your wallet, allowing others to send Ethereum to you. Display or share your Ethereum address via QR code or by providing the alphanumeric string.
- Check Transaction History: Periodically, you may want to check your transaction history to ensure that any incoming or outgoing transactions have been successfully processed. You can do this by using an Ethereum blockchain explorer or the wallet software.
By following these steps, you can securely send and receive Ethereum transactions even while keeping your wallet offline. Always double-check the transaction details and ensure the signed transaction is securely transferred to an online device for broadcasting.
In the next section, we will discuss some best practices to consider for offline storage of Ethereum.
Read more: How To Fix Printer That Is Offline
Best Practices for Offline Storage
When it comes to offline storage of Ethereum, implementing best practices is crucial to ensure the security and integrity of your digital assets. Consider the following recommendations to enhance your offline storage practices:
- Keep Your Wallet Backup Secure: Store multiple copies of your wallet backup in separate secure locations. Use encrypted storage mediums, such as USB drives or password-protected cloud storage.
- Use Dedicated Offline Devices: Consider using dedicated devices for offline storage and transactions to minimize the risk of exposure to online threats. Air-gapped computers or devices without internet connectivity are ideal for this purpose.
- Regularly Update Wallet Software: Stay up to date with the latest wallet software releases. Regular updates often include security patches and enhancements to protect against emerging threats.
- Periodically Test Your Backup: Ensure that your wallet backup is functional by periodically restoring it on a separate device. This helps confirm that you can recover your wallet and access your Ethereum funds if necessary.
- Disable Automatic Updates: Disable automatic updates on your offline device to prevent potential security risks or compatibility issues that could arise from unintentional updates.
- Enable Extra Security Layers: If your wallet software offers additional security features, such as two-factor authentication or multi-signature capabilities, enable them to add an extra layer of protection to your transactions.
- Use Strong Passwords or PINs: Set strong and unique passwords or PINs for your wallet software and hardware wallets. Avoid using easily guessable information and consider using a password manager to securely store your credentials.
- Be Wary of Phishing Attempts: Protect yourself from phishing attacks by being cautious of unsolicited emails, messages, or websites that request your wallet information. Always double-check URLs and only interact with official wallet platforms.
- Regularly Update Your Knowledge: Stay informed about the latest security practices and developments in the Ethereum community. Subscribe to reputable cryptocurrency news sources and follow trusted security experts in the field.
- Consider Hardware Wallets: Hardware wallets offer robust security for offline storage. Consider investing in a reputable hardware wallet to further protect your Ethereum and streamline the offline storage process.
By adhering to these best practices, you can significantly reduce the risk of unauthorized access or loss of your Ethereum funds. Remember, offline storage requires careful handling and ongoing diligence to ensure the safety of your digital assets.
Now armed with the knowledge of offline storage and best practices, you can confidently protect and manage your Ethereum investments.
Disclaimer: The information provided in this article is for educational purposes only and should not be considered financial or investment advice. Please conduct your own research and consult with a professional financial advisor before making any investment decisions.
Conclusion
Congratulations! You have reached the end of this comprehensive guide on storing Ethereum offline. By understanding the benefits of offline storage and following the recommended practices, you are taking proactive steps to protect your digital assets from online threats.
We discussed the various types of Ethereum wallets suitable for offline storage, including hardware wallets, paper wallets, and offline software wallets. Each option comes with its own advantages and considerations, so choose the one that aligns with your needs and preferences.
Setting up an offline Ethereum wallet involves installing the required software, generating a new wallet address, and creating a backup of your wallet. Importing the wallet to an offline device and securely sending and receiving Ethereum transactions offline form an essential part of the process.
Remember to implement best practices for offline storage, such as keeping your wallet backup secure, regularly updating wallet software, using strong passwords or PINs, and staying informed about the latest security practices in the Ethereum community. These practices will help ensure the safety and integrity of your Ethereum funds.
Offline storage provides an added layer of protection, giving you peace of mind and control over your digital assets. However, always stay vigilant and be cautious of potential phishing attempts or malicious activities. Remain informed and educated about emerging threats in the cryptocurrency space to stay one step ahead of potential risks.
Thank you for taking the time to learn about offline storage for Ethereum. By prioritizing security and following the best practices outlined in this guide, you are well-equipped to protect and manage your Ethereum investments effectively.
Remember, the cryptocurrency market is constantly evolving, and so are the associated security risks. Stay informed, adapt your security measures accordingly, and continue to prioritize the protection of your Ethereum assets.
Disclaimer: The information provided in this article is for educational purposes only and should not be considered financial or investment advice. Please conduct your own research and consult with a professional financial advisor before making any investment decisions.
Frequently Asked Questions about How To Store Ethereum Offline
Was this page helpful?
At Storables.com, we guarantee accurate and reliable information. Our content, validated by Expert Board Contributors, is crafted following stringent Editorial Policies. We're committed to providing you with well-researched, expert-backed insights for all your informational needs.


0 thoughts on “How To Store Ethereum Offline”