
Articles
How To Store Homemade Sauerkraut
Modified: February 28, 2024
Looking for tips on how to store homemade sauerkraut? Check out our informative articles for expert advice and techniques. Ensure your sauerkraut stays fresh and delicious!
(Many of the links in this article redirect to a specific reviewed product. Your purchase of these products through affiliate links helps to generate commission for Storables.com, at no extra cost. Learn more)
Introduction
Welcome to the world of homemade sauerkraut! If you’re a fan of this tangy and nutritious fermented cabbage dish, you’ll be thrilled to learn how to make it at home. Not only is homemade sauerkraut delicious, but it also offers a wide range of health benefits. Making your own sauerkraut allows you to control the ingredients and flavors, ensuring a fresh and satisfying outcome.
Sauerkraut, which means “sour cabbage” in German, is created through the process of lacto-fermentation. During this natural fermentation process, bacteria convert the vegetable sugars into lactic acid, giving sauerkraut its distinct sour taste. This fermentation process not only enhances the flavor but also preserves the cabbage, creating a nutrient-rich food.
In addition to its unique flavor and texture, homemade sauerkraut is also packed with nutrients. It is an excellent source of dietary fiber, vitamin C, and vitamin K. It also contains beneficial bacteria called probiotics, which support gut health and strengthen the immune system. Incorporating sauerkraut into your diet may also improve digestion, aid in weight loss, and promote overall wellbeing.
Now that you understand the benefits of homemade sauerkraut, let’s delve into the ingredients and equipment needed to get started with your own delicious batch.
Key Takeaways:
- Homemade sauerkraut is a versatile and probiotic-rich condiment that offers numerous health benefits, from supporting gut health to boosting immunity. With the right ingredients and storage methods, you can enjoy its tangy flavor and nutritional value for months to come.
- Storing homemade sauerkraut in airtight containers, canning jars, or fermentation crocks in a cool, dark place ensures its freshness and flavor. Whether enjoyed in classic dishes or innovative recipes, sauerkraut adds a delightful twist to culinary creations.
Read more: How To Store Sauerkraut
Benefits of Homemade Sauerkraut
Homemade sauerkraut not only tantalizes your taste buds but also provides numerous health benefits. Here are some of the key advantages of incorporating this fermented cabbage dish into your diet:
- Rich in Probiotics: Sauerkraut is a natural source of probiotics, which are beneficial bacteria that support a healthy gut. These probiotics help maintain a balanced intestinal flora, improve digestion, and enhance nutrient absorption.
- Gut Health: The probiotics found in sauerkraut can help promote a healthy gut microbiome. A healthy gut is essential for proper digestion, nutrient absorption, and a strong immune system. Adding homemade sauerkraut to your meals can aid in alleviating digestive issues like bloating, gas, and constipation.
- Boosted Immunity: The fermentation process involved in making sauerkraut produces natural compounds, such as organic acids and antioxidants, that can enhance the immune system. Probiotics found in sauerkraut have also been shown to improve immune function, reducing the risk of infections and supporting overall health.
- Improved Digestion: Sauerkraut is rich in fiber, which aids in digestion and contributes to a healthy digestive system. The fiber content promotes regular bowel movements, prevents constipation, and supports the growth of beneficial gut bacteria.
- Weight Management: Sauerkraut is a low-calorie food that can be a valuable addition to a weight management plan. Its high fiber content helps you feel fuller for longer, reducing overall calorie intake. Additionally, the fermentation process increases the bioavailability of nutrients, making them easier for the body to absorb and utilize.
- Heart Health: Regular consumption of sauerkraut may have a positive impact on heart health. The probiotics and fiber in sauerkraut can help reduce cholesterol levels, lower blood pressure, and improve overall cardiovascular function.
- Cancer Prevention: Some studies suggest that the compounds produced during sauerkraut fermentation, such as isothiocyanates, may have anticancer properties. These compounds have been linked to a lower risk of certain types of cancer, including colon, breast, and lung cancer.
These are just a few of the many benefits that homemade sauerkraut can offer. With its combination of tangy flavor and powerful nutritional profile, sauerkraut is a versatile and valuable addition to a healthy diet.
Ingredients for Homemade Sauerkraut
To create your own delicious batch of homemade sauerkraut, you’ll need just a few simple ingredients. The primary ingredient, of course, is fresh cabbage. Here’s a list of the key ingredients you’ll need:
- Fresh Cabbage: Choose firm and crisp heads of cabbage for the best results. Green cabbage is commonly used, but you can also experiment with red cabbage or a combination of both for a vibrant sauerkraut.
- Canning or Kosher Salt: It’s important to use the right kind of salt to ensure proper fermentation. Canning or kosher salt without any additives is recommended. Avoid table salt, as it often contains anti-caking agents that can interfere with the fermentation process.
- Optional Flavorings: While sauerkraut tastes fantastic with just cabbage and salt, you can add extra flavors to customize your batch. Some popular options include caraway seeds, juniper berries, garlic, pepper, dill, or even shredded carrots and apples. Get creative and experiment with different flavor combinations.
That’s it! With just cabbage, salt, and some optional flavorings, you can create your own homemade sauerkraut. Remember to use fresh and high-quality ingredients to ensure the best results. Now that you have your ingredients ready, let’s move on to the equipment needed to get started with the fermentation process.
Equipment Needed
Before diving into the process of making homemade sauerkraut, it’s essential to gather the necessary equipment. Fortunately, you don’t need any fancy or specialized tools to get started. Here’s a list of the equipment you’ll need:
- Fermentation Vessel: You’ll need a suitable container to ferment your sauerkraut. Options include glass jars, ceramic crocks, or food-grade plastic containers. Make sure the vessel you choose is clean and has enough space to hold your cabbage.
- Knife or Mandoline: A sharp knife or mandoline will come in handy for slicing the cabbage into thin, uniform strips. This will ensure even fermentation and a pleasing texture in your sauerkraut. If using a knife, make sure it’s sharp to avoid bruising or crushing the cabbage.
- Bowl or Large Mixing Container: Use a large bowl or container to hold the cabbage as you season and mix it with salt. Aim for a container that provides enough space for easy mixing and allows the salt to distribute evenly.
- Weights or Fermentation Stones: To ensure proper fermentation, you’ll need something to weigh down the cabbage and keep it submerged in its own liquid. Ceramic fermentation weights or food-safe fermentation stones work best for this purpose. Alternatively, you can use clean, sanitized heavy jars or even clean river stones.
- Cloth or Airlock: During the fermentation process, it’s important to cover the vessel to prevent debris and insects from entering while still allowing gases to escape. You can use a clean cloth secured with a rubber band or opt for a specialized fermentation lid with an airlock to maintain a controlled environment.
- Cutting Board: Use a clean cutting board to slice the cabbage and prepare any additional flavorings.
- Fermentation Labels: While not essential, using fermentation labels can help you keep track of the start date and any custom flavorings you’ve added. This will come in handy during the fermentation and storage processes.
With these equipment essentials, you’re well-prepared to embark on your homemade sauerkraut-making journey. Now that all the elements are in place, let’s move on to the step-by-step guide for creating your delicious sauerkraut.
Step-by-Step Guide to Making Sauerkraut
Making your own sauerkraut at home is a straightforward and rewarding process. Follow these steps to create a batch of tangy and flavorful sauerkraut:
- Prepare the Cabbage: Remove any outer leaves from the cabbage and set them aside. Cut the cabbage into quarters and remove the core. Use a knife or mandoline to slice the cabbage into thin, uniform shreds.
- Add Salt: Transfer the shredded cabbage to a large bowl or mixing container. Sprinkle the salt over the cabbage, using approximately 1 to 2 tablespoons of salt per medium-sized head of cabbage. The salt helps draw out moisture from the cabbage and inhibits the growth of harmful bacteria.
- Massage and Mix: With clean hands, begin massaging the cabbage and salt mixture. Squeeze and knead the cabbage to break down its cellular structure and release its natural juices. Continue to massage for about 5 to 10 minutes, or until the cabbage becomes softer and releases more liquid.
- Add Optional Flavorings: If desired, add any optional flavorings, such as caraway seeds, garlic, or other spices, to the cabbage mixture. Fold in the flavorings and mix well so they are evenly distributed throughout.
- Pack the Cabbage: Transfer the cabbage mixture to your fermentation vessel. Pack the cabbage tightly, ensuring there are no air pockets. Use clean hands or a tamper to press down on the cabbage to help release more liquid.
- Add Cabbage Leaves: Take the reserved outer cabbage leaves and place them on top of the packed cabbage. These leaves will help keep the shredded cabbage submerged in its own brine during fermentation.
- Weigh It Down: Place fermentation weights, fermentation stones, or sanitized heavy jars on top of the cabbage leaves to weigh them down and keep the cabbage submerged. This is crucial to prevent exposure to air and promote proper fermentation.
- Secure Covering: Cover the fermentation vessel with a clean cloth or a specialized fermentation lid with an airlock. Make sure the cloth is secure and allows gases to escape while preventing debris or insects from entering.
- Fermentation Process: Place the fermentation vessel in a cool, dark spot away from direct sunlight. The ideal temperature for sauerkraut fermentation is around 65-70°F (18-21°C). Let the sauerkraut ferment for at least 1 to 4 weeks, depending on your desired taste. Check on it periodically, ensuring the cabbage stays submerged in brine.
- Taste and Adjust: After the fermentation period, remove the weights and cabbage leaves. Taste the sauerkraut to determine if it has reached your preferred level of tanginess. If it needs more fermentation, cover it again and let it continue fermenting until it reaches the desired flavor.
- Store and Enjoy: Once fermented to your liking, transfer your sauerkraut to clean, airtight jars or containers. Store it in the refrigerator or follow specific storage instructions for long-term storage. Enjoy your homemade sauerkraut as a condiment, side dish, or ingredient in various recipes.
Now that you’ve successfully created your own sauerkraut, it’s time to explore different storage options to keep it fresh and flavorful for longer periods of time.
Read more: How To Store Sauerkraut After Opening
Preparing the Cabbage
The first step in making homemade sauerkraut is to properly prepare the cabbage. Follow these steps to ensure your cabbage is ready for fermentation:
- Select Fresh Cabbage: Choose firm and crisp heads of cabbage. Look for vibrant green or purple leaves without any signs of wilting or discoloration. Fresh cabbage will yield the best results in terms of taste and texture.
- Remove Outer Leaves: Start by removing any damaged or wilted outer leaves from the cabbage. These leaves can be discarded or saved for other culinary uses.
- Quarter the Cabbage: Using a sharp knife, carefully cut the cabbage into quarters. This will make it easier to remove the tough core and shred the cabbage into smaller pieces.
- Remove the Core: Cut out the tough core from each cabbage quarter. By removing the core, you will get rid of any unwanted bitterness and create space for easier shredding.
- Thinly Slice the Cabbage: With a knife or mandoline, slice the cabbage quarters into thin, uniform shreds. Aim for a thickness of about 1/8 to 1/4 inch (3 to 6 mm). Thin, consistent slices will ferment more evenly and result in a better texture in the finished sauerkraut.
- Rinse (optional): Some people prefer to rinse the shredded cabbage under cold water to remove excess dirt or debris. However, this step is optional, as rinsing can also wash away some of the natural bacteria present on the cabbage leaves, which aid in the fermentation process.
Once the cabbage is properly prepared, you can move on to the next step of adding salt and initiating the fermentation process. Remember to use clean hands, utensils, and equipment throughout the process to maintain a hygienic environment for fermentation. Now that you’ve prepared the cabbage, let’s add the salt and begin the transformation into delicious sauerkraut!
Adding the Salt
Once the cabbage is shredded and ready, the next crucial step in making homemade sauerkraut is to add the right amount of salt. Salt acts as a natural preservative and plays a vital role in the fermentation process by drawing out moisture from the cabbage and creating an environment conducive to beneficial bacteria growth. Follow these steps to ensure the proper salt-to-cabbage ratio:
- Choose the Right Salt: It’s important to choose the right salt for sauerkraut. Opt for canning or kosher salt, which is free from additives. Avoid table salt, as it often contains anti-caking agents that can interfere with the fermentation process.
- Measure the Salt: The general rule of thumb is to use approximately 1 to 2 tablespoons of salt per medium-sized head of cabbage. This salt-to-cabbage ratio ensures proper fermentation and flavor development. Adjust the amount of salt based on the size of your batch, keeping in mind that it’s better to slightly underestimate than overestimate the salt quantity.
- Transfer the Shredded Cabbage: Transfer the shredded cabbage to a large bowl or mixing container. Ensure that the container is clean and free of any residue that could affect the fermentation process.
- Add the Salt: Sprinkle the measured salt evenly over the cabbage. It’s important to distribute the salt as evenly as possible to ensure consistent flavor and fermentation. Avoid adding all the salt in one spot to prevent uneven distribution.
- Massage the Cabbage: Begin massaging the cabbage and salt mixture with clean hands. Squeeze and knead the cabbage, stimulating it to release its natural juices and mix with the salt. Massage for approximately 5 to 10 minutes, or until the cabbage softens slightly and releases enough liquid to cover itself.
- Moisture Level: The salt will draw out moisture from the cabbage, creating a brine that promotes fermentation. The cabbage should be moist and covered in the brine generated from its own juices. If the cabbage is not generating enough liquid to submerge itself, continue massaging until enough brine is produced.
Adding the salt is a crucial step that kickstarts the fermentation process in homemade sauerkraut. Once the cabbage has been mixed thoroughly with salt, it’s time to move on to the next stage: the fermentation process. We’ll delve into the fermentation process and the various storage options for homemade sauerkraut in the following sections.
Fermentation Process
After you’ve added the salt to the shredded cabbage, it’s time to let the fermentation process work its magic. Fermentation is a natural and transformative process where beneficial bacteria, primarily lactobacilli, break down the sugars in the cabbage and produce lactic acid. This lactic acid gives sauerkraut its tangy flavor and acts as a natural preservative. Follow these steps to ensure a successful fermentation process for your homemade sauerkraut:
- Pack the Cabbage: Transfer the salted cabbage into a fermentation vessel, such as a glass jar, ceramic crock, or food-grade plastic container. Pack the cabbage tightly, pressing it down to remove any air pockets. The cabbage should be fully submerged in its own brine to create an anaerobic (oxygen-free) environment that promotes fermentation.
- Add the Cabbage Leaves: Take a few of the reserved outer cabbage leaves and place them on top of the packed cabbage. These leaves act as a layer to keep the shredded cabbage submerged in the brine, preventing contact with air, which can lead to spoilage. Make sure the cabbage leaves cover the surface of the packed cabbage completely.
- Weight It Down: Place fermentation weights, fermentation stones, or sanitized heavy jars on top of the cabbage leaves to weigh them down and ensure the cabbage remains submerged in brine. The pressure from the weights helps create an anaerobic environment and prevents the growth of unwanted bacteria or mold.
- Cover the Vessel: Cover the fermentation vessel with a clean cloth or a specialized fermentation lid equipped with an airlock. If using a cloth, secure it with a rubber band to keep pests and debris out while allowing gases, produced during fermentation, to escape.
- Select a Fermentation Spot: Place the fermentation vessel in a cool, dark location with a temperature ranging from 65-70°F (18-21°C). Avoid direct sunlight, as it can heat up the container and negatively impact the fermentation process. A cool spot away from the hustle and bustle of the kitchen is ideal.
- Patience is Key: Let the sauerkraut ferment for at least 1 to 4 weeks, depending on your desired taste and texture. During this time, the fermentation process will develop the tangy flavors and transforming the cabbage into sauerkraut. Check on the sauerkraut periodically to ensure the cabbage remains submerged and no mold or scum has formed on the surface.
- Fermentation Duration: The fermentation duration may vary based on various factors, including the ambient temperature, desired tartness, and personal preference. Taste the sauerkraut periodically to determine when it has reached your preferred level of tanginess. Some people prefer a shorter fermentation time for a milder flavor, while others enjoy a longer fermentation for a more intense tang.
- Skim off Mold: Occasionally, a thin layer of harmless white mold, known as Kahm yeast, may form on the surface of the brine. If you notice this, carefully skim it off using a clean utensil. It’s important to distinguish Kahm yeast from harmful mold, which would have a distinctive odor and appearance. If in doubt, discard the sauerkraut.
- Enjoy the Results: Once the sauerkraut has fermented to your liking, remove the weights and cabbage leaves. Transfer the sauerkraut to clean, airtight jars or containers and store it in the refrigerator or follow specific storage instructions for long-term storage. Sauerkraut improves in flavor over time, so you can continue to enjoy it for several months.
By following these fermentation steps, you’ll be able to create delicious homemade sauerkraut that is rich in probiotics and bursting with tangy flavors. Now that your sauerkraut is ready, let’s explore different storage options to maintain its freshness and quality.
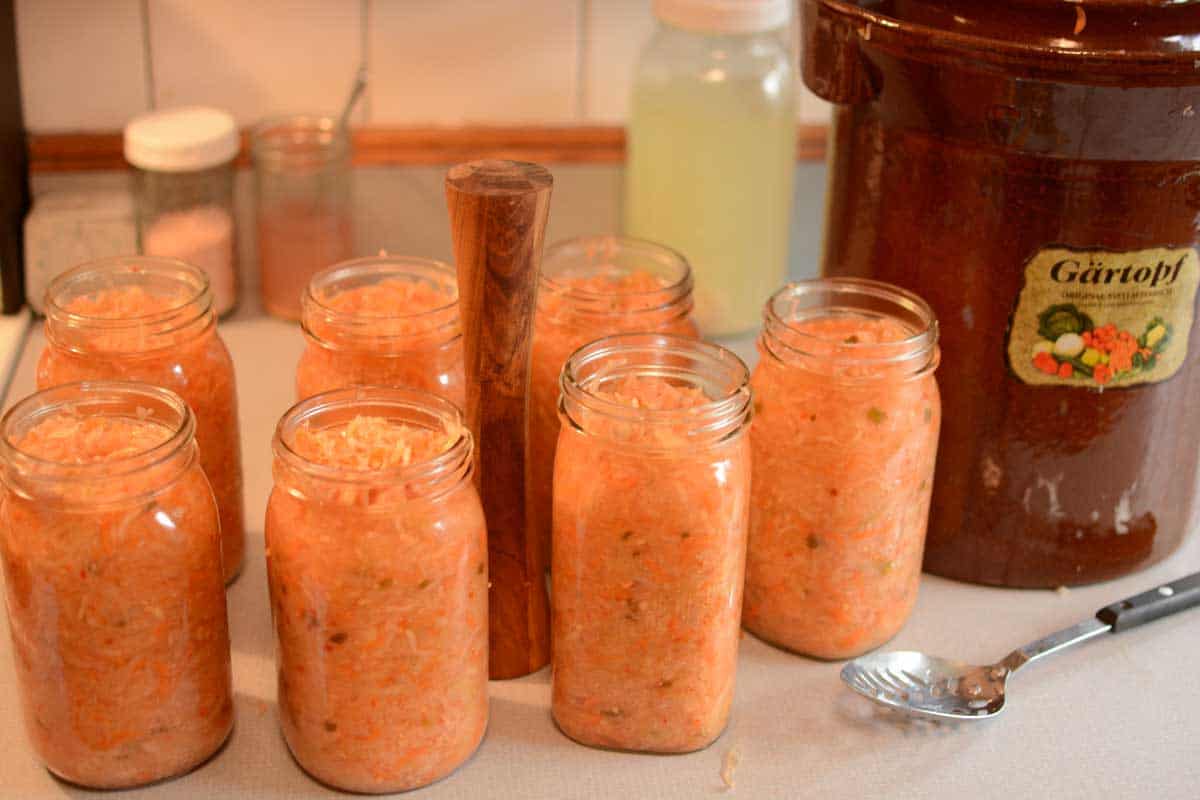
Store homemade sauerkraut in a glass or ceramic container with a tight-fitting lid to keep out air. Keep it in the refrigerator to slow down the fermentation process and maintain its flavor and texture.
Storage Options for Homemade Sauerkraut
Once your homemade sauerkraut has completed the fermentation process, it’s time to consider the best storage options to maintain its freshness and flavor. Proper storage will help preserve the sauerkraut and allow it to develop its taste over time. Here are some storage methods to consider:
- Refrigerator Storage: Storing sauerkraut in the refrigerator is the most common and convenient option. Transfer the fermented sauerkraut to clean, airtight jars or containers and place them in the refrigerator. The cool temperature of the fridge slows down the fermentation process, extending the sauerkraut’s shelf life. Refrigerated sauerkraut can last for several months, maintaining its tangy flavor and texture.
- Canning Jars: If you prefer long-term storage and have the necessary equipment, you can preserve sauerkraut using canning jars. Follow proper canning procedures, including sterilizing the jars, lids, and rings, and processing the jars in a water bath or pressure canner according to recommended times and pressures. Canned sauerkraut can be stored in a cool, dark pantry for up to a year.
- Fermentation Crocks: If you used a fermentation crock to make your sauerkraut, you can continue storing it in the same crock. Remove the weights and cabbage leaves, cover the crock with a lid or a clean cloth, and place it in a cool area. However, note that fermentation crocks may not provide as airtight of a seal as jars, so it’s recommended to consume the sauerkraut within a few months.
- Freezing: Freezing sauerkraut is an option if you want to extend its shelf life even further. Transfer the sauerkraut into freezer-safe containers or resealable bags, ensuring you remove as much air as possible. Label the containers with the date and store them in the freezer. Frozen sauerkraut can be stored for up to several months with minimal impact on its texture and taste.
Regardless of the storage option you choose, it’s important to keep the sauerkraut in a clean and airtight container to prevent exposure to air, which can lead to spoilage. Additionally, avoid using metal containers or lids, as the acid in sauerkraut can react with metal and affect the taste and quality.
Remember that sauerkraut continues to develop its flavor and complexity over time. It’s worth experimenting with different storage methods and durations to find your preferred balance of tanginess and texture. Whether you enjoy it fresh from the refrigerator or after months of aging, homemade sauerkraut is a versatile and delicious addition to many dishes.
Now that you understand the various storage options, you can confidently store and enjoy your homemade sauerkraut for months to come. Let’s explore some useful tips for long-term storage and ways to savor the deliciousness of your sauerkraut.
Read more: How To Store Sauerkraut After Fermentation
Storing Sauerkraut in the Refrigerator
One of the most popular and convenient storage options for homemade sauerkraut is keeping it in the refrigerator. Refrigeration slows down the fermentation process and helps maintain the sauerkraut’s freshness and flavor. Here are some steps to properly store sauerkraut in the refrigerator:
- Transfer to Airtight Containers: Once your sauerkraut has fermented to your desired level of tanginess, transfer it to clean, airtight jars or containers. Glass jars with screw-top lids or food-grade plastic containers with tight-fitting lids work well. Ensure the containers are clean and dry before adding the sauerkraut.
- Remove Excess Air: When filling the jars or containers, press the sauerkraut down gently to remove any air pockets. Leaving excess air in the container can lead to spoilage. Fill the container to the top, but leave a small space (about an inch) between the sauerkraut and the lid to allow for expansion and prevent leaking.
- Seal the Containers: Secure the lids tightly to create an airtight seal. This will help preserve the flavor and texture of the sauerkraut while preventing any odors or flavors from other foods in the fridge from permeating it.
- Label and Date: It’s a good practice to label each container with the date of preparation. This way, you can keep track of the sauerkraut’s freshness and determine how long it has been stored in the refrigerator.
- Store in the Refrigerator: Place the sealed sauerkraut containers in the refrigerator. The cool temperature of the fridge (around 32-40°F or 0-4°C) slows down the fermentation process, preserving the sauerkraut’s tangy flavor and texture. Avoid placing the sauerkraut containers in the refrigerator door, as it experiences temperature fluctuations with frequent opening and closing.
- Check for Spoilage: Occasionally, check the sauerkraut for any signs of spoilage during storage. Look out for mold growth, off smells, or changes in texture. If any of these signs are present, discard the sauerkraut to prevent consuming spoiled food.
Stored in the refrigerator, homemade sauerkraut can stay fresh and flavorful for several months. However, note that over time, the sauerkraut may continue to ferment and develop a stronger tangy flavor. This is a natural part of the fermentation process and can be enjoyable if you prefer a more intense sauerkraut taste.
Using airtight containers and proper refrigeration techniques will help extend the shelf life of your sauerkraut. It’s worth mentioning that homemade sauerkraut stored in the refrigerator may undergo changes in texture, becoming softer over time. This is normal and doesn’t affect its taste or safety.
Now that you know how to properly store sauerkraut in the refrigerator, let’s explore further storage options such as using canning jars or fermenting crocks for longer-term preservation.
Storing Sauerkraut in Canning Jars
If you’re looking for long-term storage options for your homemade sauerkraut, using canning jars is a great choice. Properly canned sauerkraut can be stored in a cool, dark pantry for up to a year. Follow these steps to store sauerkraut in canning jars:
- Prepare the Jars: Start by thoroughly cleaning the canning jars, lids, and rings. Wash them with hot soapy water and rinse well. Sterilize the jars and lids by boiling them in water for 10 minutes or using a dishwasher’s sterilize cycle. Keep them hot until ready to use.
- Pack the Sauerkraut: Fill the hot, sterilized canning jars with your homemade sauerkraut. Use a jar funnel to prevent spills and to ensure the jars are filled without leaving excessive air pockets. Press down gently on the sauerkraut to remove any air bubbles and leave about 1/2 inch (1 cm) headspace at the top.
- Add Brine (if needed): If your sauerkraut didn’t generate enough brine during the fermentation process or if you prefer a juicier sauerkraut, you can add a small amount of brine made with water and salt to each jar. The brine should cover the sauerkraut completely.
- Seal the Jars: Wipe the rim of each jar with a clean, damp cloth to remove any food debris or liquid. Place the sterilized lids on the jars and twist the rings on tightly to create a secure seal. The sealing compound on the lids should be positioned on the jar rim for a proper seal during canning.
- Process the Jars: Submerge the filled jars in a water bath canner or pressure canner, according to the specific canning instructions and recommended processing times for sauerkraut. Proper processing ensures the safety of the sauerkraut and extends its shelf life. Follow the recommended guidelines for altitude and jar size to process the jars correctly.
- Cool and Check: After processing, remove the jars from the canner and let them cool undisturbed on a wire rack or cloth towel. As they cool, you may hear the lids make a popping sound, indicating a successful seal. Once cooled, check the jars’ seals by pressing down on the center of each lid. If the lid doesn’t move or make a popping sound, it indicates a proper seal.
- Label and Store: Label each jar with the sauerkraut’s name, date, and any additional notes such as flavorings or fermentation duration. Store the sealed jars in a cool, dark pantry or cellar away from direct sunlight and extreme temperatures. Canned sauerkraut can stay fresh for up to a year, but it’s still recommended to consume it within the first year for the best quality.
Properly canned sauerkraut offers a convenient option for long-term storage. The processing required for canning creates a sealed, shelf-stable product that retains the sauerkraut’s flavor and texture over an extended period.
Remember to follow safe canning practices and guidelines specific to sauerkraut to ensure food safety. Keep in mind that improperly canned or unsealed jars can lead to spoilage, so it’s crucial to check for proper seals and store the sauerkraut in appropriate conditions.
Now that you know how to store sauerkraut in canning jars, let’s discuss another storage method — using fermentation crocks.
Storing Sauerkraut in Fermentation Crocks
A fermentation crock is a traditional vessel specifically designed for fermenting and storing sauerkraut and other fermented foods. If you used a fermentation crock to make your sauerkraut, you can continue storing it in the same crock. Here’s how to store sauerkraut in fermentation crocks:
- Remove Weights and Cabbage Leaves: Once your sauerkraut has finished fermenting to your desired tanginess, remove the weights and cabbage leaves from the fermentation crock. Set them aside for cleaning.
- Clean the Fermentation Crock: Rinse the fermentation crock thoroughly with warm water to remove any residue. Do not use soap, as it can interfere with future fermentations. Allow the crock to air dry or pat it dry with a clean towel.
- Transfer the Sauerkraut: Gently transfer the fermented sauerkraut from the crock into clean, airtight jars or containers. Use a large spoon or tongs to scoop the sauerkraut out, ensuring you evenly distribute it among the containers.
- Leave Some Brine: Transfer a portion of the remaining brine from the fermentation crock to each jar or container. The brine helps preserve the sauerkraut’s flavor and texture, so it’s important to have enough to cover the sauerkraut completely. Leave about an inch of headspace at the top of each container to allow for expansion during storage.
- Seal the Containers: Secure the lids tightly on the jars or containers to create an airtight seal. This will help maintain the sauerkraut’s freshness and prevent any odors or flavors from contaminating it.
- Label and Date: Consider labeling each jar or container with the date of preparation. This way, you can track how long the sauerkraut has been stored and monitor its freshness. Include any additional flavorings or notes if applicable.
- Refrigerate or Store in a Cool Place: You have two options for storing the sauerkraut from the fermentation crock. You can either transfer the jars or containers to the refrigerator for short-term storage, or you can keep them in a cool, dark place away from direct sunlight, such as a cellar or pantry, for longer-term storage.
- Enjoy Your Stored Sauerkraut: Stored sauerkraut can be enjoyed as a side dish, added to salads, sandwiches, or used as an ingredient in various recipes. The flavor will continue to develop and mellow over time, so feel free to experiment and see how the sauerkraut changes with age.
Storing sauerkraut in a fermentation crock allows you to maintain the authenticity of the fermentation process while ensuring easy access to the sauerkraut whenever you desire. However, keep in mind that fermentation crocks may not provide as airtight of a seal as jars, so it’s recommended to consume the sauerkraut within a few months.
Whether you choose to store your sauerkraut in canning jars, fermentation crocks, or the refrigerator, proper storage techniques will help preserve its flavor and quality for an extended period. Now that you’re familiar with various storage options, let’s explore some additional tips for long-term storage and enjoying your homemade sauerkraut.
Tips for Long-Term Storage
While sauerkraut can be enjoyed fresh after a short fermentation period, many people prefer to store it for longer periods to develop deeper flavors and textures. Here are some tips to ensure successful long-term storage of your homemade sauerkraut:
- Choose the Right Storage Container: Use clean, airtight jars, containers, or fermentation crocks specifically designed for food storage. Ensure they are made of food-grade materials and have airtight seals to prevent air exposure, which can lead to spoilage.
- Keep it Cool: Sauerkraut is best stored in a cool environment. Whether you choose to refrigerate or store in a cellar or pantry, make sure the temperature is stable and doesn’t fluctuate dramatically. Aim for a temperature between 32-50°F (0-10°C) for optimal long-term storage.
- Avoid Sunlight: Light exposure can degrade the quality of sauerkraut over time. Store it in a dark or opaque container, or in a location shielded from direct sunlight. This will help preserve the sauerkraut’s flavor, color, and nutritional properties.
- Prevent Air Exposure: Properly seal your sauerkraut containers to prevent air from entering. Oxygen can lead to spoilage and affect the taste and quality of the sauerkraut. Use airtight lids, check the seals regularly, and ensure the containers are filled to the top to minimize air contact.
- Label and Date: It’s essential to label your sauerkraut containers with the date of preparation. This will help you keep track of how long the sauerkraut has been stored and enable you to consume it within a reasonable time frame. Be sure to rotate your sauerkraut stockpile, consuming older batches first.
- Periodically Check for Spoilage: Even with proper storage, it’s essential to periodically check your sauerkraut for any signs of spoilage. Look for mold growth, off odors, or changes in texture. If you notice any signs of spoilage, discard the sauerkraut to avoid consuming spoiled food.
- Practice Good Hygiene: Always use clean utensils, hands, and containers when handling sauerkraut. This can help prevent contamination and ensure the longevity of your sauerkraut. Wash your hands thoroughly before touching the sauerkraut and ensure all equipment is properly cleaned and sanitized.
- Consider Freezing: If you want to store sauerkraut for an extended period, consider freezing it. Transfer the sauerkraut to freezer-safe containers or resealable bags, remove excess air, and label with the date. Frozen sauerkraut can maintain its flavor and texture for several months.
- Enjoy the Aging Process: Sauerkraut continues to develop flavor and complexity over time. Experiment with different storage durations to find your preferred level of tanginess and texture. Some people enjoy the sauerkraut after a few weeks of fermentation, while others prefer the flavors that develop over several months of aging.
By following these tips, you can ensure the long-term storage of your homemade sauerkraut while maintaining its quality and flavor. Remember that sauerkraut is a living food, and its flavors can change and intensify during storage. Embrace the aging process and savor the unique characteristics of your homemade sauerkraut.
Now that you have all the knowledge you need for successful storage, it’s time to enjoy your homemade sauerkraut. Let’s explore some ideas on how to incorporate sauerkraut into your meals and unleash its delicious potential.
Read more: How To Store Homemade Noodles
Enjoying Your Homemade Sauerkraut
Your homemade sauerkraut is ready to be enjoyed in various ways, adding a tangy and flavorful twist to your meals. Here are some creative and delicious ideas to incorporate sauerkraut into your culinary adventures:
- Classic Reuben Sandwich: Layer homemade sauerkraut, thinly sliced corned beef or pastrami, Swiss cheese, and Russian dressing between two slices of rye bread. Toast or grill the sandwich until the cheese is melted and the flavors meld together for a mouthwatering delight.
- Sausage and Sauerkraut: Simmer sausages, such as bratwurst or kielbasa, in a mixture of sauerkraut and beer for a traditional hearty dish. Serve with a side of mashed potatoes or crusty bread to soak up the flavors.
- Sauerkraut Pierogies: Fill homemade or store-bought pierogies with a blend of sauerkraut, mashed potatoes, and caramelized onions. Boil or pan-fry the pierogies until golden and serve with sour cream for a comforting and savory meal.
- Sauerkraut Salad: Toss sauerkraut with fresh greens, sliced apples or pears, toasted nuts, and crumbled cheese. Drizzle with a tangy vinaigrette for a refreshing and nutritious salad with a delightful twist.
- Sauerkraut Soup: Add sauerkraut to hearty soups, such as bean or lentil soup, for an extra burst of flavor. The tanginess of sauerkraut complements the richness of the broth and adds a depth of flavor to your comforting bowl.
- Sauerkraut Pancakes: Combine sauerkraut with flour, eggs, and spices to create savory pancakes. Serve them alongside sour cream and smoked salmon for a unique and delicious breakfast or brunch treat.
- Stuffed Cabbage Rolls: Fill blanched cabbage leaves with a mixture of sauerkraut, ground meat, rice, and herbs. Roll them up and bake in a tomato sauce until tender and flavorful. This classic comfort food is elevated by the addition of tangy sauerkraut.
- Sauerkraut Tacos: Upgrade your taco game by topping your favorite tacos, such as fish or pulled pork, with a scoop of sauerkraut. The crunch and tanginess of sauerkraut provide a delicious contrast to the bold flavors of the fillings.
- Sauerkraut and Cheese Dip: Mix sauerkraut with cream cheese, shredded cheese, and your favorite seasonings to create a tangy and creamy dip. Serve it with pretzels, crackers, or crunchy vegetables for a tasty appetizer or party snack.
- Sauerkraut Pizza: Use sauerkraut as a unique topping for homemade pizza. Combine it with cooked bacon or sausage, caramelized onions, and a blend of cheeses. Bake until the cheese is bubbly and golden for a deliciously different pizza experience.
These are just a few creative ideas to get you started, but feel free to experiment and find your own favorite ways to enjoy sauerkraut. It can be a versatile ingredient that adds a tangy and probiotic-rich element to a wide range of dishes.
Remember to store any leftover sauerkraut properly, following the storage methods we discussed earlier, to maintain its freshness and quality for future culinary adventures.
Now it’s time to savor the deliciousness of your homemade sauerkraut and explore the endless possibilities it brings to your table. Enjoy!
Conclusion
Congratulations on learning how to make and store your own homemade sauerkraut! By delving into the world of sauerkraut, you’ve discovered a versatile and flavorful ingredient that not only adds a tangy twist to your dishes but also offers numerous health benefits.
Through the step-by-step guide, you learned the importance of selecting quality ingredients, such as fresh cabbage and the right type of salt. You also discovered various equipment options, including fermentation crocks and canning jars, for successfully fermenting and storing your sauerkraut.
The fermentation process itself, driven by beneficial bacteria, transforms simple cabbage and salt into a delicious and nutritious probiotic-rich condiment. By understanding the different storage options, such as refrigeration, canning, and fermentation crocks, you can ensure the longevity and freshness of your sauerkraut.
From enjoying classic pairings like sausages and sauerkraut to exploring inventive recipes like sauerkraut pancakes and sauerkraut salads, you now have a wide array of ways to incorporate this tangy delight into your meals. The possibilities are endless, and sauerkraut’s unique flavor profile adds a delightful twist to both comforting and innovative dishes.
Remember to follow proper hygiene practices and periodic checks to prevent spoilage and contamination. With these precautions, your homemade sauerkraut will continue to develop its flavors over time, offering a culinary experience that evolves and delights.
Whether you enjoy your sauerkraut fresh from the fermentation vessel or after months of storage, relish the satisfaction that comes from making your own probiotic-rich, tangy delight. Share your homemade sauerkraut with family and friends, or savor it as a comforting and flavorful addition to your own meals.
With your newfound knowledge, you can continue to experiment with different fermentations, explore unique flavors, and expand your repertoire of sauerkraut-infused recipes. The journey of homemade sauerkraut is a delicious and healthful exploration that adds an exciting twist to your culinary endeavors.
So go ahead, embrace the art of homemade sauerkraut, and let your taste buds embark on a tangy adventure that will keep you coming back for more. Enjoy the vibrant and probiotic-rich goodness of your homemade sauerkraut with every bite!
Frequently Asked Questions about How To Store Homemade Sauerkraut
Was this page helpful?
At Storables.com, we guarantee accurate and reliable information. Our content, validated by Expert Board Contributors, is crafted following stringent Editorial Policies. We're committed to providing you with well-researched, expert-backed insights for all your informational needs.






0 thoughts on “How To Store Homemade Sauerkraut”