Articles
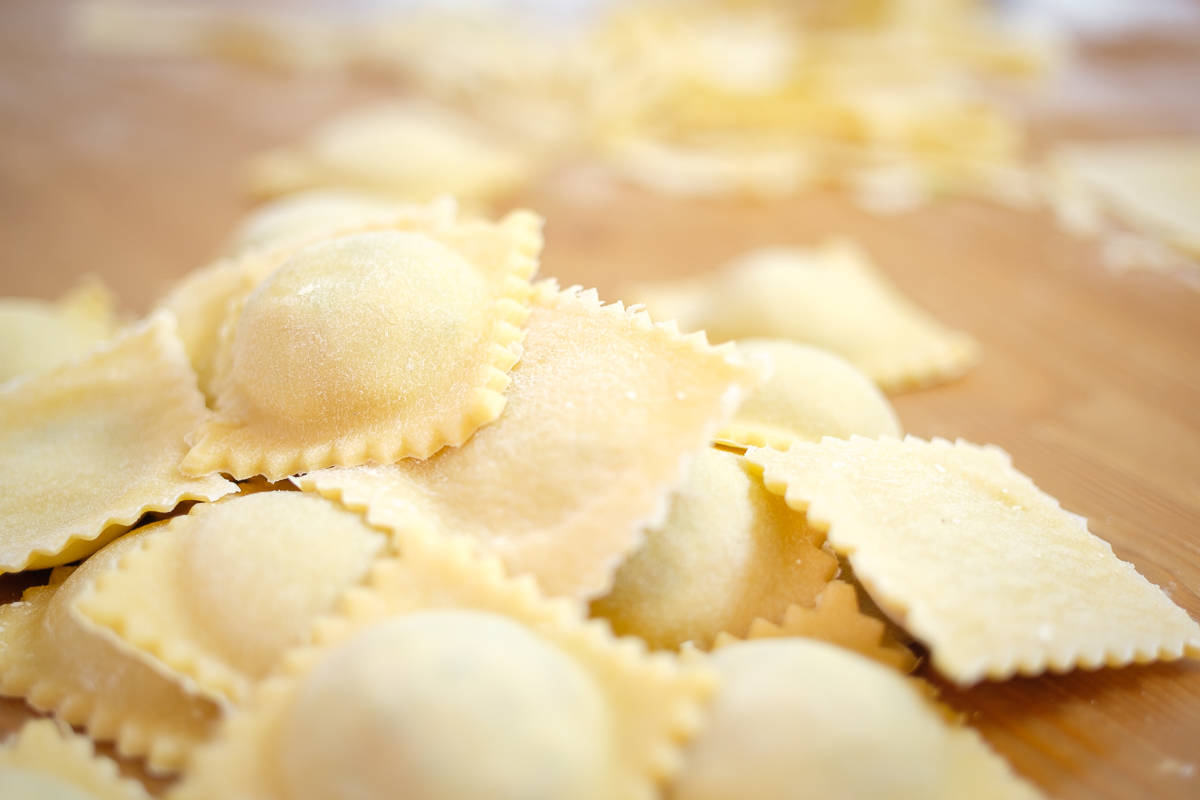
How To Store Homemade Ravioli
Modified: May 6, 2024
Learn the best methods to store and preserve your homemade ravioli for later enjoyment. Discover helpful articles on proper storage techniques and tips to keep your pasta fresh and delicious.
(Many of the links in this article redirect to a specific reviewed product. Your purchase of these products through affiliate links helps to generate commission for Storables.com, at no extra cost. Learn more)
Introduction
Making homemade ravioli is a labor of love. From selecting the freshest ingredients to crafting the perfect dough, every step requires careful attention to detail. But all that effort is worth it when you take a bite of these delectable pockets of pasta filled with delicious fillings. Whether you’re making ravioli from scratch for a special occasion or preparing a large batch to enjoy over time, knowing how to properly store them is essential to ensure their freshness and flavor.
In this article, we’ll explore the step-by-step process of storing homemade ravioli. We’ll cover everything from choosing the right ingredients to freezing and cooking the ravioli. By following these tips and techniques, you can extend the shelf life of your homemade ravioli, allowing you to savor their flavors and textures for days or even weeks to come.
So, let’s dive in and discover the best ways to store your homemade ravioli!
Key Takeaways:
- Master the art of homemade ravioli by selecting high-quality ingredients, crafting the perfect dough, and storing them properly. Enjoy the fruits of your labor with tantalizing flavors and creative culinary adventures.
- Whether refrigerating, air-drying, or freezing, learn the best methods to store your homemade ravioli for future enjoyment. Cook and serve with your favorite sauces and garnishes for a delightful culinary experience.
Read more: How To Store Fresh Ravioli
Choosing the Right Ingredients
The first step in creating delicious homemade ravioli is choosing the right ingredients. The quality of the ingredients you use will greatly impact the taste and texture of your final dish. Here are a few key considerations when selecting ingredients:
- Flour: Use all-purpose flour or semolina flour for your ravioli dough. These types of flour have the perfect balance of protein and gluten to create a tender yet sturdy pasta.
- Eggs: Fresh eggs are essential for making the dough. Opt for organic or free-range eggs for the best flavor.
- Filling ingredients: When it comes to the filling, the options are endless. Whether you choose traditional cheese or meat fillings or get creative with vegetables or seafood, make sure to use fresh, high-quality ingredients for the best results.
- Herbs and spices: Adding herbs and spices to your filling can elevate the flavors of your ravioli. Experiment with combinations like basil and Parmesan or sage and butternut squash to add depth and complexity.
- Cheese: If your filling includes cheese, opt for premium varieties like Parmesan, ricotta, or mozzarella. Avoid using pre-shredded cheese, as it may contain additives that can affect the texture of the filling.
- Sauces and toppings: Consider the sauces and toppings you plan to serve with your ravioli. Choose complementary ingredients that will enhance the overall flavor profile.
By selecting high-quality ingredients, you’ll ensure that your homemade ravioli is bursting with flavor and offers a truly memorable culinary experience.
Making the Ravioli Dough
The key to crafting perfect homemade ravioli lies in creating a well-made dough. The dough should be elastic, easy to work with, and sturdy enough to hold the filling without tearing. Here’s a step-by-step guide to making the ravioli dough:
- Measure and sift the flour: Start by measuring the required amount of flour and sift it into a large mixing bowl. Sifting helps to aerate the flour and remove any lumps, resulting in a smoother dough.
- Create a well in the center: Make a well in the center of the flour mound. This is where you’ll add the wet ingredients.
- Add the wet ingredients: Crack the eggs into the well and add a pinch of salt. Using a fork, gently beat the eggs and incorporate the flour, starting from the edges and gradually working your way in. Continue mixing until a shaggy dough forms.
- Knead the dough: Transfer the dough to a lightly floured surface and knead it for about 5-10 minutes until it becomes smooth and elastic. This process helps to develop the gluten in the flour, giving the dough its structure and chewiness.
- Rest the dough: Shape the dough into a ball and wrap it tightly in plastic wrap. Let it rest at room temperature for at least 30 minutes. This resting time allows the gluten to relax and the dough to become more pliable.
Once your ravioli dough is ready, you can proceed with rolling it out and shaping the ravioli. Remember to work with small portions of dough at a time to prevent drying out. Keeping the dough covered with a damp cloth or plastic wrap while working will also help maintain its moisture.
Now that you have a perfectly made ravioli dough, you’re ready to move on to the next step in creating your batch of mouthwatering homemade ravioli.
Rolling out the Dough
Once you have prepared the ravioli dough, the next step is to roll it out into thin, even sheets. This will provide the perfect foundation for filling and shaping your ravioli. Here’s how to roll out the dough:
- Divide the dough: Cut the rested dough into smaller portions that are more manageable to work with. Wrap the remaining dough in plastic wrap to prevent it from drying out.
- Flatten the dough: Take one portion of the dough and flatten it with your hands into a rough rectangular shape. Lightly dust the work surface and the dough with flour to prevent sticking.
- Start rolling: Using a rolling pin, begin rolling the dough from the center outwards, applying even pressure. Roll in one direction, then rotate the dough 90 degrees and continue rolling. This helps to achieve an even thickness.
- Flip and rotate: Periodically flip and rotate the dough to ensure it is rolled out evenly. This also prevents the dough from sticking to the surface and tearing.
- Achieve desired thickness: Continue rolling until the dough reaches your desired thickness. For ravioli, a thickness of about 1/8 inch (3 mm) is usually recommended.
- Repeat the process: Repeat the rolling process with the remaining portions of dough.
As you roll out the dough, be mindful not to roll it too thin, as this can result in the ravioli becoming too delicate and prone to breaking during cooking. Additionally, avoid using excessive amounts of flour as it can make the dough dry and tough. Lightly dusting the surface is sufficient to prevent sticking.
Once your dough is rolled out to the desired thickness, you’re ready to add the delicious filling and shape your homemade ravioli.
Filling the Ravioli
The filling is the heart and soul of any ravioli dish. It’s where you can get creative and experiment with flavors and textures. Whether you prefer classic cheese and herb fillings or want to try unique combinations, here are the steps to fill your ravioli:
- Prepare the filling ingredients: Gather all the necessary ingredients for your chosen filling, such as cheeses, meats, vegetables, herbs, and spices. Ensure the ingredients are finely grated, chopped, or cooked before proceeding.
- Roll out the dough: Roll out the ravioli dough into thin sheets, following the previous step. If necessary, trim the edges to create clean, even rectangles or squares of dough.
- Space the filling: Depending on the size of your ravioli, leave a sufficient space between each mound of filling. This allows room for sealing the edges and prevents the filling from spilling out during cooking.
- Add the filling: Place a spoonful of filling in the center of one half of the rolled-out dough. The amount of filling will vary based on personal preference and the size of the ravioli. Avoid overfilling, as it can make sealing the ravioli difficult.
- Brush with egg wash: Lightly brush the exposed dough around the filling with an egg wash. This helps the top layer of dough adhere to the bottom layer during sealing.
- Top with another layer of dough: Carefully place another sheet of rolled-out dough on top of the filling and press gently around the edges to seal. Use your fingers or a ravioli cutter to cut out individual ravioli pieces, ensuring they are tightly sealed to prevent any filling leakage.
Remember to work efficiently while filling the ravioli to prevent the dough from drying out. Cover the rolled-out dough and filled ravioli with a damp cloth or plastic wrap as you work to maintain their moisture.
Once you have filled your ravioli, it’s time to shape and store them properly for future enjoyment.
After making homemade ravioli, dust them with flour and place them in a single layer on a baking sheet. Freeze until firm, then transfer to a resealable plastic bag and store in the freezer for up to 3 months.
Read more: How To Store Homemade Boba
Shaping the Ravioli
Shaping the ravioli not only adds a beautiful touch to your homemade pasta but also ensures that the filling is evenly distributed. There are various ways to shape ravioli, depending on your preference and available tools. Here are a few popular methods:
- Traditional square or rectangular shape: After filling the dough, place another layer of rolled-out dough on top. Use a sharp knife or a ravioli cutter to cut the dough into evenly sized squares or rectangles. Press the edges firmly to seal the ravioli.
- Round shape: Instead of using a knife or ravioli cutter, use a round cookie cutter to cut out circles of filled dough. Press the edges together to securely seal the ravioli.
- Half-moon shape: Place a spoonful of filling on one half of the rolled-out dough. Fold the other half over the filling, creating a half-moon shape. Gently press the edges to seal the ravioli.
- Triangle shape: Similar to the half-moon shape, place a spoonful of filling on one half of the dough. Fold the other half diagonally to create a triangle shape. Seal the edges carefully.
When shaping the ravioli, ensure the edges are properly sealed to prevent the filling from leaking out during cooking. You can use a fork to press along the edges, creating a decorative pattern while also ensuring a tight seal.
Experiment with different shapes and get creative with your presentation. The shape of the ravioli can add visual appeal to your dish and make it even more enjoyable to eat.
Now that your ravioli are beautifully shaped, it’s time to explore the best methods for storing them to maintain their freshness and quality.
Storing the Ravioli
Properly storing your homemade ravioli is crucial to maintain their freshness and prevent them from drying out or becoming mushy. Here are the recommended methods for storing ravioli:
- Fresh refrigeration: If you plan to consume the ravioli within a day or two, you can store them in the refrigerator. Place the filled and shaped ravioli on a baking sheet lined with parchment paper and lightly dusted with flour to prevent sticking. Cover the sheet with plastic wrap and refrigerate for up to 48 hours. Just be sure to cook them promptly to enjoy them at their best.
- Drying: If you prefer a longer shelf life, you can dry the ravioli slightly before storing. Lay the filled and shaped ravioli on a clean kitchen towel or a drying rack. Allow them to air dry at room temperature for about an hour or until the surface feels dry to the touch. Once dry, you can store the ravioli in an airtight container in a cool, dry place for up to 2-3 days.
- Freezing: Freezing is the most convenient method for long-term storage. Place the filled and shaped ravioli on a baking sheet lined with parchment paper, ensuring they are not touching. Freeze the ravioli on the sheet for a few hours until they are firm. Then, transfer them to airtight freezer-safe containers or freezer bags, separating layers with parchment or wax paper to prevent sticking. Frozen ravioli can be stored for up to 3 months.
When storing ravioli, it’s important to label the containers with the date of preparation for easy identification. This helps you keep track of their freshness and ensure you consume them within the recommended timeframes.
Regardless of the storage method you choose, always handle the ravioli with care to prevent any damage or breakage. Also, avoid stacking or overcrowding them, as this can cause them to stick together or lose their shape.
Now that you know the best ways to store your homemade ravioli, you can enjoy them whenever you crave a delicious, homemade pasta dish.
Freezing the Ravioli
Freezing homemade ravioli is a convenient way to preserve them for future meals. Whether you’ve made a large batch or want to save some leftovers, freezing ravioli can extend their shelf life while maintaining their flavor and texture. Here’s how to freeze ravioli properly:
- Prepare the ravioli: Fill and shape the ravioli according to your desired recipe. Ensure that the ravioli are fully sealed to prevent any filling leakage during freezing.
- Flash freeze on a baking sheet: Place the filled and shaped ravioli on a baking sheet lined with parchment paper. Ensure that the ravioli are not touching each other, allowing them to freeze individually. This process, known as flash freezing, prevents the ravioli from sticking together.
- Pre-freeze for a few hours: Transfer the baking sheet with the ravioli to the freezer and let them pre-freeze for a few hours until they are firm. This step helps to maintain the shape and integrity of the ravioli during storage.
- Transfer to freezer-safe containers: Once the ravioli are pre-frozen, transfer them to freezer-safe containers or freezer bags. It’s a good idea to separate the layers of ravioli with parchment paper to prevent them from sticking together.
- Label and date the containers: Don’t forget to label each container or freezer bag with the contents and the date of freezing. This will help you keep track of their freshness and ensure you use them within the recommended timeframe.
- Store in the freezer: Place the properly sealed ravioli containers in the freezer. Make sure the temperature of your freezer is set to 0°F (-18°C) or below for optimal storage conditions.
Frozen ravioli can be stored for up to 3 months. To cook the frozen ravioli, simply remove the desired amount from the freezer and cook them directly in boiling water. There’s no need to thaw them beforehand, as this can cause the ravioli to become mushy.
By freezing your homemade ravioli, you can have a delicious and satisfying meal on hand whenever you need it. Whether you’re preparing a quick weeknight dinner or hosting a dinner party, frozen ravioli can be a convenient and flavorful option.
Remember to check the quality of the frozen ravioli before using them, and discard any that show signs of freezer burn or spoilage.
With these simple steps, you can confidently freeze your homemade ravioli and enjoy them whenever you crave a taste of delicious homemade pasta.
Cooking and Serving the Ravioli
Now that you have stored your homemade ravioli, it’s time to cook and serve them to enjoy their delicious flavors. Here’s how to prepare your frozen or freshly made ravioli:
- Bring a pot of water to a boil: Fill a large pot with water and add a generous amount of salt. Bring the water to a rolling boil.
- Cook the ravioli: Carefully drop the ravioli into the boiling water. If cooking fresh ravioli, they will typically cook within a few minutes. Frozen ravioli may take a bit longer, usually around 4 to 6 minutes. Cook until the ravioli float to the surface and are tender but still al dente.
- Remove the cooked ravioli: Using a slotted spoon or a spider strainer, gently remove the cooked ravioli from the boiling water and transfer them to a serving dish.
- Serve with your preferred sauce: Choose your favorite sauce to accompany the ravioli. Traditional options include marinara sauce, alfredo sauce, or a sage-butter sauce. Toss the cooked ravioli with the sauce until they are well coated or serve the sauce on top.
- Garnish and enjoy: Finish the dish with a sprinkle of freshly grated Parmesan cheese, chopped herbs, or a drizzle of olive oil. Serve the ravioli immediately while they are still hot and delicious.
Whether you’re serving the ravioli as a main course or as part of a larger meal, pair them with a fresh salad, crusty bread, or a side of steamed vegetables to complete the dish.
Keep in mind that cooking times may vary depending on the size and thickness of the ravioli. It’s best to test one piece to ensure it is cooked to your desired doneness before removing the remaining ravioli.
With perfectly cooked ravioli and a flavorful sauce, you’re ready to savor the taste of your homemade creation. Enjoy the combination of textures and flavors that make ravioli a beloved dish around the world.
Remember, you can always customize the dish by experimenting with different fillings, sauces, and garnishes to suit your personal preferences and culinary creativity.
Read more: How To Store Homemade Pies
Conclusion
Creating homemade ravioli is a rewarding culinary experience that allows you to showcase your creativity in the kitchen. From choosing the right ingredients to rolling out the dough, filling, shaping, and storing, every step is essential in crafting the perfect batch of ravioli.
By selecting high-quality ingredients and mastering the techniques involved, you can ensure that your homemade ravioli not only tastes delicious but also impresses your family and friends. The process of making ravioli may take time and effort, but the end result is well worth it.
Properly storing your ravioli is crucial for maintaining their freshness, flavor, and texture. Whether you opt for fresh refrigeration, air-drying, or freezing, each method offers its own benefits and allows you to enjoy your homemade ravioli at your convenience.
When it’s time to cook and serve your ravioli, remember to follow the recommended cooking times and pair them with your favorite sauce and garnishes. The combination of tender pasta, flavorful fillings, and delicious sauces will surely delight your taste buds.
As you continue on your culinary journey, don’t be afraid to experiment with different fillings, shapes, and sauces. Let your creativity shine as you customize your ravioli to suit your personal preferences and culinary style.
So, gather your ingredients, roll out the dough, and embark on the flavorful adventure of making homemade ravioli. With patience, practice, and a touch of passion, you’ll soon master the art of creating these delectable pasta pockets that will impress and satisfy your loved ones for years to come.
Get ready to enjoy the fruits of your labor and indulge in the tantalizing flavors of homemade ravioli. Bon appétit!
Now that you've mastered storing homemade ravioli, why not elevate your organizational skills in other areas of your kitchen? Our next read provides clever and practical solutions to declutter and optimize space with the latest kitchen storage innovations for the upcoming year. Whether you're looking to overhaul your pantry or just need a few tips to manage countertop chaos, this article's insights will transform your kitchen into a model of efficiency and convenience.
Frequently Asked Questions about How To Store Homemade Ravioli
Was this page helpful?
At Storables.com, we guarantee accurate and reliable information. Our content, validated by Expert Board Contributors, is crafted following stringent Editorial Policies. We're committed to providing you with well-researched, expert-backed insights for all your informational needs.


0 thoughts on “How To Store Homemade Ravioli”