Articles
How To Use A Hand Saw
Modified: January 8, 2024
Learn how to effectively use a hand saw with our informative articles. Discover tips and techniques for precise cuts.
(Many of the links in this article redirect to a specific reviewed product. Your purchase of these products through affiliate links helps to generate commission for Storables.com, at no extra cost. Learn more)
Introduction
Hand saws have been a reliable tool for cutting wood and other materials for centuries. Despite the advancements in power tools, many craftsmen and DIY enthusiasts still prefer the precision and control that a hand saw provides. Whether you’re a beginner or seasoned woodworker, learning how to use a hand saw effectively will greatly enhance your woodworking skills.
Using a hand saw may seem straightforward, but there are techniques and safety precautions that should be followed to ensure accurate and efficient cuts. This article will guide you through the essential steps of using a hand saw, covering everything from selecting the right saw to maintaining it for long-lasting use.
Before we dive into the specifics, it’s important to note that safety should always be a top priority when using any type of saw. Make sure you wear appropriate safety gear, including safety goggles, ear protection, and gloves. Additionally, keep your work area clean and organized to minimize the risk of accidents. Now, let’s get started with the basics of using a hand saw.
Key Takeaways:
- Mastering the art of using a hand saw requires patience, practice, and attention to detail. From safety precautions to sawing techniques, this article provides a comprehensive guide for woodworkers and DIY enthusiasts.
- Proper maintenance and storage are essential for prolonging the lifespan of a hand saw. By following the tips in this article, woodworkers can ensure that their saw remains in top condition for all their future projects.
Read more: What Are Some Of The Hand Tools For Saws
Safety Precautions
Using a hand saw can be safe if proper safety precautions are followed. Here are some essential safety guidelines to keep in mind:
- Always wear safety goggles to protect your eyes from flying debris. Safety glasses with side shields provide additional protection.
- Wear ear protection, such as earplugs or earmuffs, to reduce the risk of hearing damage from prolonged exposure to noise.
- Use gloves to improve your grip on the saw and protect your hands from cuts or splinters.
- Keep your workspace well-lit to ensure clear visibility of your workpiece and the saw blade.
- Secure your workpiece firmly in place with clamps or a sturdy workbench to prevent it from moving during the sawing process.
- Be aware of your body positioning and maintain a balanced stance. Avoid standing directly in the path of the saw blade.
- Always cut away from your body and keep your hands at a safe distance from the saw blade to minimize the risk of accidental injuries.
- Use a sawing horse or a sawing stand whenever possible to provide a stable and secure surface for cutting.
- Inspect the saw blade before each use for any signs of damage or dullness. Replace the blade if necessary.
- When not in use, store the hand saw in a safe and dry location to prevent rust and damage.
Remember, accidents can happen even with the utmost caution. If you’re new to using a hand saw or undertaking a challenging project, it’s beneficial to seek guidance from experienced individuals or take woodworking classes to learn proper techniques and safety measures.
By following these safety precautions, you can greatly reduce the risk of accidents and injuries while working with a hand saw. Now that we’ve covered safety, let’s move on to choosing the right hand saw for your needs.
Choosing the Right Hand Saw
Choosing the right hand saw is essential for achieving accurate and efficient cuts. There are several types of hand saws available, each designed for specific purposes. Consider the following factors when selecting a hand saw:
1. Blade Type: Hand saws come with different blade types, such as crosscut, rip, and combination. Crosscut saws have fine teeth designed for cutting across the wood grain, while rip saws have fewer teeth and are ideal for cutting along the grain. Combination saws have both crosscut and rip teeth, making them versatile options.
2. Teeth Per Inch (TPI): The TPI refers to the number of teeth on one inch of the saw blade. Saws with higher TPI provide smoother cuts in finer materials, while saws with lower TPI are better suited for rougher materials.
3. Blade Length: Blade lengths vary depending on the intended use. For general woodworking tasks, a blade length between 20 to 26 inches is suitable. Smaller hand saws with blade lengths of around 12 inches are ideal for more intricate cuts and finer woodworking.
4. Handle Comfort: Look for a hand saw with an ergonomic handle that offers a comfortable grip. This will enable you to maintain control and accuracy while sawing for extended periods.
5. Budget and Quality: Consider your budget and prioritize a hand saw that offers both quality and affordability. High-quality hand saws tend to have sharper and more durable blades, resulting in cleaner and more precise cuts.
Once you have considered these factors, you can make an informed decision on the hand saw that suits your needs. It’s worth noting that investing in a quality hand saw can make a significant difference in the outcome of your woodworking projects.
In the next section, we’ll discuss how to prepare your workpiece before using a hand saw.
Preparing the Workpiece
Before you begin using a hand saw, it’s important to properly prepare your workpiece. This involves marking and securing the material to ensure accurate and clean cuts. Follow these steps to prepare your workpiece:
1. Measure and Mark: Use a measuring tape and pencil to mark the desired length or shape on the material. Double-check your measurements to ensure accuracy.
2. Use a Square: To ensure straight cuts, use a carpenter’s square to draw straight lines perpendicular to the edges of the material.
3. Secure the Material: If possible, secure the workpiece firmly in place using clamps or a workbench. This will prevent the material from moving around while you’re sawing.
4. Consider Grain Direction: Take note of the direction of the wood grain. This will help you determine the appropriate sawing technique and minimize the risk of tear-out or splintering.
5. Apply Masking Tape: To further prevent splintering, you can apply masking tape along the cutting line. This can act as a guide for the saw and provide added protection to the material.
6. Set Sawing Angle: Depending on the type of cut you’re making, you may need to adjust the angle at which you hold the hand saw. For straight cuts, aim for a perpendicular angle to the surface. For angled cuts, adjust the angle accordingly.
By properly preparing your workpiece, you’ll have a clear cutting line, a secured material, and minimized risks of splintering or inaccuracies. Once your workpiece is ready, it’s time to grip the hand saw correctly and make the initial cut, which we’ll discuss in the next section.
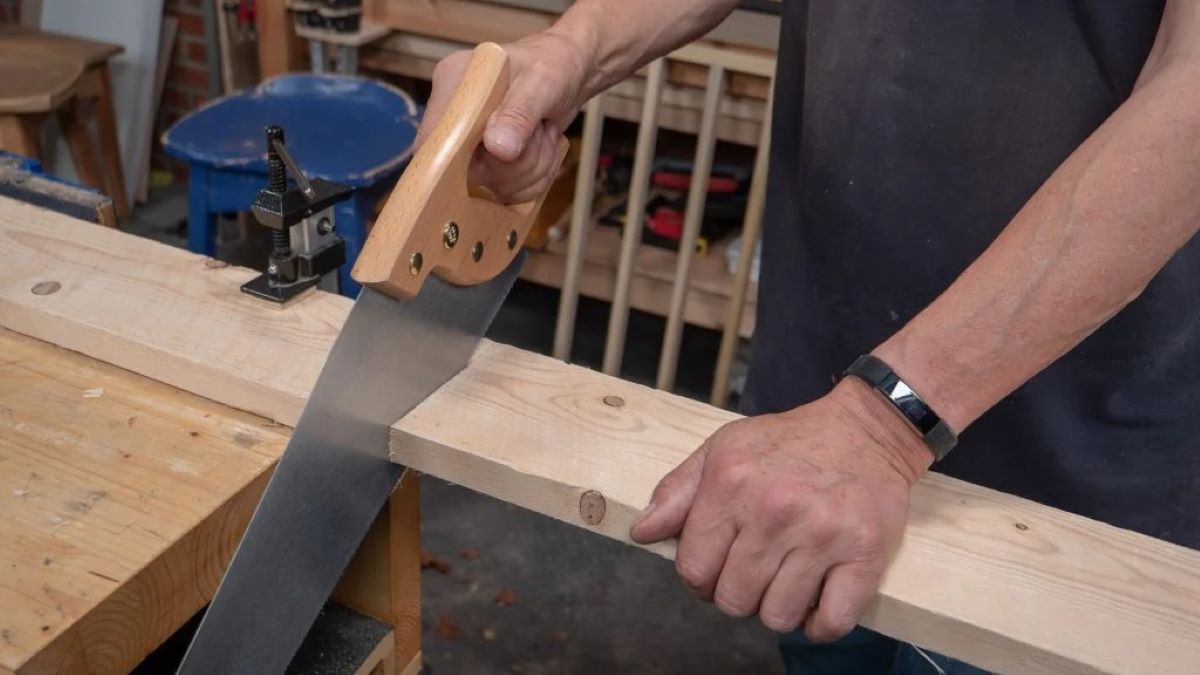
Gripping the Hand Saw
Properly gripping the hand saw is crucial for maintaining control and achieving accurate cuts. The way you hold the saw will depend on your dominant hand and the type of hand saw you’re using. Here’s a general guide on how to grip a hand saw:
1. Dominant Hand Position: If you’re right-handed, hold the handle of the saw in your right hand. If you’re left-handed, hold it in your left hand. Your dominant hand will provide the primary force for sawing.
2. Grip Positions: The hand saw handle typically has three grip positions: the handle grip, the thumb grip, and the finger grip.
- Handle Grip: Place your dominant hand’s thumb over the top of the handle, wrapping your fingers around the handle for a comfortable grip and secure control.
- Thumb Grip: Position your non-dominant hand’s thumb on the side of the blade, near the handle, to guide the saw along the cutting line.
- Finger Grip: Rest your non-dominant hand’s fingers lightly on the side of the blade, applying gentle pressure to keep the saw steady while cutting.
3. Stance and Alignment: Stand comfortably with your feet shoulder-width apart, ensuring a stable base. Align your body and saw with the cutting line to maintain accuracy.
4. Apply Even Pressure: As you begin sawing, apply even pressure on both the push and pull strokes. Avoid forcing the saw or using excessive pressure, as this can lead to misalignment and a jagged cut.
5. Practice Your Grip: It may take some time to find a grip that feels natural and comfortable for you. Experiment with different grip positions and adjust as needed to achieve optimal control and stability.
Remember, the key is to maintain a firm yet relaxed grip on the hand saw to ensure smooth and controlled cutting. In the next section, we’ll cover the initial cut and establishing a sawing rhythm.
Read more: How To Use A Miter Saw
Making the Initial Cut
Once you have prepared your workpiece and have a solid grip on the hand saw, it’s time to make the initial cut. This initial cut will help establish a sawing rhythm and guide the subsequent cuts. Follow these steps to make the initial cut:
1. Position the Saw: Place the saw blade on the material, aligning it with the marked cutting line. Ensure that the blade is positioned at the edge of the material, ready for the first stroke.
2. Start with a Light Score Cut: To create a guide for the saw blade, begin with a light score cut. Apply minimal pressure and make a shallow cut along the marked line. This will help prevent the saw blade from slipping or wandering off the cutting line.
3. Establish Sawing Rhythm: Once the score cut is made, you can start establishing a steady sawing rhythm. Apply more pressure and use long, smooth strokes. Let the saw do the work and avoid forcing it through the material. Maintain a consistent pace to achieve a smooth and even cut.
4. Use Full Length of the Blade: Utilize the full length of the saw blade for efficient cutting. Extend your arm fully during the push stroke and retract it fully during the pull stroke. This will allow for smoother and more effective cutting.
5. Mind the Kerf: The kerf refers to the width of the saw blade. Keep in mind the kerf when sawing along the marked line to ensure the final cut aligns with your intended measurement.
6. Take Breaks if Necessary: Sawing can be physically demanding, so take breaks if you feel fatigued. This will help maintain your accuracy and prevent mistakes caused by tiredness.
Remember, practice makes perfect. It may take some time to develop a comfortable sawing rhythm and achieve precise cuts. With each project, you’ll become more proficient and confident in your sawing skills.
In the next section, we’ll cover the importance of following the saw line to maintain accuracy in your cuts.
Establishing a Sawing Rhythm
Establishing a sawing rhythm is crucial for achieving accurate and efficient cuts with a hand saw. A consistent and smooth sawing rhythm allows for better control, reduces the risk of mistakes, and improves overall cutting precision. Here are some tips to help you establish a sawing rhythm:
1. Maintain a Balanced Stance: Start by standing with your feet shoulder-width apart and maintaining a balanced posture. This will provide a stable base and optimal control over the saw.
2. Position the Saw Properly: Ensure that the saw blade is aligned with the cutting line, allowing for an accurate cut. Take a moment to double-check the position before starting.
3. Apply the Right Amount of Pressure: Use a moderate amount of pressure on both the push and pull strokes to maintain control. Avoid forcing the saw or using excessive pressure, as this can lead to inaccurate cutting and potential damage to the material.
4. Relax Your Grip: While it’s important to have a firm grip on the saw, avoid tensing your hand muscles excessively. A relaxed grip allows for smoother movements and reduces fatigue.
5. Use Fluid Movements: Aim for smooth and fluid movements while sawing. Avoid jerky or erratic motions, as they can affect the accuracy of the cut. Engage your entire arm in a coordinated manner, utilizing the full length of the saw blade.
6. Find Your Preferred Sawing Speed: Experiment with different sawing speeds to find the pace that suits you best. Some individuals may prefer a faster sawing speed, while others may find a slower, more deliberate pace to be more effective. Find the speed that allows you to maintain control and accuracy.
7. Take Breaks as Needed: If you feel fatigued or notice that your cuts are becoming less accurate, take short breaks. Resting periodically will help maintain your focus and prevent mistakes caused by exhaustion.
8. Practice and Refine: Like any skill, establishing a sawing rhythm takes practice. The more you use a hand saw, the better you’ll become at finding your rhythm and achieving precise cuts. Take the time to refine your technique and pay attention to your body movements and grip pressure.
By following these tips and practicing consistently, you’ll be able to develop a sawing rhythm that suits your style and ensures accurate cuts. In the next section, we’ll delve into the importance of following the saw line to maintain precision in your cuts.
When using a hand saw, make sure to keep a firm grip on the handle and use long, smooth strokes to cut through the material. Let the saw do the work and avoid forcing it to prevent injury.
Following the Saw Line
Following the saw line is crucial for maintaining accuracy and achieving clean cuts with a hand saw. By carefully following the marked line, you can ensure that your cuts align with your intended measurements. Here are some tips to help you follow the saw line effectively:
1. Start with a Score Cut: Begin by making a shallow score cut along the marked line. This provides a guide for the saw blade and helps prevent it from wandering off course.
2. Position the Saw Blade: Align the saw blade with the cutting line, ensuring that the teeth of the blade are positioned directly over the line. Keep a close eye on the alignment as you saw.
3. Focus on the Cutting Action: Pay attention to the cutting action of the saw blade. As you saw, watch how the teeth interact with the material. This will help you gauge if you are staying on track with the saw line.
4. Use Visual Cues: Concentrate on the point where the blade meets the material. This visual cue can help you keep the saw aligned with the marked line. Constantly refer back to the line and make small adjustments as necessary.
5. Take It Slow: Sawing too quickly can lead to inaccuracies. Take your time and maintain a steady pace. By sawing slowly and deliberately, you’ll have better control and be able to follow the saw line more precisely.
6. Make Small Corrections: If you notice the saw wandering slightly off the line, make small adjustments to bring it back on track. A gentle nudge or shift in the sawing angle can help realign the blade with the desired cutting path.
7. Avoid Exerting Too Much Pressure: Applying excessive pressure while sawing can lead to inaccurate cuts. Instead, focus on maintaining a consistent and controlled sawing motion without using unnecessary force.
8. Continue to Track the Saw Line: Follow the saw line with your eyes as you progress with each stroke. This constant visual reference will help you stay on course and make any needed adjustments in real-time.
By practicing and developing your ability to follow the saw line, you’ll greatly improve the accuracy and precision of your cuts. Remember that consistency and attention to detail are key. In the next section, we’ll discuss specific techniques for making straight cuts with a hand saw.
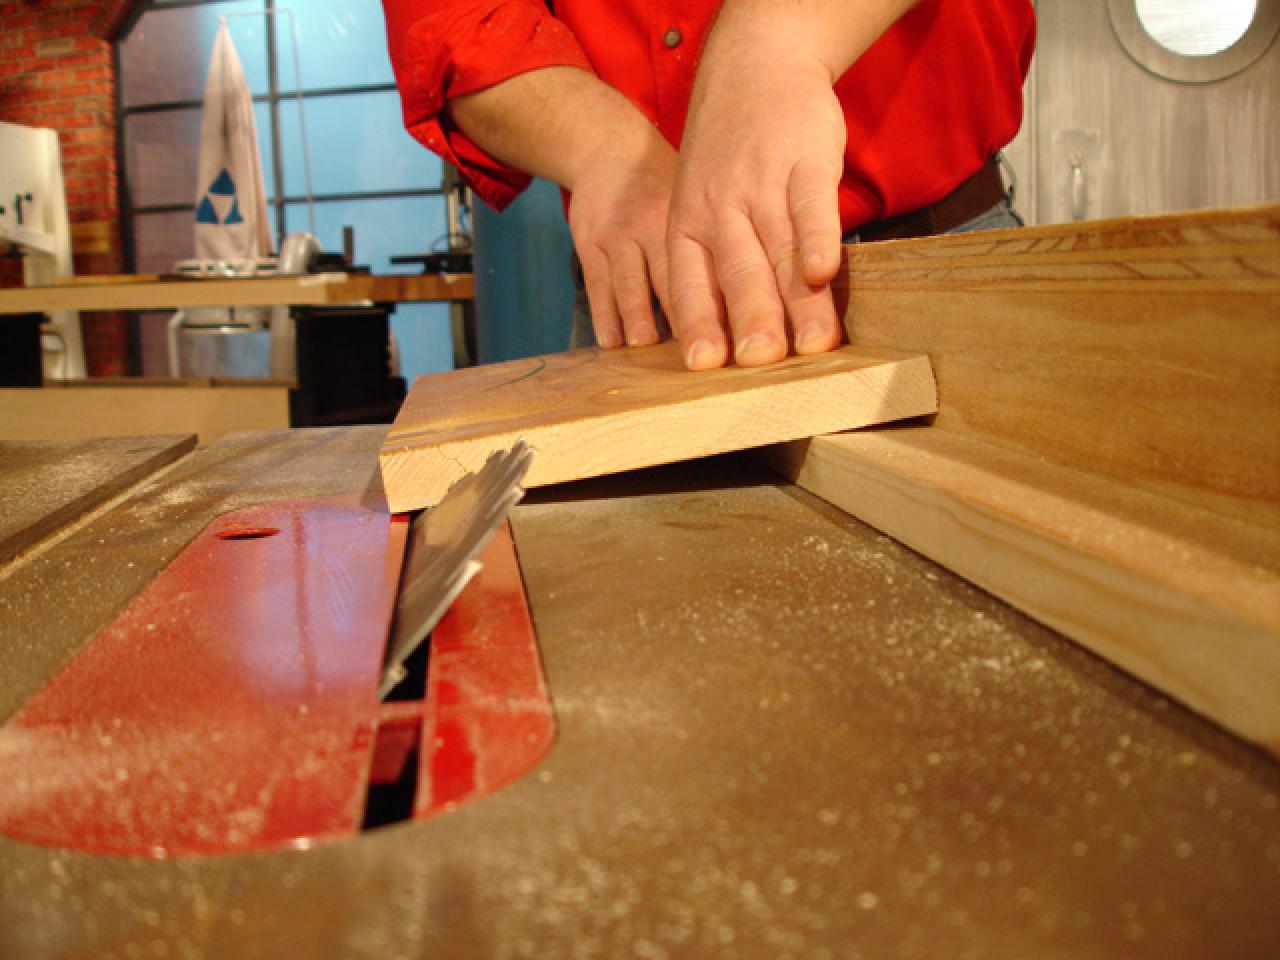
Making Straight Cuts
Being able to make straight cuts with a hand saw is an essential skill for any woodworker or DIY enthusiast. Straight cuts are necessary for a wide range of projects, from building furniture to cutting lumber for various purposes. Here are some techniques to help you achieve straight cuts with a hand saw:
1. Start with a Guide: Use a straight edge or a carpenter’s square as a guide to help you maintain a straight cutting line. Clamp the guide securely to the material, aligning it with your marked cutting line. This will provide a visual reference and help keep the saw on track.
2. Perform the Initial Score Cut: Begin by making a shallow score cut along the marked line. This will create a guide for the saw blade and help prevent it from wandering off course.
3. Maintain Proper Body Positioning: Stand in a balanced stance with your feet shoulder-width apart. Align your body and saw vertically with the cutting line. This will ensure that your sawing motion is consistent and in line with the desired cut.
4. Utilize the Full Length of the Blade: Use the full length of the saw blade to maintain a straight cut. Extend your arm fully during the push stroke and retract it fully during the pull stroke. This will provide smoother and more accurate cuts.
5. Steady Pressure and Controlled Movements: Apply gentle and even pressure on both the push and pull strokes. Avoid exerting excessive force, as this can lead to the saw wandering off the line. Maintain a steady sawing rhythm with controlled movements.
6. Focus on the Saw Line: Keep your eyes focused on the saw line as you saw. Concentrate on aligning the blade with the marked line and compare its position during each stroke. This will help you make any necessary adjustments to maintain a straight cut.
7. Practice and Patience: Making straight cuts with a hand saw requires practice and patience. Don’t be discouraged if your first few attempts aren’t perfect. With time and experience, you’ll refine your technique and improve your ability to make precise straight cuts.
8. Finishing Touches: Once the cut is complete, use sandpaper or a file to smooth any rough edges. This will ensure a clean and professional finish to your straight cut.
Remember, mastering the art of making straight cuts with a hand saw takes time and practice. By following these techniques and staying focused, you’ll be able to achieve accurate and precise straight cuts for your woodworking projects.
Read more: How To Use A Coping Saw
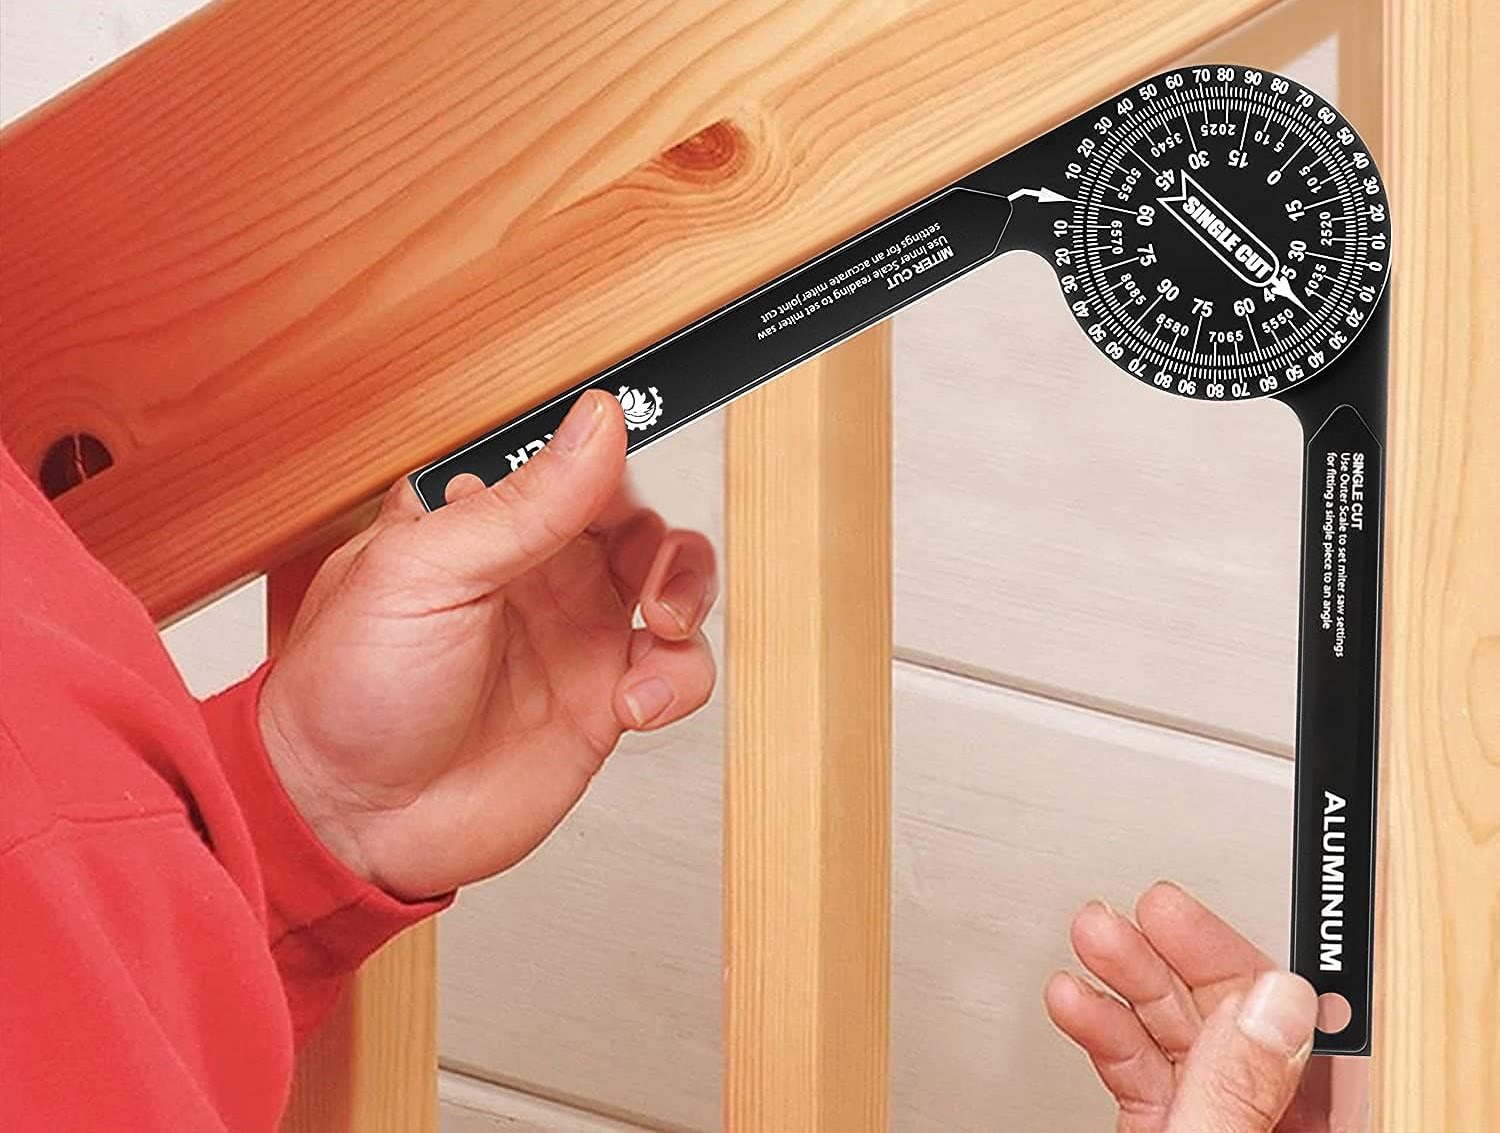
Sawing Curves and Angles
In addition to making straight cuts, knowing how to saw curves and angles with a hand saw is essential for various woodworking projects. Whether you’re creating decorative patterns or shaping materials to fit specific designs, mastering the technique of sawing curves and angles will expand your woodworking capabilities. Here are some tips to help you saw curves and angles with a hand saw:
1. Mark the Curve or Angle: Use a pencil or marking tool to draw the desired curve or angle on the material. Take your time to ensure accuracy, as this will be your guideline for sawing.
2. Cut Away Excess Material: If you’re dealing with a large curve or angle, remove excess material using a coping or fret saw before using the hand saw. This will make the sawing process easier and more manageable.
3. Make Relief Cuts: For tight curves or angles, you may need to make relief cuts. These are small straight cuts made along the curve or angle at regular intervals. Relief cuts help to prevent the material from binding and allow for easier maneuverability of the saw.
4. Adjust the Sawing Technique: When sawing curves, use a gentle rocking motion while following the marked line. Pivot the saw slightly as you progress along the curve, allowing the teeth to bite into the material in a controlled manner. For angles, adjust the angle at which you hold the hand saw to match the desired measurement.
5. Take Your Time: Sawing curves and angles requires patience and precision. Take your time to ensure that you’re following the marked line accurately. Avoid rushing the process and make small adjustments as needed to maintain control.
6. Practice on Scrap Material: If you’re new to sawing curves and angles, practice on scrap material first. This will allow you to familiarize yourself with the technique and gain confidence before working on your actual project.
7. Use a Specialty Saw: Depending on the complexity of the curve or angle, you may consider using a specialty saw, such as a coping saw or a fret saw. These saws have finer blades and are specifically designed for making intricate cuts and navigating tight curves.
8. Sand and Finish: Once the curve or angle is cut, use sandpaper or a file to smooth any rough edges. This will give the final piece a polished and professional appearance.
Remember, sawing curves and angles with a hand saw requires practice and patience. With time, you’ll become more comfortable and proficient in handling intricate cuts. Embrace the challenge and enjoy the creative possibilities that come with mastering this skill.
Sawing through Thick Material
Sawing through thick material with a hand saw requires a slightly different approach compared to standard cuts. It requires additional effort and control to ensure a clean and accurate cut. Whether you’re working with thick boards, large timber, or dense materials, these tips will help you navigate the challenges of sawing through thick material:
1. Choose the Right Saw: Select a hand saw that is designed for cutting through thick material. A saw with a longer blade and coarse teeth, such as a rip saw or a large tenon saw, will make the task easier and more efficient.
2. Make Relief Cuts: When dealing with very thick material, consider making relief cuts to help alleviate the strain on the blade and prevent binding. Relief cuts are shallow cuts made at regular intervals along the cutting line, allowing the saw to remove material more effectively.
3. Use a Sawing Horse or Bench: When possible, secure the thick material on a sawing horse or workbench. This will provide stability and make it easier to control the saw as you cut through the thickness. Ensure that the material is firmly held to prevent any movement during sawing.
4. Take It Slow and Steady: Sawing through thick material requires patience. Take your time and maintain a steady pace. Apply even pressure on both the push and pull strokes, allowing the saw to do the work. Avoid forcing the saw or using excessive pressure, as this can lead to inaccuracies or damage to the material.
5. Alternate Sides: To prevent the saw from wandering off the cutting line, alternate sides of the material as you saw. This helps distribute the cutting force evenly and ensures a straighter cut.
6. Use Guiding Tools: Consider using a straight edge or a clamped guide to help keep the saw aligned with the desired cut. This will provide visual reference and help you maintain straight lines while sawing through the thickness.
7. Keep the Blade Sharp: A sharp blade is essential for cutting through thick material efficiently. Regularly inspect the saw blade and sharpen it if necessary. A sharp blade will reduce the effort required and produce cleaner cuts.
8. Take Breaks as Needed: Sawing through thick material can be physically demanding. If you feel fatigued, take short breaks to rest and regain your energy. This will help you maintain accuracy and prevent mistakes caused by tiredness.
By following these tips, you’ll be able to confidently and effectively saw through thick material with a hand saw. Remember to prioritize safety and always wear appropriate protective gear. Enjoy the process and the satisfaction of successfully completing your woodworking projects.
Maintaining and Storing a Hand Saw
Proper maintenance and storage of your hand saw are essential for ensuring its longevity and optimal performance. Taking care of your saw will not only prolong its lifespan but also ensure that it delivers accurate and clean cuts. Here are some tips to help you maintain and store your hand saw:
1. Clean the Saw Blade: After each use, remove any sawdust, resin, or other debris from the saw blade. Use a stiff brush or a toothbrush to gently clean the teeth and blade. This will prevent buildup that can affect the saw’s cutting ability.
2. Oil the Blade: Apply a light coat of oil to the saw blade to prevent rusting. Use a non-drying oil, such as mineral oil or silicone spray, and wipe off any excess. This will help maintain the blade’s sharpness and protect it against corrosion.
3. Sharpen the Teeth: Regularly check the condition of the saw teeth. If you notice any dull or damaged teeth, it’s time to sharpen them. You can use a saw file or a sharpening stone to restore the sharpness of the teeth. Take your time and follow the proper sharpening technique to maintain the saw’s cutting performance.
4. Check for Blade Straightness: Periodically inspect the straightness of the saw blade. Lay the saw on a flat surface and look for any signs of bending or warping. If you notice any issues, it may be necessary to straighten or replace the blade.
5. Store in a Dry Location: Moisture can cause rusting and damage to the saw blade. Ensure that you store the hand saw in a dry location, away from any humidity or moisture. Consider using a protective cover or sheath to provide an additional layer of protection.
6. Protect the Teeth: To prevent accidental damage or injury, consider using a blade guard or cover to protect the saw teeth. This will also help maintain the sharpness of the teeth and prevent them from getting chipped or bent.
7. Organize Your Tools: Keep your hand saw in a dedicated space alongside your other tools. This will not only make it easily accessible but also protect it from being damaged by other tools or falling objects. Consider using a tool rack or a toolbox for organized storage.
8. Handle with Care: Always handle your hand saw with care, especially when transporting or moving it. Avoid dropping or banging the saw against hard surfaces, as this can damage the blade or handle. Treat your saw as a valuable tool and it will serve you well for years to come.
By following these maintenance and storage tips, you’ll ensure that your hand saw remains in excellent condition and provides reliable performance. Regularly inspect and care for your saw to keep it in top shape for all your future woodworking projects.
Conclusion
Learning how to use a hand saw effectively is a valuable skill for woodworkers and DIY enthusiasts alike. It allows you to make precise cuts, unleash your creativity, and achieve professional-looking results. By following the guidelines and techniques discussed in this article, you’ll be well-equipped to use a hand saw with confidence and precision.
Remember to prioritize safety by wearing appropriate protective gear and maintaining a clean and organized workspace. Take the time to choose the right hand saw for your specific needs, considering factors such as blade type, teeth per inch, and handle comfort. Properly preparing your workpiece, gripping the hand saw correctly, and making the initial cut will set the foundation for successful sawing.
Establishing a sawing rhythm and following the saw line are crucial for maintaining accuracy and achieving clean cuts. Whether you’re making straight cuts, sawing curves and angles, or tackling thick materials, practice and patience are key. With time and experience, you’ll develop the skills to create intricate designs and tackle complex woodworking projects.
Lastly, always remember to maintain and store your hand saw properly. Regular cleaning, oiling, and sharpening will help keep the blade in optimal condition. Store your hand saw in a dry location, protect the teeth, and handle it with care to ensure its longevity.
With dedication and practice, using a hand saw will become second nature. Embrace the craftsmanship and satisfaction that comes with hand tool woodworking. Enjoy the process of bringing your ideas to life and creating beautiful pieces through the art of sawing with a hand saw.
Frequently Asked Questions about How To Use A Hand Saw
Was this page helpful?
At Storables.com, we guarantee accurate and reliable information. Our content, validated by Expert Board Contributors, is crafted following stringent Editorial Policies. We're committed to providing you with well-researched, expert-backed insights for all your informational needs.


0 thoughts on “How To Use A Hand Saw”