Articles
How To Use A Wet Saw
Modified: March 2, 2024
Learn how to use a wet saw effectively with our informative articles. From safety tips to step-by-step instructions, discover everything you need to know.
(Many of the links in this article redirect to a specific reviewed product. Your purchase of these products through affiliate links helps to generate commission for Storables.com, at no extra cost. Learn more)
Introduction
When it comes to cutting tiles for your home improvement projects, a wet saw can be an invaluable tool. Whether you’re renovating your bathroom, installing a new backsplash in your kitchen, or working on a tile flooring project, using a wet saw can make the job easier and more precise.
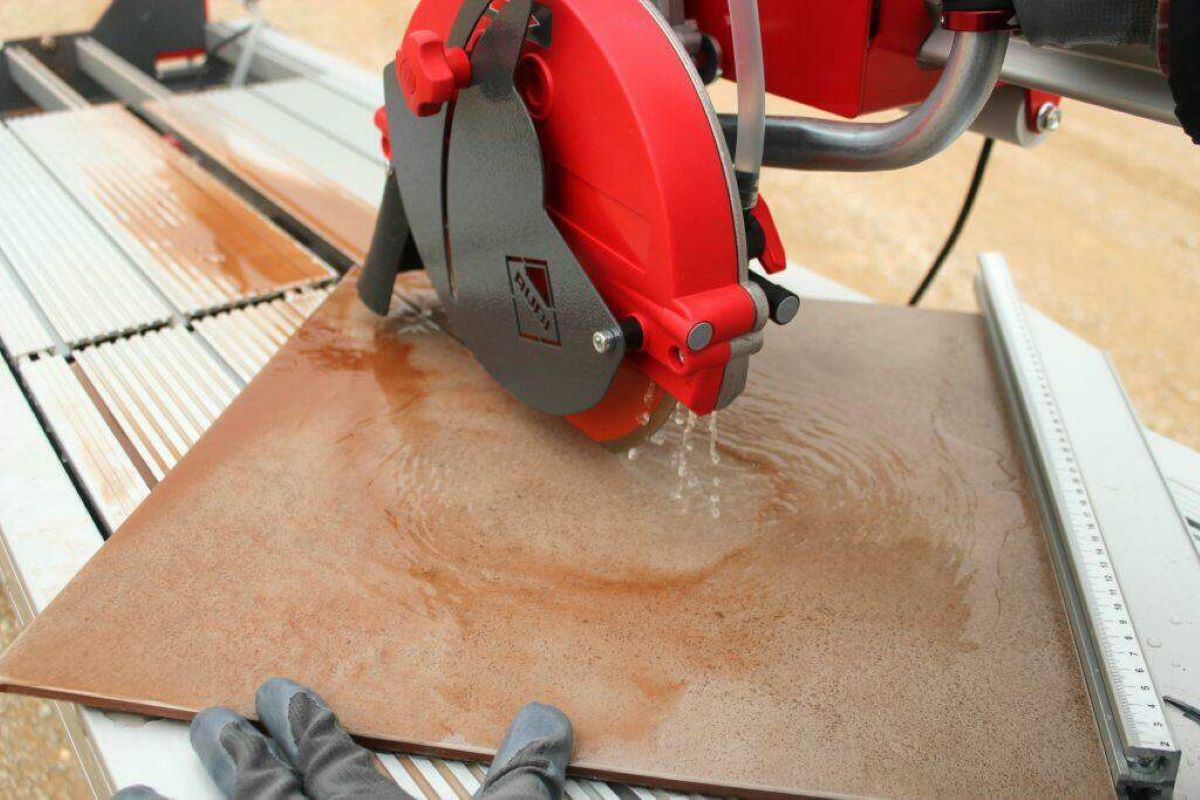
A wet saw is specifically designed to cut through various types of tiles, including ceramic, porcelain, and stone. It utilizes a diamond blade that is cooled with water, hence the name “wet” saw. This water-cooling feature helps to reduce friction and prevent the blade from overheating, resulting in cleaner cuts and prolonging the life of the blade.
Using a wet saw may seem intimidating at first, especially if you’ve never used one before. However, with the right guidance and safety precautions, you can quickly become proficient in using this powerful tool.
In this article, we will guide you through the process of using a wet saw to cut tiles effectively and safely. We will cover the necessary safety precautions, the materials and tools required, setting up the wet saw, preparing the tile for cutting, making the cut, cleaning and maintaining the wet saw, troubleshooting tips, and more.
By the end of this article, you’ll feel confident and ready to tackle your tile cutting projects with a wet saw. So, let’s get started!
Key Takeaways:
- Prioritize safety by wearing protective gear, working in a well-ventilated area, and following manufacturer’s instructions. Gather materials, set up the wet saw, and prepare tiles accurately for clean and precise cuts.
- Regularly clean and maintain the wet saw to ensure optimal performance and longevity. Follow troubleshooting tips to overcome common issues and achieve professional results.
Read also: 15 Best Wet Masonry Saw For 2025
Safety Precautions
Before diving into using a wet saw, it’s important to prioritize your safety. Working with any power tool requires caution and attention to detail. Here are some essential safety precautions to keep in mind:
- Wear protective gear: Always wear safety glasses or goggles to protect your eyes from debris and splashes. Additionally, wearing ear protection can help minimize the noise generated by the wet saw. Don’t forget to wear gloves to protect your hands and sturdy shoes to prevent any foot injuries.
- Work in a well-ventilated area: Cutting tiles with a wet saw can generate fine particles and dust. To minimize inhalation of these particles, it’s crucial to work in an area with good ventilation. Open windows or doors, or use a fan to improve airflow.
- Keep the work area clean and organized: Clear away any clutter or obstacles from the work area to prevent accidents. Make sure the surface is stable and secure before placing the wet saw on it.
- Use a GFCI outlet: When working with wet tools, it’s important to use a Ground Fault Circuit Interrupter (GFCI) outlet. This type of outlet helps protect against electrical shock by instantly cutting off power if an electrical fault occurs.
- Follow the manufacturer’s instructions: Familiarize yourself with the user manual provided by the wet saw manufacturer. Every wet saw may have specific guidelines and instructions for safe operation. Make sure to read and understand them thoroughly before starting.
- Keep your hands clear: Never reach under the blade while it is spinning or attempt to remove debris with your bare hands. Always use a brush or appropriate tools to clean the cutting area.
- Stay focused and avoid distractions: Concentrate on the task at hand and avoid any distractions while operating the wet saw. Accidents are more likely to happen when your attention is divided.
- Disconnect the power when not in use: Before performing any maintenance or adjustments on the wet saw, make sure to unplug it from the power source. This will prevent accidental starts or electrical shocks.
- Never force the tile into the blade: Let the wet saw do the work and avoid applying excessive pressure. Forced cutting can lead to dangerous kickbacks and damage to the blade.
- Work at a comfortable pace: Rushing through the cutting process can increase the risk of mistakes and accidents. Take your time and work at a comfortable speed to ensure precision and safety.
By following these safety precautions, you can significantly reduce the risk of injury and create a safe working environment when using a wet saw. Remember, safety should always be your top priority!
Gathering Materials and Tools
Before you can start using a wet saw to cut tiles, you’ll need to gather the necessary materials and tools. Having everything prepared and readily available will streamline the process and ensure a smoother workflow. Here’s a list of what you’ll need:
- Wet saw: Invest in a good quality wet saw that suits your needs. Consider factors such as the size of the tiles you’ll be cutting and the type of projects you’ll be working on. Look for a wet saw with a sturdy frame, a powerful motor, and a diamond blade that can be adjusted for different angles and depths.
- Water source: Most wet saws require a water source to cool the blade. You can use a hose connected to a nearby faucet or a water container with a pump system to provide a continuous flow of water to the saw.
- Tiles: Choose the type and size of tiles that you’ll be working with for your specific project. Purchase enough tiles to account for any mistakes or extra cuts that may be required.
- Measuring tools: A tape measure and a square are essential for accurately measuring and marking the tiles before cutting. This will ensure precise cuts and proper alignment.
- Tile markers: Use a non-permanent marker or a pencil to mark the tiles where you need to make the cuts. This will provide a clear guide for positioning the tiles on the wet saw.
- Tile spacers: If you’re working on a tiling project that requires even spacing between the tiles, have tile spacers on hand to ensure consistent gaps.
- Tile nippers or tile cutter: Although a wet saw is the primary tool for cutting tiles, you may still need tile nippers or a tile cutter for intricate or smaller cuts. These tools are useful for trimming and shaping tiles around edges and corners.
- Safety gear: As mentioned in the safety precautions section, make sure to have safety glasses, gloves, ear protection, and sturdy shoes to protect yourself during the cutting process.
- Worktable or sawhorse: A stable work surface is crucial for positioning the wet saw and supporting the tiles during cutting. If your wet saw doesn’t come with a built-in table, consider using a sturdy worktable or sawhorse to provide a stable base.
- Cleaning supplies: Keep a sponge or a cloth nearby to clean the wet saw and wipe away excess water and debris during and after cutting. This will help maintain the wet saw’s performance and prolong its lifespan.
Having these materials and tools at your disposal will ensure a more efficient and successful tile cutting experience. Make sure to double-check that you have everything before starting your project to avoid any unnecessary interruptions.
Setting Up the Wet Saw
Once you have gathered all the necessary materials and tools, you are ready to set up your wet saw. Proper setup is essential for ensuring accurate cuts and a smooth cutting process. Follow these steps to set up the wet saw:
- Select an appropriate location: Choose an area with enough space to accommodate the wet saw and your working materials. Ensure the location is well-ventilated and has access to a water source for the wet saw’s cooling system.
- Level the work surface: If your wet saw comes with an adjustable table, make sure it is level by using a bubble level. A level surface will provide stability and accurate cuts.
- Install the diamond blade: Refer to the manufacturer’s instructions to install the diamond blade onto the wet saw. Make sure to tighten the blade securely using the provided wrench or key.
- Connect the water source: Set up the water source according to your wet saw’s requirements. This may involve attaching a hose to a faucet or connecting a water container with a pump system. Ensure that the water flow is directed toward the blade to keep it cool during the cutting process.
- Adjust the blade height and angle: Use the wet saw’s adjustment mechanisms to set the appropriate height and angle for the blade. This will depend on the type and thickness of the tiles you’ll be cutting. Consult the wet saw’s manual for guidance on adjusting the blade.
- Test the wet saw: Before cutting your tiles, it’s a good idea to do a test run. Turn on the wet saw and observe the blade in action. Check for any abnormal vibration or noise and ensure that the water is flowing properly onto the blade.
- Position the worktable or sawhorse: If your wet saw doesn’t come with a built-in table, position a worktable or sawhorse adjacent to the wet saw. This will provide ample support and stability for the tiles while cutting.
- Set up a work area: Clear the area around the wet saw and establish a designated work area where you can safely handle the tiles. Remove any potential obstructions and organize your tools and materials for easy access.
- Double-check safety precautions: Ensure that you have all the necessary safety gear, such as safety glasses, gloves, ear protection, and sturdy shoes. Also, ensure there are no loose clothing or accessories that could get entangled in the wet saw.
Once you have completed the setup process, you’re ready to move on to the next step: preparing the tiles for cutting. Proper setup and alignment of the wet saw are crucial for achieving accurate and clean cuts, so take your time to ensure everything is in order before proceeding.
Preparing the Tile for Cutting
Before you can start cutting tiles with a wet saw, it’s important to properly prepare them to ensure clean and accurate cuts. Follow these steps to prepare the tile for cutting:
- Measure and mark: Use a tape measure and a square to measure and mark the tiles where you need to make cuts. Double-check your measurements to ensure accuracy, especially for complex cuts or if you’re working with multiple tiles.
- Place the tile on the wet saw: Position the marked tile on the worktable or sawhorse adjacent to the wet saw. Carefully slide the tile onto the wet saw’s table, ensuring that it is properly aligned and securely held in place. Pay attention to the orientation of the tile and the guide marks you’ve made.
- Secure the tile: If your wet saw has clamps or adjustable guides, use them to secure the tile in place. This will prevent any movement or slippage during the cutting process and ensure consistent and accurate cuts.
- Align the blade with the cutting mark: Adjust the wet saw’s blade position and angle to match the cutting mark on the tile. Take your time to align the blade precisely with the mark, ensuring that it will cut exactly where you need it to.
- Check the water flow: Before making the cut, make sure that the water flow from the wet saw’s cooling system is directed onto the blade. This will ensure adequate cooling and lubrication, preventing the blade from overheating and reducing friction during the cutting process.
- Put on safety gear: Double-check that you’re wearing all the necessary safety gear, including safety glasses, gloves, ear protection, and sturdy shoes. Ensure that you’re in a comfortable position and have a clear line of sight to the cutting area.
- Ready to cut: Once everything is properly aligned and secured, you’re ready to make the cut. Turn on the wet saw and let the blade reach its full speed before lowering it gently onto the tile.
- Apply gentle pressure: Use light and steady pressure to guide the tile through the wet saw’s blade. Let the blade do the work and avoid forcing the tile through. Allow the water to continually flow over the blade to keep it cool and prevent excessive heat buildup.
- Complete the cut: Carefully guide the tile through the blade until you’ve achieved a clean and precise cut. Once the cut is complete, slowly raise the blade and turn off the wet saw.
- Inspect the cut: After making the cut, inspect the tile to ensure that it has been cut to your desired specifications. Check for any rough edges or imperfections that may require additional smoothing or trimming.
By following these steps, you will properly prepare the tile for cutting and set yourself up for successful and accurate cuts with the wet saw. Take your time and focus on precision to achieve the best results possible.
Always wear safety goggles and gloves when using a wet saw to protect your eyes and hands from flying debris and water splashes.
Read more: How To Use A Hand Saw
Making the Cut with the Wet Saw
Now that you have prepared the tile and set up the wet saw, it’s time to make the actual cut. Follow these steps to effectively and safely cut the tile with the wet saw:
- Verify the setup: Before proceeding, double-check that all safety precautions are in place. Also, ensure that the wet saw is properly set up and the blade is securely tightened.
- Position the tile: Place the marked tile onto the wet saw’s table, aligning it with the cutting mark and securely fastening it in place using clamps or adjustable guides if available.
- Turn on the wet saw: Switch on the wet saw and let the blade reach its full speed before proceeding. This may vary depending on the specific saw model, so consult the manufacturer’s instructions for guidance.
- Start the cut: Gently lower the tile onto the wet saw’s blade, aligning the cutting mark with the blade’s path. Apply light pressure to guide the tile through the blade, allowing the water to continuously flow onto the blade to keep it cool and lubricated.
- Focus on the cut: Keep your attention solely on the cutting process. Follow the cutting mark and maintain a steady hand to ensure a clean and straight cut. Avoid rushing or applying excessive force, as this can lead to imperfect cuts or damage the blade.
- Support the tile: Use your non-dominant hand to support the tile as you guide it through the blade. This will help prevent any vibrations or slippage, ensuring a smooth and controlled cut.
- Finish the cut: Continue guiding the tile through the blade until you’ve reached the end of the cut. Once the cut is complete, slowly lift the tile off the blade and turn off the wet saw.
- Inspect the cut: Examine the cut edge of the tile to ensure it is clean, smooth, and meets your desired specifications. If any rough edges or imperfections are present, you may need to use a tile file or sandpaper to smooth them out.
- Clean the tile and wet saw: Remove any debris or excess water from the tile and clean the wet saw’s table and blade. This will ensure optimal performance and prevent any buildup that may affect future cuts.
- Repeat the process: If you have more tiles to cut, repeat the steps above for each tile, making sure to take breaks as needed to rest and maintain focus.
Remember, practice makes perfect. As you gain more experience using the wet saw, you will become more proficient in making precise and clean cuts. Take your time, follow the proper technique, and soon you will master the art of cutting tiles with a wet saw.
Cleaning and Maintaining the Wet Saw
Proper cleaning and maintenance of your wet saw are vital to ensure its longevity and optimal performance. Regular maintenance not only keeps your tool in good condition but also enhances the quality of your cuts. Follow these steps to clean and maintain your wet saw:
- Turn off and unplug the wet saw: Always make sure the wet saw is turned off and unplugged before starting any cleaning or maintenance tasks. This ensures your safety while working on the tool.
- Remove debris and excess water: Use a brush or a damp cloth to remove any debris or excess water from the wet saw’s table, blade, and surrounding areas. Clearing away debris helps maintain accurate cuts and prevents blockages.
- Clean the blade: Gently clean the diamond blade using a soft brush or cloth. Remove any built-up residue or debris by brushing along the blade in the same direction as the cutting motion. Take care to avoid contact with the sharp edges of the blade.
- Inspect and replace the blade: Regularly inspect the blade for signs of wear or damage. If the blade becomes dull or shows signs of wear, it’s essential to replace it to maintain clean and efficient cuts. Follow the manufacturer’s instructions for proper blade replacement.
- Check the water system: Examine the water system for any clogs or blockages that may affect water flow. Clean or unclog any obstructions to ensure a steady flow of water onto the blade during cutting.
- Inspect the motor and wiring: Carefully inspect the motor and wiring for any visible damage or loose connections. If you notice any issues, it’s best to seek professional assistance or contact the manufacturer for repair or replacement.
- Tighten loose parts: Check all nuts, bolts, and screws on the wet saw to ensure they are securely tightened. Loose parts can affect the saw’s stability and compromise its performance and safety.
- Store in a dry and clean area: After cleaning and maintenance, store the wet saw in a dry and clean area, protected from dust and moisture. If possible, cover it with a waterproof cover to further safeguard it from any potential damage.
- Follow manufacturer’s maintenance guidelines: In addition to these general cleaning and maintenance steps, refer to the manufacturer’s instructions for any specific maintenance guidelines or recommendations. Adhering to these guidelines will help keep your wet saw in optimal condition.
- Regularly check safety features: Ensure that all safety features, such as blade guards and safety switches, are functioning properly. If any safety features are damaged or not working correctly, do not use the wet saw until they are repaired or replaced.
By following these cleaning and maintenance steps, you can keep your wet saw in excellent condition and prolong its lifespan. Regularly clean and inspect the tool to address any potential issues promptly, ensuring that it continues to operate safely and efficiently.
Troubleshooting Tips
Even with proper setup and maintenance, you may encounter occasional issues or challenges while using a wet saw. Here are some common troubleshooting tips to help you overcome these challenges:
- Blade not cutting smoothly: If the blade is not cutting smoothly or creating jagged edges, it may be dull or worn. Replace the blade with a new one to ensure clean and precise cuts.
- Chipping or cracking of tiles: To prevent chipping or cracking of tiles, ensure that the blade is properly aligned with the cutting mark. Additionally, adjust the cutting speed and pressure to minimize any potential damage to the tile surface.
- Water not flowing properly: If the water is not flowing properly onto the blade, check for any clogs or blockages in the water system. Unclog any obstructions and ensure a constant and even water flow to keep the blade cool and lubricated.
- Overheating of the blade: Overheating can occur if the blade is not adequately cooled with water. Make sure the water flow is directed onto the blade during cutting and check that the water supply is sufficient to maintain proper cooling.
- Blade becoming stuck: If the blade becomes stuck during cutting, immediately turn off the wet saw and unplug it. Carefully examine the blade for any obstructions or debris, and remove them before attempting to resume cutting.
- Uneven cutting depth: If you are experiencing uneven cutting depth, check that the blade is properly attached and aligned. Additionally, ensure that the cutting guide or adjustable fences are securely in place to maintain consistent cutting depth.
- Excessive vibration or noise: Excessive vibration or noise can be a sign of an unbalanced blade or loose components. Check and tighten all nuts, bolts, and screws, and ensure that the blade is securely fastened to minimize vibrations and noise.
- Poor water drainage: If water is pooling on the wet saw’s table and not draining properly, check for any clogs or blockages in the drainage system. Clean or unclog the drainage channels to maintain proper water drainage and prevent damage to the wet saw.
- Motor not starting: If the motor fails to start, check the power source and ensure that the wet saw is correctly plugged in. If the power source is not the issue, inspect the electrical connections and consult the manufacturer or a professional for further assistance.
- Excessive water spray: If the wet saw is producing excessive water spray during cutting, check the water flow and adjust it to a suitable level. Also, ensure that the blade guard is properly positioned to minimize water spray outside the cutting area.
If you encounter any persistent issues or difficulties that you are unable to resolve, it is advisable to consult the manufacturer’s instructions or seek assistance from a professional. They can provide further guidance and help address any specific issues with your wet saw.
Remember, troubleshooting is a normal part of using a wet saw, but with patience and the right approach, you can overcome these challenges and achieve precise and clean cuts.
Conclusion
Using a wet saw to cut tiles can significantly simplify and enhance your home improvement projects. By following the proper steps and safety precautions, you can achieve precise and clean cuts, resulting in professional-looking results. Throughout this article, we have covered various aspects of using a wet saw, including safety precautions, gathering materials, setting up the wet saw, preparing the tile for cutting, making the cut, cleaning and maintaining the wet saw, and troubleshooting tips.
Remember to prioritize your safety by wearing the appropriate protective gear and working in a well-ventilated area. Gather all the necessary materials and tools, including the wet saw itself, and set it up properly before starting the cutting process. Take the time to measure and mark the tile accurately, and ensure it is securely positioned on the wet saw’s table. Make sure to follow the proper techniques for guiding the tile through the blade, applying light pressure and allowing the water to flow to keep the blade cool. Regularly clean and inspect the wet saw to maintain its performance and longevity.
Should you encounter any issues or challenges, follow the troubleshooting tips provided to overcome them effectively. Remember, practice makes perfect, and with experience, you will become more proficient in using the wet saw.
By incorporating the knowledge and techniques outlined in this article, you’ll be well-equipped to tackle your tile cutting projects with confidence and achieve professional results. So, go ahead and unleash your creativity as you transform your home with the help of a wet saw!
Frequently Asked Questions about How To Use A Wet Saw
Was this page helpful?
At Storables.com, we guarantee accurate and reliable information. Our content, validated by Expert Board Contributors, is crafted following stringent Editorial Policies. We're committed to providing you with well-researched, expert-backed insights for all your informational needs.


0 thoughts on “How To Use A Wet Saw”