Articles
13 Amazing Plumbing Putty For 2025
Modified: June 10, 2025
Discover the top 13 plumbing putty for 2025. Find the perfect solution for your plumbing needs with these amazing products.
(Many of the links in this article redirect to a specific reviewed product. Your purchase of these products through affiliate links helps to generate commission for Storables.com, at no extra cost. Learn more)
Welcome to our comprehensive guide on "13 Amazing Plumbing Putty for 2025." Plumbing putty is an essential tool for any DIY plumber or professional contractor, providing a reliable solution for sealing leaks and preventing water damage. In this article, we will present a curated list of thirteen exceptional plumbing putties that have garnered widespread acclaim in the industry. By exploring their unique features, strengths, and applications, we aim to equip you with the knowledge needed to make informed choices when it comes to tackling plumbing projects. Whether you are a seasoned plumber or a novice homeowner, this guide will help you find the best plumbing putty for your needs.

Overall Score: 9/10
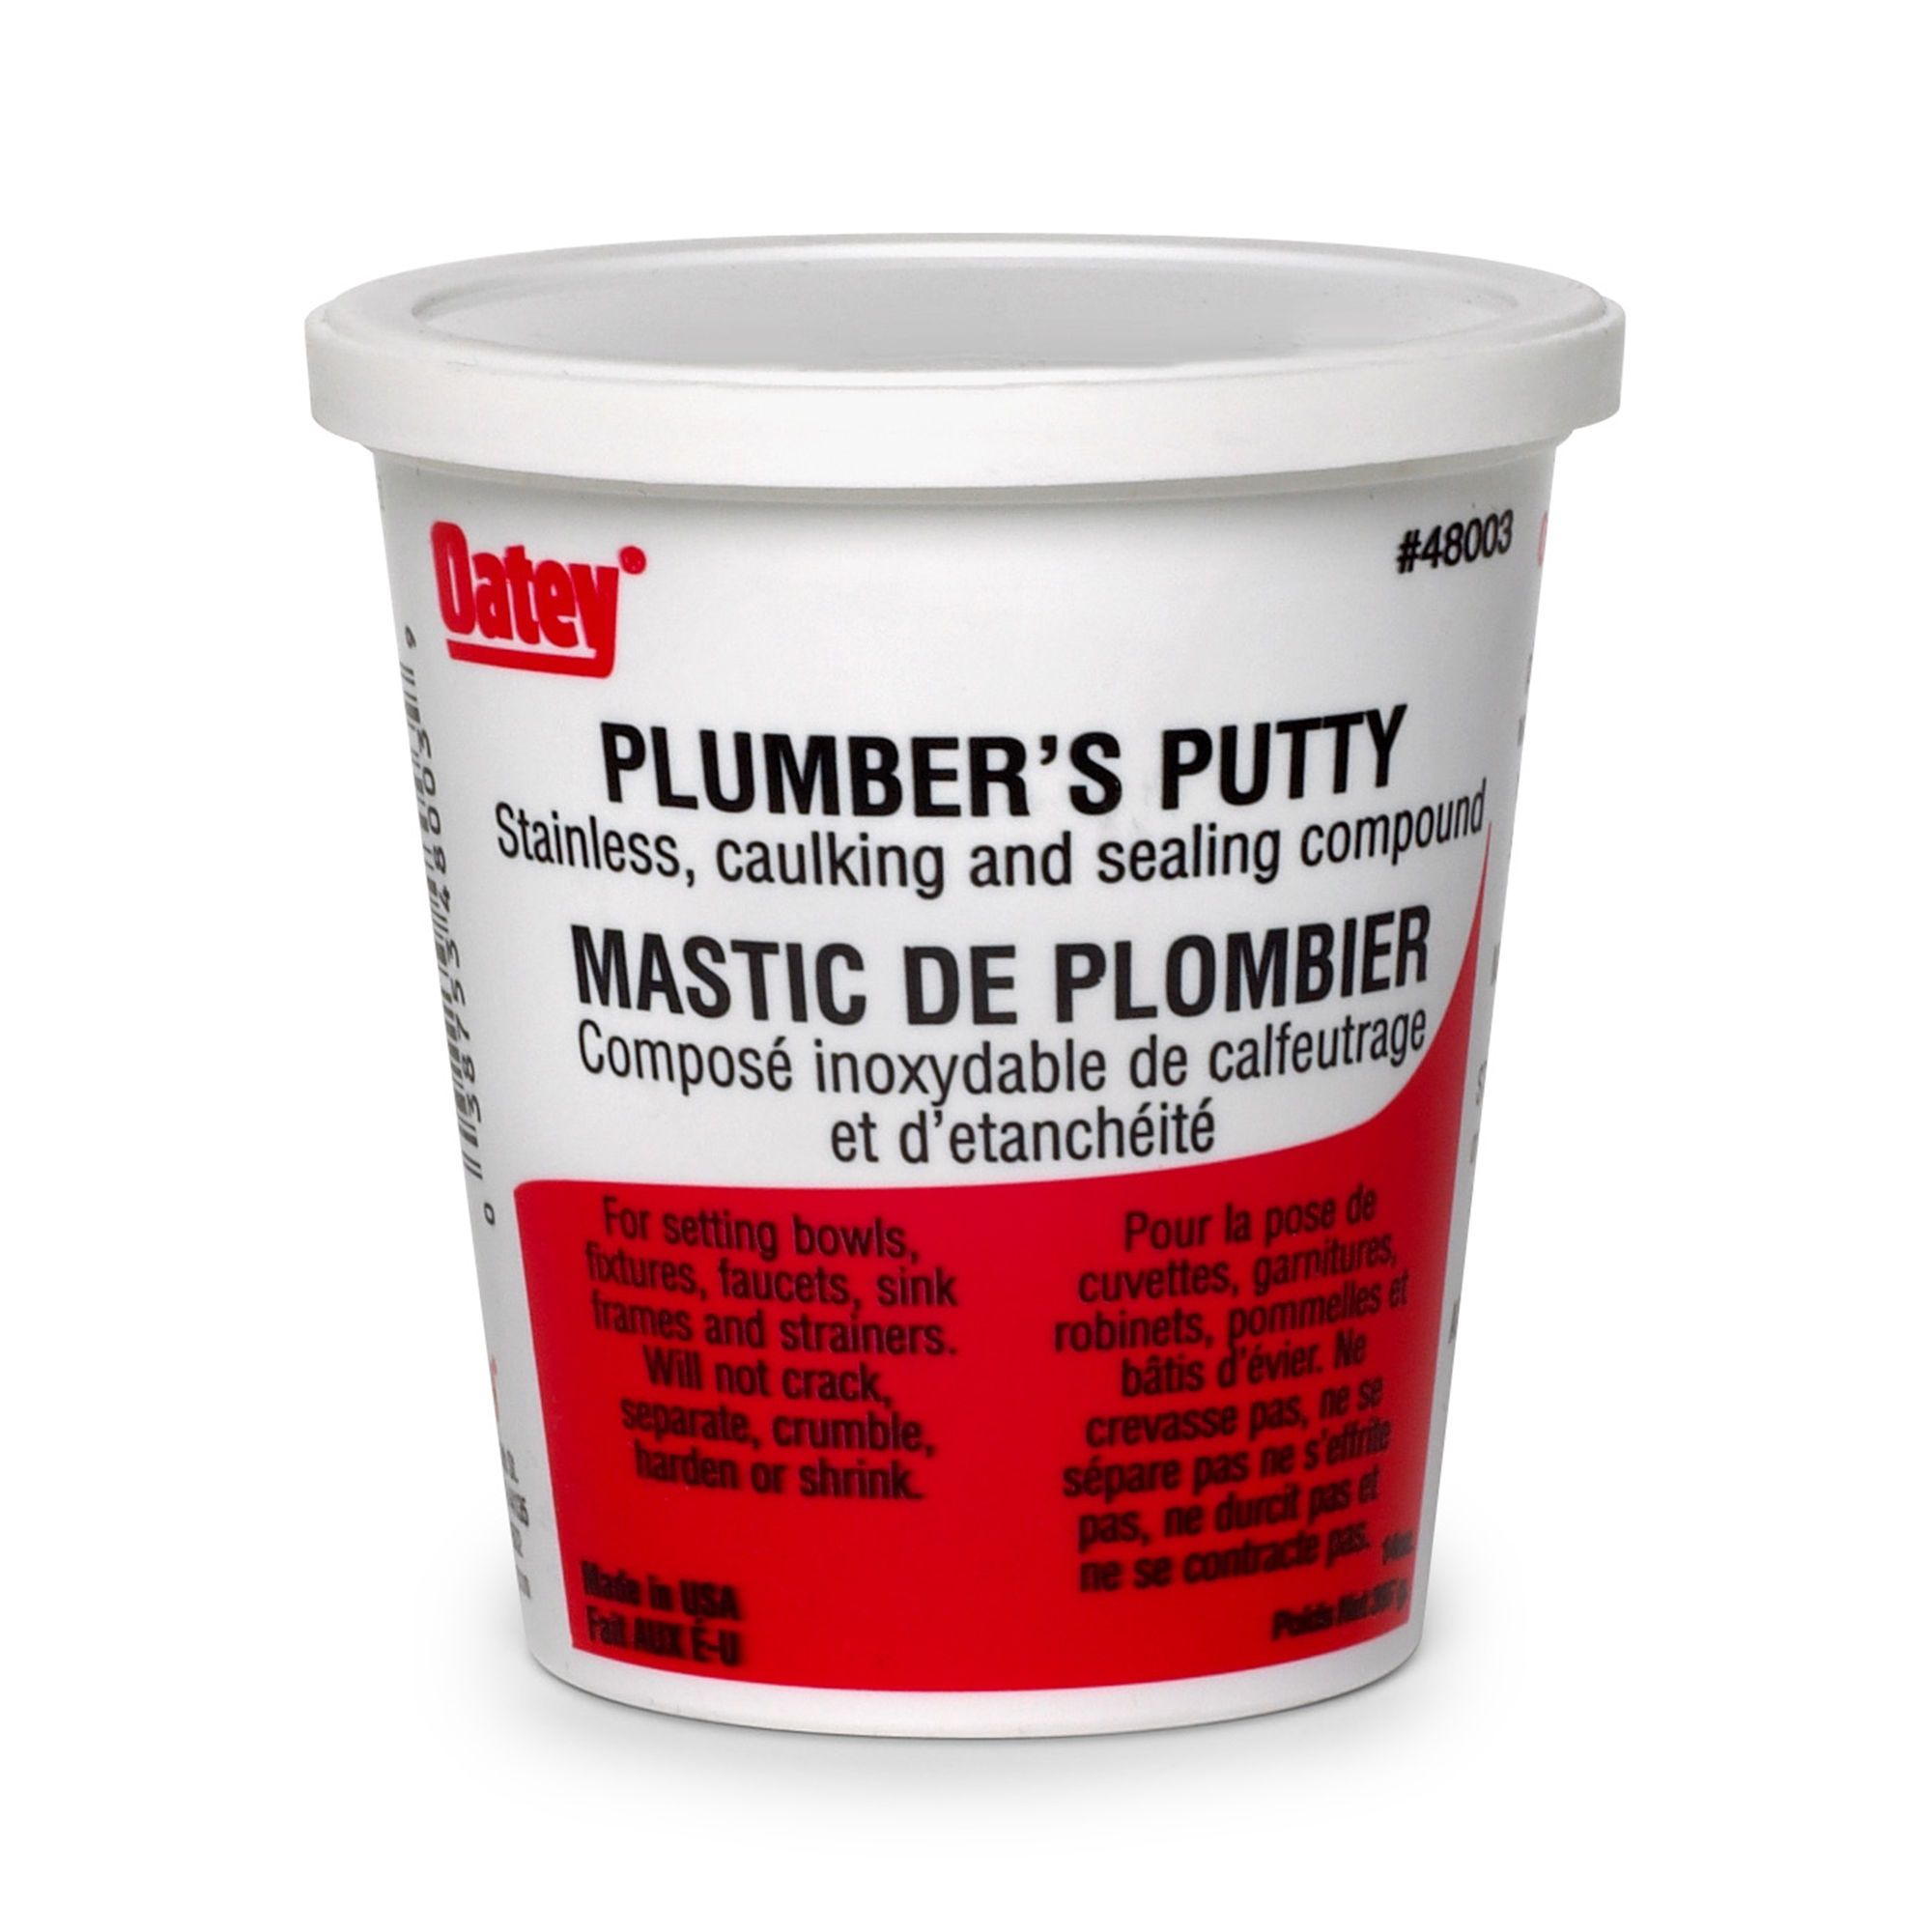
The Harvey's WM Harvey 043010 Stainless Plumbers Putty is a versatile plumbing product that provides a reliable and long-lasting seal. With its off-white color and 14 oz size, it is suitable for various applications. This plumbers putty will not support bacteria and meets Federal Specification TT-P-1536A. However, it should not be used on marble, synthetic marble, porous surfaces, or plastic lavatories and fixtures. It is recommended to use Harvey's Siliconized Tub Seal Latex or 100% RTV Silicone for these specific applications. Customers have praised its pliability and ease of use, making it ideal for sink repairs and drain installations. Overall, the Harvey's WM Harvey 043010 Stainless Plumbers Putty is a reliable and effective solution for all your plumbing needs.
Key Features
- Will not support bacteria
- Meets Federal Specification TT-P-1536A
- Recommended for specific applications
- Not suitable for marble, synthetic marble, porous surfaces, or plastic lavatories and fixtures
Specifications
- Color: Off-White
- Dimension: 3.30Lx3.30Wx3.30H
- Size: 14 oz
Pros
- Very moist and easy to work with
- Provides a reliable and long-lasting seal
- Easy to mold and paint over
- Conforms as it should
- Non-hardening for easy clean-up
Cons
- Not suitable for certain surfaces
- Limited customer reviews
The Harvey’s WM Harvey 043010 Stainless Plumbers Putty is a high-quality product that delivers excellent results. Its versatility, pliability, and long-lasting seal make it an ideal choice for various plumbing applications. However, it is important to note that it is not suitable for use on certain surfaces. Overall, this plumbers putty provides a reliable and effective solution for all your plumbing needs.

Overall Score: 8.2/10
The AquaPlumb Plumbers Putty is a versatile and reliable solution for sealing, fixing, and preventing leaks. This white plumbers putty stays soft over time, even in higher heats, allowing for a durable and long-lasting water-tight seal. Its 14 oz container provides an ample amount of putty for various applications. From kitchen sinks to bathroom tubs, toilets, fountains, and more, this multi-use putty is a go-to choice for both professionals and DIY enthusiasts. Made in the USA, it offers a reliable and trusted solution for all your plumbing needs.
Key Features
- PLUMBERS PUTTY: Seals, fixes, and prevents leaks
- STAYS SOFT: Retains softness even in higher heats
- MULTI-USE: Suitable for sinks, tubs, toilets, fountains, and more
- Made in USA
Specifications
- Color: White
- Dimension: 3.25Lx3.15Wx3.15H
- Size: Compact
Pros
- Stays soft over time
- Creates water-tight seals
- Versatile for various applications
- Made in the USA
Cons
- Putty may dry and become hard to apply
- Strong smell during application
The AquaPlumb Plumbers Putty is a reliable and versatile solution that delivers on its promises. It offers a water-tight seal that stays soft over time, making it ideal for sinks, tubs, toilets, fountains, and more. The putty is easy to use and provides a long-lasting solution to prevent leaks. While it may have a strong smell during application and could dry out, overall, it offers great value for the price. Whether you’re a professional plumber or a DIY enthusiast, this white plumbers putty is a dependable choice that gets the job done effectively.

Overall Score: 8/10
The Oatey 31274 Stick Fix-It Multi-Purpose Epoxy Putty is a convenient, steel-filled compound that can be used for sealing, patching, and mending various items. This multipurpose putty mixes easily in the hand and hardens within minutes, allowing for quick repairs. Once hardened, it can be drilled, tapped, filed, sanded, sealed, and painted, providing versatility in its use. The non-toxic material contains no solvents and does not shrink, making it safe and reliable for a range of applications. Whether it's plumbing, electrical, automotive, or home repairs, this epoxy putty is an ideal temporary solution. Please note that there have been some customer reports of the color not being white as described and a strong smell during kneading.
Key Features
- Convenient multi-purpose sealing, patching and mending compound
- Steel filled material, mixes in the hand and hardens in minutes
- May be drilled, tapped, filed, sanded, sealed and painted when hardened
- Non-toxic material contains no solvents and will not shrink
- Ideal for temporary repair of plumbing, electrical, auto and home products
Specifications
- Color: White
- Dimension: 5.50Lx3.63Wx2.00H
- Size: 1.7 oz.
Pros
- Convenient and versatile for various repair needs
- Easy to use and hardens quickly
- Non-toxic and safe to handle
- Can be drilled, filed, sanded, and painted after hardening
- Ideal for temporary repairs on multiple surfaces
Cons
- Color may not match description (not white)
- Strong smell while kneading the putty
- Limited working time before it hardens and becomes useless
- May arrive partially dried out if not properly sealed
The Oatey 31274 Stick Fix-It Multi-Purpose Epoxy Putty is a reliable and convenient option for quick repairs. Its steel-filled composition and easy-to-use nature make it a versatile choice for a variety of applications. While there have been some minor drawbacks reported, such as color inconsistency and a strong smell during use, the overall positive customer reviews highlight its effectiveness. With a quick-hardening formula and the ability to be drilled, filed, sanded, and painted after hardening, this epoxy putty provides a practical solution for temporary repairs. Keep a pack handy for those unexpected fixes around your home or workplace.

Overall Score: 8.7/10
The InSinkErator Dishwasher Connector Kit is a fast and easy way to connect a dishwasher drain to your food waste disposer. It installs easily in minutes. The kit includes an inlet connector, hose clamp, and 3 spring clamps—everything you need to connect your dishwasher drain to your InSinkErator garbage disposal. There are more American-built InSinkErator garbage disposals in US homes than all other brands combined. A full line of models means there's one right for every need and budget. Additionally, the WM Harvey 043010 Stainless Plumbers Putty is a reliable option that meets Federal Specification TT-P-1536A and will not support bacteria.
Key Features
- Connect your dishwasher easily
- Hardware included – inlet connector, hose clamp, and 3 spring clamps
- America's #1 disposer brand
- Faster, cleaner, smarter kitchen with In Sink Erator appliances
- WM Harvey putty – does not support bacteria and meets Federal Specification TT-P-1536A
Specifications
- N/A
Pros
- Easy installation in minutes
- High-quality hardware included
- In Sink Erator is a trusted and popular brand
- WM Harvey putty has antibacterial properties
- Meets Federal Specification TT-P-1536A
Cons
- No specifications provided
- Putty cannot be used on certain surfaces
- Mixed reviews on the need for the hose adapter
The InSinkErator DWC-00 Plumbing-Equipment is a reliable and easy-to-install dishwasher connector kit that ensures a proper connection between the dishwasher drain and InSinkErator garbage disposal. With the included hardware, installation takes only a few minutes, making it a convenient choice for any kitchen. In addition, InSinkErator is a well-known and trusted brand in the industry. The WM Harvey 043010 Stainless Plumbers Putty is also a noteworthy product, meeting Federal Specification TT-P-1536A and providing antibacterial support. However, it is important to note that the putty should not be used on certain surfaces. Overall, this product combination offers efficient and practical solutions for plumbing needs.

Overall Score: 8.5/10
The William H. Harvey 43284 Plumbers Putty Roll is the quick and easy way to use plumbers putty when installing plumbing fixtures. With its cool form factor of a roll, it surpasses the traditional tub of putty. It is easy to use and works effectively in various plumbing repairs. Its simple design makes it suitable for amateurs, and it can be easily cut to fit. The putty is a temporary solution that holds up well and prevents breaks and leaks. Although it may cost more than a tub, it offers convenience and reliability. This roll of plumbers putty is highly recommended for anyone in need of a reliable and easy-to-use plumbing solution.
Key Features
- Quick and easy to use plumbers putty
- Cool form factor of a roll
- Suitable for amateurs and professionals
- Easily cut to fit
Specifications
- Dimension: 12.30Lx7.30Wx2.90H
Pros
- Quick and easy to use
- Effective in various plumbing repairs
- Simple design suitable for amateurs
- Holds up well, no breaks, no leaks
Cons
- Costs more than traditional tub of putty
- Shipping delays
The William H. Harvey 43284 Plumbers Putty Roll is a reliable and convenient solution for plumbing repairs. Its cool form factor, ease of use, and effectiveness make it a standout product. While it may be slightly pricier than the traditional tub of putty, it offers the advantage of easy cutting and a long-lasting hold. The positive customer reviews attest to its quality and durability. Whether you’re a DIY enthusiast or a professional plumber, this plumbers putty roll is a must-have for all your plumbing needs.

Overall Score: 5.6/10
Meet the PC Products 45593 PC-Plumbing Epoxy Putty, a reliable solution for DIY plumbing repairs. This fast-curing epoxy stick is designed to work on copper, PVC, and steel pipes and fittings. It is approved for repairs on pipes carrying potable water and can be returned to service in less than 60 minutes. The putty can cure in wet or dry conditions, allowing for easy sanding, drilling, and painting. With a continuous service temperature range of -20 to 250 degrees F, it's versatile and durable. The hand-moldable formula eliminates the need for mixing or application tools, making it convenient for quick fixes. However, there are mixed reviews regarding its effectiveness, especially on copper pipes and in stopping leaks. Overall, it's a decent option for small plumbing applications.
Key Features
- Fast curing epoxy stick for plumbing repairs
- Works on copper, PVC and steel pipe and fittings
- Approved repairs to pipes and fittings carrying potable water
- Return to service in less than 60 minutes
- Cures wet or dry; sand, drill and paint
- Continuous service temperature range from -20 to 250 degrees F
- Epoxy putty for rapid sealing in plumbing applications
- Hand moldable without need for mixing or application tools
Specifications
- Color: Gray
- Dimension: 8.00Lx1.00Wx1.00H
- Size: 4 oz
Pros
- Fast curing
- Works on multiple pipe materials
- Approved for potable water
- Easy to use and mold
Cons
- Doesn't harden properly in some cases
- May not work on copper pipes
- Limited effectiveness in stopping leaks
- Mixed reviews regarding reliability
The PC Products 45593 PC-Plumbing Epoxy Putty is a convenient and fast-curing solution for minor plumbing repairs. It works on various pipe materials and can be used in wet or dry conditions. While it has its limitations, such as potential issues with copper pipes and mixed effectiveness in stopping leaks, it offers value for its price. The hand-moldable feature makes it user-friendly and eliminates the need for additional tools. If you’re looking for a quick and easy fix for small plumbing problems, this epoxy putty can be a handy addition to your toolbox.

Overall Score: 7/10
Introducing the PC Products PC-Plumbing Epoxy Putty, a fast-curing epoxy stick that is perfect for plumbing repairs. Whether you're dealing with copper, PVC, or steel pipes and fittings, this epoxy putty will get the job done. It is specially formulated for plumbing applications and can be used to repair leaking pipes, tanks, and valves. The putty is hand moldable, eliminating the need for mixing or application tools. It cures quickly, allowing you to return to service in less than 60 minutes. The putty can be used on both wet and dry surfaces, and can be sanded, drilled, and painted. With a continuous service temperature range from -20 to 250 degrees F, this epoxy putty is versatile and reliable. It is approved for use in repairs to pipes and fittings carrying potable water. Don't let plumbing issues get the best of you, rely on PC-Plumbing Epoxy Putty to solve them with ease.
Key Features
- Fast curing epoxy stick for plumbing repairs
- Approved repairs to pipes and fittings carrying potable water
- Cures wet or dry; sand, drill and paint
- Hand moldable without need for mixing or application tools
Specifications
- Color: Gray
- Dimension: 4.50Lx1.00Wx4.50H
- Size: 2 oz (4-Pack)
Pros
- Fast curing epoxy stick
- Approved for potable water installations
- Can be used on wet or dry surfaces
- Hand moldable without need for mixing or tools
Cons
- Temporary fix, may not permanently solve all leaks
- Water may find its way through tiny cracks over time
The PC-Plumbing Epoxy Putty is a reliable solution for plumbing repairs. It offers a fast cure time, allowing you to quickly fix leaks and get back to normal. The hand moldable putty makes it easy to apply without the need for additional tools. It is approved for use with potable water installations, providing peace of mind. While it may not permanently solve all leaks, the putty offers a temporary fix that can last for months or even years. Keep in mind that water may find its way through tiny cracks over time, so it’s important to monitor the repaired area. Overall, the PC-Plumbing Epoxy Putty is a valuable addition to any DIY toolbox and a reliable solution for plumbing emergencies.

Overall Score: 8/10
The Harvey 44150 Epoxy Putty is a versatile and reliable solution for various repair tasks. This 2-ounce epoxy putty hardens like steel in just 20 minutes, making it ideal for use on plumbing, underwater, bathroom, auto, electrical, and other areas in your home. It is designed to stop leaks and patch holes and cracks, providing a sturdy repair for broken items. The easy mixing formula ensures fast and convenient repairs. The putty is gray in color and comes in a compact plastic tube for easy storage. This Harvey epoxy putty is a handy tool to have in your toolkit for quick fixes and repairs.
Key Features
- Hardens like steel in only 20 minutes
- Ideal for use on a variety of surfaces and tasks
- Available in a 2 ounce size
- Stops leaks
- Easy mix makes repairs fast
- Can patch holes and mend broken items
Specifications
- Color: Gray
- Dimension: 6.86Lx5.81Wx2.52H
Pros
- Versatile and reliable for various repair tasks
- Hardens quickly for efficient repairs
- Can be used on multiple surfaces
- Stops leaks effectively
Cons
- Product may dry out if not used all at once
- Size is not clearly labeled
The Harvey 44150 Epoxy Putty is a practical and efficient solution for repairing a wide range of items. With its quick hardening time and ability to stop leaks, it offers a reliable fix for plumbing, auto, and household repairs. The easy mix formula and compact size make it convenient to use and store. However, users should be cautious of using the entire putty at once to prevent drying out. Overall, this epoxy putty is a valuable addition to any toolkit, providing a durable and long-lasting repair solution.

Overall Score: 6.5/10
The WELD-ON 80100 Soft Seal Stain-Free Plumber's Putty is a reliable and versatile product for setting and sealing plumbing fixtures and drains. With its creamy and non-separating formula, it ensures leak-free and pressure-tight joints by filling in threads. The slow-drying and soft-setting pipe sealant offers ample time to work with pipe joints and acts as a lubricant for easy disassembly. It is suitable for a wide range of gas, plumbing, and water piping applications. Additionally, its very low VOC content helps improve crew working conditions. However, some users have reported inconsistent color (brown instead of white) and receiving dried-up and unusable products. Overall, the WELD-ON 80100 Soft Seal Stain-Free Plumber's Putty is a reliable choice for plumbing needs, but attention should be paid to potential inconsistencies in color and product quality.
Key Features
- For setting and sealing plumbing fixtures and drains
- Creamy, non-separating, grit-free formula fills in threads to ensure a leak-free, pressure-tight joint
- Slow-drying, soft-setting pipe sealant allows ample time to work with pipe joints; acts as a lubricant to enable easy disassembly
- Suitable for a wide range of gas, plumbing, and water piping applications
- Very low VOC content (152 g/L) to help improve crew working conditions
Specifications
- Dimension: 3.00Lx3.00Wx5.00H
- Size: 14 oz
Pros
- Creamy and non-separating formula for leak-free joints
- Slow-drying and soft-setting for ease of use
- Suitable for various plumbing applications
- Low VOC content for better working conditions
Cons
- Inconsistent color (brown instead of white)
- Some users received dried-up and unusable product
The WELD-ON 80100 Soft Seal Stain-Free Plumber’s Putty is a decent choice for plumbers and DIY enthusiasts. Its creamy and non-separating formula ensures leak-free joints, while the slow-drying and soft-setting properties make it easy to work with. The product is suitable for various plumbing applications and has a low VOC content to improve working conditions. However, there have been reports of inconsistent color and receiving dried-up products, which may raise concerns about product quality. It is recommended to check the product upon delivery and contact the seller if any issues arise. Overall, the WELD-ON 80100 Soft Seal Stain-Free Plumber’s Putty offers reliability but may require extra attention to ensure satisfaction.

Overall Score: 8/10
The Master Plumber 176385 5/8-Inch x 54-Inch Plumbers Putty is a convenient and easy-to-use sealant for fixtures, tubs, sinks, and more. This roll of plumbers putty comes in a paper backed design, making it quick and effortless to use. Simply remove the paper from the portion you need and apply it to the desired area. Whether you're repairing leaks or installing new plumbing fixtures, this plumbers putty is a reliable choice. With its versatility and ease of use, it's a must-have item for any plumber or DIY enthusiast.
Key Features
- Contains 1 paper backed roll plumbers putty 54” L x 5/8” W
- Quick and easy way to use plumbers putty
- Use as a seal for fixtures, tubs, sinks, and more
Specifications
- Dimension: 4.75Lx4.75Wx0.22H
Pros
- Convenient roll form for easy application
- Versatile sealant for various plumbing needs
- Removable paper backing for effortless use
Cons
- Narrow width may not be suitable for all applications
The Master Plumber 176385 5/8-Inch x 54-Inch Plumbers Putty is a reliable and convenient solution for any plumbing project. With its easy-to-use design and versatile sealant properties, it provides a quick and effective way to repair leaks or install new fixtures. The removable paper backing adds an extra level of convenience, making it a breeze to handle. However, the narrow width of the putty strip may not be ideal for all applications. Overall, if you’re looking for a reliable and user-friendly plumbers putty, this product is worth considering.

Overall Score: 7/10
The PC-Plumbing Epoxy Putty is a versatile and quick-setting solution for various repairs. Whether you need to fix leaks or seal cracks on wet or dry surfaces, this epoxy putty is up to the task. It is NSF rated, ensuring it is safe for contact with potable drinking water. With a working time of just 3 minutes, you can accomplish your repairs swiftly. The putty cures within 1 hour, providing a reliable and sturdy bond. Its tensile strength of 2,500 psi guarantees durability. The PC-Plumbing Epoxy Putty is an essential product for any DIY enthusiast or professional plumber.
Key Features
- Can Be Applied To Wet And Dry Surfaces
- Fast Setting
- NSF Rated For Contact With Potable Drinking Water
- Working Time: 3 Min
- Work Life: 3 Min
- Tensile Strength: 2,500 psi
Specifications
- Color: Gray
Pros
Cons
The PC-Plumbing Epoxy Putty offers a reliable and efficient solution for various repairs. Its fast-setting feature and compatibility with wet and dry surfaces make it a versatile choice. The NSF rating further adds to its appeal, ensuring it is safe to use with potable drinking water. While its working time of 3 minutes is convenient, the 1-hour curing time provides ample opportunity to adjust and finalize the repair. The putty’s impressive tensile strength of 2,500 psi guarantees a long-lasting bond. Whether you need to fix leaks or seal cracks, the PC-Plumbing Epoxy Putty is a go-to product for both DIY projects and professional plumbing repairs.

Overall Score: 7/10
The Protective Coating 02159 PC-Plumbing Epoxy Putty – Mini is a high-quality epoxy putty made in the United States. This epoxy putty is great for repairing pipes and preventing leaks. Its quick curing time and easy application make it ideal for homeowners.
Key Features
- Made in United States
Specifications
- Color: Grey
- Dimension: 3.60Lx5.50Wx1.10H
Pros
- Quick curing time
- Easy application
Cons
- Doesn't provide watertight seal
The Protective Coating 02159 PC-Plumbing Epoxy Putty – Mini is a reliable and convenient solution for repairing pipes and preventing leaks. It is easy to use and has a quick curing time, making it a valuable tool for homeowners. However, it is important to note that it may not provide a watertight seal in all cases. Overall, this epoxy putty is a great addition to any homeowner’s toolbox.

Overall Score: 8/10
The E/FUSING 900 Moldable Silicone Putty is a versatile product made in the USA. It can be used to mold pinhole leaks on pipelines for leak sealing and can be reinforced with E/Fusing 140 or E/Fusing 330 for added strength. With a package weight of 2.65 Ounces, this grey putty is easy to work with and can be shaped to fill gaps around pipes and other areas. It is not an adhesive but is great for filling gaps. The putty does not harden and is best used in conjunction with caulk for a smooth finish. Customers have praised its ease of use and how well it seals gaps. However, some have noted that it is slightly on the stiff side.
Key Features
- Made in USA
- Mold into pinhole leaks on pipelines
- Use with E/Fusing 140 or E/Fusing 330
- Package weight: 2.65 Ounces
Specifications
- Color: Grey
Pros
- Easy to use and shape
- Versatile for filling gaps
- Seals gaps well
Cons
- Slightly stiff
- Not an adhesive, lacks holding properties
The E/FUSING 900 Moldable Silicone Putty is a convenient solution for sealing gaps and molding pinhole leaks. Its easy-to-work-with consistency allows for shaping and filling gaps effectively. While it may be slightly on the stiff side, it still performs well in its intended applications. The putty is not an adhesive, but when used in conjunction with caulk, it provides a reliable seal. Overall, this versatile product offers a practical solution for various sealing needs and comes highly recommended by customers.
Buyer's Guide: Plumbing Putty
Are you in need of a plumbing putty but unsure of where to start? Fret not, for we have compiled an expert buyer's guide to assist you in making the right choice. Plumbing putty is a versatile material used for various applications, such as sealing and joining pipes, fixtures, and fittings. Let's dive right into the world of plumbing putty and explore all the factors you should consider before making a purchase.
Read also: 13 Amazing Brass Plumb Bob for 2025
Benefits of Plumbing Putty
Plumbing putty is coveted for its remarkable properties, making it an indispensable tool for both professionals and DIY enthusiasts. Here are some benefits of using plumbing putty:
- Waterproof Seal: The primary purpose of plumbing putty is to create a waterproof and long-lasting seal. It prevents leaks in joints, ensuring your plumbing system functions flawlessly.
- Flexibility: Plumbing putty is malleable and easy to work with, allowing you to shape and mold it according to your needs. This flexibility makes it suitable for various plumbing projects.
- Compatibility: Plumbing putty is compatible with a wide range of materials, including metals, ceramics, and plastics. You can rely on it to seal connections between different plumbing components.
- Resistance: Many plumbing putties are resistant to chemicals, heat, and other adverse conditions. This resilience ensures that your plumbing connections remain secure and untouched by external factors.
- Versatility: Whether you need to seal a sink drain, mend a leaking pipe, or fix a shower fixture, plumbing putty can handle it all. It is a multi-purpose tool that proves useful in numerous plumbing applications.
Factors to Consider
Before purchasing plumbing putty, take the following factors into account to ensure you choose the right product for your specific needs:
- Type: There are different types of plumbing putty available in the market, such as oil-based and water-based putties. Each type has its own advantages and considerations. Research and select the type that suits your project requirements.
- Application: Determine the specific use for the plumbing putty. Some putties are specially formulated for specific applications, such as sink drains, shower valves, or pipe joints. Ensure that the putty you choose is designed for your intended purpose.
- Curing Time: Consider the time it takes for the putty to cure or dry completely. Opt for a putty that offers a suitable curing time, keeping in mind the urgency of your project.
- Durability: Look for a plumbing putty that provides long-lasting durability. Ensure that it can withstand the pressure, temperature, and conditions it will be exposed to in your plumbing system.
- Ease of Use: Convenience is key. Select a plumbing putty that is easy to work with and does not require complicated mixing or application processes. This will save you time and effort during installation.
- Color: While not directly related to the functionality, you might prefer a putty color that matches your plumbing fixtures for aesthetic purposes. Some putties come in multiple colors to accommodate individual preferences.
Frequently Asked Questions about 13 Amazing Plumbing Putty For 2025
Yes, most plumbing putties are compatible with various materials such as PVC, copper, stainless steel, and more. However, it is essential to check the product specifications or consult a professional for specific material compatibility.
Most plumbing putties can withstand moderate temperatures, typically up to 150°F (65°C). However, if you require a putty for extremely high-temperature applications, consider using specialized putties designed for those conditions.
The curing time can vary depending on the brand and type of plumbing putty. Typically, it takes around 24 hours for the putty to cure completely. However, refer to the manufacturer’s instructions for precise curing times.
Yes, plumbing putty can be used to seal minor leaks in pipes. However, for significant pipe repairs, it is advisable to consult a professional plumber for a thorough inspection and appropriate repairs.
Once plumbing putty has dried and cured, it forms a strong and permanent seal. As a result, it becomes difficult to remove without damaging the underlying surfaces. If necessary, consider using appropriate solvents recommended for the removal of the specific putty type.
Was this page helpful?
Trust Storables.com for unbiased and honest product reviews. Our reviews are rigorously assessed by our Expert Board Contributors and adhere to strict Editorial Standards. We ensure that each review is transparent and trustworthy, helping you make informed purchasing decisions.

0 thoughts on “13 Amazing Plumbing Putty For 2025”