Articles
How To Wind Garage Door Spring
Modified: October 22, 2024
Learn the step-by-step process of winding a garage door spring in this informative article, filled with expert tips and advice. Get the knowledge you need to safely and efficiently complete this essential task.
(Many of the links in this article redirect to a specific reviewed product. Your purchase of these products through affiliate links helps to generate commission for Storables.com, at no extra cost. Learn more)
Introduction
A garage door is an essential component of any home, providing security and convenience. One crucial part of a garage door system is the springs, which help in the smooth operation of the door. Over time, these springs may wear out or break, requiring replacement. If you’re a homeowner who wants to tackle this task yourself, it’s important to have a clear understanding of how to wind a garage door spring correctly and safely.
This article will guide you through the process of winding a garage door spring step-by-step. We’ll cover everything from understanding the different types of garage door springs to the necessary safety precautions and the tools you’ll need for the job. By following this guide, you’ll be able to successfully replace and wind your garage door spring and restore the proper functioning of your garage door.
It’s important to note that winding a garage door spring can be dangerous if not done correctly. The tension in the spring can cause severe injuries if mishandled. Therefore, it’s crucial to follow safety guidelines and take the necessary precautions throughout the process. If you are not confident in your ability to safely perform this task, it is recommended to hire a professional garage door technician.
This guide assumes that you have basic knowledge of garage door systems and are comfortable working with hand tools. If you’re ready to take on the challenge, let’s dive into the details of winding a garage door spring.
Key Takeaways:
- Safety First
Winding a garage door spring requires caution and adherence to safety guidelines. Prioritize safety gear, release tension carefully, and seek professional help if uncertain to prevent accidents and injuries. - Precision and Maintenance
Proper installation, winding, and testing of the garage door spring are crucial for smooth operation. Regular maintenance, including lubrication and inspection, ensures longevity and safe functionality of the garage door.
Read more: How To Rewind A Garage Door Spring
Understanding Garage Door Springs
Before you dive into the process of winding a garage door spring, it’s important to have a basic understanding of the two main types of springs that are commonly used in garage doors: extension springs and torsion springs.
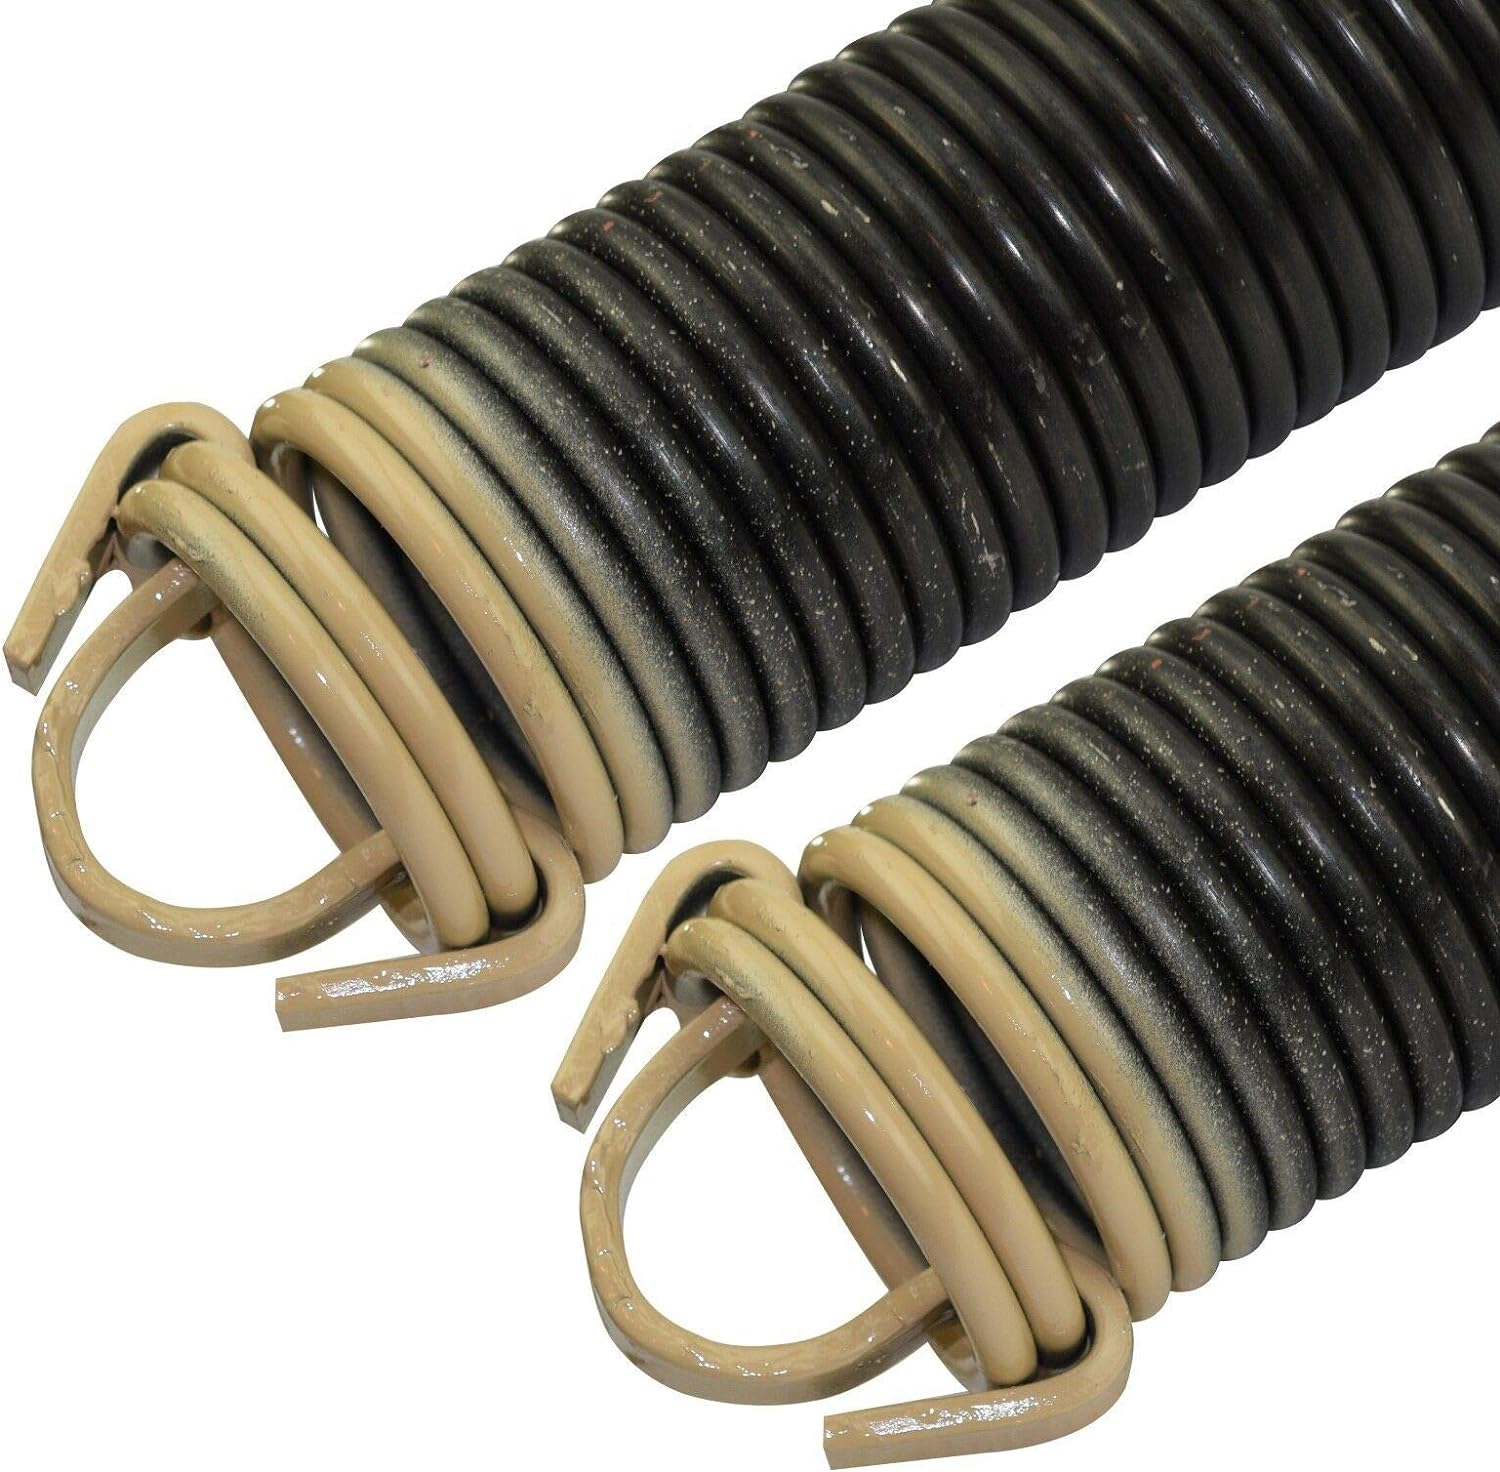
Extension Springs: Extension springs are typically found on older garage doors or doors with low clearance. They run perpendicular to the garage door tracks and extend and contract to assist in the opening and closing of the door. Extension springs are typically located on both sides of the door and are attached to pulleys and cables. These springs store and release energy as the door operates.
Torsion Springs: Torsion springs are more common in modern garage door systems. They are mounted horizontally above the garage door opening and rely on torque for operation. Torsion springs consist of tightly wound metal coils that store and release energy as the door opens and closes. Unlike extension springs, torsion springs are typically located on a single shaft and use cables and drums to lift the door.
It’s important to note that garage door springs are rated for a specific number of cycles, which refers to the number of times the door can be opened and closed before the spring is likely to break or wear out. The lifespan of a spring can vary depending on factors such as the weight of the door, frequency of use, and overall maintenance.
It’s crucial to replace a garage door spring with the correct type, size, and rating to ensure safe and effective operation. Consult the manufacturer’s specifications or seek professional advice to determine the appropriate replacement spring for your specific garage door.
Now that you have a better understanding of the different types of garage door springs, let’s move on to the safety precautions you need to take before starting the winding process.
Safety Precautions
When it comes to working with garage door springs, safety should be your top priority. The high tension and potential for injury make it essential to take the necessary precautions. Before you begin winding a garage door spring, make sure to follow these safety guidelines:
- Wear Safety Gear: Put on safety glasses, gloves, and sturdy shoes to protect yourself from any potential accidents or flying debris.
- Release Tension: Before attempting to wind or remove the spring, always release the tension from the garage door by carefully lowering it onto a stable object, such as a ladder or a set of sturdy sawhorses.
- Secure the Door: Ensure that the garage door is securely held in place to prevent it from unexpectedly coming down while you’re working on it. Use clamps or vise grips to keep the door in the open position.
- Use Proper Tools: Make sure you have the correct tools for the job, including winding bars, wrenches, and any other necessary equipment. Avoid using makeshift tools that may not provide the necessary strength or stability.
- Work with a Partner: Having a second person present can provide an extra level of safety by assisting with holding the door, handing you tools, and providing help if an emergency arises.
- Follow Manufacturer Guidelines: Always refer to the manufacturer’s instructions and guidelines for your specific garage door model. These instructions may provide specific steps or precautions to follow during the winding process.
- Do Not Overwind: It’s crucial not to overwind the spring as this can lead to excessive tension and potential damage to the garage door or injury to yourself. Follow the recommended number of revolutions as specified by the manufacturer or a professional technician.
- Know Your Limits: If you encounter any difficulties or feel unsure about any step of the process, it’s best to seek the help of a professional garage door technician. Your safety should never be compromised.
By adhering to these safety precautions, you can significantly minimize the risks associated with winding a garage door spring. Remember, it’s better to take your time and prioritize safety than to rush the process and risk injury.
Now that you’re aware of the safety measures, let’s move on to the tools and materials you’ll need to successfully wind a garage door spring.
Tools and Materials Needed
Before you can start winding a garage door spring, you’ll need to gather the necessary tools and materials. Having these items on hand will help ensure a smoother and more efficient process. Here’s a list of the tools and materials you’ll need:
- Winding Bars: These are specialized tools designed to safely unwind and wind garage door springs. It’s important to have the correct size of winding bars for your specific spring type and size.
- Adjustable Wrench: An adjustable wrench will be useful for loosening and tightening nuts and bolts during the spring replacement process.
- Safety Glasses: Protect your eyes from any potential debris or accidents by wearing safety glasses throughout the entire procedure.
- Gloves: Use sturdy work gloves to safeguard your hands and improve your grip while handling the springs and tools.
- Sturdy Shoes: Wear shoes with non-slip soles to provide stability and protect your feet during the winding process.
- Step Stool or Ladder: Depending on the height of your garage door, you may need a step stool or ladder to safely reach and work at the spring assembly.
- Replacement Springs: Ensure you have the appropriate replacement spring(s) for your specific garage door system. Refer to the manufacturer’s guidelines or seek advice from a professional if you’re uncertain.
- Socket Set: A socket set will come in handy for loosening and tightening bolts and screws during the installation and winding process.
- Rope or Clamp: Use a sturdy rope or clamp to secure the garage door in the open position and prevent it from accidentally closing while you’re working on the springs.
- Tape Measure: Measure the length and diameter of the existing spring(s) to ensure you choose the correct replacement size.
- Pliers: Having a pair of pliers can be useful for grip, twisting, or bending metal components during the spring replacement process.
- Pen and Paper: Keep a pen and paper handy to take notes, record important measurements, or document any specific steps during the process.
Having the necessary tools and materials readily available before you start winding the garage door spring will help save time and ensure a smoother workflow. Now that you’re equipped with the essential tools, it’s time to move on to the step-by-step process of winding a garage door spring.
Step 1: Preparing the Garage Door
Before you begin winding the garage door spring, it’s important to properly prepare the garage door itself. This will ensure a safe and smooth process. Follow these steps to prepare the garage door:
- Disconnect the Power: To avoid any accidental activation of the door during the winding process, unplug the power cord from the garage door opener or disable the opener system.
- Secure the Open Position: Use a sturdy rope or clamp to secure the garage door in the fully open position. This will prevent the door from unexpectedly closing while you’re working on the springs.
- Clear the Area: Remove any objects or obstructions from the vicinity of the garage door. This will create a safe working environment and prevent any accidents or damage.
- Inspect the Door and Hardware: Take a moment to inspect the garage door for any signs of damage, such as dents, warping, or loose hardware. If you notice any issues, address them before proceeding with the spring winding process.
- Gather the Necessary Tools and Materials: Ensure that you have all the required tools and materials mentioned earlier in this article. Having them nearby will make the process more efficient and minimize interruptions.
- Read the Manufacturer’s Instructions: Refer to the manufacturer’s guidelines or user manual specific to your garage door model. Familiarize yourself with any specific instructions or precautions outlined by the manufacturer.
- Prepare a Work Area: Set up a clean and well-lit work area near the garage door. This will provide you with the space you need to safely work on the spring assembly.
By following these preparatory steps, you’ll create a safe and organized environment for the spring winding process. Taking the time to properly prepare the garage door will help prevent accidents and ensure a successful outcome. Once you’ve completed these steps, you’re ready to move on to identifying the torsion spring system and releasing tension from the spring.
Read more: How To Adjust Spring Tension On Garage Door
Step 2: Identifying the Torsion Spring System
Before you can proceed with winding the garage door spring, it’s important to correctly identify the type of torsion spring system in your garage door. This will allow you to follow the appropriate steps for releasing tension and removing the old spring. Follow these steps to identify the torsion spring system:
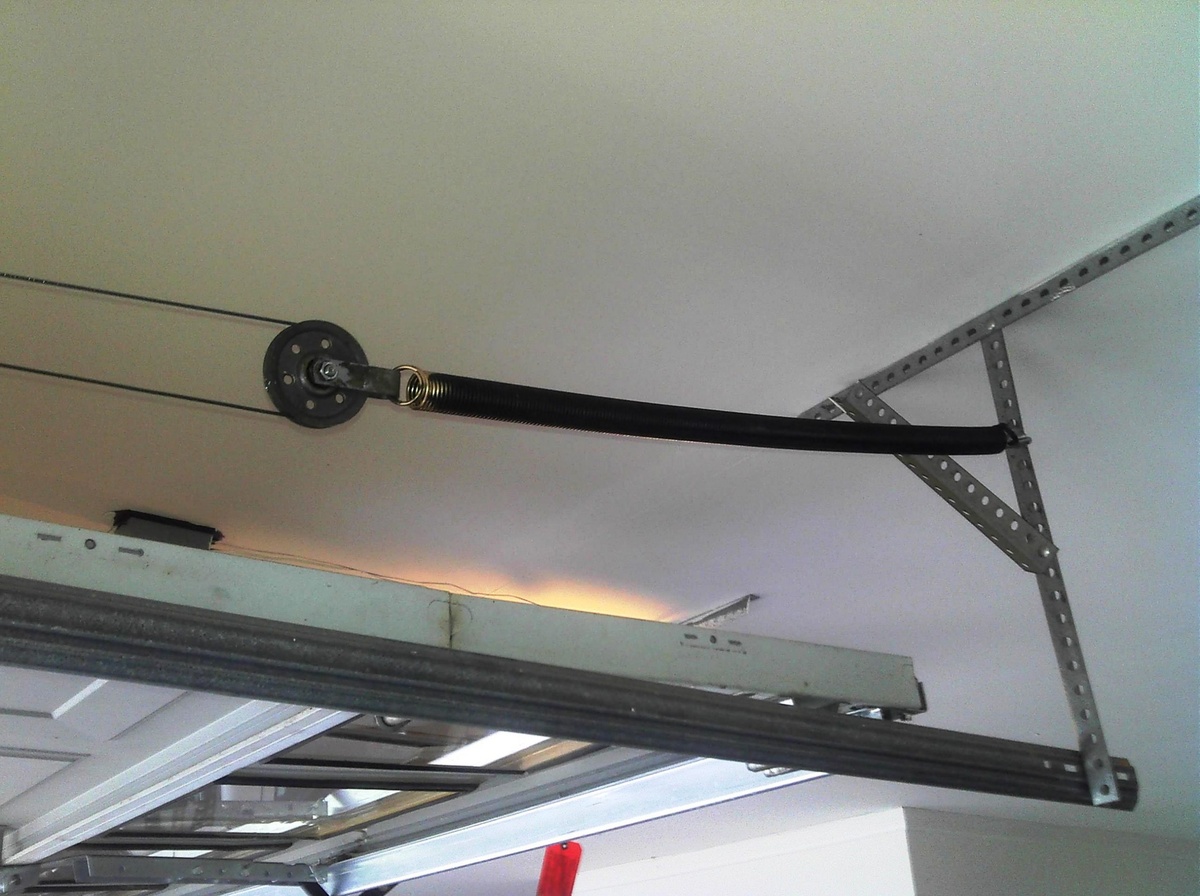
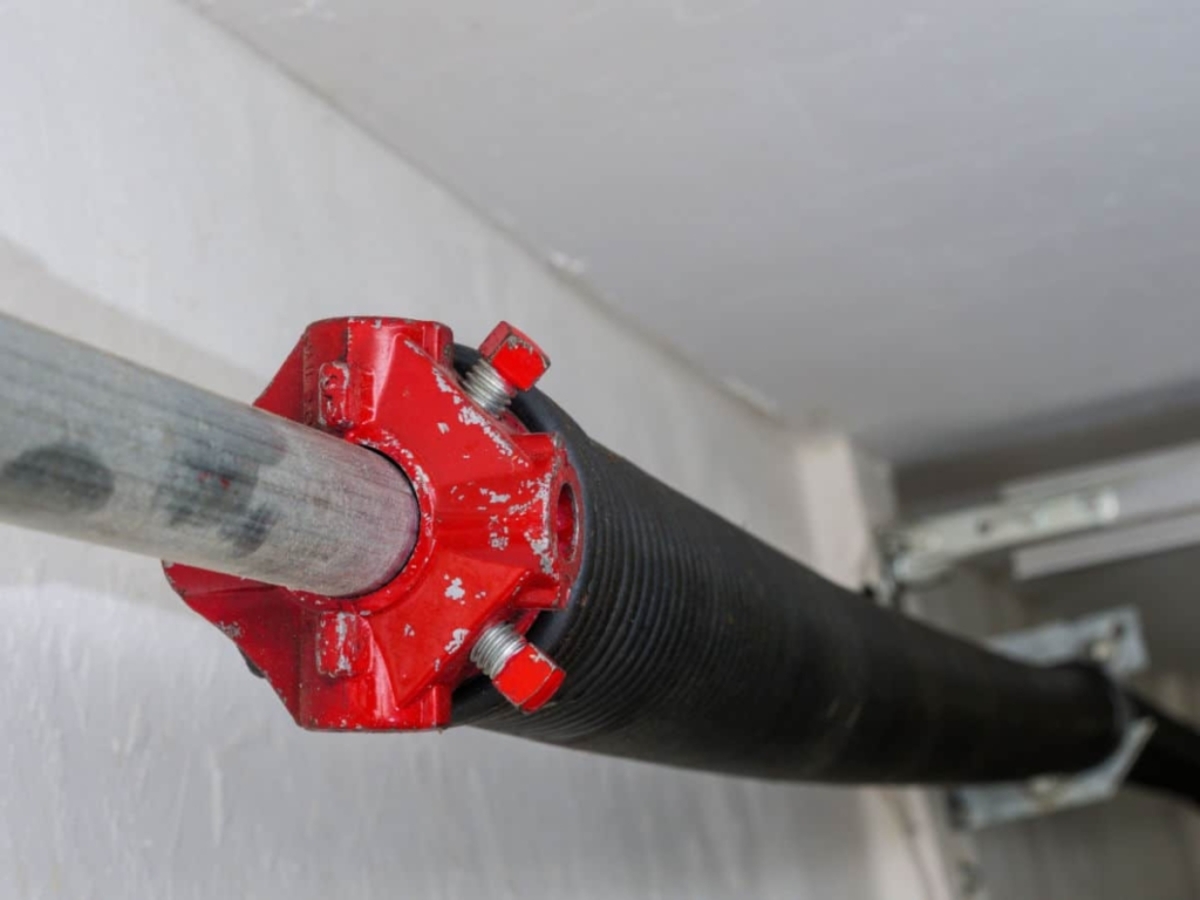
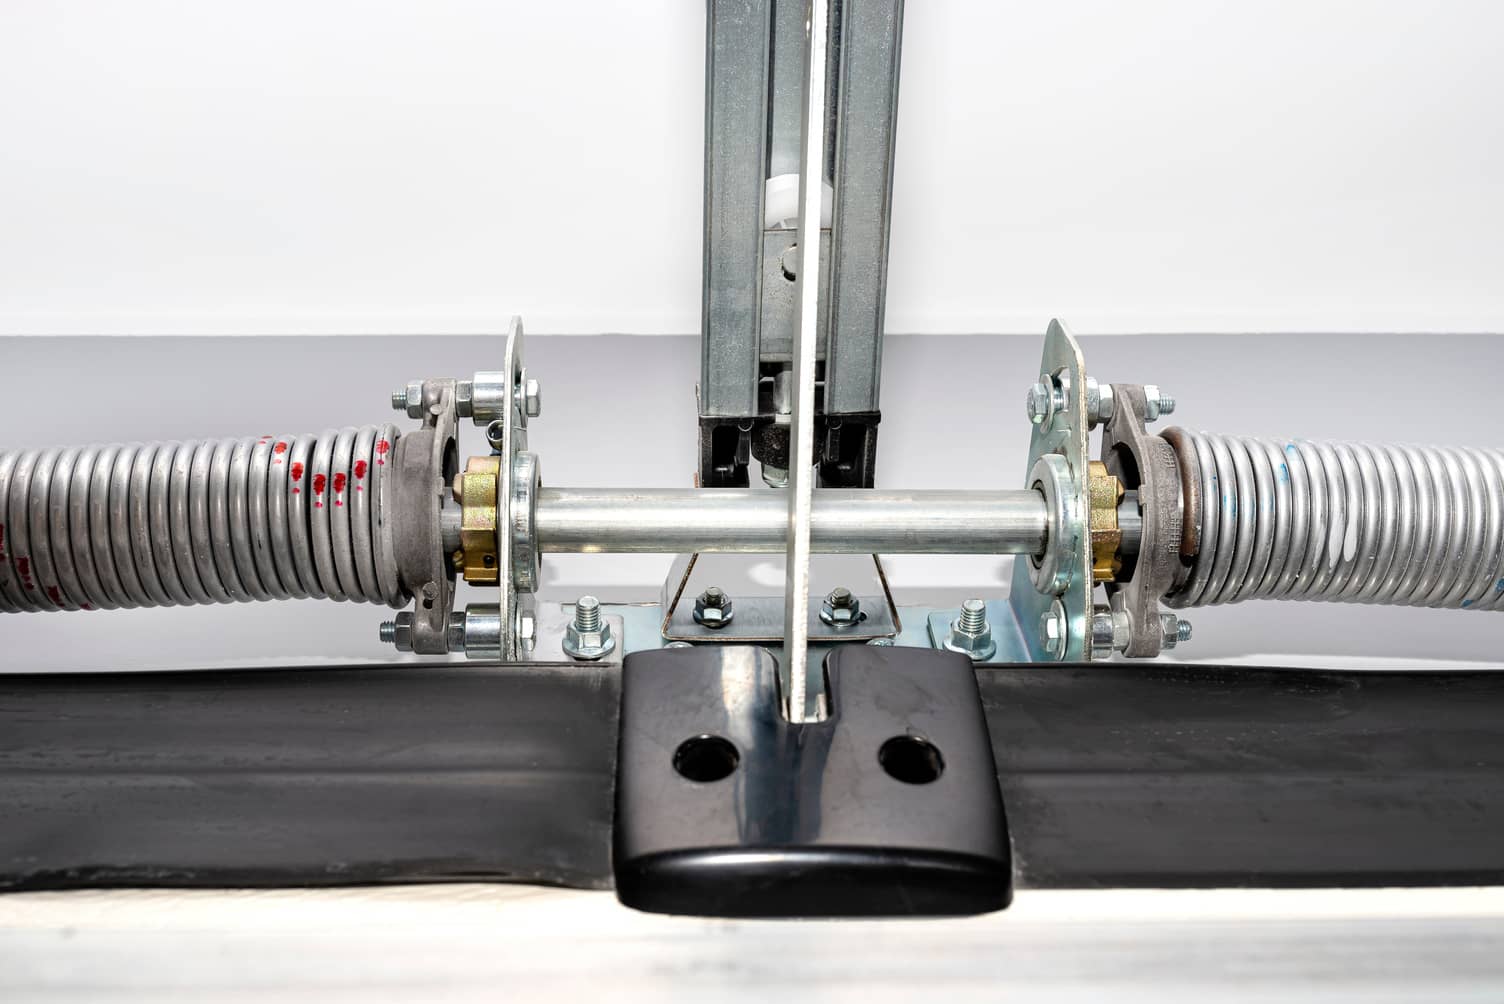
- Locate the Spring Assembly: Look above the garage door to find the spring assembly. Torsion springs are typically mounted parallel to the top of the door and secured to a shaft.
- Identify the Shaft: The shaft is the long metal rod that runs horizontally above the garage door. This is where the torsion springs are mounted. Take note of the size and diameter of the shaft.
- Count the Number of Springs: Determine the number of torsion springs in your system. Most residential garage doors have one or two torsion springs, while larger doors may have more.
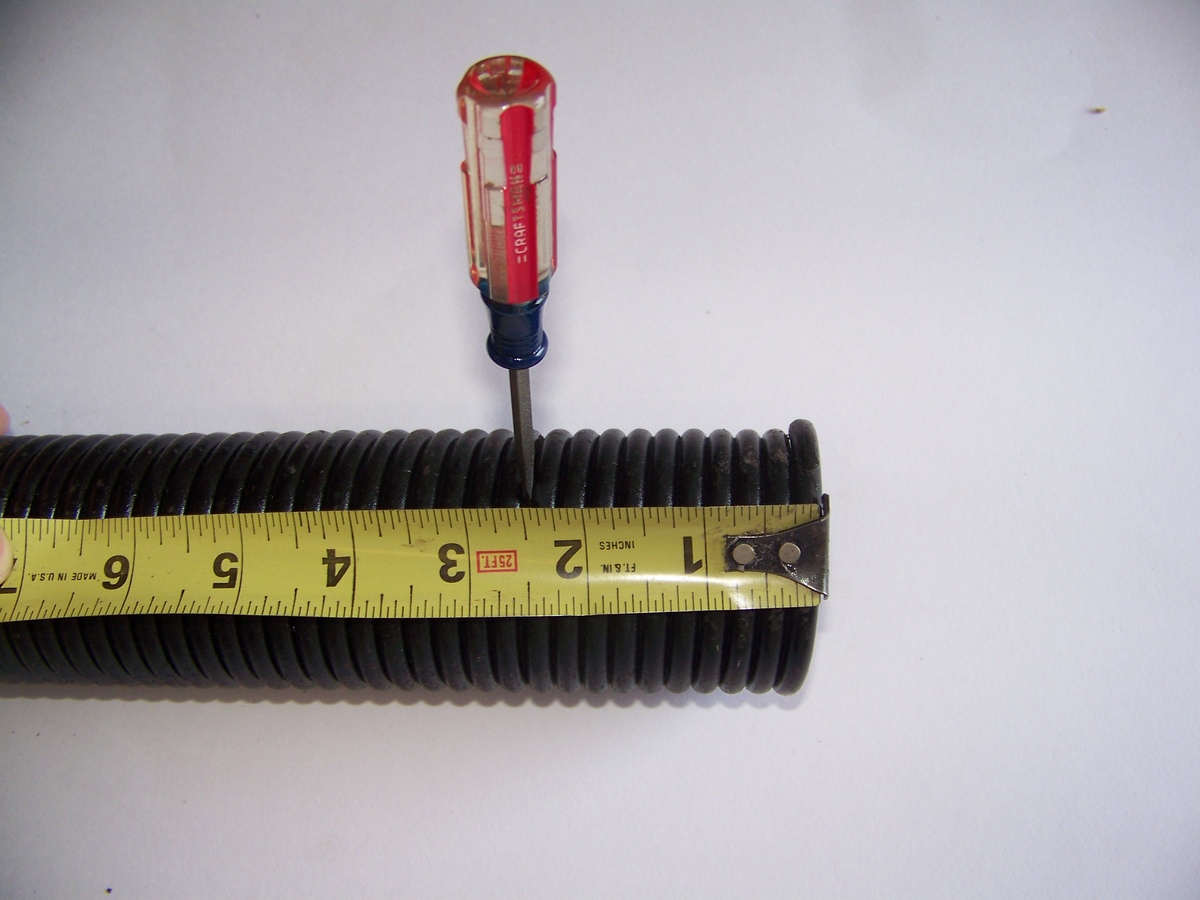
- Measure the Spring Length: Use a tape measure to measure the length of the torsion spring(s). Start from one end of the coil to the other. This measurement will help when selecting the correct replacement spring.
- Inspect the Spring Design: Examine the spring closely to determine its design. Torsion springs come in various types, such as standard torsion springs, EZ-Set springs, or TorqueMaster springs. Take note of the specific type of torsion spring in your system.
By accurately identifying the torsion spring system, you’ll have a better understanding of how to proceed with the next steps. Different torsion spring systems may require slightly different techniques for releasing tension and removing the old spring.
If you’re unsure about the type of torsion spring system in your garage door, consult the manufacturer’s documentation or seek advice from a professional garage door technician. Proceeding with caution and the right information is crucial to ensure the safe and successful winding of the garage door spring.
Once you have identified the torsion spring system, you’re ready to move on to the next step: releasing tension from the spring.
Always release tension from the spring before winding or unwinding. Use winding bars to avoid injury. If unsure, consult a professional.
Step 3: Releasing Tension from the Spring
Before you can safely remove the old garage door spring, you must release the tension from the spring. Releasing the tension will prevent any sudden movement or potential injury during the winding process. Follow these steps to release tension from the spring:
- Position the Ladder or Step Stool: Place a sturdy ladder or step stool beneath the torsion spring assembly. Ensure it is stable and securely positioned.
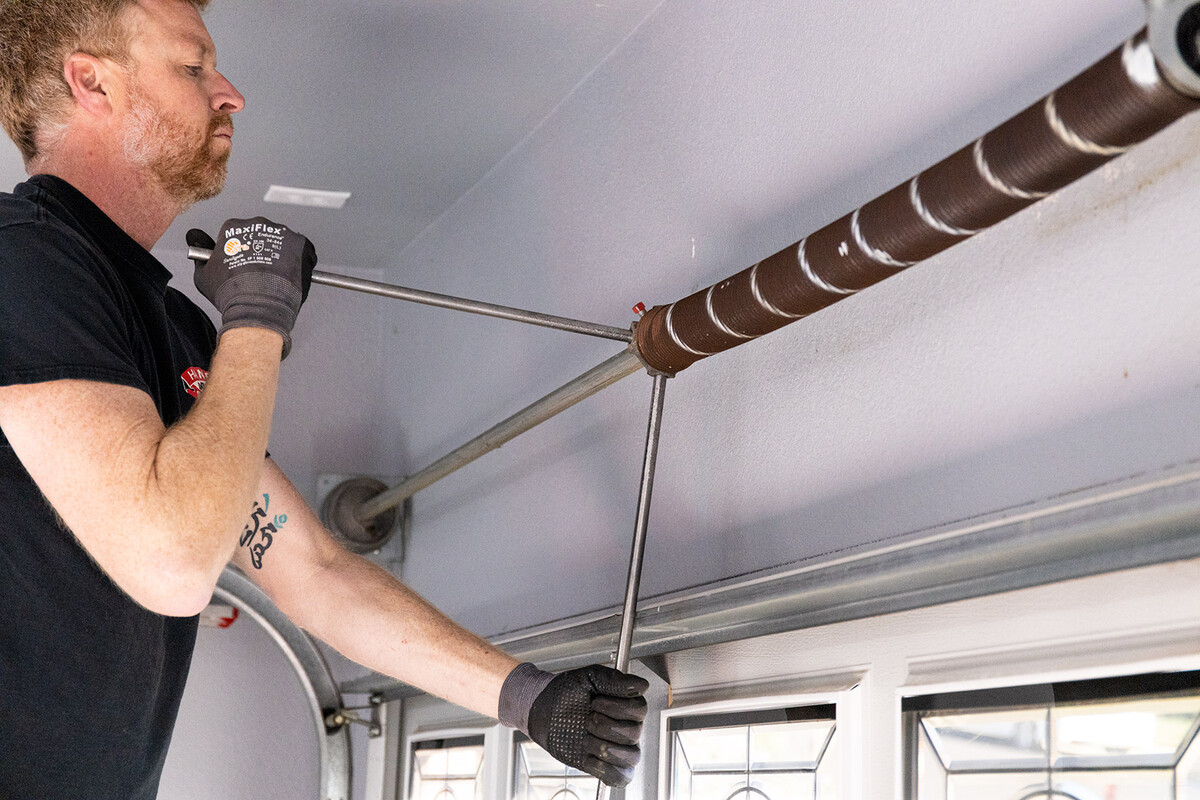
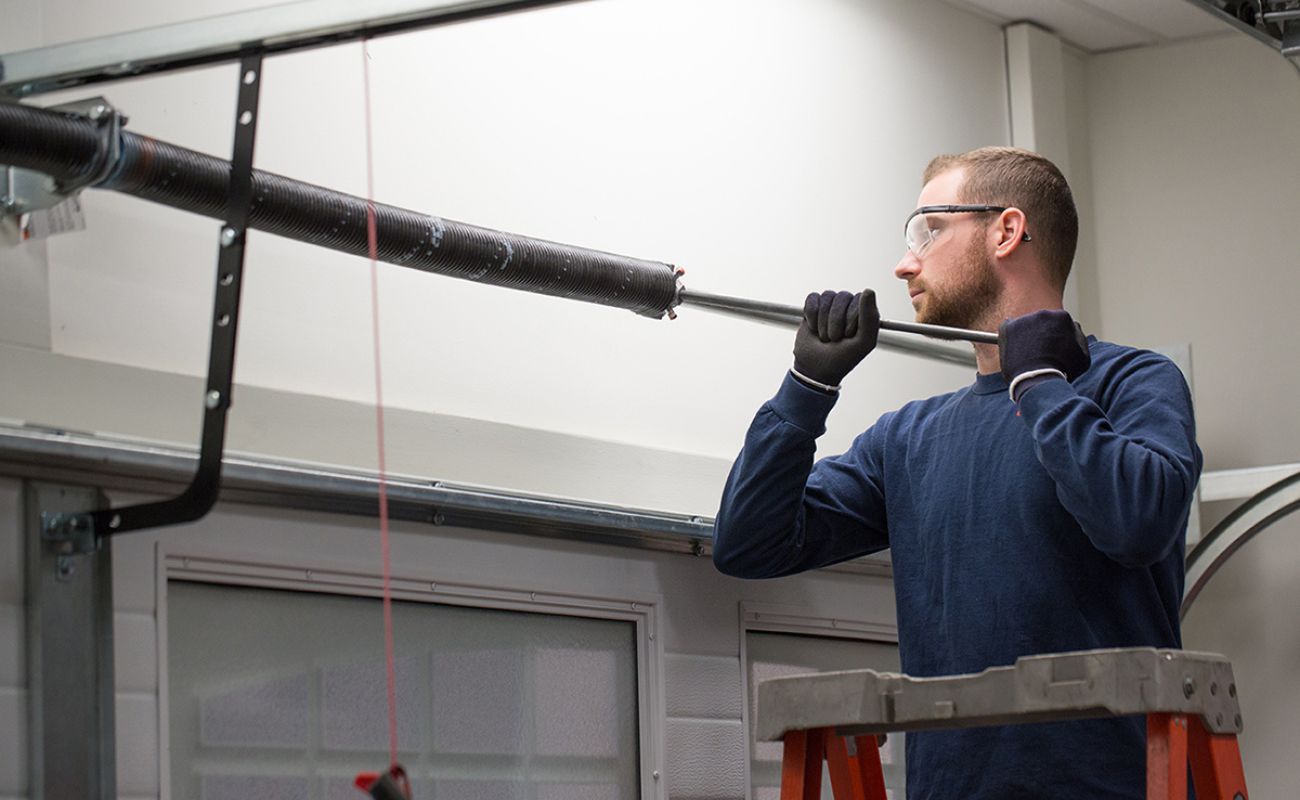
- Secure the Winding Bars: Insert the appropriate winding bars into the winding cones located at each end of the torsion spring. The winding bars should fit snugly into the winding cone holes.
- Hold the Winding Bars Firmly: Grasp the winding bars firmly with your hands, keeping a firm grip as the spring tension is released.
- Turn the Winding Bars: Slowly turn the winding bars in opposite directions. This will start releasing the tension from the torsion spring. Use caution as the spring will start to unwind.
- Continue Turning Until Tension is Released: Keep turning the winding bars until the tension in the spring is fully released. It’s important to release the tension completely to prevent any sudden spring movement.
- Double-Check the Spring: Once you believe the tension has been released, carefully test the spring’s tension by gently turning the winding bars. If the spring remains stationary and shows no sign of tension, it has been successfully released.
Take your time during this step and ensure that the tension is fully released from the spring before proceeding. It’s essential to prioritize your safety and avoid any sudden movements or accidents.
Once you have successfully released the tension from the spring, you’re ready to move on to the next step: removing the old spring from the garage door assembly.
Step 4: Remove the Old Spring
Now that you have released the tension from the garage door spring, it’s time to remove the old spring from the assembly. Removing the old spring will make way for the installation of the new spring. Follow these steps to safely remove the old spring:
- Secure the Spring-Loaded Shaft: Use vise grips or locking pliers to secure the spring-loaded shaft. This will prevent the shaft from rotating while you remove the old spring.
- Loosen the Set Screws: Locate the set screws on the winding cones of the torsion spring. Use an adjustable wrench or a socket wrench to loosen the set screws, allowing you to remove the spring from the shaft.
- Slide the Spring Off the Shaft: Once the set screws are loosened, carefully slide the old spring off the shaft. Be cautious as the spring may still have some tension remaining.
- Inspect the Spring and Assembly: Take a moment to inspect the old spring for any signs of damage, such as cracks or wear. Also, inspect the spring assembly for any signs of wear or loose components. If any issues are detected, they should be addressed before installing the new spring.
- Dispose of the Old Spring: Safely dispose of the old spring following local regulations. Springs can be recycled or taken to a metal recycling facility for proper disposal.
Removing the old spring requires caution and attention to ensure your safety. Make sure to wear safety glasses and gloves throughout the process. Take your time and avoid rushing the removal of the spring.
Now that you’ve successfully removed the old spring, you’re ready for the next step: installing the new spring. This step will guide you through the process of properly installing the replacement spring for your garage door.
Step 5: Installing the New Spring
With the old spring removed, it’s time to install the new spring in your garage door assembly. Installing the new spring correctly is crucial to ensure the proper functioning of your garage door. Follow these steps to safely install the new spring:
- Inspect the New Spring: Before installation, examine the new spring for any defects or damage. Ensure that it matches the specifications of your old spring in terms of size, length, and type.
- Prepare the Spring Assembly: If necessary, clean and lubricate the spring assembly components, such as the shaft and roller bearings, to ensure smooth operation of the new spring.
- Slide the New Spring onto the Shaft: Carefully slide the new spring onto the shaft of the spring assembly. Make sure it sits securely and aligns properly with the winding cones.
- Tighten the Set Screws: Use an adjustable wrench or a socket wrench to tighten the set screws on both winding cones. Ensure that the new spring is securely fastened to the shaft.
- Check the Tension: Slowly and cautiously release the vise grips or locking pliers from the spring-loaded shaft. Observe the spring for any signs of tension or movement. If the spring appears to be properly tensioned, you can proceed to the next step. If not, you may need to adjust the tension by tightening or loosening the set screws.
- Test the Spring: Carefully test the tension of the new spring by manually lifting the garage door. The door should lift smoothly and stay in place when opened partially. If the tension feels too strong or too weak, adjustments may be necessary.
It’s important to pay close attention to the installation process and follow the manufacturer’s guidelines if provided. If you’re unsure about any step or encounter difficulties during the installation, it’s recommended to seek the assistance of a professional garage door technician.
Once you have successfully installed the new spring, it’s time to move on to the next step: winding the garage door spring. This step will guide you through the process of carefully winding the spring to ensure proper tension and balance.
Read more: How Much To Replace Garage Door Spring
Step 6: Winding the Garage Door Spring
Winding the garage door spring is a critical step in the process, as it determines the tension and balance of the door. Proper winding ensures smooth and safe operation of the garage door. Follow these steps to wind the garage door spring:
- Identify the Winding Direction: Determine the correct winding direction of the spring. Most torsion springs are wound in a clockwise direction, but it’s important to double-check the manufacturer’s instructions or consult a professional if you’re unsure.
- Attach the Winding Bars: Insert the winding bars into the winding cone holes on the torsion spring. Make sure they are securely in place and provide a firm grip.
- Begin Winding the Spring: Using both hands, start winding the spring by turning the winding bars in the designated direction. Apply a steady and even amount of force to ensure balanced tension.
- Count the Turns: Keep track of the number of turns you make while winding the spring. The recommended number of turns will depend on the size and weight of your garage door. Consult the manufacturer’s instructions or a professional if you’re unsure about the appropriate number of turns.
- Maintain Proper Tension: As you continue winding, pay attention to the tension of the spring. It should gradually increase while maintaining balance on both sides of the door.
- Check the Balance: Once the recommended number of turns is reached, test the balance of the door by manually opening and closing it. The door should move smoothly and stay in place at any position.
- Make Adjustments if Needed: If the door is not balanced or the tension feels uneven, adjustments might be necessary. Step back and evaluate the alignment, tension, and overall operation of the door. Consult a professional if further adjustments are needed.
Winding the garage door spring requires precision and attention to detail. Take your time and be mindful of the tension and balance throughout the process. If you encounter any difficulties or feel unsure, it’s always a wise decision to seek the help of a professional garage door technician.
Once you have successfully wound the garage door spring and achieved the proper tension and balance, you’re ready for the final step: testing the garage door to ensure its functionality.
Step 7: Testing the Garage Door
After successfully winding the garage door spring, it’s important to test the functionality of the door to ensure it operates smoothly and safely. Follow these steps to test the garage door:
- Clear the Area: Remove any objects or obstructions from the path of the garage door.
- Enable the Garage Door Opener: If you disabled the garage door opener earlier, now is the time to re-enable it. Plug in the power cord or re-engage the opener system.
- Operate the Door Using the Opener: Use the garage door opener remote or wall-mounted control panel to open and close the door. Observe the door’s movement and check for any unusual noises, jerking, or imbalance.
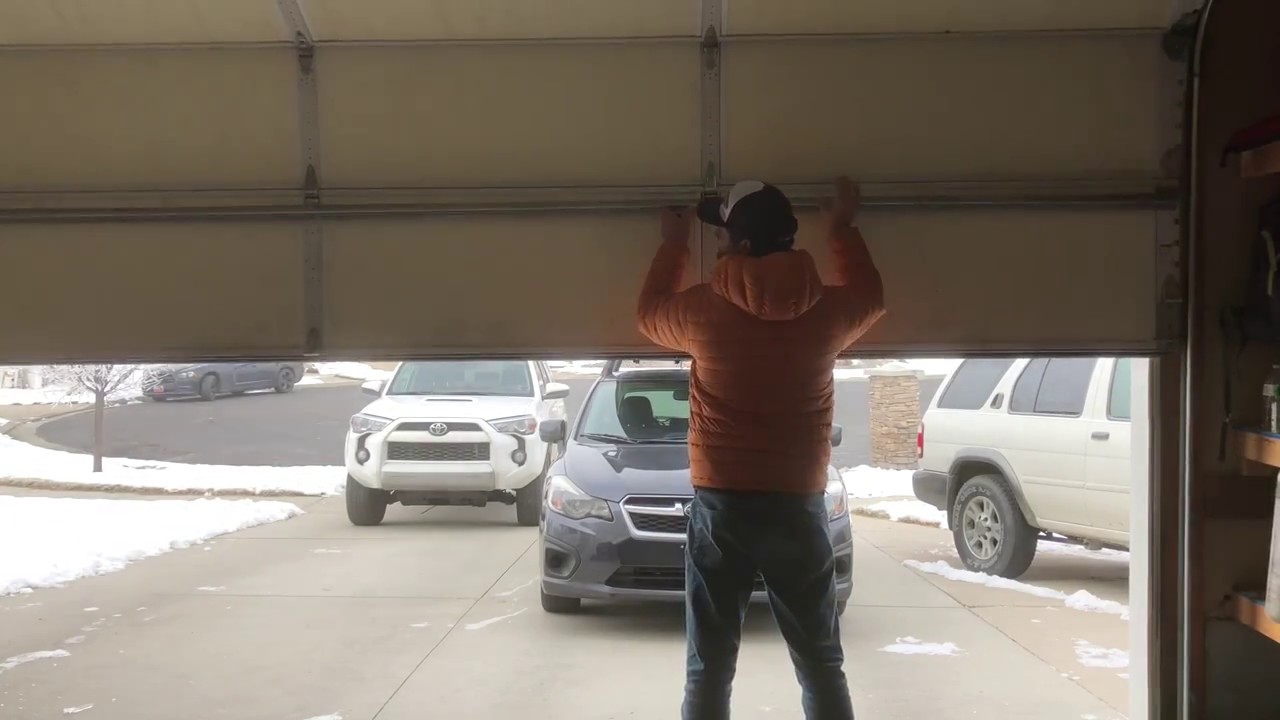
- Manually Test the Door: Disconnect the garage door opener and manually operate the door by lifting and lowering it. Pay attention to how it feels and moves. The door should open and close smoothly, without excessive resistance or misalignment.
- Check the Balance: Test the balance of the door by stopping it at different open positions (quarterway, halfway, etc.). The door should stay in place without sliding or falling on its own.
- Inspect the Hardware: Examine the hardware, such as rollers, hinges, cables, and tracks, to ensure they are secure, aligned, and in good condition. If any issues are noticed, address them promptly.
- Listen for Unusual Noises: Listen for any abnormal sounds during the operation of the garage door. Grinding, scraping, or squeaking noises may indicate problems that need attention.
- Perform Regular Maintenance: To maintain the proper function and longevity of the garage door system, establish a regular maintenance routine. This may include lubricating moving parts, inspecting and tightening hardware, and keeping the tracks clean.
Testing the garage door is a crucial step to ensure its smooth and safe operation. By carefully observing the door’s movement, balance, and overall functionality, you can identify any potential issues and address them promptly.
If you notice any significant problems or if the door does not operate as expected, it’s advisable to consult a professional garage door technician. They can provide expert guidance and make any necessary adjustments or repairs.
Congratulations! By following these steps, you have successfully wound the garage door spring and tested the functionality of your garage door. Ensure to maintain regular maintenance to keep your garage door in optimal condition.
Remember, if you ever feel uncertain or uncomfortable with any step of the process, it’s always best to seek professional assistance. Safety should always be the top priority when working with garage door springs.
Now, enjoy the reliable and smooth operation of your garage door!
Conclusion
Winding a garage door spring is a task that requires careful attention, proper technique, and a focus on safety. Through the steps outlined in this guide, you have learned the necessary knowledge and skills to successfully wind a garage door spring and restore the functionality of your garage door.
It is crucial to understand the different types of garage door springs, including extension springs and torsion springs. By identifying the torsion spring system in your garage door and following the manufacturer’s guidelines, you can ensure the correct installation and replacement of the spring.
Throughout the process, safety should remain a top priority. Take the necessary precautions, wear appropriate safety gear, and follow the recommended safety guidelines. If you feel uncertain or uncomfortable, do not hesitate to seek professional assistance. Your safety and well-being are paramount.
By properly preparing the garage door, identifying the spring system, releasing the tension, removing the old spring, installing the new spring, winding it correctly, and testing the door’s functionality, you have completed the essential steps to wind a garage door spring.
Regular maintenance and inspection of your garage door, including lubricating moving parts and checking for any signs of wear or damage, will help extend its lifespan and ensure continued smooth operation.
Remember, if you are unsure or have any concerns about the process, it is always best to consult with a professional garage door technician who can provide expert guidance and assistance.
By following this guide and taking the necessary precautions, you can successfully wind your garage door spring and enjoy a fully functional and safe garage door for years to come.
Frequently Asked Questions about How To Wind Garage Door Spring
Was this page helpful?
At Storables.com, we guarantee accurate and reliable information. Our content, validated by Expert Board Contributors, is crafted following stringent Editorial Policies. We're committed to providing you with well-researched, expert-backed insights for all your informational needs.


0 thoughts on “How To Wind Garage Door Spring”