Articles
How To Wrap Car Mirrors
Modified: December 7, 2023
Discover the best techniques and materials for wrapping car mirrors with our informative articles. Gain valuable insights on how to protect and transform your car mirrors with ease.
(Many of the links in this article redirect to a specific reviewed product. Your purchase of these products through affiliate links helps to generate commission for Storables.com, at no extra cost. Learn more)
Introduction
Welcome to our comprehensive guide on how to wrap car mirrors. Whether you want to add a touch of style, protect your mirrors, or simply change their color, vinyl wrapping is a popular and cost-effective solution. By following the steps outlined in this article, you’ll be able to achieve professional-looking results and give your car a unique and customized appearance.
Vinyl wrapping is a technique that involves covering the surface of an object, such as a car mirror, with a thin, adhesive-backed vinyl film. This film is available in a variety of colors, finishes, and textures, allowing you to completely transform the look of your car’s mirrors. The process requires patience, precision, and attention to detail, but with the right tools and techniques, you can achieve a flawless and long-lasting outcome.
In this guide, we will walk you through the step-by-step process of wrapping your car mirrors. We will cover everything from preparing the mirrors to applying the vinyl wrap and ensuring a seamless finish. So, let’s dive in and get started with the tools and materials you’ll need for this project.
Key Takeaways:
- Transform your car mirrors with vinyl wrapping to add style, protection, or a new color. Follow the step-by-step guide for professional-looking results and a customized vehicle appearance.
- Ensure a flawless finish by preparing the mirror surface, applying the vinyl wrap with precision, and adding final touches for a polished and unique look. Regular maintenance will keep your wrapped car mirrors looking vibrant and attractive.
Read more: How To Reverse A Car Using Mirrors
Tools and Materials Needed
Before you begin wrapping your car mirrors, you’ll need to gather the necessary tools and materials to ensure a successful and smooth process. Here’s a list of what you’ll need:
- Heat gun or hairdryer: A heat gun or hairdryer will help warm the vinyl wrap, allowing it to stretch and adhere better to the mirror surface. It’s an essential tool for achieving a wrinkle-free finish.
- Vinyl wrap: Choose a high-quality vinyl wrap in the color and finish of your choice. Make sure to purchase enough to cover both mirrors adequately.
- Vinyl squeegee: A vinyl squeegee is a valuable tool for smoothing out any air bubbles or wrinkles during the application process. It helps ensure a seamless and professional-looking result.
- Knife or razor blade: You’ll need a sharp knife or razor blade for cutting the vinyl wrap to the correct size and trimming off any excess after application.
- Cleaning solution: Use a mild cleaning solution or alcohol-based solution to thoroughly clean the mirror surface before applying the vinyl wrap. This will remove any dirt, grease, or residue that could affect the adhesive’s bonding ability.
- Clean cloth or microfiber towel: Use a clean cloth or microfiber towel to dry and wipe down the mirror surface after cleaning.
- Masking tape: Masking tape will come in handy for securing the vinyl wrap in place during the application process. It will prevent the wrap from shifting or slipping as you work.
It’s important to ensure that you have all the necessary tools and materials ready before you begin wrapping your car mirrors. This will help you work efficiently and minimize any potential mistakes. Once you have everything prepared, it’s time to move on to the first step: preparation.
Step 1: Preparation
Before you start the vinyl wrapping process, it’s crucial to prepare the car mirrors properly. This step will ensure that the surface is clean and free from any dirt, debris, or contaminants that could affect the adhesion of the vinyl wrap. Follow these steps:
- Remove any existing decals or stickers: If your car mirrors have any decals or stickers on them, carefully peel them off. Use a plastic scraper or your fingernail to gently lift the edges and remove them. If there is residue left behind, use a mild adhesive remover to clean it off.
- Clean the mirror surface: Using a mild cleaning solution or an alcohol-based cleaner, thoroughly clean the mirror surface. This will remove any dirt, grease, or residue that could interfere with the adhesive. Be sure to clean both the mirror housing and the mirror glass.
- Dry the surface: Use a clean cloth or microfiber towel to dry the mirror surface completely. Avoid using paper towels or abrasive materials that could scratch the surface. Ensure that there is no moisture left on the mirrors before proceeding.
- Mask off the surrounding area: Using masking tape, cover any areas surrounding the mirror that you want to protect from accidental contact with the vinyl wrap. This includes the painted surfaces of the car and other nearby objects.
By taking the time to properly prepare the mirror surfaces, you’ll ensure a clean and smooth base for the vinyl wrap application. This will enhance the adhesive’s ability to bond and result in a more professional-looking finish. Once you’ve completed the preparation process, you’re ready to move on to the next step: removing the mirror cover.
Step 2: Removing the Mirror Cover
Before you can apply the vinyl wrap, you’ll need to remove the mirror cover from your car. The method for removing the cover may vary depending on the make and model of your vehicle, so refer to your car’s manual for specific instructions. In general, the process can be broken down into the following steps:
- Locate the retaining clips or screws: Look for any retaining clips or screws that hold the mirror cover in place. These are typically located on the backside or the sides of the cover. Use a screwdriver or a panel removal tool to carefully remove the screws or release the clips.
- Gently pry off the mirror cover: Once the retaining clips or screws are removed, carefully pry off the mirror cover. Start from one end and work your way around to avoid damaging the cover or the mirror itself. Use a plastic trim removal tool to avoid scratching the surface.
- Set the mirror cover aside: Place the mirror cover in a safe and clean area to prevent any damage or dirt accumulation. You’ll need to reattach it later after applying the vinyl wrap.
Removing the mirror cover will provide you with easier access to the mirror surface, allowing you to apply the vinyl wrap with greater precision. Take your time and be gentle during this step to avoid any unnecessary damage. Once the mirror cover is removed, you can proceed to the next step: cleaning the mirror surface.
Step 3: Cleaning the Mirror Surface
Now that you have removed the mirror cover, it’s time to clean the mirror surface thoroughly. This step is crucial to ensure proper adhesion and remove any dirt, oils, or debris that could affect the vinyl wrap. Follow these steps to clean the mirror surface:
- Choose a suitable cleaning solution: Use a mild cleaning solution or an alcohol-based cleaner for best results. Avoid harsh chemicals or abrasive cleaners that could damage the mirror surface.
- Dampen a clean cloth or microfiber towel: Moisten a clean cloth or microfiber towel with the cleaning solution. Make sure it’s not dripping wet, as excess moisture can affect the adhesive’s ability to bond.
- Gently wipe the mirror surface: Starting from one side, gently wipe the mirror surface in a horizontal or circular motion. Pay attention to any areas that may have stubborn dirt or residue, and apply a bit more pressure if needed.
- Repeat with a dry cloth: Once you have wiped the mirror surface with the cleaning solution, use a dry cloth or microfiber towel to remove any excess moisture and give the surface a final wipe-down.
It’s important to ensure that the mirror surface is completely clean and dry before proceeding with the vinyl wrap application. Any dirt, oils, or residue can hinder the adhesive’s effectiveness and lead to a less-than-desirable outcome. Take your time during this step to ensure a thorough cleaning. Once the mirror surface is clean and dry, you’re ready to move on to the next step: preparing the vinyl wrap.
Read more: How To Clean Car Side Mirrors
Step 4: Preparing the Vinyl Wrap
Now that your mirror surface is clean and dry, it’s time to prepare the vinyl wrap for application. Proper preparation of the vinyl wrap is essential to ensure a smooth and precise installation. Follow these steps to prepare the vinyl wrap:
- Measure and cut the wrap: Measure the dimensions of your car mirror and cut the vinyl wrap to the appropriate size. Make sure to leave some extra material around the edges for trimming later.
- Warm up the vinyl wrap: Using a heat gun or hairdryer on a low heat setting, gently warm up the vinyl wrap. This will make it more pliable and easier to work with, allowing it to conform to the mirror surface better.
- Peel off the backing: Carefully peel off the backing of the vinyl wrap, starting from one corner. Be cautious not to stretch or distort the wrap as you remove the backing.
- Position the wrap: Position the vinyl wrap on the mirror surface, starting from one edge. Align it carefully to ensure proper coverage and symmetry.
- Smooth out any air bubbles: Use a vinyl squeegee to gently smooth out any air bubbles or wrinkles that may have formed during the application process. Start from the center and work your way towards the edges, pushing the air bubbles out.
By properly preparing the vinyl wrap, you’ll have a much easier time applying it to the mirror surface. Warming up the vinyl helps it conform to the shape of the mirror, while peeling off the backing and positioning it accurately ensures a clean and precise installation. Take your time during this step to achieve the desired result. Once the vinyl wrap is in place, you’re ready to move on to the next step: applying the vinyl wrap to the mirror surface.
When wrapping car mirrors, make sure to thoroughly clean the surface before applying the wrap to ensure a smooth and secure adhesion. This will help prevent any air bubbles or imperfections in the finished result.
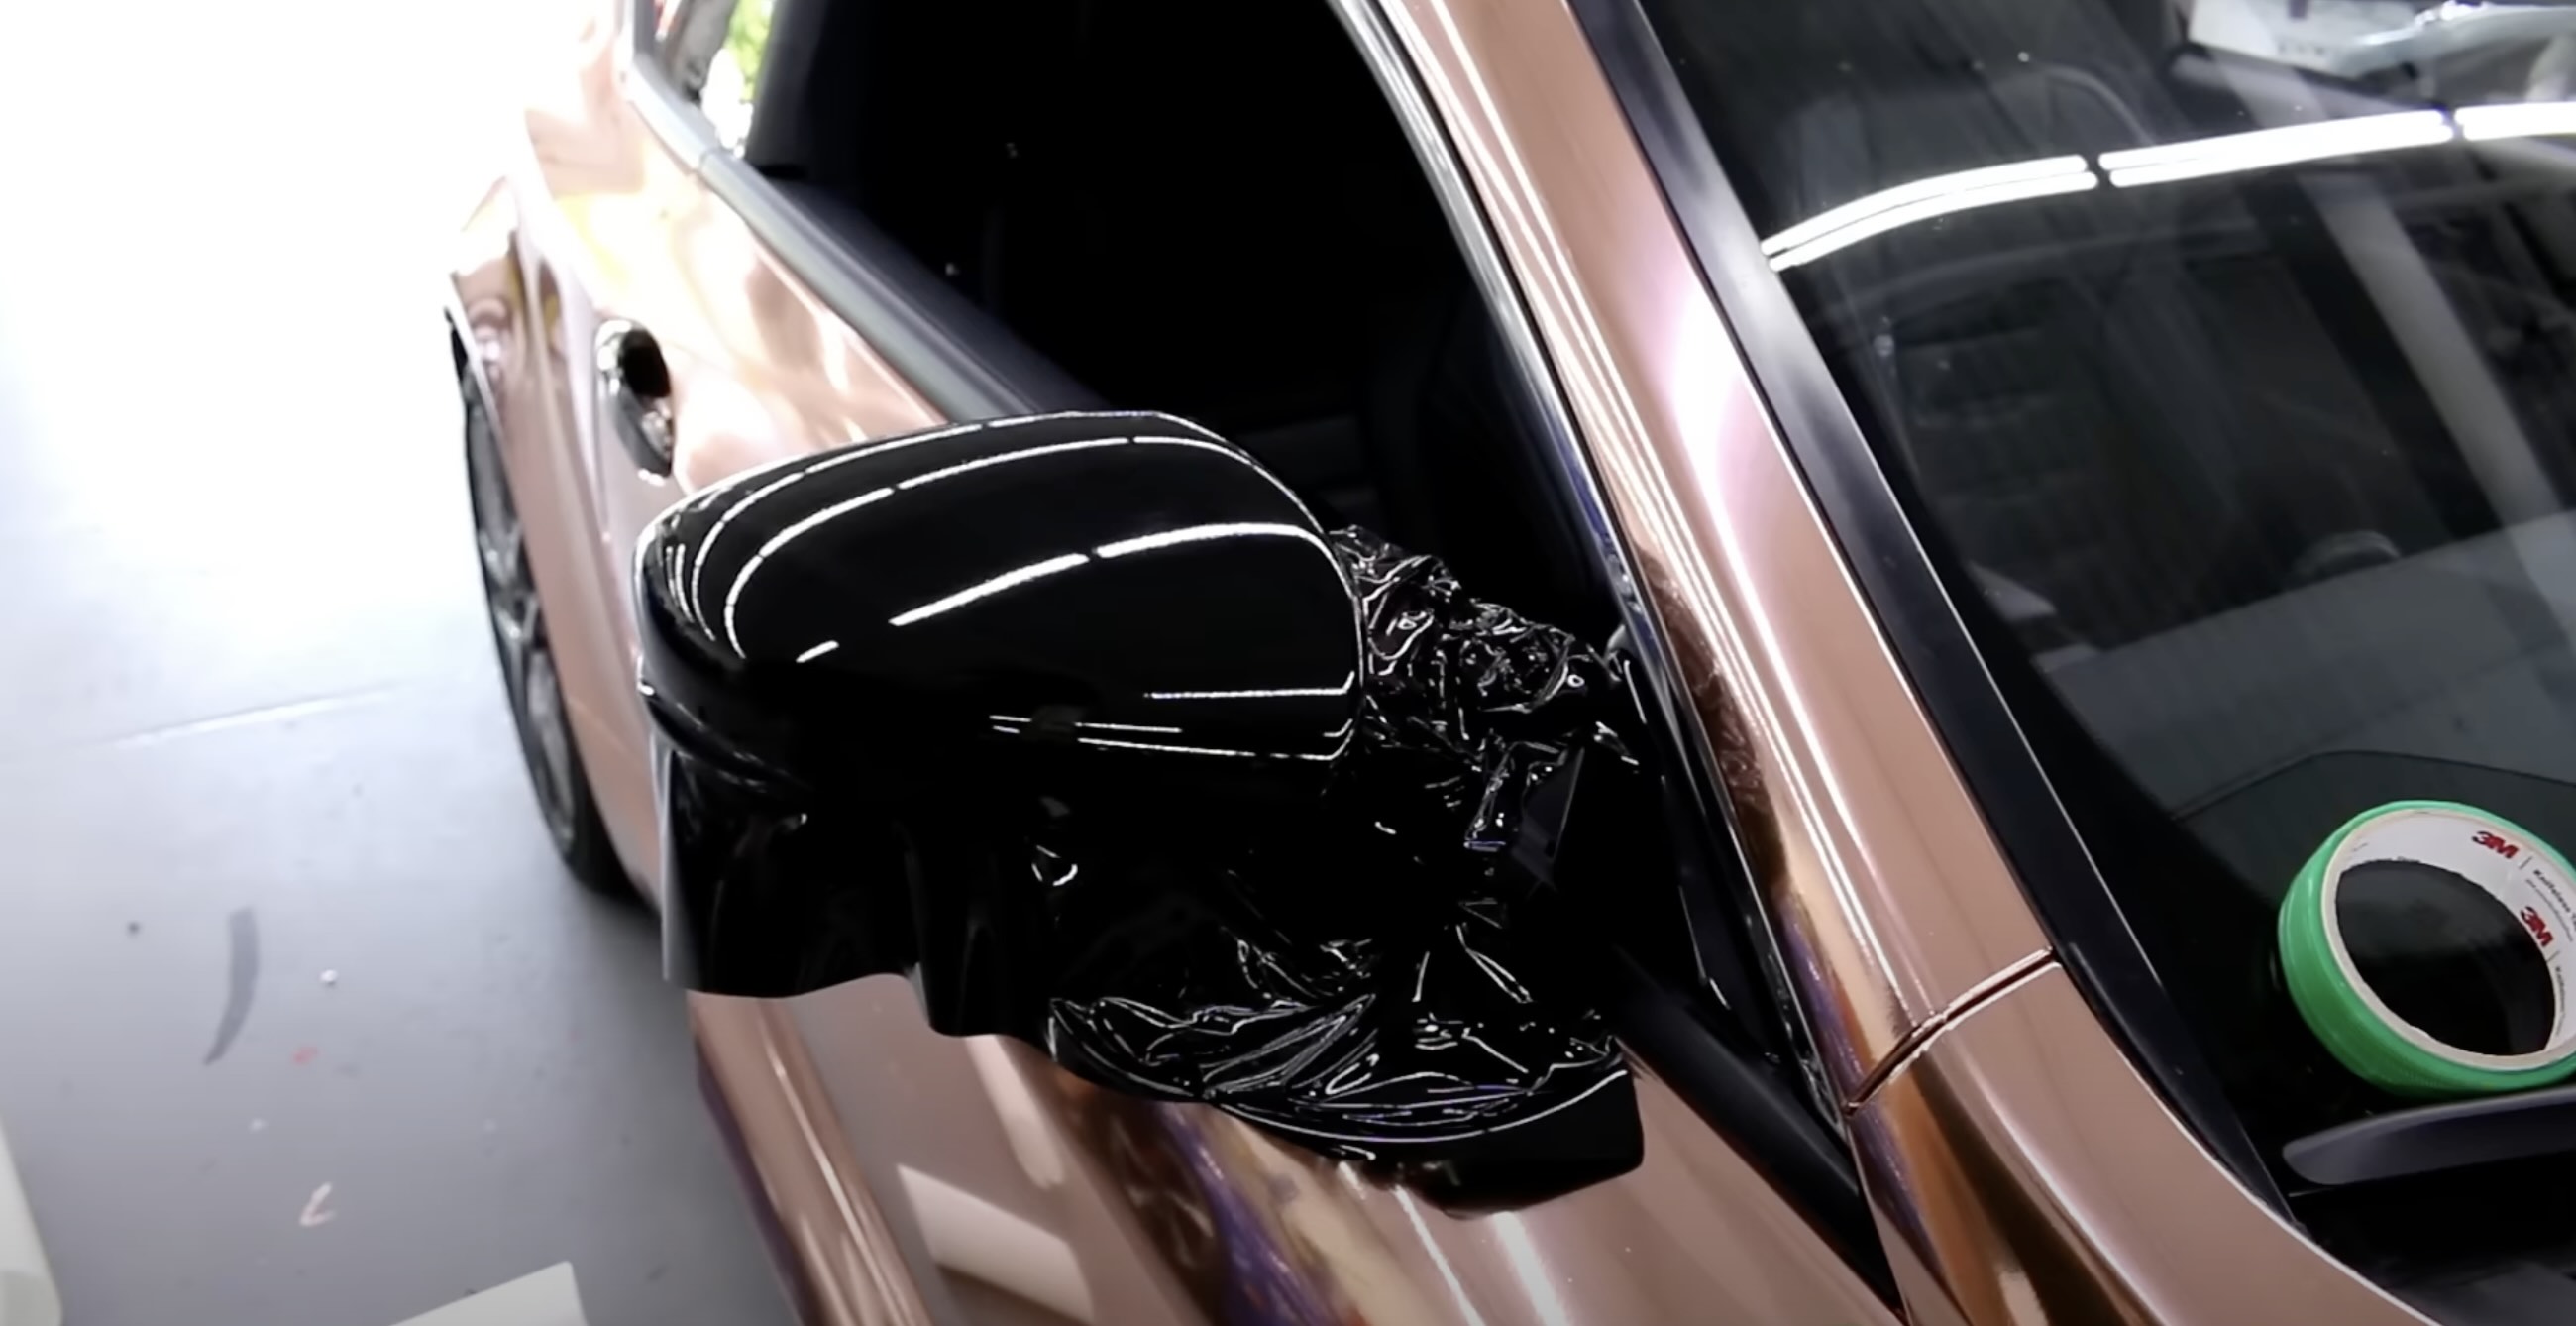
Step 5: Applying the Vinyl Wrap
Now that you have prepared the vinyl wrap, it’s time to apply it to the mirror surface. This step requires precision and careful maneuvering to ensure proper alignment and a smooth finish. Follow these steps to apply the vinyl wrap:
- Start from one edge: Begin by starting from one edge of the mirror surface. This will allow you to gradually work your way across the mirror, ensuring even coverage.
- Align the vinyl wrap: As you position the vinyl wrap on the mirror surface, align it carefully with the edges. Take your time to ensure accurate placement.
- Press and smooth: Once the vinyl wrap is aligned, begin pressing it onto the mirror surface using your fingers or a vinyl squeegee. Start from the center and gradually work your way towards the edges, smoothing out any air bubbles or wrinkles as you go.
- Stretch when necessary: If needed, gently stretch the vinyl wrap to accommodate any curved or angled areas of the mirror. Be cautious not to overstretch, as this can cause the wrap to distort or lose its shape.
- Continue across the mirror: Move across the mirror surface, repeating the process of aligning, pressing, and smoothing the vinyl wrap. Take your time and be patient to achieve a seamless and professional-looking finish.
During the application process, it’s important to work methodically and avoid rushing. Take breaks if needed to ensure that you maintain steady hands and precise movements. Keep smoothing out any air bubbles or wrinkles as you go to achieve a sleek and flawless appearance. Once you’ve applied the vinyl wrap to the entire mirror surface, you’re ready to move on to the next step: trimming the excess wrap.
Step 6: Trimming the Excess Wrap
Now that you’ve applied the vinyl wrap to the mirror surface, it’s time to trim any excess wrap for a clean and polished look. Trimming the excess wrap will give your car mirrors a professional appearance and help ensure that the edges are neatly finished. Follow these steps to trim the excess wrap:
- Inspect the edges: Carefully examine the edges of the vinyl wrap to identify any areas where excess wrap needs to be trimmed. Look for any uneven or overlapping sections.
- Use a knife or razor blade: With a sharp knife or razor blade, carefully trim the excess wrap along the edges of the mirror surface. Make precise and controlled cuts to avoid damaging the vinyl or mirror.
- Work in small sections: Trim the excess wrap in small sections, moving gradually around the mirror surface. Take your time to ensure clean and straight cuts.
- Remove trimmed pieces: As you trim the excess wrap, gently peel away the trimmed pieces. Be cautious not to disturb or displace the vinyl wrap that’s already applied.
Trimming the excess wrap requires patience and attention to detail. Take your time during this step to ensure a neat and professional finish. It’s better to make small, precise cuts rather than rushing and potentially damaging the vinyl or mirror surfaces. Once you’ve finished trimming the excess wrap, you’re ready to progress to the next step: reattaching the mirror cover.
Step 7: Reattaching the Mirror Cover
After trimming the excess wrap and achieving a clean and polished look, it’s time to reattach the mirror cover. The mirror cover not only adds aesthetic appeal but also provides protection for the mirror itself. Follow these steps to reattach the mirror cover:
- Inspect the mirror cover: Before reattaching the mirror cover, check for any damage or dirt. Clean the cover if necessary to ensure a pristine appearance.
- Align the mirror cover: Carefully position the mirror cover back onto the mirror housing, aligning it with any clips or screw holes.
- Reinsert screws or secure clips: Using a screwdriver or your hands, reinsert the screws or secure the clips to hold the mirror cover in place.
- Apply gentle pressure: Apply gentle pressure to ensure that the mirror cover is securely attached to the mirror housing. Avoid applying excessive force, as it could damage the cover or the mirror.
When reattaching the mirror cover, be mindful of any wiring or connectors that may be present. Make sure that the cover is properly aligned and securely fastened to prevent any movement or rattling while driving. Once the mirror cover is reattached, you’re ready for the final steps: adding final touches and conducting an inspection.
Read more: How To Keep Spiders Out Of Car Mirrors
Step 8: Final Touches and Inspection
With the vinyl wrap applied, excess wrap trimmed, and the mirror cover reattached, you’re almost finished with the process of wrapping your car mirrors. However, before you call it a day, it’s important to add some final touches and conduct a thorough inspection to ensure a flawless finish. Follow these steps for the final touches and inspection:
- Smooth out any imperfections: Take a few moments to inspect the vinyl wrap on the mirror surface. If you notice any areas with air bubbles, wrinkles, or uneven edges, use a heat gun or hairdryer to gently warm up the vinyl wrap and smooth out any imperfections.
- Double-check the alignment: Step back and examine the overall appearance of the wrapped mirrors. Make sure that the vinyl wrap is aligned properly, and the color and finish are consistent on both mirrors.
- Clean and polish: Use a clean microfiber cloth and some vinyl cleaner or detailing spray to clean and polish the wrapped mirrors. This will enhance the shine and protect the vinyl wrap, giving it a professional appearance.
- Inspect from different angles: Walk around your car and inspect the wrapped mirrors from different angles. Look for any visible seams, lifting edges, or other imperfections that may need touch-ups.
By paying attention to these final touches, you can ensure that your wrapped car mirrors look impeccable. Take the time to address any imperfections and make necessary adjustments to achieve a flawless finish. Once you’re satisfied with the appearance, step back and admire your newly wrapped car mirrors.
Remember, it’s essential to regularly maintain and clean your wrapped car mirrors to preserve their appearance and longevity. Avoid using abrasive cleaners or tools that could scratch or damage the vinyl wrap. Instead, use a non-abrasive cleaner and a soft cloth to keep the mirrors looking their best.
With your newly wrapped car mirrors, you’ve successfully transformed the look of your vehicle and added a personal touch. Now, hit the road and enjoy the attention your custom car mirrors will undoubtedly attract!
Note: The process and steps mentioned in this guide are general guidelines. Always refer to the specific instructions and recommendations provided by the manufacturer of the vinyl wrap and your vehicle’s manual for the most accurate and detailed instructions.
Conclusion
Wrapping your car mirrors can be a fun and rewarding project that allows you to express your personal style and customize the look of your vehicle. By following the step-by-step guide outlined in this article, you can achieve professional-looking results and transform your car mirrors into unique and eye-catching features.
Throughout this guide, we’ve covered the necessary tools and materials, as well as the crucial steps of preparation, removing the mirror cover, cleaning the mirror surface, preparing the vinyl wrap, applying the vinyl wrap, trimming the excess wrap, reattaching the mirror cover, and adding final touches and conducting an inspection. Each step is important in ensuring a seamless and flawless result.
When wrapping your car mirrors, remember to take your time and pay attention to detail. Proper alignment, smoothing out air bubbles or wrinkles, and ensuring a clean and precise finish are essential for a professional-looking outcome. Regular maintenance and cleaning of the wrapped mirrors will help extend their lifespan and keep them looking vibrant and attractive.
Always follow the instructions provided by the manufacturer of the vinyl wrap and refer to your vehicle’s manual for any specific guidance or recommendations. Take proper safety precautions when using tools and heating equipment, and work in a clean and well-ventilated area to ensure optimal results.
Now that you have the knowledge and steps to wrap your car mirrors, it’s time to embark on your own personalization journey. Get creative, have fun, and enjoy the transformation of your car mirrors into stylish and unique features that reflect your personality and taste.
Remember, practice makes perfect, so the more you work with vinyl wrapping, the better your skills will become. Don’t be afraid to experiment and try different techniques or colors on future projects. Before you know it, you’ll be a master at wrapping not just car mirrors but other parts of your vehicle as well!
Frequently Asked Questions about How To Wrap Car Mirrors
Was this page helpful?
At Storables.com, we guarantee accurate and reliable information. Our content, validated by Expert Board Contributors, is crafted following stringent Editorial Policies. We're committed to providing you with well-researched, expert-backed insights for all your informational needs.

0 thoughts on “How To Wrap Car Mirrors”