Articles
How To Wrap Porch Posts
Modified: December 7, 2023
(Many of the links in this article redirect to a specific reviewed product. Your purchase of these products through affiliate links helps to generate commission for Storables.com, at no extra cost. Learn more)
Introduction
Welcome to our comprehensive guide on how to wrap porch posts. Wrapping porch posts not only adds visual appeal and enhances the overall aesthetic of your porch, but it also provides protection against the elements and prolongs the lifespan of the posts. Whether you’re looking to give your porch a fresh look or want to add a layer of defense to your existing porch posts, this article will walk you through the step-by-step process.
Before we dive into the details, it’s important to note that wrapping porch posts requires some basic DIY skills and tools. However, with a bit of patience and attention to detail, you’ll be able to achieve professional-looking results.
So, grab your measuring tape, gather the necessary materials, and let’s get started on transforming your porch posts!
Key Takeaways:
- Transform your porch posts with durable PVC or aluminum wrapping material for added protection and visual appeal. Follow the step-by-step process to achieve professional results and enjoy a fresh, polished look for your porch.
- Secure the wrapping material with care, ensuring a snug fit and long-term stability. Add finishing touches like trimming, sanding, and optional painting or staining to elevate the aesthetic and functionality of your porch posts.
Read more: How To Replace Porch Post
Materials Needed
Before you begin wrapping your porch posts, make sure you have the following materials on hand:
- PVC or aluminum wrapping material: PVC and aluminum are popular choices for porch post wrapping due to their durability, weather resistance, and low maintenance requirements. Choose a material that suits your aesthetic preferences and budget.
- Measuring tape: Accurate measurements are crucial for a proper fit, so be sure to have a measuring tape or ruler handy.
- Saw: You may need a saw to cut the wrapping material to the required length.
- Adhesive or caulking: Depending on the wrapping material you choose, you may need adhesive or caulking to secure the wrapping material in place.
- Screws or nails: Fasteners are needed to attach the wrapping material to the porch posts. The type of fasteners will depend on the material you’re working with.
- Level: A level will help ensure that the wrapping material is installed evenly and straight.
- Paint or stain (optional): If desired, you can paint or stain the wrapping material to match the color scheme of your porch.
- Safety equipment: Don’t forget to wear protective eyewear and gloves to keep yourself safe while working.
Having these materials readily available will make the wrapping process more efficient and seamless.
Step 1: Measure and Cut the Wrapping Material
The first step in wrapping porch posts is to accurately measure and cut the wrapping material. This ensures a proper fit and professional finish. Follow these steps:
- Start by measuring the height and circumference of each porch post. Use a measuring tape or ruler to get precise measurements. Keep in mind that the wrapping material should cover the entire length of the post and wrap around it securely.
- Add a few extra inches to the measurements to account for any overlap or trimming that may be necessary. This will help ensure a tight and seamless fit.
- If using PVC or aluminum wrapping material, mark the measurements on the material and use a saw to cut it to the desired length. Take caution when cutting to ensure a clean, straight edge.
- If needed, cut out any additional pieces for corners or decorative elements, ensuring they fit snugly against the porch posts.
Remember to double-check your measurements before making any cuts and make adjustments as necessary. It’s better to measure twice and cut once to avoid any wastage or ill-fitting wrapping material.
By accurately measuring and cutting the wrapping material, you’ll have a solid foundation for the rest of the wrapping process. Take your time in this step to ensure a professional and polished outcome.
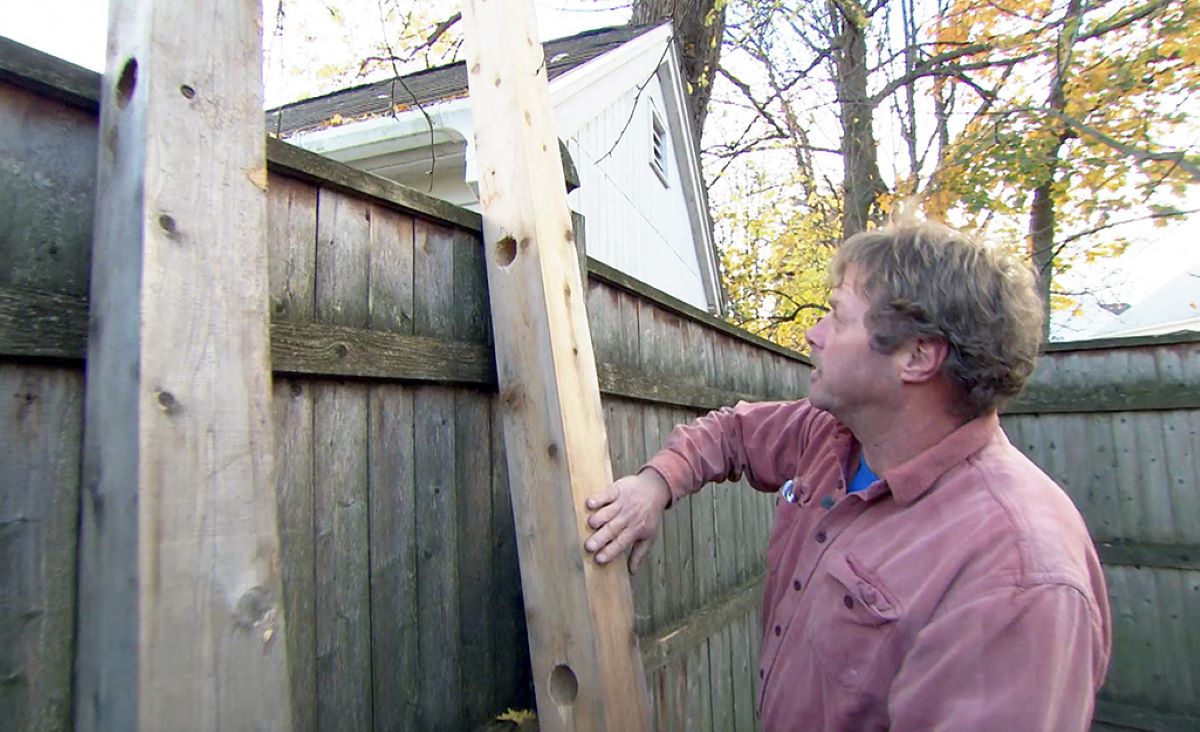
Step 2: Prepare the Porch Posts
Before attaching the wrapping material, it’s essential to prepare the porch posts to ensure a clean and secure installation. Follow these steps:
- Clean the porch posts: Use a mild detergent and water to clean the porch posts, removing any dirt, dust, or debris. A clean surface will allow for better adhesion of the wrapping material.
- Inspect the porch posts: Check the condition of the porch posts to ensure they are structurally sound and free from any damage or rot. If any repairs are needed, address them before proceeding with the wrapping process.
- Sand the porch posts (optional): If the porch posts have a rough or uneven surface, you may choose to sand them lightly. This step will create a smoother base for the wrapping material and facilitate better adhesion.
- Prime and paint (optional): If desired, you can apply a coat of primer and paint to the porch posts before wrapping them. This step allows you to customize the color and further protect the posts from the elements.
Preparing the porch posts ensures a clean and stable foundation for the wrapping material. Taking the time to clean, inspect, and potentially paint or prime the posts will result in a professional and cohesive look for your porch.
When wrapping porch posts, be sure to measure and cut the wrap material accurately to ensure a seamless and professional-looking finish. Use a level to ensure the wrap is straight and secure it with construction adhesive for added stability.
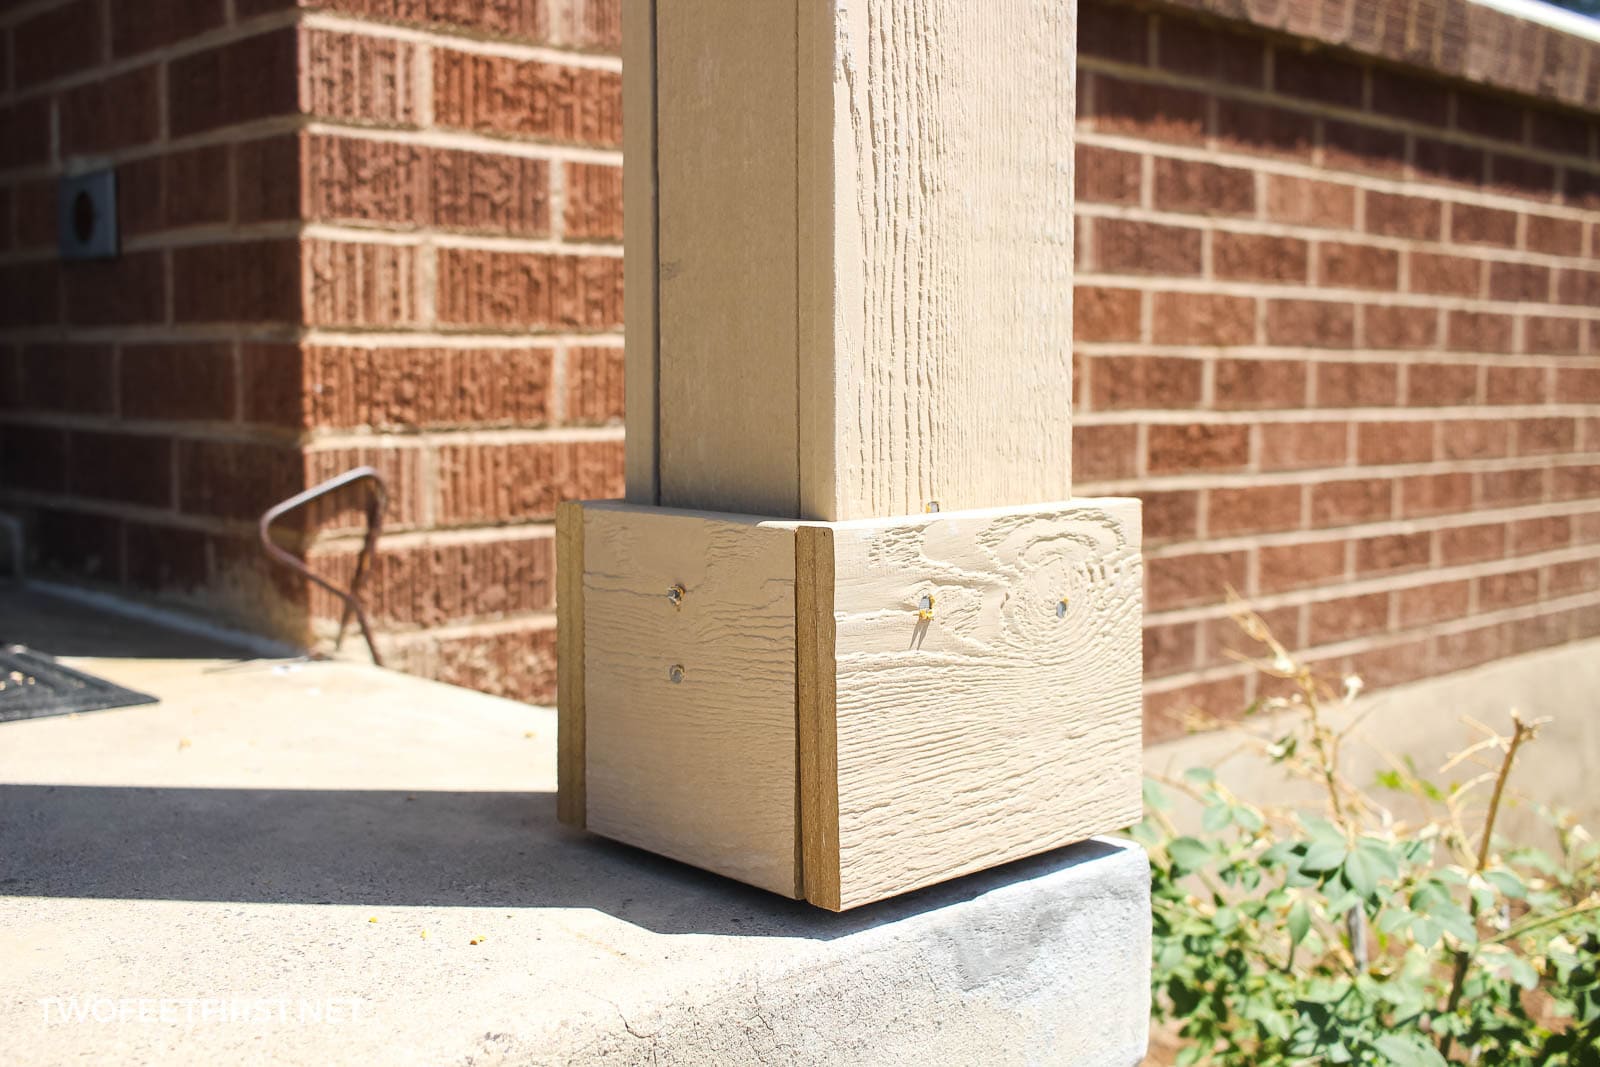
Step 3: Attach the Wrapping Material to the Posts
Now that the porch posts are prepared, it’s time to attach the wrapping material. Follow these steps to ensure a secure and seamless installation:
- Start at the bottom: Begin wrapping the material at the bottom of the porch post. This allows for better stability and easier alignment as you work your way up.
- Apply adhesive or caulking: Depending on the type of wrapping material you’re using, apply adhesive or caulking to the backside of the material. This will enhance adhesion and ensure a strong bond with the porch post.
- Align and press the material: Gently align the wrapping material with the porch post, making sure it is level and centered. Press the material firmly against the post to secure it in place. Use a level to ensure that the material is straight.
- Continue wrapping: Slowly wrap the material around the porch post, ensuring a snug fit. If necessary, trim the material to ensure a proper overlap and alignment. Use fasteners, such as screws or nails, to secure the wrapping material to the post as you go along.
- Repeat the process for each porch post: Complete the wrapping process for each porch post, following the same steps. Take your time to ensure that each wrap is evenly aligned and securely fastened.
Pay attention to any corners or decorative elements on the porch posts and adjust the wrapping material accordingly. Take care not to stretch or distort the material during the wrapping process.
By following these steps, you will attach the wrapping material securely to the porch posts, creating a polished and professional look for your porch.
Read more: How To Build Wrap Around Porch
Step 4: Secure the Wrapping Material in Place
After attaching the wrapping material to the porch posts, it’s important to secure it in place to ensure its long-term stability. Follow these steps to secure the wrapping material:
- Check for any loose areas: Carefully inspect the wrapped porch posts for any areas where the wrapping material may feel loose or have gaps. These areas can be susceptible to movement and may compromise the overall integrity of the wrap.
- Apply additional adhesive or caulking: If you notice any loose areas, apply additional adhesive or caulking to those spots and firmly press the material against the porch post to secure it.
- Use additional fasteners if needed: If the wrapping material feels insecure in certain places, consider using additional fasteners, such as screws or nails, to reinforce those areas. Be mindful of the material you’re working with and use appropriate fasteners to avoid damaging it.
- Check for levelness: Use a level to ensure that the wrapped porch posts are still straight and aligned. Adjust as necessary to achieve a uniform and visually appealing look.
Ensuring that the wrapping material is securely in place will prevent any shifting or movement over time. This step is vital for maintaining the durability and aesthetics of the wrapped porch posts.
Take your time during this step to double-check all areas of the wrapping material, making any necessary adjustments or reinforcements. By securing the wrapping material properly, you can enjoy a long-lasting and visually pleasing porch post wrap.
Step 5: Finishing Touches
With the wrapping material securely in place, it’s time to add the finishing touches to complete the look of your porch posts. Follow these steps to add those final details:
- Trim any excess material: If there are any areas where the wrapping material extends beyond the desired length, use a saw or utility knife to carefully trim off the excess. This will give the wrap a neat and polished appearance.
- Sand or file rough edges: Smooth out any rough edges or sharp corners on the wrapping material using sandpaper or a file. This step will provide a finished look and prevent any accidental injuries.
- Paint or stain the wrapping material (optional): If you want to further enhance the appearance of the porch posts, consider painting or staining the wrapping material. Choose a color that complements your porch and apply the paint or stain according to the manufacturer’s instructions. Allow sufficient drying time before touching or placing any objects on the newly finished porch posts.
- Clean the porch posts: Once the wrapping material and any additional finishes are in place, give your porch posts a final clean to remove any dust or debris. This will ensure your porch looks its best.
- Enjoy your transformed porch: Step back and take a moment to admire your handiwork! Your newly wrapped porch posts will not only add visual appeal but also provide durability and protection.
By paying attention to these finishing touches, you’ll add those final details that elevate the overall look and feel of your porch. Take pride in your completed project and enjoy the enhanced beauty and functionality of your porch posts!
Conclusion
Congratulations! You have successfully learned how to wrap porch posts. By following the step-by-step process outlined in this guide, you can transform the look of your porch while providing added protection to your porch posts.
Remember to gather all the necessary materials, measure and cut the wrapping material accurately, and prepare the porch posts before starting the wrapping process. Use adhesive or caulking to secure the wrapping material in place and ensure it is aligned and level along the entire length of each porch post.
Take the time to secure the wrapping material properly and make any necessary adjustments to ensure its stability. Consider adding finishing touches such as trimming the excess material, sanding rough edges, and optionally painting or staining the wrapping material to complement your porch’s design.
Once you’ve completed the wrapping process, step back and admire the beautifully transformed porch posts. Not only will they enhance the aesthetic appeal of your porch, but they will also provide added protection against the elements, ultimately prolonging the lifespan of your porch posts.
Don’t forget to properly maintain your wrapped porch posts by regularly cleaning them and addressing any necessary repairs. This will help keep them looking great for years to come.
Thank you for following this comprehensive guide on how to wrap porch posts. Embrace your newfound knowledge and enjoy the transformed look and durability that wrapped porch posts bring to your outdoor space!
Frequently Asked Questions about How To Wrap Porch Posts
Was this page helpful?
At Storables.com, we guarantee accurate and reliable information. Our content, validated by Expert Board Contributors, is crafted following stringent Editorial Policies. We're committed to providing you with well-researched, expert-backed insights for all your informational needs.


0 thoughts on “How To Wrap Porch Posts”