Articles
Why Does My Water Heater Pilot Keep Going Out
Modified: February 22, 2024
Find out why your water heater pilot keeps going out and learn how to fix it with our informative articles.
(Many of the links in this article redirect to a specific reviewed product. Your purchase of these products through affiliate links helps to generate commission for Storables.com, at no extra cost. Learn more)
Introduction
A water heater is an essential appliance in any household, providing hot water for various purposes such as bathing, dishwashing, and laundry. It relies on a pilot light to ignite the burner and heat the water. However, if you’ve noticed that your water heater’s pilot light keeps going out, it can be frustrating and inconvenient. Understanding the reasons behind this issue can help you prevent it from recurring and ensure a consistent supply of hot water.
In this article, we will delve into the common causes of a water heater pilot light going out and explore the possible solutions. By gaining a deeper understanding of these issues, you can troubleshoot the problem effectively or seek professional assistance if needed.
Key Takeaways:
- Ensure proper ventilation and clean the pilot assembly regularly to prevent the water heater pilot light from going out. Address gas supply issues promptly and consult a professional technician for complex problems.
- Replace a faulty thermocouple and adjust gas pressure if needed to maintain a steady pilot flame. When in doubt, seek professional assistance to ensure the safe and reliable operation of your water heater.
Read more: Why Does My Gas Fireplace Keep Going Out
Understanding the Water Heater Pilot
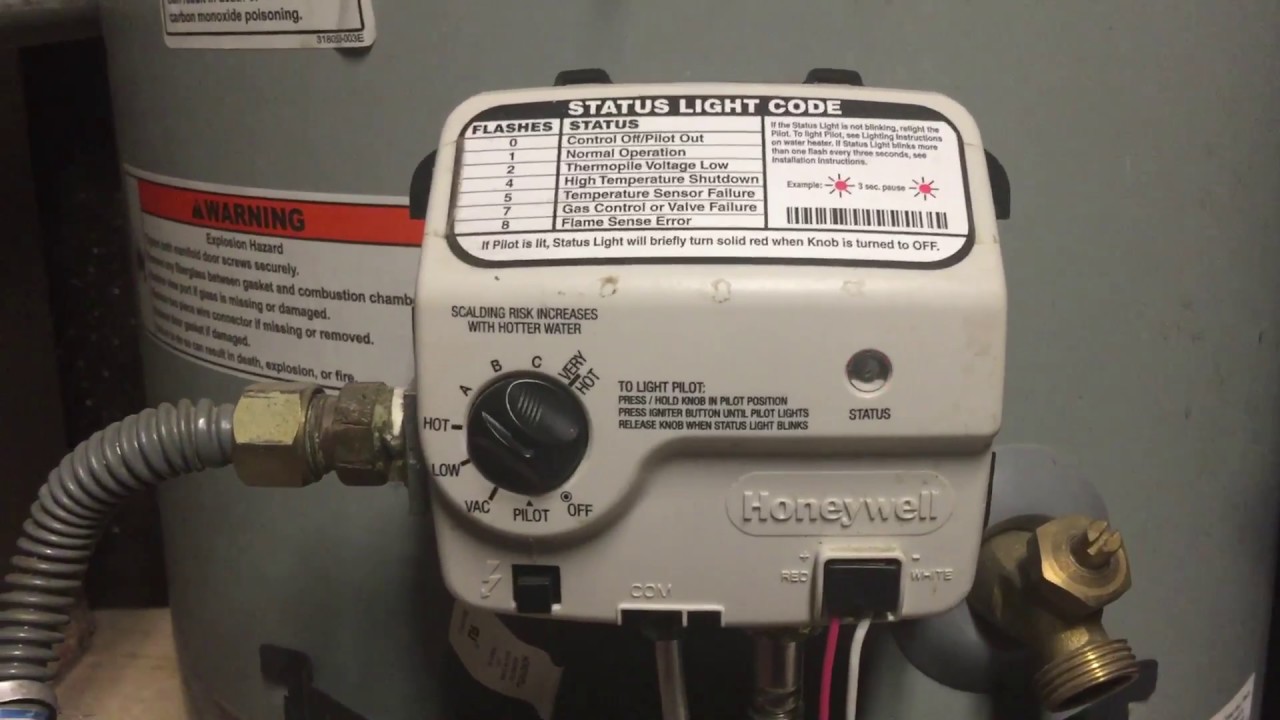
The pilot light in a water heater is a small flame that is constantly burning, serving as an ignition source for the burner that heats the water. It is typically fueled by gas, such as natural gas or propane, and is crucial for the proper functioning of the water heater.
The pilot light is housed in a pilot assembly, which consists of a burner, a thermocouple, and a pilot tube. The burner provides the source of ignition, while the thermocouple detects whether the pilot light is lit. If the thermocouple senses that the pilot light is not lit, it sends a signal to the gas control valve to shut off the gas supply, preventing any dangerous gas leaks.
When the water heater is turned on, the gas control valve opens to allow gas to flow to the pilot assembly. The pilot assembly then ignites the gas and the burner starts heating the water. However, if the pilot light keeps going out, it disrupts this process and prevents the water heater from operating properly.
Now that we have a basic understanding of how the water heater pilot works, let’s explore some of the common reasons why it might keep going out.
Common Reasons for a Pilot Going Out
There are several factors that can cause a water heater pilot light to go out repeatedly. Understanding these common reasons is essential in troubleshooting the issue and restoring the functionality of your water heater. Here are some potential causes:
- Insufficient Oxygen Supply: A pilot light requires a sufficient supply of oxygen to burn efficiently. If the area around the pilot flame is not properly ventilated, it can lead to the pilot going out. This can be caused by debris or obstructions near the pilot or a lack of combustion air in the surrounding area.
- Dirty Pilot Assembly: Over time, the pilot assembly can become dirty or clogged with dust, lint, or other debris. This can disrupt the flow of gas to the pilot flame, causing it to go out. Regular cleaning and maintenance of the pilot assembly can help prevent this issue.
- Faulty Thermocouple: The thermocouple is a safety device that detects whether the pilot light is lit. If the thermocouple is faulty or malfunctioning, it may not accurately sense the flame, causing the gas control valve to shut off and the pilot light to go out. Replacing a faulty thermocouple is a common solution to this issue.
- Gas Supply Issues: Problems with the gas supply can also cause the pilot light to go out. This can include issues such as low gas pressure, a faulty gas valve, or a gas leak. It is important to check the gas supply line and connections to ensure that there are no leaks or other problems affecting the flow of gas to the water heater.
- Improperly Adjusted Flame: If the pilot flame is not properly adjusted, it may be too weak or too strong, leading to issues with stability and reliability. A weak flame may be easily blown out, while a strong flame can cause the thermocouple to overheat. Adjusting the pilot flame to the manufacturer’s recommended specifications can help prevent the pilot from going out.
- Malfunctioning Gas Control Valve: The gas control valve is responsible for regulating the flow of gas to the pilot assembly and the burner. If the gas control valve is defective or malfunctioning, it can cause the pilot light to go out. In such cases, professional assistance may be necessary to repair or replace the gas control valve.
By understanding these common reasons for a water heater pilot going out, you can take appropriate steps to address the issue and ensure a consistent and reliable supply of hot water in your home.
Insufficient Oxygen Supply
One of the common reasons for a water heater pilot light going out is an insufficient supply of oxygen. A pilot light requires oxygen to burn properly and maintain a stable flame. If there isn’t enough oxygen in the surrounding area, the flame may flicker or go out completely.
This issue can be caused by various factors, such as poor ventilation in the area where the water heater is installed. If the space is confined or lacks proper air circulation, the pilot light may struggle to obtain the necessary oxygen for combustion. Additionally, debris or obstructions near the pilot assembly can limit the airflow and disrupt the flame.
To ensure sufficient oxygen supply to the pilot light, you can take the following steps:
- Check and clean the area around the pilot assembly. Remove any dust, lint, or debris that could hinder the airflow.
- Make sure the space where the water heater is located is properly ventilated. If necessary, consider installing additional vents or improving air circulation in the area.
- Check for any blockages in the flue or chimney. A blocked flue can prevent proper air intake and lead to a pilot going out.
- Inspect the air intake vents and ensure they are clear of obstructions. These vents provide the necessary fresh air supply for the combustion process.
Regular maintenance and cleaning of the pilot assembly and surrounding area can help prevent issues related to insufficient oxygen supply. If the problem persists despite taking these measures, it is advisable to consult a professional technician who can assess the situation and provide further guidance.
Remember, a well-ventilated and clean environment around the water heater not only helps keep the pilot light lit but also promotes the overall efficiency and safety of the appliance.
Dirty Pilot Assembly
If you find that your water heater pilot light keeps going out, a dirty pilot assembly could be the culprit. Over time, dust, lint, and other debris can accumulate in the pilot assembly, hindering the proper functioning of the pilot flame and causing it to go out.
When the pilot assembly becomes dirty, it can restrict the flow of gas to the pilot flame, resulting in a weak or unstable flame. This can lead to the flame being easily extinguished, leaving you without hot water. Regular maintenance and cleaning of the pilot assembly can help prevent this issue.
To clean the pilot assembly, you can follow these steps:
- Turn off the gas supply to the water heater. Safety is crucial, so make sure to shut off the gas before proceeding.
- Locate the pilot assembly. It is usually located near the bottom of the water heater, underneath the main burner.
- Gently remove the pilot assembly. Be careful not to damage any components.
- Inspect the pilot assembly for any visible dirt, dust, or debris. Use a soft brush or a compressed air canister to remove the buildup. Avoid using sharp objects that could damage the components.
- Once the pilot assembly is clean, reassemble it carefully and ensure that all connections are secure.
- Turn on the gas supply and relight the pilot. Follow the manufacturer’s instructions for relighting the pilot light and ensure that the flame burns steadily and consistently.
Regularly cleaning the pilot assembly can help prevent issues related to a dirty pilot assembly and ensure a reliable and efficient operation of your water heater. If you are unsure about performing the cleaning yourself or if the pilot light continues to go out after cleaning, it is recommended to seek assistance from a qualified technician to diagnose and resolve the issue.
Remember, proper maintenance and cleaning of the pilot assembly not only improve the performance of your water heater but also extend its lifespan, saving you from unnecessary repairs or replacements in the future.
Read more: Why Does My Gas Fire Pit Keep Going Out
Faulty Thermocouple
A faulty thermocouple is another common reason why a water heater pilot light may keep going out. The thermocouple is a safety device within the pilot assembly that senses whether the pilot flame is lit. If it detects that the flame is not present, the thermocouple sends a signal to the gas control valve to shut off the gas supply, preventing any potential gas leaks.
Over time, the thermocouple can wear out or become faulty, leading to inaccurate detection of the pilot flame. As a result, the gas control valve may mistakenly shut off the gas supply, causing the pilot light to go out.
If you suspect a faulty thermocouple, here are the steps you can take to address the issue:
- Turn off the gas supply to the water heater to ensure safety.
- Locate the thermocouple within the pilot assembly. It is typically a small copper or silver tube that connects to the gas control valve.
- Disconnect the thermocouple from the gas control valve. Be gentle and ensure not to damage any surrounding components.
- Install a new thermocouple by connecting it securely to the gas control valve.
- Reassemble the pilot assembly and ensure all connections are tight and properly aligned.
- Turn on the gas supply and follow the manufacturer’s instructions to relight the pilot flame.
Replacing a faulty thermocouple can often resolve the issue of the pilot light repeatedly going out. However, if the problem persists after replacing the thermocouple, it is recommended to consult a professional technician who can further diagnose the water heater and identify any underlying issues.
Regular maintenance and inspection of the thermocouple, along with other components within the pilot assembly, can help ensure the safe and reliable operation of your water heater.
Gas Supply Issues
Problems with the gas supply can also contribute to a water heater pilot light repeatedly going out. Gas supply issues can range from low gas pressure to faulty gas valves or even gas leaks. It is crucial to address these issues promptly to ensure the proper functioning of your water heater.
If you suspect gas supply issues, here are some steps to troubleshoot the problem:
- Check the Gas Pressure: Low gas pressure can prevent the pilot light from staying lit. You can contact your gas supplier or a qualified technician to measure the gas pressure and determine if it meets the required specifications for your water heater. If the pressure is low, they can adjust it accordingly.
- Inspect the Gas Control Valve: A faulty gas control valve can disrupt the gas supply to the pilot assembly and cause the flame to go out. Check for any visible signs of damage or malfunction, such as corrosion or leaking gas. If you suspect a faulty gas control valve, it is best to consult a professional technician for repair or replacement.
- Detect and Address Gas Leaks: Gas leaks pose a significant safety hazard and can cause the pilot light to go out. If you smell gas near your water heater or suspect a leak, take immediate action. Turn off the gas supply, open windows for ventilation, and evacuate the area. Contact your gas provider or a professional technician to locate and fix the gas leak.
Gas supply issues should never be ignored or taken lightly. It’s essential to prioritize safety and seek the assistance of qualified professionals to address gas-related problems. They have the expertise to identify and resolve issues with the gas supply, ensuring the reliable operation of your water heater.
Regular maintenance, including periodic inspections of the gas supply connections and components, is also crucial in preventing and detecting gas supply issues early on.
Improperly Adjusted Flame
An improperly adjusted flame can contribute to the pilot light repeatedly going out in a water heater. The flame should be steady, well-formed, and of the correct size to ensure optimal combustion and prevent the pilot from extinguishing.
If the flame is too weak, it may struggle to stay lit and can be easily blown out by the slightest air movement. On the other hand, if the flame is too strong, it can cause the thermocouple to overheat, leading to shutdown of the gas supply and extinguishing of the pilot light.
To ensure a properly adjusted flame, follow these steps:
- Turn off the gas supply to the water heater for safety.
- Locate the flame adjustment screw or valve on the pilot assembly. The specific location may vary depending on the model of your water heater.
- Refer to the manufacturer’s instructions to determine the recommended flame setting for your particular water heater.
- Using a flathead screwdriver or the appropriate tool, adjust the flame to the desired size. Turning the screw or valve clockwise usually decreases the flame size, while turning it counterclockwise increases it.
- Once you have made the adjustment, turn on the gas supply and relight the pilot following the manufacturer’s instructions.
- Observe the flame to ensure it burns steadily and consistently. It should neither flicker nor touch any nearby components.
If you are uncertain about adjusting the flame yourself or if the pilot light continues to go out after adjusting it, it is advisable to consult a professional technician. They can accurately assess the flame and make any necessary adjustments or repairs.
Regularly inspecting and adjusting the flame is an essential part of water heater maintenance. It helps optimize the performance of the pilot light and ensures a reliable and consistent supply of hot water in your home.
Check for a faulty thermocouple, a dirty pilot light, or a draft near the water heater. These are common reasons why the pilot light keeps going out.
Malfunctioning Gas Control Valve
A malfunctioning gas control valve can be a significant factor contributing to a water heater pilot light repeatedly going out. The gas control valve is responsible for regulating the flow of gas to the pilot assembly and the burner. If it is defective or malfunctioning, it can disrupt the gas supply, leading to the pilot flame going out.
If you suspect a malfunctioning gas control valve, it is essential to address the issue promptly to avoid further complications. Here are some steps you can take:
- Check for visible signs of damage: Examine the gas control valve for any visible signs of corrosion, dents, or leaks. These can indicate a faulty valve and may require professional attention.
- Verify proper electrical connections: Some gas control valves have electrical components that communicate with the thermostat. Ensure that all electrical connections are secure and undamaged.
- Consult a professional technician: If you suspect a malfunctioning gas control valve, it is advisable to consult a professional technician with experience in water heater repair. They can accurately diagnose the issue and recommend the appropriate course of action, which may involve repairing or replacing the gas control valve.
It’s crucial to note that working with gas lines and valves can be dangerous. If you are unfamiliar with gas systems or unsure of how to proceed, it is recommended to seek professional assistance. They have the knowledge, skills, and proper tools to handle gas-related issues safely.
Regular maintenance and inspection of the gas control valve, as well as other components, are essential for the smooth operation of your water heater. By addressing a malfunctioning gas control valve promptly, you can ensure the reliable and efficient performance of your water heater and prevent further interruptions to your hot water supply.
Read more: How To Light Rv Water Heater Pilot
Possible Solutions for a Pilot Going Out
Experiencing a pilot light that keeps going out in your water heater can be frustrating, but there are several solutions that can help resolve the issue. Here are some possible solutions to consider:
- Check and Clean the Pilot Assembly: Over time, debris, dust, or dirt can accumulate in the pilot assembly, obstructing the flow of gas and causing the pilot light to go out. Regularly inspect and clean the pilot assembly to ensure proper functioning.
- Replace the Thermocouple: A faulty thermocouple can inaccurately detect the presence of the pilot flame, leading to the gas control valve shutting off the gas supply and extinguishing the pilot light. Replace a faulty thermocouple to restore proper operation.
- Ensure Proper Ventilation: Insufficient oxygen supply can cause the pilot light to go out. Check for proper ventilation around the water heater and remove any obstructions that could block airflow. This will help maintain a consistent flame and prevent the pilot light from extinguishing.
- Check and Adjust Gas Pressure: Low gas pressure can result in an unstable pilot flame that easily goes out. Consult a professional to measure and adjust the gas pressure if necessary to ensure a steady and reliable flame.
- Consult a Professional: If you have tried the above solutions and the pilot light continues to go out, it is recommended to consult a professional technician. They have the expertise and knowledge to diagnose and address more complex issues with your water heater.
Remember, proper maintenance and regular inspections of your water heater can help identify and address potential issues before they become major problems. If you are unsure about performing any repairs or troubleshooting yourself, it is best to seek professional assistance to ensure the safe and effective operation of your water heater.
By implementing these possible solutions, you can restore the functionality of your water heater’s pilot light and enjoy a consistent supply of hot water in your home.
Check and Clean the Pilot Assembly
One of the possible solutions to address a pilot light that keeps going out in your water heater is to check and clean the pilot assembly. Over time, the pilot assembly can accumulate debris, dust, or dirt, obstructing the flow of gas and causing the pilot light to go out.
To check and clean the pilot assembly, follow these steps:
- Turn off the gas supply to the water heater. Safety should always be the top priority when working with gas appliances.
- Locate the pilot assembly. It is typically found near the bottom of the water heater, beneath the main burner.
- Gently remove the pilot assembly. Be cautious not to damage any surrounding components or disconnect any gas or electrical connections.
- Inspect the pilot assembly for any signs of dirt, dust, or debris. Use a soft brush or a can of compressed air to carefully remove any buildup from the pilot assembly components, such as the burner and pilot tube.
- Ensure all the small openings in the pilot assembly, such as the burner ports and pilot tube, are clear and free from any blockages. Use a needle or thin wire to gently unclog any obstructions if needed.
- Clean the surrounding area of the pilot assembly as well, removing any loose debris or dust. This will help maintain proper airflow to the pilot flame.
- Inspect the components for any signs of damage or wear. Look for cracks, corrosion, or other issues that may affect the performance of the pilot assembly.
- Once the pilot assembly is clean and in good condition, carefully reassemble it, ensuring all connections are secure.
- Turn on the gas supply and follow the manufacturer’s instructions to relight the pilot flame.
Regularly checking and cleaning the pilot assembly of your water heater can help prevent debris buildup and ensure proper functioning of the pilot light. This simple maintenance task can help improve the reliability and efficiency of your water heater, ensuring a consistent supply of hot water in your home.
If the pilot light continues to go out after cleaning the pilot assembly, it is recommended to consult a professional technician who can further diagnose and address any underlying issues with your water heater.
Replace the Thermocouple
If your water heater’s pilot light keeps going out, a faulty thermocouple could be the culprit. The thermocouple is a safety device within the pilot assembly that detects the presence of the pilot flame. If the thermocouple detects that the flame is not lit, it sends a signal to the gas control valve to shut off the gas supply, causing the pilot light to go out.
Over time, the thermocouple can wear out or become faulty, resulting in inaccurate detection of the pilot flame. This can lead to the gas control valve mistakenly shutting off the gas supply even when the flame is present. To resolve this issue, replacing the thermocouple is often necessary.
To replace the thermocouple, follow these steps:
- Turn off the gas supply to the water heater. Safety is paramount when working with gas appliances.
- Locate the thermocouple within the pilot assembly. It is a narrow copper or silver tube that connects to the gas control valve.
- Disconnect the thermocouple from the gas control valve. Depending on the model, you may need to unscrew it or release a retaining clip.
- Take note of the length and position of the old thermocouple for reference when installing the new one.
- Install the new thermocouple by connecting it securely to the gas control valve. Ensure it is inserted fully and properly aligned.
- Tighten any screws or reattach any retaining clips to hold the thermocouple in place.
- Turn on the gas supply and follow the manufacturer’s instructions to relight the pilot flame.
- Observe the pilot flame to ensure it burns steadily and consistently. The new thermocouple should accurately detect the flame, allowing it to remain lit.
Replacing a faulty thermocouple is a common solution to resolve issues with a pilot light that keeps going out. However, if the problem persists after replacing the thermocouple, it is advisable to consult a professional technician who can diagnose and address any other underlying issues with your water heater.
Regular maintenance and inspection of the pilot assembly, including the thermocouple, can help prevent future problems and ensure the reliable operation of your water heater.
Ensure Proper Ventilation
Proper ventilation is crucial for the efficient and safe operation of your water heater. Insufficient ventilation can lead to a pilot light that keeps going out. A pilot light requires an adequate supply of oxygen to burn properly and maintain a steady flame. Without proper ventilation, the oxygen supply may be limited, causing the flame to struggle or extinguish altogether.
To ensure proper ventilation for your water heater, consider the following steps:
- Check the surrounding area: Examine the space where your water heater is located. Make sure it is clear of any obstructions that could hinder proper airflow, such as boxes, stored items, or debris.
- Ensure sufficient clearance: Water heaters typically have specified clearance requirements from walls, ceilings, and floors. Verify that your water heater has the recommended clearance to allow adequate air circulation and ventilation.
- Inspect the air intake vents: Look for air intake vents or openings near your water heater. Ensure they are not blocked by dust, lint, or other debris. Periodically clean or vacuum these vents to maintain clear airflow.
- Consider room ventilation: If your water heater is located in a small or enclosed space, such as a utility closet, ensure that the area has proper ventilation. You may need to install additional vents or fans to improve air circulation and oxygen supply.
- Check the flue or chimney: If your water heater is vented through a flue or chimney, inspect it for any blockages or obstructions. Clear away any debris or buildup that could impede the proper venting of combustion gases.
By ensuring proper ventilation, you can help prevent issues with the pilot light going out due to a lack of oxygen supply. Adequate airflow and ventilation not only promote a steady and reliable flame but also contribute to the overall efficiency and safety of your water heater.
If you are unsure about the ventilation requirements or if your water heater continues to experience pilot light issues despite ensuring proper ventilation, it is recommended to consult a professional technician. They can assess your specific system and provide appropriate recommendations or solutions.
Read more: Why My Water Heater Is Not Working
Check and Adjust Gas Pressure
If your water heater’s pilot light keeps going out, it could be due to low or inadequate gas pressure. Insufficient gas pressure can result in a weak or unstable flame that is susceptible to being extinguished easily. Checking and adjusting the gas pressure can help resolve this issue and ensure a reliable and consistent pilot flame.
Here are the steps to check and adjust the gas pressure:
- Turn off the gas supply to the water heater to ensure safety.
- Locate the gas pressure regulator, which is usually situated near the gas control valve or gas meter.
- Slowly turn the adjustment screw or knob on the gas pressure regulator, following the manufacturer’s instructions.
- Use a gas pressure gauge to measure the gas pressure. Connect the gauge to an available test port on the regulator or gas line.
- Compare the measured gas pressure to the manufacturer’s recommended specifications for your water heater. If the pressure is below the recommended range, it may be necessary to adjust it.
- Make small adjustments to the gas pressure regulator by turning the screw or knob in small increments. Check the pressure after each adjustment to ensure it falls within the desired range.
- Once the gas pressure is adjusted to the appropriate level, secure the adjustment screw or knob to lock the setting in place.
- Turn on the gas supply and follow the manufacturer’s instructions to relight the pilot light.
It’s important to note that adjusting the gas pressure should be done with caution, and it’s recommended to consult a professional if you are unsure about the process. A professional technician can accurately measure and adjust the gas pressure, ensuring it is within the required range for your water heater.
Regularly checking and adjusting the gas pressure, if needed, can help maintain a stable pilot flame and prevent issues with the pilot light going out. If you continue to experience problems with the pilot light after adjusting the gas pressure, it is advisable to consult a professional technician for further assistance and diagnosis.
Consult a Professional
If you have tried the aforementioned solutions and your water heater’s pilot light continues to go out, it is best to consult a professional technician who specializes in water heater repairs. A professional can provide expert advice, accurate diagnosis, and the necessary expertise to address more complex issues that may be causing the problem.
Here are some reasons why consulting a professional is highly recommended:
Professional technicians have the knowledge and experience to accurately diagnose the root cause of the pilot light issue. They can identify any underlying problems within the water heater system, such as faulty components, gas leaks, or electrical issues. If repairs or component replacements are necessary, a professional technician can perform these tasks correctly. They have access to genuine replacement parts and know how to install them properly, ensuring the longevity and efficiency of your water heater. Attempting to fix complex issues without the proper expertise can potentially aggravate the problem or cause further damage to your water heater. By consulting a professional, you can avoid unnecessary costs and ensure that the problem is resolved correctly the first time. Aside from addressing the immediate issue, a professional technician can provide valuable maintenance recommendations to keep your water heater functioning optimally. They can suggest preventive measures and routine maintenance tasks to extend the lifespan of your appliance and prevent future problems.
When working with a professional technician, remember to provide them with as much information as possible about the issue, such as when the pilot light started going out and any specific symptoms you have observed. This will help them in their diagnostic process.
Overall, consulting a professional is a wise decision when you encounter persistent issues with your water heater’s pilot light. Their expertise and specialized knowledge will ensure a thorough assessment and effective resolution of the problem, restoring the functionality and reliability of your water heater.
Conclusion
Dealing with a water heater pilot light that keeps going out can be frustrating and inconvenient. However, by understanding the common causes and implementing the appropriate solutions, you can resolve this issue and enjoy a steady and reliable supply of hot water in your home.
In this article, we explored various factors that can contribute to a pilot light going out, such as insufficient oxygen supply, a dirty pilot assembly, a faulty thermocouple, gas supply issues, an improperly adjusted flame, or a malfunctioning gas control valve.
We discussed possible solutions for each of these issues, including checking and cleaning the pilot assembly, replacing the thermocouple, ensuring proper ventilation, checking and adjusting the gas pressure, and consulting a professional technician when necessary.
Remember, regular maintenance and inspections are crucial for the proper functioning of your water heater. Cleaning the pilot assembly, checking for debris or obstructions, and ensuring proper ventilation are important routine tasks to prevent issues with the pilot light.
If the problem persists or if you are uncertain about any repairs or adjustments, it is always advisable to consult a professional technician. They have the expertise, diagnostic tools, and safety measures to accurately assess and resolve more complex issues with your water heater.
By implementing these solutions and seeking professional assistance when necessary, you can ensure a reliable and efficient water heating system, providing you with the comfort of hot water whenever you need it.
Remember, safety always comes first when working with gas appliances, so exercise caution and follow manufacturer’s instructions and safety guidelines throughout the process. Regular maintenance and attention to your water heater will help prolong its lifespan and minimize future issues.
With the knowledge gained from this article, you are now equipped to troubleshoot and resolve the issue of a water heater pilot light repeatedly going out. Stay proactive in maintaining your water heater, and enjoy the continuous supply of hot water in your home.
Frequently Asked Questions about Why Does My Water Heater Pilot Keep Going Out
Was this page helpful?
At Storables.com, we guarantee accurate and reliable information. Our content, validated by Expert Board Contributors, is crafted following stringent Editorial Policies. We're committed to providing you with well-researched, expert-backed insights for all your informational needs.
0 thoughts on “Why Does My Water Heater Pilot Keep Going Out”