Home>Dining>Table Decor>How To Make A Short Rose And Hydrangea Table Centerpiece for Wedding Reception
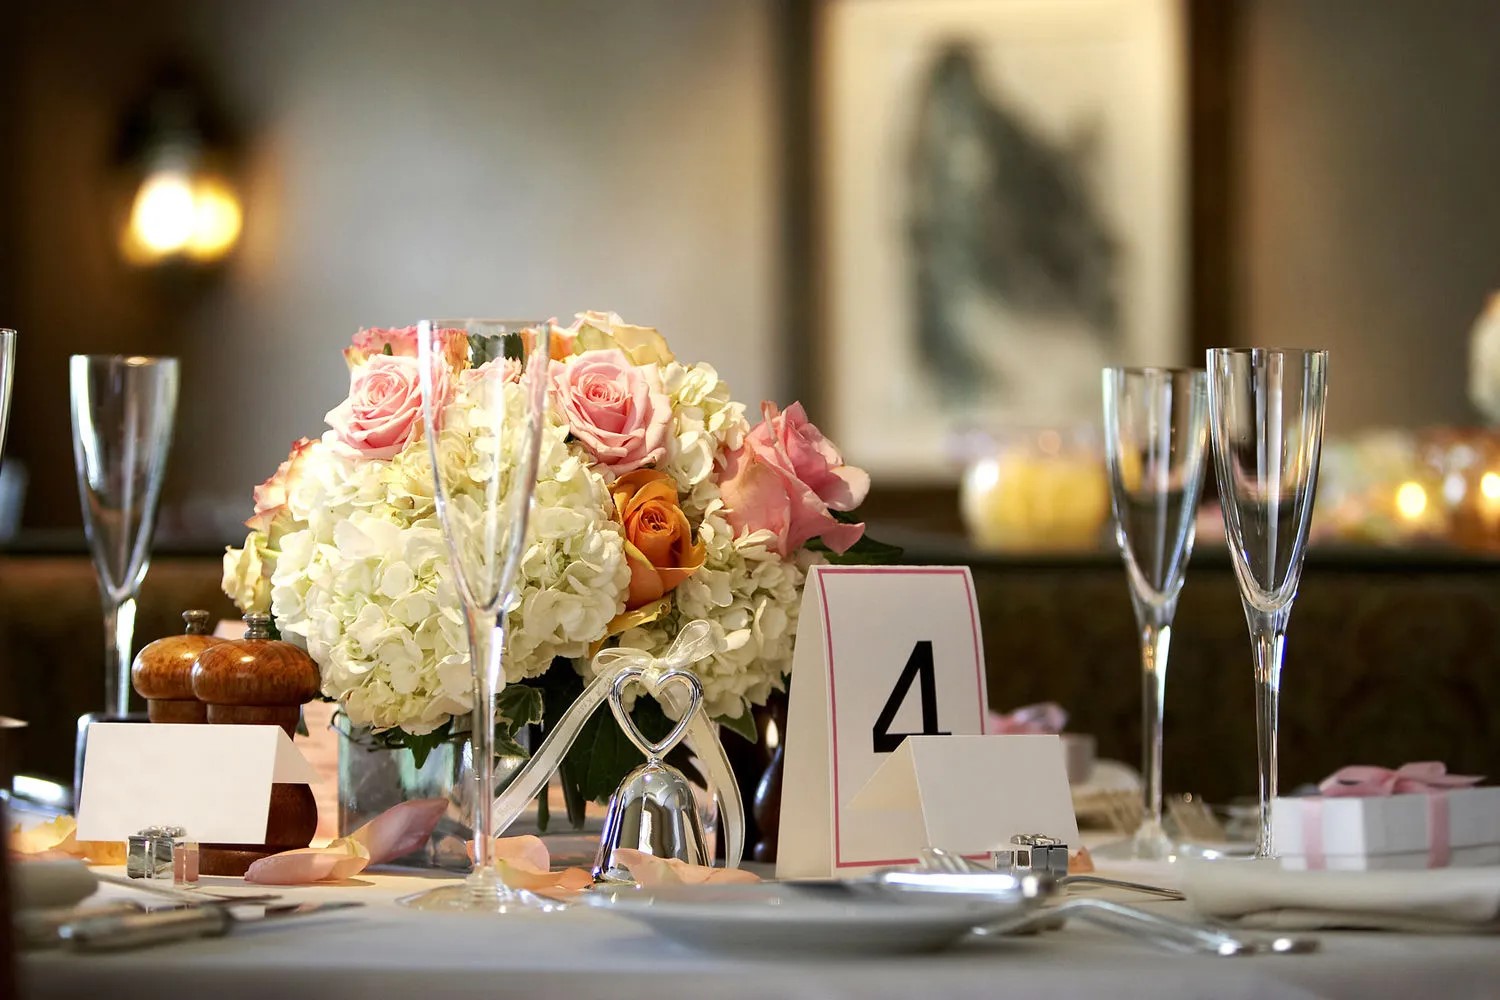
Table Decor
How To Make A Short Rose And Hydrangea Table Centerpiece for Wedding Reception
Modified: February 24, 2024
Learn how to create a stunning wedding reception table centerpiece with our step-by-step videos. Discover unique techniques for making a short rose and hydrangea arrangement that will impress your guests.
(Many of the links in this article redirect to a specific reviewed product. Your purchase of these products through affiliate links helps to generate commission for Storables.com, at no extra cost. Learn more)
Introduction
Welcome to the world of wedding table decor! Planning your wedding can be an exciting and overwhelming experience, but table decor is an essential element that can truly transform the ambiance of your reception. One popular and beautiful option for a wedding reception centerpiece is a short rose and hydrangea arrangement. With the right materials and a little creativity, you can create stunning centerpieces that will wow your guests and add a touch of elegance to your special day.
In this article, we will provide you with step-by-step instructions on how to make a short rose and hydrangea wedding reception table centerpiece. We will also include helpful video tutorials that visually guide you through the process. So, grab your materials and get ready to unleash your inner floral artist!
But before we dive into the tutorials, let’s first make sure we have all the materials we need to create these beautiful centerpieces.
Key Takeaways:
- Create stunning rose and hydrangea wedding centerpieces by choosing complementary flowers, preparing vases, and arranging with creativity. Add personal touches for unique, elegant table decor that wows guests.
- Assemble a captivating wedding reception centerpiece by combining rose and hydrangea arrangements, considering height variations, and adding extra elements for a romantic and visually appealing table decor. Enjoy the magical ambiance you’ve created!
Materials Needed
Before you begin creating your rose and hydrangea wedding reception table centerpieces, it’s important to gather all the necessary materials. Here’s a list of what you’ll need:
1. Flowers:
- Fresh roses in your desired color(s)
- Fresh hydrangeas in your desired color(s)
2. Vases:
- Short, clear glass vases (one for each centerpiece)
3. Floral Foam:
- Wet floral foam (also known as Oasis foam)
4. Floral Supplies:
- Floral tape
- Floral shears or scissors
- Waterproof floral adhesive
- Green floral wire
5. Foliage:
- Greenery such as eucalyptus, ivy, or ferns
6. Optional Additions:
- Ribbon or twine
- Decorative accents such as pearls, crystals, or feathers
Once you have gathered all of these materials, you are ready to embark on the journey of creating your beautiful rose and hydrangea centerpieces. Let’s move on to the step-by-step process of bringing these centerpieces to life!
Step 1: Choosing the Right Flowers
When it comes to selecting the flowers for your rose and hydrangea wedding reception table centerpieces, there are a few factors to consider. You’ll want to choose flowers that complement your wedding theme and color palette, as well as ones that are in season and readily available. Here’s how to choose the right flowers:
1. Wedding Theme and Color Palette:
Take into account the overall theme and color scheme of your wedding. Are you going for a romantic, rustic, glamorous, or bohemian vibe? This will help you determine the style and colors of the flowers that will best suit your centerpieces.
2. Seasonal Availability:
Consider the season in which your wedding will take place. Opting for flowers that are in season not only ensures their availability but also tends to be more cost-effective. It’s always a good idea to consult with a florist to get insight into what flowers are abundant during your wedding season.
3. Rose Varieties:
Roses come in a wide array of colors, sizes, and shapes. You can choose classic red roses for a timeless look, or go for pastel hues like blush, peach, or ivory for a soft and romantic vibe. Consider the different varieties of roses, such as garden roses or spray roses, to add texture and depth to your centerpieces.
4. Hydrangea Varieties:
Hydrangeas are known for their beautiful cluster-like blooms. They are available in various shades of white, pink, blue, and purple. Consider the size of the hydrangea blooms, as they can vary from small to large, and choose the ones that will work best with your overall centerpiece design.
Once you have determined the type and color of roses and hydrangeas you want to incorporate, you’re ready to move on to the next step: preparing the vases for your centerpieces.
Read more: How To Make Flower Centerpieces For Weddings
Step 2: Preparing the Vases
Before you start arranging the flowers, it’s essential to prepare the vases that will hold your rose and hydrangea centerpieces. Here’s what you need to do:
1. Clean the Vases:
Make sure the vases are clean and free from any dust or residue. Wash them with warm soapy water, rinse thoroughly, and dry them completely before proceeding.
2. Trim the Stem Length:
Measure the height of your vases and trim the stems of your hydrangeas and roses accordingly. Cut the stems at an angle to allow better water absorption and to prevent them from sitting flat at the bottom of the vase.
3. Add Water:
Fill the vases with clean water, leaving enough space to avoid overflow once you insert the flowers.
Read more: How To Make Tall Wedding Centerpieces
4. Add Floral Preservative (Optional):
If you have floral preservative solution, add it to the water according to the package instructions. This will help extend the life of your flowers and keep them looking vibrant for longer.
5. Greenery Bed:
For added visual appeal and to provide a stable foundation for your flowers, you can place a layer of greenery at the bottom of the vases. Use foliage such as eucalyptus, ivy, or ferns to create a bed for the stems of your roses and hydrangeas.
Once your vases are prepared, it’s time to move on to the exciting part: creating the rose centerpiece. Let’s get started!
Step 3: Creating the Rose Centerpiece
Now that your vases are ready, let’s dive into creating the gorgeous rose centerpiece for your wedding reception table. Follow these steps:
1. Prepare the Floral Foam:
Soak the floral foam in water until it becomes saturated. Make sure it is completely soaked but not dripping. Place the soaked floral foam inside the vase, ensuring a snug fit. You can cut the foam to size if needed.
Read more: How To Make Wedding Centerpieces On A Budget
2. Secure the Floral Foam:
Using floral tape, secure the floral foam to the top of the vase. This will keep the foam in place and provide stability for your arrangement.
3. Start with Greenery:
Begin by adding greenery, such as eucalyptus or ivy, to the floral foam. This will create a base and add volume to your centerpiece. Place the greenery strategically around the foam, ensuring that it covers any visible areas.
4. Trim and Insert the Roses:
Trim the stems of your roses at a diagonal angle, leaving them long enough so that the blooms sit above the rim of the vase. Start inserting the roses into the floral foam, spacing them evenly and at varying heights to create depth and dimension.
5. Fill in the Gaps:
Continue adding roses until you achieve a full and cohesive look. Fill in any gaps with additional greenery or smaller flowers to complete the arrangement.
6. Adjust and Perfect:
Step back and assess your rose centerpiece. Make any necessary adjustments to ensure the roses are evenly distributed and that there are no visible gaps. Trim any excess foliage or stems for a clean and polished look.
7. Add Final Touches (Optional):
If desired, you can add decorative accents like pearls, crystals, or feathers to enhance the visual appeal of your centerpiece. Use floral adhesive or green floral wire to securely attach these embellishments to your arrangement.
Now that your rose centerpiece is complete, it’s time to move on to creating the hydrangea centerpiece. Keep reading to find out how!
Step 4: Creating the Hydrangea Centerpiece
With the rose centerpiece complete, it’s time to move on to creating the stunning hydrangea centerpiece for your wedding reception table. Follow these steps to bring your vision to life:
1. Prepare the Floral Foam:
If you haven’t already done so, soak the floral foam in water until it becomes saturated. Ensure that it is fully soaked but not dripping. Place the soaked floral foam inside the vase, making sure it fits securely.
Read more: How To Make Wedding Centerpieces On A Budget
2. Secure the Floral Foam:
Using floral tape, secure the floral foam to the top of the vase. This will keep the foam in place and provide stability for your arrangement.
3. Insert Foliage:
Start by adding foliage or greenery to the floral foam. Use foliage like eucalyptus or ferns to create a lush and textured base. Insert the foliage evenly around the foam, ensuring that it covers any visible areas.
4. Trim and Insert the Hydrangeas:
Trim the stems of your hydrangeas at an angle, leaving them long enough to sit above the rim of the vase. Begin inserting the hydrangeas into the floral foam, spacing them out evenly and at varying heights to create visual interest.
5. Fill in the Gaps:
If needed, add additional hydrangeas to fill in any empty spaces and create a full, cohesive look. Ensure that the blooms are evenly distributed and that there are no visible gaps.
6. Adjust and Perfect:
Step back and assess your hydrangea centerpiece. Make any necessary adjustments, such as rearranging the stems or removing any excess foliage, to achieve a balanced and visually pleasing arrangement.
7. Add Final Touches (Optional):
If you wish to add a touch of elegance or personal flair, consider adding decorative elements such as ribbon or twine around the vase. This can enhance the overall look of the centerpiece and tie it in with your wedding theme.
With the rose and hydrangea centerpieces complete, it’s time to assemble the final wedding reception table centerpiece. Keep reading to learn how it all comes together!
Step 5: Assembling the Wedding Reception Table Centerpiece
Now that you have created both the rose and hydrangea centerpieces, it’s time to bring them together to create a stunning wedding reception table centerpiece. Follow these steps to assemble the centerpiece:
1. Choose the Table Runner:
Select a table runner or tablecloth that complements your overall wedding theme and color palette. Ensure that it fits the dimensions of your reception table and provides a backdrop for your centerpiece.
Read more: How To Make Centerpieces With Candy
2. Arrange the Centerpieces:
Place your rose and hydrangea centerpieces in the middle of the table, evenly spaced. Adjust their positioning until you are satisfied with the overall look and symmetry.
3. Add Additional Elements:
If desired, you can enhance the centerpiece by adding additional elements such as votive candles, tea lights, or scattered flower petals. These elements can create an enchanting atmosphere and add a touch of romance to the table.
4. Consider Height Variations:
If you want to add visual interest and dimension to your centerpiece, consider incorporating height variations. This can be achieved by using elevated platforms or candle stands to showcase one of the centerpieces or by using tall vases for some of the flowers.
5. Evaluate the Overall Look:
Step back and evaluate the assembled centerpiece from different angles. Make any necessary adjustments to achieve a balanced and visually appealing arrangement. Ensure that there is enough space for place settings and that the centerpiece does not obstruct guests’ line of sight across the table.
Read more: How To Make Topiary Centerpieces
6. Finalize the Details:
Check that all elements are secure and evenly distributed. Tuck in any loose stems or foliage, and make sure the vases are centered on the table. Take a moment to appreciate your beautiful creation!
Congratulations! You have successfully assembled your rose and hydrangea wedding reception table centerpiece. This beautiful focal point will surely impress your guests and add an elegant touch to your special day.
Now all that’s left to do is await the arrival of your guests and enjoy the festivities of your wedding reception. Wishing you a joyous celebration filled with love, laughter, and memorable moments!
Conclusion
Congratulations on creating your stunning rose and hydrangea wedding reception table centerpiece! By following the step-by-step instructions and using your creativity, you have crafted a beautiful and elegant centerpiece that will undoubtedly impress your guests and enhance the ambiance of your special day.
Throughout the process, we discussed the importance of choosing the right flowers that align with your wedding theme and color palette. We also explored the necessary preparations for both the vases and the floral foam, ensuring a sturdy and visually appealing arrangement. By carefully arranging the roses and hydrangeas, you have created a centerpiece that is both captivating and cohesive.
Remember, don’t be afraid to add your personal touch to the centerpieces. Consider incorporating elements such as decorative accents, candles, or unique containers that reflect your style and personality. These small details will elevate the overall aesthetic and make your centerpieces truly one-of-a-kind.
Lastly, as you assemble the centerpiece on your wedding reception table, pay attention to the overall look and layout. Consider the height variations and any additional elements you want to include. By taking the time to evaluate and perfect the details, you can ensure that your centerpiece is an eye-catching focal point that sets the tone for your entire reception.
Your rose and hydrangea wedding reception table centerpiece is a testament to your creativity and attention to detail. It will create an inviting and elegant atmosphere that your guests will remember long after the celebration. So, take a step back, admire your masterpiece, and get ready to enjoy the magical moments of your special day!
Frequently Asked Questions about How To Make A Short Rose And Hydrangea Table Centerpiece For Wedding Reception
Was this page helpful?
At Storables.com, we guarantee accurate and reliable information. Our content, validated by Expert Board Contributors, is crafted following stringent Editorial Policies. We're committed to providing you with well-researched, expert-backed insights for all your informational needs.


0 thoughts on “How To Make A Short Rose And Hydrangea Table Centerpiece for Wedding Reception”