Home>Dining>Table Decor>How To Make Dum Dum Centerpieces
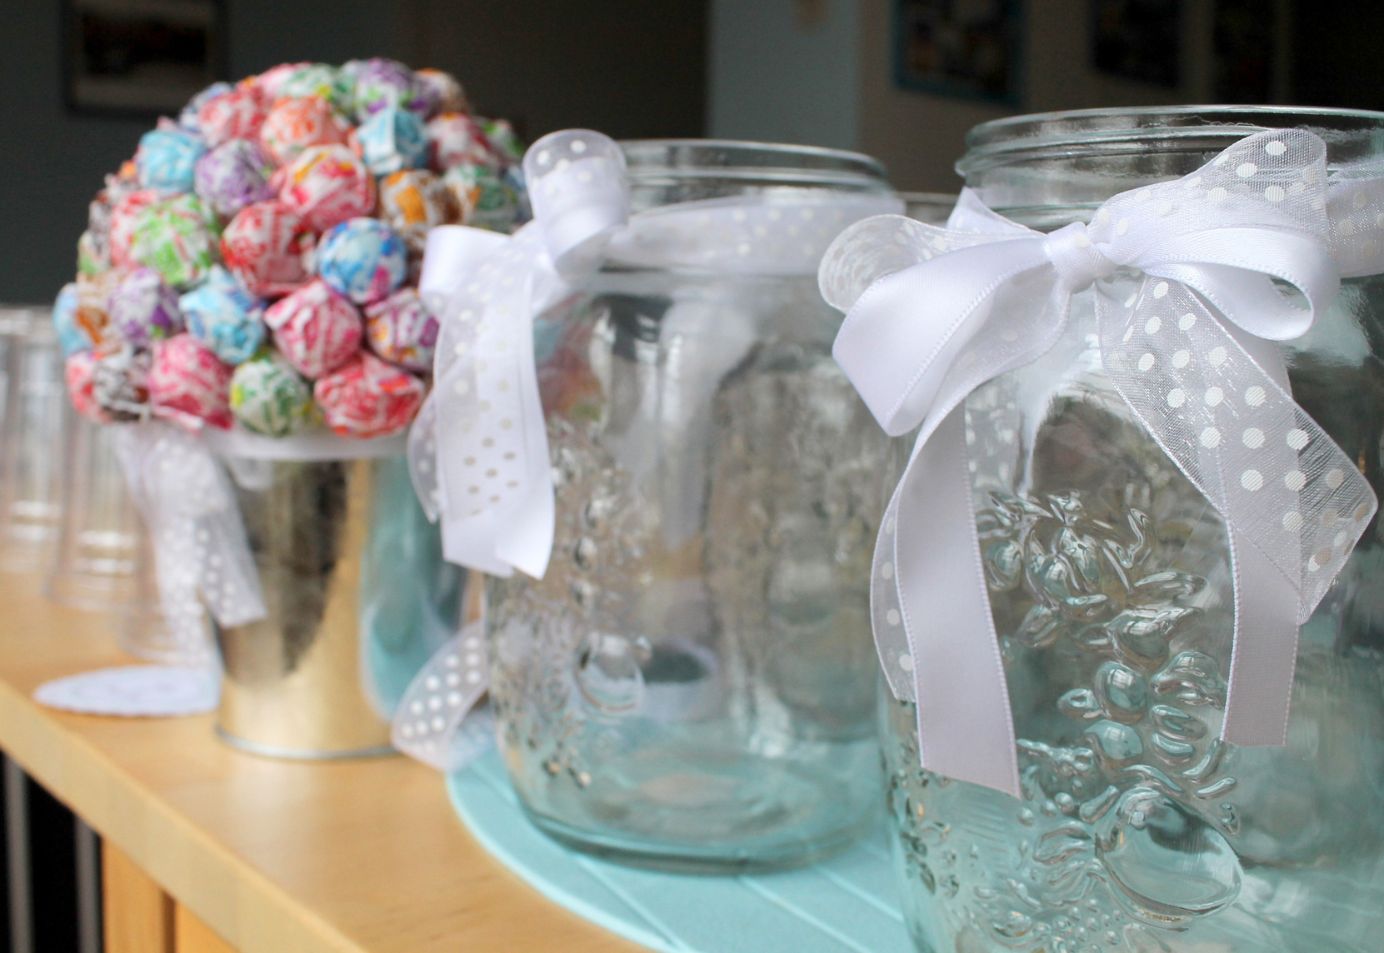
Table Decor
How To Make Dum Dum Centerpieces
Modified: January 5, 2024
Learn how to create stunning table decor with these simple steps for making beautiful Dum Dum centerpieces. Perfect for any occasion!
(Many of the links in this article redirect to a specific reviewed product. Your purchase of these products through affiliate links helps to generate commission for Storables.com, at no extra cost. Learn more)
Introduction
Welcome to the world of table decor where creativity knows no bounds. If you’re looking to add a touch of whimsy and color to your next party or event, look no further than Dum Dum centerpieces. These delightful and eye-catching decorations are not only easy to make, but they also bring a sense of fun and playfulness to any table setting.
Whether you’re planning a birthday party, a baby shower, or simply want to spruce up your dining table for a special occasion, Dum Dum centerpieces are sure to be a hit. With their vibrant colors and delicious flavors, Dum Dums provide the perfect pop of excitement while doubling as a tasty treat for your guests.
In this article, we’ll guide you through the step-by-step process of creating your very own Dum Dum centerpieces. So, gather your materials and let your creativity flow as we embark on this delightful journey of table decor.
Key Takeaways:
- Create vibrant and playful Dum Dum centerpieces to add whimsy and color to any event. Unwrap, secure, and decorate lollipops for a visually stunning and delicious table decor.
- Transform simple materials into eye-catching centerpieces with personalized touches. Let your creativity shine and bring joy to guests with vibrant Dum Dum creations.
Read more: How To Make Centerpieces With Candy
Materials Needed
Before we dive into the crafting process, let’s gather all the materials you’ll need to create your Dum Dum centerpieces:
- 1 Styrofoam ball or cone as the base
- Assorted Dum Dums lollipops
- A hot glue gun
- A vase or container to hold the centerpiece
- Decorative ribbon or fabric
- Optional: Additional decorative elements such as flowers, miniature toys, or glittery accents
Now that we have our materials ready, let’s move on to the next step: preparing the Dum Dums for the centerpiece creation.
Step 1: Preparing the Dum Dums
Before we can start assembling our Dum Dum centerpiece, we need to prepare the Dum Dums themselves. This step involves removing the wrappers from the lollipops to reveal the vibrant colors of the candies.
Start by unwrapping each Dum Dum carefully, being mindful not to damage the lollipop itself. You can enlist the help of friends or family members to speed up the process. Gather all the unwrapped Dum Dums and set them aside.
Once you have unwrapped all the Dum Dums, take a moment to marvel at the array of colors before you. You may want to arrange them in a decorative pattern or mix them up for a more random look. The choice is yours!
With the Dum Dums unwrapped and ready, we can now move on to the next step of creating our Dum Dum centerpiece – creating the base.
Step 2: Creating the Base
Now that we have our Dum Dums prepared, it’s time to create the base for our centerpiece. This will serve as the foundation to hold the lollipops in place and give our centerpiece stability.
Begin by selecting a Styrofoam ball or cone that will serve as the base. The size of the base will depend on the number of Dum Dums you want to use and the desired height of your centerpiece. You can find Styrofoam balls and cones at your local craft store or online.
Place the Styrofoam ball or cone in the center of your vase or container. Make sure it fits snugly and is stable. If needed, you can secure it further using floral foam or hot glue.
Now it’s time to start attaching the Dum Dums to the base. Take a Dum Dum and insert the stick into the Styrofoam, making sure it goes in securely. Repeat this step with the rest of the Dum Dums, spacing them evenly around the base.
If you’re using a Styrofoam cone as the base, you can start at the top and work your way down, adding rows of Dum Dums until the entire cone is covered. This will create a visually appealing cascading effect.
Continue attaching the Dum Dums until the entire base is covered to your liking. You can choose to leave some empty spaces for variety or fill the entire base with lollipops for a full and vibrant look.
Once you’re satisfied with the placement of the Dum Dums, it’s time to move on to the next step – adding decorative elements to enhance the overall look of the centerpiece.
When making Dum Dum centerpieces, consider using a variety of colors and flavors to create visual interest. You can also add decorative elements like ribbons or small flowers to enhance the overall look.
Step 3: Attaching the Dum Dums to the Base
With our base prepared, it’s time to attach the Dum Dums to create the centerpiece’s main focal point. This step requires careful placement and secure attachment to ensure the lollipops stay in place.
Start by heating up your hot glue gun according to the manufacturer’s instructions. Once it’s ready, take a Dum Dum and apply a small dot of hot glue to the back of the wrapper. Be careful not to get any glue on the actual lollipop.
Quickly and gently press the Dum Dum onto the Styrofoam base, securing it in place. Hold it for a few seconds to allow the glue to dry and create a strong bond. Repeat this process with the rest of the Dum Dums, working your way around the base.
Make sure to vary the colors and placement of the Dum Dums to create a visually interesting and balanced centerpiece. You can choose to follow a specific pattern or go for a more random arrangement – it’s all up to your personal preference and desired aesthetic.
As you attach the Dum Dums, periodically step back and assess the overall look. Adjust the placement as needed to ensure an even distribution of colors and a visually pleasing composition.
Continue attaching the Dum Dums until the base is fully covered and you’re satisfied with the arrangement. Take your time with this step to ensure a polished and professional look.
With the Dum Dums securely attached, it’s time to move on to the next step – adding decorative elements to further enhance the centerpiece’s visual appeal.
Read more: How To Make Centerpieces For Baptism
Step 4: Adding Decorative Elements
Now that we have our Dum Dum centerpiece assembled, it’s time to take it to the next level by adding some decorative elements. These additional touches will elevate the overall look and tie everything together.
One option is to wrap a decorative ribbon or fabric around the base of the centerpiece. Choose a ribbon or fabric that complements the color scheme of the Dum Dums and the theme of your event. Secure the ends with a small dot of hot glue or use a decorative pin to hold it in place.
If you want to add a touch of nature, consider incorporating fresh flowers or greenery into the arrangement. Gently insert the stems into the gaps between the Dum Dums, being careful not to disturb the lollipops. This will add a beautiful and fragrant element to your centerpiece.
For a more whimsical approach, you can include miniature toys or figurines that match the theme of your event. Simply place them strategically among the Dum Dums to create a playful and eye-catching display.
If you want to add some sparkle and glam, consider sprinkling glitter over the Dum Dums or using metallic accents like small beads or sequins. Apply a small amount of clear glue to the desired areas and gently sprinkle the glitter or attach the accents.
Feel free to get creative and experiment with different elements to make your centerpiece unique and personalized. The added touches will add depth and visual interest to the overall design.
With the decorative elements added, we’re almost done. It’s time for the final step – putting the finishing touches on our Dum Dum centerpiece.
Step 5: Finishing Touches
We’re on the home stretch! It’s time to add the final touches to our Dum Dum centerpiece to make it truly shine.
If you’ve used a vase or container to hold the centerpiece, consider adding some decorative elements to the base. You can adorn it with ribbon, fabric, or even a layer of colorful stones or beads. This will create a polished and cohesive look.
Take a moment to step back and evaluate your centerpiece. Is there any empty space or area that needs a little something extra? Consider adding small decorative accents like bows, confetti, or even small LED lights to add a touch of sparkle and further enhance the visual appeal of your centerpiece.
Don’t forget to ensure the lollipops are securely attached. If you find any Dum Dums that feel loose, carefully remove them and reattach them with a small dot of hot glue.
Finally, give your centerpiece a gentle shake or tap to make sure everything is securely in place and nothing shifts or falls out. This will ensure that your Dum Dum centerpiece remains intact throughout your event.
Now that you’ve put all the finishing touches on your Dum Dum centerpiece, step back and admire your handiwork. It’s a vibrant and delightful creation that’s sure to be a conversation starter and a focal point of your party or event.
Remember to take some photos of your masterpiece to capture this moment and share it with others. Your Dum Dum centerpiece is not only a reflection of your creativity but also a testament to your attention to detail.
With your centerpiece complete, it’s time to sit back, relax, and enjoy the festivities. Your guests will be dazzled by your artistic flair and the sweet treats they can enjoy.
So go ahead, proudly display your Dum Dum centerpiece and let the celebration begin!
Thank you for joining us on this creative journey of making Dum Dum centerpieces. We hope you had fun and feel inspired to explore other table decor ideas in the future.
Remember, with a little imagination and the right materials, you can transform any table into a stunning work of art!
Happy crafting!
Conclusion
Congratulations on completing your Dum Dum centerpiece! You’ve successfully transformed a simple Styrofoam base and colorful lollipops into a visually stunning and playful decoration. Your creative touch and attention to detail have resulted in a centerpiece that will surely wow your guests and add a touch of sweetness to any occasion.
Through the step-by-step process, we learned how to prepare the Dum Dums, create a sturdy base, attach the lollipops securely, and add decorative elements to enhance the overall design. With each stage, you allowed your creativity to shine and added personalized touches that make your centerpiece unique.
Remember, table decor is an opportunity to let your imagination run wild and bring joy to others. Whether it’s a birthday party, baby shower, or a special dinner gathering, these Dum Dum centerpieces are sure to bring smiles to faces and create a festive atmosphere.
Don’t be afraid to experiment with different colors, patterns, and decorative elements to suit your taste and event theme. Let your personality and style shine through as you create one-of-a-kind centerpieces that leave a lasting impression on your guests.
We hope this guide has inspired you to explore further possibilities with table decor and to continue your creative journey. Remember to have fun and enjoy the process of crafting beautiful pieces that make your celebrations truly memorable.
Thank you for joining us on this delightful adventure of making Dum Dum centerpieces. Now it’s time to showcase your masterpiece and let the festivities begin!
Happy crafting!
Frequently Asked Questions about How To Make Dum Dum Centerpieces
Was this page helpful?
At Storables.com, we guarantee accurate and reliable information. Our content, validated by Expert Board Contributors, is crafted following stringent Editorial Policies. We're committed to providing you with well-researched, expert-backed insights for all your informational needs.


0 thoughts on “How To Make Dum Dum Centerpieces”