Home>Furniture & Design>Bathroom Accessories>How Do You Thread A Needle With A Toothbrush
Bathroom Accessories
How Do You Thread A Needle With A Toothbrush
Modified: October 18, 2024
Learn a clever hack for threading a needle using a toothbrush, a handy bathroom accessory. Discover this simple solution for easy sewing.
(Many of the links in this article redirect to a specific reviewed product. Your purchase of these products through affiliate links helps to generate commission for Storables.com, at no extra cost. Learn more)
Introduction
Threading a needle can be a tricky task, especially for those with visual impairments or unsteady hands. However, with a little creativity and resourcefulness, you can repurpose a common household item to make this process much easier. In this article, we will explore an unconventional yet effective method for threading a needle using a toothbrush. By following the simple steps outlined below, you can transform a toothbrush into a handy tool for threading needles, making sewing and mending tasks more accessible and manageable.
Threading a needle with a toothbrush is a practical solution that can benefit individuals who struggle with traditional needle threading methods. Whether you have difficulty seeing the eye of the needle, have limited dexterity, or simply want to streamline the process, this innovative technique offers a convenient alternative. By repurposing a toothbrush, a familiar item found in most households, you can create a customized tool that simplifies the often-frustrating task of threading a needle.
In the following sections, we will discuss the materials needed for this DIY project and provide a step-by-step guide to transforming a toothbrush into a needle threader. By the end of this article, you will have a clear understanding of how to utilize a toothbrush to thread a needle effectively, empowering you to tackle sewing projects with confidence and ease. Let's dive into the process and discover how a simple toothbrush can become a valuable tool in your sewing kit.
Key Takeaways:
- Transform a toothbrush into a needle threader by preparing the handle, cutting the bristles, and creating a threader entry point. This innovative DIY solution simplifies needle threading for sewing and mending tasks.
- Repurpose a toothbrush to guide thread through a needle’s eye, making sewing accessible for those with visual impairments or limited dexterity. This creative technique showcases the resourcefulness of everyday household items.
Read more: How Do You Use A Dog Toothbrush
Materials Needed
To embark on this innovative approach to threading a needle, you will need a few basic materials that are readily available in most households. The beauty of this technique lies in its simplicity and the minimal supplies required. Here's what you'll need to get started:
-
Toothbrush: Select a clean, unused toothbrush with a sturdy handle and bristles in good condition. Opt for a toothbrush with a straight handle, as this will facilitate the modification process.
-
Scissors: A pair of sharp scissors is essential for trimming the toothbrush bristles to the desired length. Ensure that the scissors are suitable for cutting through plastic without causing splintering or jagged edges.
-
Needle and Thread: Of course, you'll need a needle and thread for the final step of the process. Choose a needle appropriate for your sewing project, and select a thread color that complements the fabric you'll be working with.
-
Optional: Lighter or Matches: While not essential, having a lighter or matches on hand can be useful for sealing the cut ends of the toothbrush bristles. This step can prevent fraying and ensure that the modified toothbrush remains durable over time.
By gathering these simple materials, you'll be well-prepared to transform a standard toothbrush into a practical tool for threading needles. With these items at your disposal, you can proceed to the next steps and begin the process of creating your custom needle threader from a toothbrush.
Step 1: Prepare the Toothbrush
Before you can transform a toothbrush into a functional needle threader, it's essential to prepare the toothbrush for modification. This initial step involves making the necessary adjustments to the toothbrush handle and bristles to create a user-friendly tool for threading needles.
To begin, select a clean, unused toothbrush with a straight handle and sturdy bristles. The handle should be firm and easy to grip, as it will serve as the base for your needle threader. Once you have chosen a suitable toothbrush, you can proceed to the following sub-steps:
-
Inspect the Toothbrush: Carefully examine the toothbrush to ensure that it is free from any dirt, debris, or residue. Thoroughly rinse the toothbrush under running water and allow it to dry completely before proceeding with the modification process.
-
Remove the Bristle Head: Using a pair of sharp scissors, carefully cut off the bristle head of the toothbrush. This step will leave you with a clean, straight handle that is ideal for crafting a needle threader. Exercise caution when cutting the bristle head to avoid any accidental damage to the handle.
-
Smooth the Cut End: After removing the bristle head, take a moment to inspect the cut end of the toothbrush handle. If there are any rough or jagged edges, use the scissors to carefully trim and smooth the cut end. This will ensure that the handle is comfortable to hold and will not snag on fabric during use.
By following these sub-steps, you will effectively prepare the toothbrush for the subsequent modifications required to transform it into a needle threader. With the handle now free from the bristle head and smoothed to perfection, you are ready to move on to the next step in the process: cutting the bristles to the appropriate length.
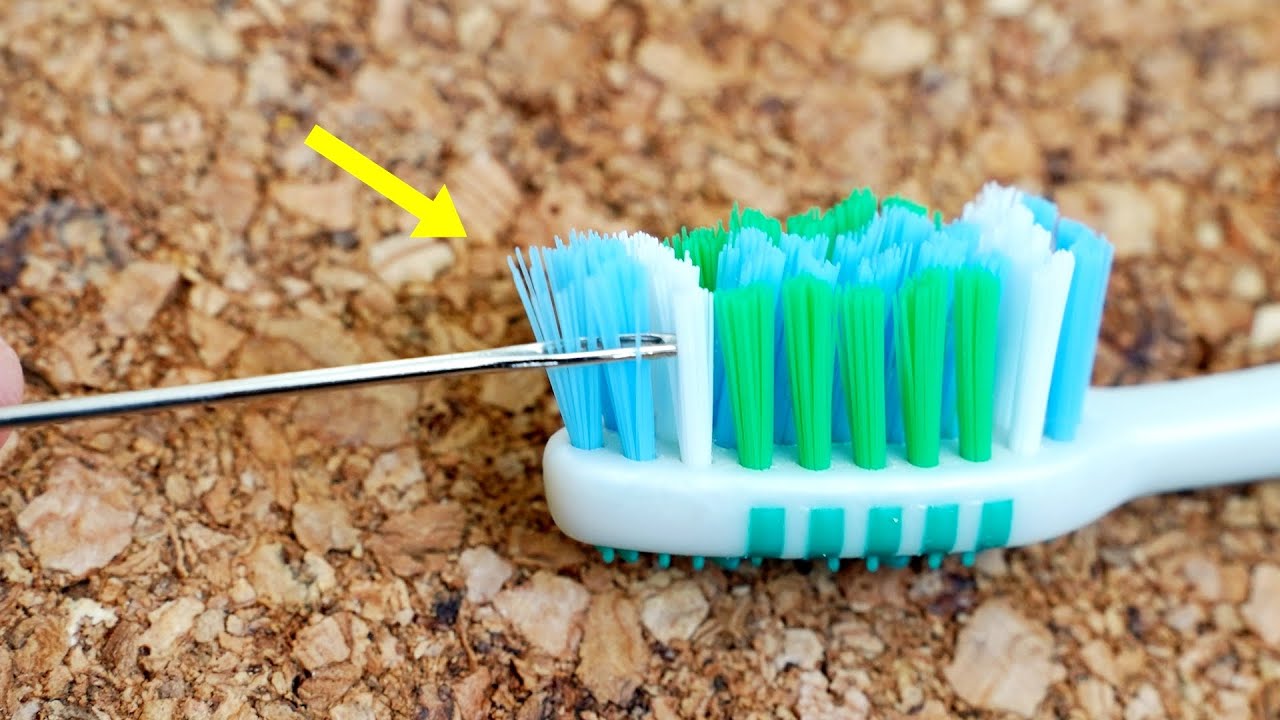
Step 2: Cut the Bristles
With the toothbrush handle prepared, the next crucial step in creating a needle threader involves cutting the bristles to the appropriate length. This process is essential for crafting a functional threader that can easily guide the thread through the eye of a needle. Follow these detailed sub-steps to ensure that the bristles are trimmed to the ideal size:
-
Assess the Bristle Length: Before making any cuts, take a moment to assess the length of the bristles. The goal is to shorten the bristles to a length that allows for easy maneuverability when threading a needle. While the exact measurement may vary depending on personal preference and the type of needles you typically use, a general guideline is to trim the bristles to approximately 1/4 to 1/2 inch in length.
-
Use Sharp Scissors: Select a pair of sharp scissors suitable for cutting through plastic bristles without causing splintering or uneven edges. Position the toothbrush handle securely and hold the bristles taut to ensure a clean and precise cut.
-
Trim the Bristles: Carefully trim the bristles to the desired length, maintaining a straight and even line across the bristle tips. Exercise caution to avoid cutting the bristles too short, as they should provide ample surface area to grip and guide the thread during the needle threading process.
-
Inspect the Cut Ends: After trimming the bristles, inspect the cut ends to ensure that they are uniform in length and free from any frayed or jagged edges. If necessary, use the scissors to refine the cut ends, creating a smooth and consistent surface that will facilitate seamless thread manipulation.
-
Optional: Seal the Cut Ends: While not essential, some individuals choose to use a lighter or matches to carefully seal the cut ends of the bristles. This additional step can prevent fraying and prolong the durability of the modified toothbrush, ensuring that the bristles remain intact and functional over time.
By meticulously following these sub-steps, you will effectively tailor the bristles of the toothbrush to serve as a reliable tool for threading needles. With the bristles trimmed to the appropriate length and prepared for the next phase of the process, you are now ready to move on to the subsequent step: creating a threader from the modified toothbrush.
Use a toothbrush with a small hole in the handle. Cut a small piece of thread and fold it in half. Insert the folded end through the hole and pull the loose ends through the loop. Pull tight and you’re ready to sew!
Step 3: Create a Threader
With the toothbrush handle prepared and the bristles trimmed to the ideal length, the next pivotal step in this innovative process involves transforming the modified toothbrush into a functional needle threader. This transformation will enable the toothbrush to effectively guide the thread through the eye of a needle, simplifying the often-challenging task of threading a needle. Follow these detailed sub-steps to craft a customized threader from the modified toothbrush:
-
Position the Toothbrush Handle: Begin by holding the toothbrush handle securely in your non-dominant hand, ensuring a comfortable and stable grip. Orient the toothbrush handle so that the trimmed bristles are facing upward and easily accessible for the next phase of the process.
-
Identify the Threader Location: With the toothbrush handle in hand, visually identify the optimal location for creating the threader. This area should be situated near the base of the trimmed bristles, where the handle provides a sturdy foundation for crafting the threader.
-
Create a Notch or Groove: Using a sharp utility knife or a similar cutting tool, carefully carve a small notch or groove into the side of the toothbrush handle at the identified location. This notch will serve as the entry point for the thread, allowing it to be guided through the bristles and into the eye of a needle with precision and ease.
-
Refine the Threader Entry Point: After creating the initial notch, take a moment to refine and smooth the entry point using fine-grit sandpaper or a small file. This step will ensure that the threader is free from any rough edges or imperfections that could potentially snag or damage the thread during use.
-
Optional: Seal the Threader Entry Point: While not essential, some individuals choose to use a lighter or matches to carefully seal the entry point of the threader. This additional step can prevent any plastic residue from interfering with the threading process and help maintain the durability of the modified toothbrush over time.
By meticulously following these sub-steps, you will effectively transform the modified toothbrush into a practical and reliable needle threader. With the threader now crafted and ready for use, you are well-equipped to proceed to the final step of the process: threading the needle using your newly created tool.
Read more: How Do You Clean A Sonicare Toothbrush
Step 4: Thread the Needle
With the modified toothbrush now serving as a functional needle threader, you are ready to tackle the final step of the process: threading the needle with ease and precision. This transformative technique, utilizing a repurposed toothbrush, offers a practical solution for individuals who encounter challenges when attempting to thread a needle using conventional methods. Follow the detailed sub-steps below to seamlessly guide the thread through the eye of the needle using your newly created tool:
-
Prepare the Thread: Begin by selecting a suitable length of thread for your sewing project, ensuring that the end is neatly trimmed to facilitate smooth insertion through the needle's eye. If necessary, use sharp scissors to create a clean, angled cut at the end of the thread, minimizing the risk of fraying and simplifying the threading process.
-
Position the Threader: Hold the toothbrush handle securely in your non-dominant hand, positioning the threader entry point near the trimmed end of the thread. Orient the toothbrush handle so that the bristles are facing upward, providing easy access to the threader entry point for the next phase of the process.
-
Guide the Thread: With the threader entry point aligned with the end of the thread, gently insert the trimmed end of the thread into the notch or groove created in the toothbrush handle. The threader's design allows for effortless manipulation of the thread, guiding it through the bristles and positioning it for seamless insertion into the eye of the needle.
-
Thread the Needle: Once the thread has been guided through the bristles using the toothbrush threader, carefully position the end of the thread near the eye of the needle. With a steady hand, guide the thread through the needle's eye, taking advantage of the precision and control offered by the toothbrush threader. The modified toothbrush effectively streamlines the threading process, allowing you to effortlessly thread the needle and prepare for your sewing or mending task.
By following these sub-steps, you can leverage the innovative toothbrush threader to overcome traditional challenges associated with threading a needle. This unconventional yet effective approach empowers individuals to engage in sewing and mending activities with confidence and ease, demonstrating the resourcefulness and adaptability of everyday household items. With the needle successfully threaded, you are now equipped to embark on your sewing project, utilizing your customized tool to streamline the process and achieve optimal results.
Conclusion
In conclusion, the process of threading a needle with a toothbrush presents a creative and practical solution for individuals facing challenges with traditional needle threading methods. By repurposing a standard toothbrush and following the step-by-step transformation process outlined in this article, individuals can create a customized needle threader that simplifies the often-frustrating task of threading a needle. This innovative approach offers a valuable alternative for those with visual impairments, limited dexterity, or anyone seeking a more accessible and efficient method for threading needles.
The journey begins with the selection of a clean, unused toothbrush with a straight handle and sturdy bristles. With the toothbrush in hand, the initial steps involve preparing the handle and trimming the bristles to the appropriate length. These foundational modifications set the stage for the pivotal transformation of the toothbrush into a functional needle threader.
Crafting the threader involves creating a notch or groove near the base of the trimmed bristles, allowing the toothbrush to guide the thread through the eye of a needle with precision and ease. This process empowers individuals to overcome traditional challenges associated with threading a needle, offering a practical and reliable tool for sewing and mending tasks.
The culmination of this transformative process is the successful threading of the needle using the newly created toothbrush threader. By leveraging this innovative tool, individuals can seamlessly guide the thread through the needle's eye, streamlining the preparation for sewing projects and empowering them to engage in creative endeavors with confidence and ease.
Ultimately, the utilization of a repurposed toothbrush as a needle threader exemplifies the resourcefulness and adaptability of everyday household items. This unconventional yet effective approach demonstrates the potential for ingenuity and problem-solving in everyday tasks, showcasing the value of creativity and innovation in simplifying and enhancing daily activities.
By embracing this inventive technique, individuals can expand their capabilities, overcome obstacles, and engage in sewing and mending activities with newfound confidence and efficiency. The journey from a standard toothbrush to a customized needle threader exemplifies the power of creativity and resourcefulness, offering a practical solution that can benefit individuals of all backgrounds and abilities.
Frequently Asked Questions about How Do You Thread A Needle With A Toothbrush
Was this page helpful?
At Storables.com, we guarantee accurate and reliable information. Our content, validated by Expert Board Contributors, is crafted following stringent Editorial Policies. We're committed to providing you with well-researched, expert-backed insights for all your informational needs.


0 thoughts on “How Do You Thread A Needle With A Toothbrush”