Articles
How To Seal Plumbing Threads
Modified: March 2, 2024
Learn how to properly seal plumbing threads with our informative articles. Get step-by-step instructions and valuable tips to ensure a leak-free plumbing system.
(Many of the links in this article redirect to a specific reviewed product. Your purchase of these products through affiliate links helps to generate commission for Storables.com, at no extra cost. Learn more)
Introduction
When it comes to plumbing installations and repairs, one crucial step that often gets overlooked is properly sealing plumbing threads. Whether you’re working with pipes, fittings, or valves, ensuring a secure and leak-free connection is essential for the overall functionality and longevity of your plumbing system.
Plumbing threads are the interlocking grooves found on the ends of pipes, fittings, or fixtures. They create a tight seal when joined together, preventing leaks and ensuring a smooth flow of water or other fluids. However, even the most precisely cut threads can still allow leaks if not properly sealed.
In this article, we will explore the importance of sealing plumbing threads, the types of thread sealants available, how to choose the right one for your project, and the step-by-step process of sealing threads effectively. Additionally, we will cover troubleshooting common issues that may arise during the sealing process.
Understanding how to seal plumbing threads properly is not only crucial for DIY enthusiasts but also for professional plumbers. By following the correct techniques and utilizing the appropriate thread sealants, you can ensure a secure and leak-free plumbing system.
So, whether you’re embarking on a plumbing project at home or at a client’s property, let’s dive into the world of plumbing threads and learn how to seal them effectively!
Key Takeaways:
- Properly sealing plumbing threads is crucial for leak-free connections. Understanding thread types, choosing the right sealant, and following correct application techniques are essential for reliable and long-lasting seals.
- Attention to detail, proper preparation, and thorough testing are key to addressing common issues and achieving leak-free plumbing connections. Following manufacturer’s instructions and industry standards is crucial for optimal results.
Read more: How To Thread Conduit
Understanding Plumbing Threads
Before we delve into the process of sealing plumbing threads, it’s important to have a clear understanding of what they are and how they work. Plumbing threads are the grooves on the ends of pipes, fittings, or fixtures that allow them to be joined together.
Threads are typically cut into the material using specialized tools or machinery. They come in various sizes and types, such as tapered (NPT), straight (NPS), or metric. The purpose of these threads is to create a tight and secure connection between two plumbing components, ensuring a leak-free flow of fluids.
When properly assembled, the threads form a mechanical seal. This means that the pressure from the fluid inside the pipes or fittings applies force to the mating surfaces of the threads, creating a tight bond. However, it is important to keep in mind that the threads alone may not provide a completely watertight seal.
This is where thread sealants come into play. While threads provide the mechanical strength, thread sealants ensure a reliable watertight seal by filling any microscopic gaps or imperfections between the threads. These sealants come in a variety of forms, including liquid, tape, or paste, and are specifically designed to prevent leaks in plumbing connections.
Understanding the characteristics and potential challenges of plumbing threads is crucial before attempting to seal them. It’s important to remember that different types of threads require different techniques and sealants. Failure to match the correct sealant to the thread type can result in leaks and compromised plumbing connections.
Now that we have a basic understanding of what plumbing threads are and their role in creating a secure connection, let’s move on to exploring the various types of thread sealants available for different applications.
Types of Thread Sealant
When it comes to sealing plumbing threads, there are several types of thread sealants available. The choice of sealant depends on various factors, including the type of thread, the materials being joined, and the specific requirements of the project. Let’s take a look at the different types of thread sealants and their characteristics:
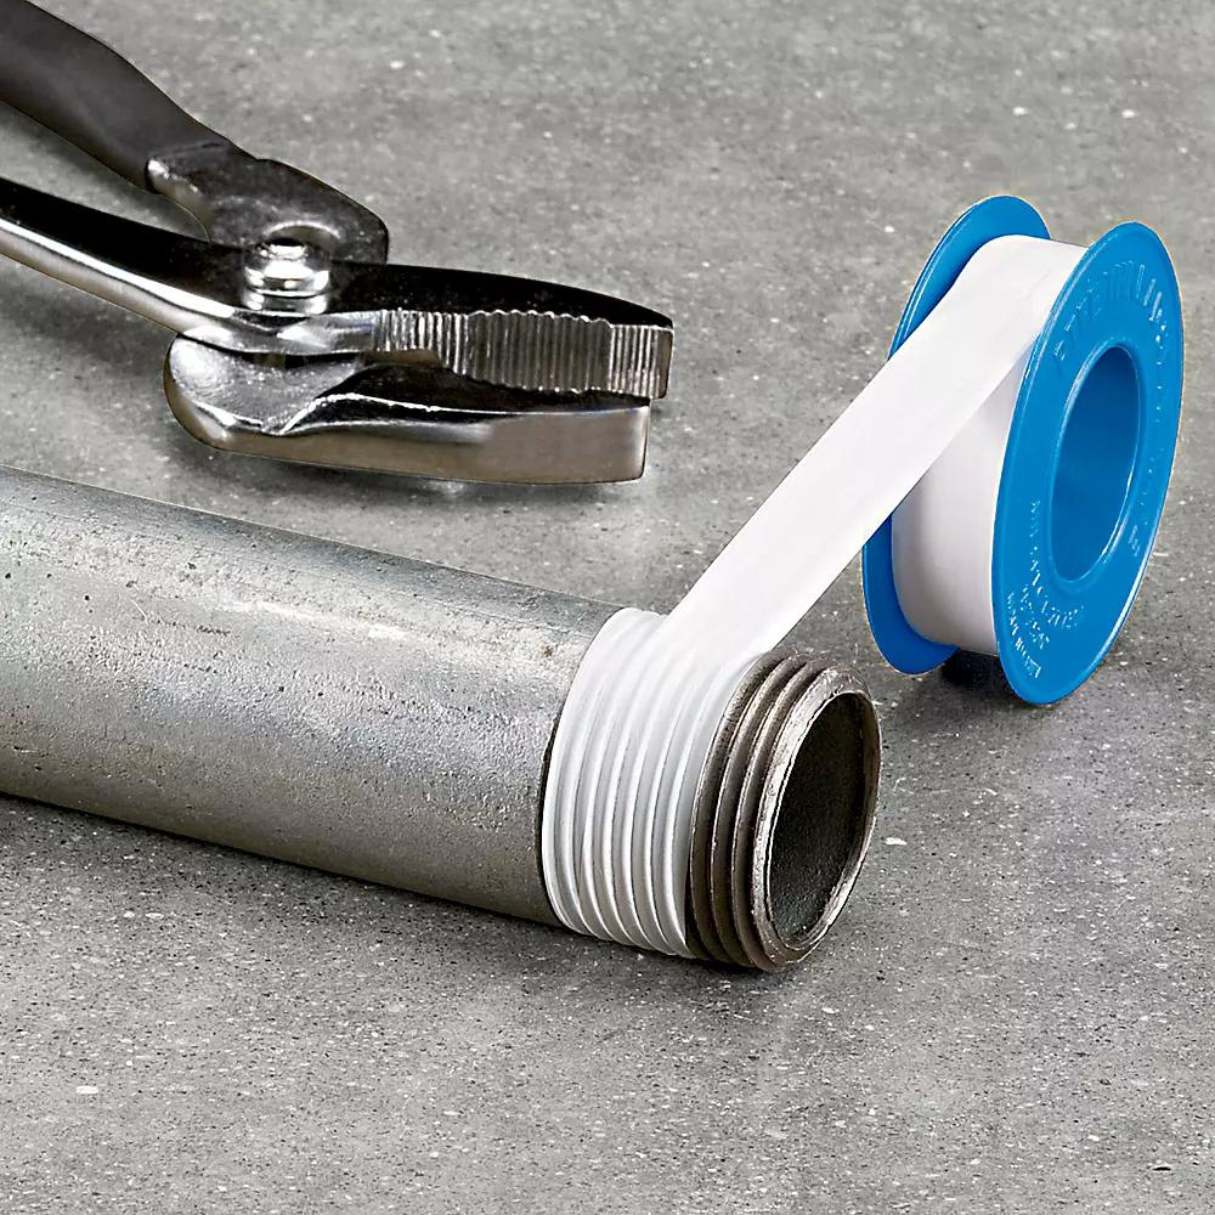
- Teflon Tape: Teflon tape, also known as plumber’s tape or thread seal tape, is one of the most commonly used thread sealants. It is made from a thin, flexible film of polytetrafluoroethylene (PTFE) and is suitable for most general plumbing applications. Teflon tape is easy to use and provides a reliable seal, preventing leaks between threaded connections.
- Liquid Pipe Sealants: Liquid pipe sealants, also called pipe dope, come in the form of a viscous liquid or paste. They are applied directly to the threads and provide a more robust seal compared to Teflon tape. Liquid pipe sealants are suitable for a wide range of applications, including high-pressure systems, gas lines, and metal-to-metal connections.
- Pipe Joint Compound: Pipe joint compound, also known as pipe dope, is a thick paste-like substance that is applied to the threads. It contains a combination of lubricants, fillers, and solvents to provide a tight seal. Pipe joint compound is often used for metal plumbing connections and is particularly effective for sealing larger diameter pipes.
- Anaerobic Sealants: Anaerobic sealants are specialty thread sealants that cure in the absence of air. They are typically used for sealing pipe threads in high-pressure applications and can withstand extreme temperature and pressure conditions. Anaerobic sealants are commonly used in industrial and commercial plumbing systems.
- PTFE Paste: PTFE paste, also known as pipe thread compound, is a non-hardening sealant that contains PTFE particles suspended in a paste-like substance. It provides an effective seal for threaded connections and can be used for both metal and plastic plumbing components. PTFE paste is easy to apply and offers good resistance to chemicals.
It’s important to note that certain thread sealants may not be compatible with certain materials or applications. Therefore, it’s crucial to read and follow the manufacturer’s instructions and choose the appropriate sealant for your specific plumbing project.
Now that we’ve explored the different types of thread sealants available, the next step is to understand how to choose the right sealant for your particular project. We’ll discuss this in the next section.
Choosing the Right Thread Sealant
Choosing the right thread sealant is essential for ensuring a secure and leak-free plumbing connection. With various options available, it’s important to consider several factors when selecting the appropriate sealant for your specific project. Here are some key factors to consider when choosing a thread sealant:
- Type of Thread: The first consideration is to match the type of thread sealant with the type of plumbing thread you are working with. Different thread types, such as tapered (NPT), straight (NPS), or metric, may require specific sealants to create an effective seal. Ensure you choose a sealant compatible with the type of thread you are working with.
- Material Compatibility: Consider the materials of the pipes, fittings, or fixtures you are working with. Certain sealants may be more suitable for specific materials, such as metal-to-metal connections or plastic components. It’s important to choose a sealant that is compatible with the materials you are joining to ensure a reliable and long-lasting seal.
- Application: Consider the specific application and conditions in which the plumbing connection will be used. For example, if you are working on a high-pressure system, you may need a more robust and resistant sealant. Similarly, if the connection will be exposed to chemicals or extreme temperatures, choose a sealant that is designed to withstand those conditions.
- Ease of Application: Consider the ease of application of the sealant. Teflon tape is generally easy to apply and wrap around thread connections. Liquid pipe sealants and PTFE paste can be applied directly to the threads using a brush or a squeezable bottle. Choose a sealant that suits your comfort level and ease of application.
- Industry Standards: Consider any industry standards or regulations that may dictate the type of sealant to use for specific applications. Certain industries, such as gas or oil, may have specific requirements and standards for thread sealants. Ensure you are familiar with any regulations and choose a sealant that meets the necessary standards.
By considering these factors, you can make an informed decision and select the most appropriate thread sealant for your plumbing project. It’s important to note that following the manufacturer’s instructions and recommendations is crucial for achieving the best results.
Now that we have covered the selection process, it’s time to move on to the step-by-step process of sealing the plumbing threads effectively. Continue reading to learn the proper techniques for preparing the threads and applying the sealant.
Preparing the Threads
Properly preparing the plumbing threads is an important step in ensuring a secure and leak-free connection. Before applying the thread sealant, you need to make sure the threads are clean and free from any debris or contaminants. Here’s a step-by-step guide on preparing the threads:
- Cut the Threads: If you are working with pipes or fittings that do not already have threads, you will need to cut them using a suitable threading tool. Ensure that the threads are cut correctly and are of the appropriate size and type for the connection you are making.
- Inspect the Threads: Before proceeding, inspect the threads for any signs of damage, such as cracks, nicks, or burrs. If you notice any issues, you may need to re-cut the threads or replace the damaged component.
- Clean the Threads: Use a wire brush or a pipe thread cleaning tool to clean the threads thoroughly. Remove any dirt, debris, or old sealant residue from the threads. This will ensure proper adhesion of the thread sealant and prevent any potential leaks.
- Apply Pipe Joint Compound (Optional): For metal plumbing connections, applying a thin layer of pipe joint compound to the threads can help improve the seal. Use a brush or your finger to evenly distribute a small amount of compound along the threads. Be careful not to apply too much, as it can squeeze out and cause blockages.
- Check for Proper Fit: Before proceeding to the next step, ensure that the pipes, fittings, or fixtures fit together properly. The threads should engage smoothly and securely without excessive force. If you encounter any resistance or misalignment, double-check the threads and make any necessary adjustments.
By following these steps, you will ensure that the threads are clean, properly cut, and ready for the application of the thread sealant. The next step is to choose the appropriate thread sealant and apply it correctly to ensure a reliable and leak-free plumbing connection. We will discuss this process in the next section.
When sealing plumbing threads, use Teflon tape or pipe joint compound to create a tight seal. Wrap the tape or apply the compound in the direction of the threads to prevent leaks.
Read more: How To Store Embroidery Thread
Applying Thread Sealant
Now that the plumbing threads are clean and properly prepared, it’s time to apply the thread sealant. The application process will vary depending on the type of sealant you have chosen. Here is a step-by-step guide on how to apply thread sealant:
- Teflon Tape: If you are using Teflon tape, start by wrapping the tape tightly around the male threads in a clockwise direction. Ensure that the tape covers the entire threaded area, but avoid overlapping it excessively. For best results, apply at least three wraps of tape, pressing it firmly against the threads as you go.
- Liquid Pipe Sealants and PTFE Paste: If you are using liquid pipe sealants or PTFE paste, apply a small amount directly to the male threads using a brush or the applicator provided with the sealant. Make sure that the entire threaded area is coated evenly with the sealant. Avoid applying too much sealant, as it can squeeze out and obstruct the flow or cause leaks.
- Thread Engagement: Once you have applied the sealant, carefully thread the male and female components together. Ensure that the threads engage smoothly and align properly. Use your hand to tighten the connection until it is snug. Avoid overtightening, as it can damage the threads or cause leaks.
- Quarter-Turn Back: After hand tightening, gently turn the connection back a quarter-turn to create a slight looseness. This ensures that the sealant is evenly distributed along the threads and allows for proper sealing. Keep in mind that this step may not be necessary for all applications, especially if the manufacturer’s instructions specify otherwise.
It’s important to note that certain thread sealants may have specific cure times or recommendations provided by the manufacturer. Allow sufficient time for the sealant to cure before turning on the water or applying pressure to the plumbing connection. Follow the manufacturer’s instructions regarding cure time and any additional precautions.
By following these steps, you will effectively apply the thread sealant to the plumbing threads, creating a secure and leak-free connection. The next step is to properly tighten the threads to ensure a reliable seal, which we will discuss in the following section.
Properly Tightening the Threads
Properly tightening the plumbing threads is crucial for creating a secure and leak-free connection. Over or under-tightening can lead to damaged threads, leaks, or even component failure. Here are some guidelines to ensure you tighten the threads properly:
- Hand-Tighten First: Begin by hand-tightening the connection. Use your hand to tighten the threaded components until they are snug. This will help ensure proper alignment and prevent cross-threading.
- Use Tools if Needed: Depending on the specific requirements of the connection or the components being joined, you may need to use tools such as a wrench or pliers to tighten the threads further. If using tools, be cautious not to overtighten, as it can damage the threads or cause leaks.
- Follow Manufacturer’s Recommendations: Refer to the manufacturer’s guidelines or instructions for the specific components and thread sealant you are using. They may provide specific torque specifications or recommendations for proper tightening. Follow these instructions to ensure a reliable and secure connection.
- Use Caution with Plastic Connections: When tightening threads in plastic components, be extra careful to avoid excessive force. Plastic can be more susceptible to damage, so tighten the threads with caution and avoid overtightening, which can lead to cracks or leaks.
- Check for Leaks: After tightening the threads, carefully inspect the connection for any signs of leaks. Turn on the water or apply pressure to the plumbing system and observe for any drips or moisture around the threaded area. If you notice leaks, you may need to retighten the connection or reapply the thread sealant.
Remember, it’s important to strike a balance between tightness and avoiding overtightening. Properly tightened threads should provide a secure and leak-free connection without damaging the components or compromising the integrity of the joint.
Once you have properly tightened the threads, the next step is to test the connection for leaks. We will discuss this important step in the next section.
Testing for Leaks
After sealing and tightening the plumbing threads, it is crucial to test the connection for any potential leaks. Testing for leaks will ensure that the connection is secure and watertight before finalizing the plumbing installation. Here are the steps to perform a leak test:
- Visually Inspect: Start by visually inspecting the threaded area for any signs of leaks. Look for water droplets, moisture, or any other evidence of water escaping from the connection.
- Apply Soapy Water: Using a spray bottle or a sponge, apply a solution of soapy water to the threaded connection. Ensure that you cover the entire area, including the joint and the surrounding fittings or pipes.
- Look for Bubbles: Observe the soapy water for any bubbles or foaming. If there are no leaks, the soapy water will remain calm. However, if there is a leak, you will notice bubbles forming at the site of the leak.
- Address any Leaks: If you detect any leaks, tighten the threads slightly and retest. If the leak persists, you may need to disassemble the connection, clean the threads, reapply the thread sealant, and then reassemble. Repeat the leak test until there are no signs of leaks.
- Complete the Installation: Once you have confirmed there are no leaks, you can proceed with completing the plumbing installation. Turn on the water supply or apply pressure to the system to ensure that the connection remains watertight during normal operation.
Performing a thorough leak test is essential to identify and address any potential leaks before they can cause damage or compromise the integrity of the plumbing system. It’s important to note that the leak test should be conducted for both new installations and any connections that have been disassembled and reassembled during repairs or maintenance.
By following these steps and confirming that the connection is leak-free, you can have confidence in the reliability and longevity of the sealed plumbing threads.
In the next section, we will discuss some common troubleshooting tips for addressing any issues that may arise during the sealing and testing process.
Troubleshooting Common Issues
While sealing and testing plumbing threads, you may encounter certain issues that can affect the effectiveness of the seal or cause leaks. Here are some common troubleshooting tips to help you address these issues:
- Leaking Threads: If you notice leaks coming from the threaded connection, it could be due to several reasons. Check if the threads are clean and free from debris. If not, clean them thoroughly and apply the thread sealant again. Ensure that you have tightened the threads adequately but without overtightening, as excessive force can cause leaks.
- Cross-Threaded Connection: Cross-threading occurs when the threads are not aligned properly during the tightening process. This can lead to leaks and weakened connections. To fix this issue, carefully undo the connection and realign the threads. Then, tighten the connection properly, ensuring the threads engage smoothly.
- Compatibility Issues: In some cases, the thread sealant may not be compatible with the materials being joined, leading to leaks or a weakened seal. Check the manufacturer’s instructions for any specific compatibility requirements, and switch to a sealant that is suitable for the materials in question.
- Insufficient Sealant: If you are experiencing leaks despite applying the thread sealant, it could be due to insufficient coverage of the threads. Ensure that you have applied enough sealant to completely cover the threaded area. Consider adding an extra layer of sealant or using a different type of sealant that provides a more robust seal.
- Over-Tightening: Overtightening the threads can damage the threads, fittings, or pipes, leading to leaks or cracks. If you suspect over-tightening, loosen the connection slightly and retest for leaks. Be cautious not to overtighten, especially when working with plastic components, as this can cause damage.
By troubleshooting and addressing these common issues, you can ensure a reliable and leak-free seal for your plumbing threads. Remember, it’s important to practice patience, attention to detail, and follow the manufacturer’s instructions to achieve the best results.
Now that we have covered troubleshooting tips, let’s summarize the importance of sealing plumbing threads and the key steps to achieve a secure and leak-free connection.
Read more: How To Store Spools Of Thread
Conclusion
Sealing plumbing threads is an essential step in any plumbing project to ensure a secure and leak-free connection. By properly understanding plumbing threads, choosing the right thread sealant, and following the correct procedures, you can achieve reliable and long-lasting seals.
Understanding the characteristics of plumbing threads and the importance of thread sealants sets the foundation for successful sealing. Different types of thread sealants, such as Teflon tape, liquid pipe sealants, and PTFE paste, offer various advantages depending on the application.
Choosing the right thread sealant involves considering factors such as the type of thread, material compatibility, application requirements, ease of application, and industry standards. Following the manufacturer’s recommendations and guidelines is crucial to ensure a proper seal.
Preparing the threads by cutting, inspecting, and cleaning them is vital for optimal adhesion of the thread sealant. Applying the thread sealant correctly, whether it’s Teflon tape, liquid pipe sealant, or PTFE paste, ensures a reliable and watertight seal.
Properly tightening the threads, with attention to hand-tightening and using tools if needed, prevents leaks and damage to the threads. Testing for leaks using visual inspection and soapy water helps identify potential issues and allows for adjustments before finalizing the installation.
If any issues arise during the sealing and testing process, such as leaking threads or compatibility problems, troubleshooting techniques can help address these concerns effectively.
By following these steps and taking proactive measures to seal plumbing threads properly, you can achieve leak-free plumbing connections, minimizing the risk of water damage, and ensuring the longevity of your plumbing system.
Remember, each plumbing project is unique, and it’s important to refer to the manufacturer’s instructions, industry standards, and applicable regulations to ensure the best practices for sealing plumbing threads.
Now armed with the knowledge and techniques explained in this article, you can confidently tackle your next plumbing project and ensure secure and dependable plumbing connections every time.
Frequently Asked Questions about How To Seal Plumbing Threads
Was this page helpful?
At Storables.com, we guarantee accurate and reliable information. Our content, validated by Expert Board Contributors, is crafted following stringent Editorial Policies. We're committed to providing you with well-researched, expert-backed insights for all your informational needs.


0 thoughts on “How To Seal Plumbing Threads”